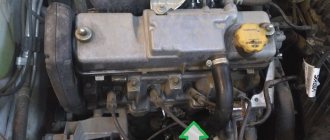
I had a little trouble. The pump is leaking. This creates several troubles... The antifreeze runs out... The engine makes noise... And the most dangerous thing is that if the pump bearing becomes skewed or jams, the timing belt is damaged... and then you yourself understand what the consequences are. So, I came to my native Rtishchevo and immediately started repairs. I read a lot before replacing... That they say there will be a lot of removal there... It was decided to disassemble and navigate the work independently.
For convenience, I removed the adsorber without disconnecting the wires and hoses and pulled it to the side. Then I removed the plastic cover from the engine and the timing belt cover.
Next, let's jack up... We hang up the right front wheel. This is necessary in order to put everything on the marks. By the way, for convenience, I made one mark... with white paint, which is very helpful in the future. Photo below. In the end, you will have to remove the wheel, because only from below you can get to the lower bolt securing the inside of the plastic casing.
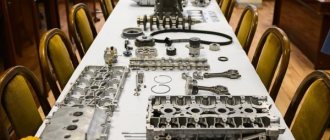
And now ATTENTION))) The condition of the timing belt was excellent... Therefore, it was decided not to remove either the timing belt, or the generator drive belt, or the generator drive pulley. Which saved us a lot of time. But you still need to remove the plastic casing, which means you need to remove the camshaft pulleys and rollers. Actually, this is not difficult, we loosen the tension rollers and remove them and the timing belt. Then we use something flat to place a spacer between the camshaft gears... and unscrew them. Be careful, the teeth themselves are very soft, so only push into the teeth, not lateral pressure.
We removed the pulleys... now we unscrew the plastic casing itself (one fastening bolt will have to be unscrewed from below, from the cavity of the wheel) and finally we get to the pump.
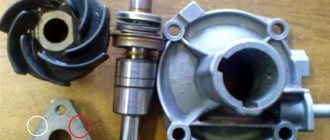
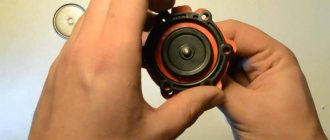
The pump itself is screwed on with three hexagons. We unscrew them... and gently tapping on it, we begin to pull it out... antifreeze will begin to flow... we substitute the vessel along the way so as not to make dirt. As it turned out, I got home by miracle))) The pump bearing was so damaged... there was both axial and lateral play... about 4 - 5 mm. In short, it was hanging unrealistically))) Now we take a new pump (check for the presence of lubricant in it), if the gasket is paper, then lubricate it with sealant, a thin layer... and let it dry for 5 - 10 minutes. Yes yes... the sealant should always dry out a little.
Now we put everything back together in reverse order. We install the pump... We install the plastic casing... We install the camshaft pulleys... And now we need to put on the timing belt. In the photo you can see the mark that I made on the crankshaft pulley (circled in red)... there are marks on the camshafts. We combine everything and put on a belt, nothing complicated.
We turn the engine by the wheel a couple of times, adjust the position and tension of the belt if necessary, and assemble further. At this stage, you can check the operation of the engine.
Then we put on the cover, the adsorber... we put the wheel in place... that's all)) This work took about 3 hours.
Many people write on the Internet that you can remove the pump without removing the plastic casing - this is not true! Be sure to remove it... here's the pump mount in the photo... you can unscrew it, but you won't be able to pull it out.
Thank you all for your attention))) I am pleased with the work!
Step-by-step replacement of a VAZ-2112 pump 16 valves
The pump belongs to the vehicle's cooling system. In its unit, this part is the second most likely to break down. On a VAZ-2112 with a 16-valve engine, replacing the pump is quite easy, so even a novice motorist can do it.
The pump promotes stable circulation of coolant in the vehicle system. Therefore, if it malfunctions, leaks of this substance are possible, and air often gets into the system, which is very bad. It is much less common for valves to bend and the pump to jam, which may require a complete engine repair if we are talking about the 21120 model.
Replacing the rear
It should be noted that the clutch discs may become oily due to a leak through the gearbox input shaft oil seal, or due to the rear crankshaft oil seal.
The smells of oil from the engine and transmission are different, so many experienced specialists can use the smell to determine which element is causing problems.
There is also a visual method of determination. To do this, take any container, pour some water into it, or simply use a puddle near your garage. Drop oil leaking on the clutch discs into the water and monitor its behavior. If the oil spreads and turns into a rainbow film, it is gearbox oil. And if the oil remains in the water in the form of a grain-like drop, we are talking about motor lubricating fluid.
Changing the rear oil seal is actually somewhat more difficult than changing the front oil seal. But this does not take away the fact that it is still more than possible to do the work with your own hands.
Disassembled
Following the instructions step by step, replacing the crankshaft oil seal on a VAZ 2114 will become a fairly simple task for you, which will add to your experience in repairing a car yourself.
- Disconnect the negative terminal from the battery of your VAZ 2114.
- Make notes on the location of the flywheel relative to the crankshaft, and then remove it.
- Next, the rear shield of the clutch housing is removed from the guide bushings.
- The next step is to remove the eight bolts that are responsible for securing the oil seal.
- This will allow you to remove the holder.
- The oil seal is pressed out of its holder.
- The new element is installed in place of the old one until it stops. Here you will need a mandrel again. Its outer diameter is 99 millimeters. Press in the element so that its working edge points inward.
- To make pressing easier, a chamfer is made on the seating edge of the element using a needle file. An alternative tool for bevelling is a small sanding wheel.
- Now we change the gasket, which is probably torn on the holder. Even if the old gasket looks fine, we strongly recommend replacing it with a new one.
- The gasket is glued with a special thick lubricant. This will ensure the strength of its retention, as well as additional tightness of the connection.
- The working edge of the pressed-in oil seal is treated with regular engine oil, as is the case with the front one.
- The crankshaft flange is subjected to similar processing.
- The fasteners of the engine oil sump to the cylinder block will need to be loosened slightly. To do this, it is enough to make 2-3 turns on each of the 14 bolts that hold the crankcase.
- When installing the holder, the working edge of the new oil seal is carefully tucked onto the crankshaft flange. Arm yourself with a wooden stick for this purpose, but do not use metal objects.
- Retighten the holder bolts.
- Screw back the engine crankcase mounting bolts.
- Place the clutch housing rear shield back onto the guide bushings.
- According to the previously marked places, mount the flywheel, gearbox and clutch in their place. To ensure that the flywheel mounting bolts have high quality adhesion and reliability, first apply sealant to their threaded part.
Obviously, it is quite possible to replace the crankshaft oil seals on a VAZ 2114 car with your own hands. The procedure requires accuracy and consistency of actions. Plus, do not forget to use new high-quality auto parts, so that after a short period of time you do not have to carry out the entire procedure again.
Causes and symptoms of malfunction
In order to understand whether the device is broken or not, you need to understand at least a little about the operation of the vehicle, as indicated by certain spontaneous manifestations.
Signs that the water pump is broken:
- extraneous sounds - pump clatter or bearing noise;
- increased coolant temperature;
- pump leaks, which can be not only a breakdown of the device itself, but also gasket breakdown or bearing wear.
Why is this happening:
- wear of the pump shaft or bearing - unstable circulation of coolant and leaks;
- the gasket is broken due to wear;
- failure of the shaft - rotation of the shaft itself, which will be expressed by unstable circulation of fluid in the system and, as a result, large overheating;
- pulley wear is immediately determined by belt wear.
By correctly identifying the faulty part based on the above signs, you will be able to fix the problem in a timely manner with minimal negative consequences for the remaining elements of the car.
Shaft defects
Among the signs of a malfunctioning water pump, one should note the presence of deformation on the shaft. Upon inspection, it may appear bent or completely destroyed. If it is broken, it means the overload was sudden. Also, imbalances lead to similar consequences.
If the material from which the shaft is made has changed color (most often it acquires a blue tint), this indicates the gradual destruction of the shaft. This occurs due to excessive heat. The reason for this failure is the misalignment of the drive belt. This leads to shaft deformation or even fracture. Due to insufficient quality maintenance, significant vibrations appear in the system.
In this case, the pump is changed, and the belt drive is also checked. All elements of its system need to be inspected. You also need to evaluate the condition of the fan that is located on the pump (if it is provided in the engine system). If it is bent, other deformations are visible on it, this can destroy the shaft. Wear of the fan coupling and spacer ring also lead to a similar outcome.
Preparing to replace your pump
First of all, you need to make sure that all the necessary tools are available to replace the water pump.
You will need:
- key for 10 and 17;
- Screwdriver Set;
- hammer;
- timing clamping mechanism;
- rags;
- container for draining old coolant;
- new coolant – 2 l.
You should immediately decide on the time, since the process may take a little longer if you are performing this manipulation for the first time.
Purpose
The purpose of the oil pump is to circulate oil through all engine components to lubricate them evenly and increase their service life. It is driven by an internal combustion engine (internal combustion engine) and is structurally divided into two different types, based on the principle of coupling with the crankshaft. In our case, it connects directly to the crankshaft, that is, it rotates with it. This is the operating scheme of the unit for front-wheel drive VAZ cars. Cars with all-wheel drive, as well as classics, have a more complex system installed. There, the drive contains additional links: an intermediate shaft, a timing chain (gas distribution mechanism), and toothed gears, through which torque is transmitted from the crankshaft to this device.
Common faults
So:
- Most often, the pump of the VAZ 2112 and other VAZ models with front-wheel drive leaks through the seal, which has to be changed.
- The oil receiver also often fails, especially if you use low-quality oil, or missed replacing it in a timely manner, or the oil does not meet specifications (too thick).
- Too liquid simply will not be pumped and the pressure sensor will immediately light up.
- In this case, the oil receiver mesh becomes clogged, the circulation of oil through the engine becomes difficult, causes oil starvation, and as a result, the service life of the engine is significantly reduced.
- This includes a malfunction of the pressure reducing (bypass) valve: either it is stuck in the open position, and then the oil pressure drops. Either it does not bypass, and then the oil will squeeze out through the oil seal
What oil to fill and at what frequency?
The manufacturer recommends changing the engine oil after 10 thousand kilometers, however, it is recommended to shorten this period if possible, and at the same time change the oil filter. You should only buy oil from well-known companies and, when choosing it, beware of counterfeits. The ideal option is to pour oil recommended by the manufacturer and not be fooled by cheapness or high cost (expensive does not mean high quality).
Recommendations for choosing spare parts
So:
- The oil pump usually does not cause car owners much trouble, since it has a service life of at least 120 thousand kilometers. However, no one is immune from breakdowns
- If suddenly you still need to replace the oil pump on a VAZ 2112, it is better to take original spare parts and not save
- Among the well-known suppliers of parts for VAZ cars, the official one is the Tolyatti Automobile Assemblies Plant (TZA for short).
- It also produces oil pumps for the VAZ 2112
- This is one of four varieties of such units in the VAZ line, which fits all front-wheel drive fuel-injected cars
Helpful advice: To avoid serious consequences for the car and major engine repairs, it is important to monitor the indicators on the dashboard. If the oil pressure lamp flashes at idle speed, and replacing it does not solve the problem, the lamp lights up again - this means there is a breakdown
When the warning light suddenly comes on and the performance of your car’s engine is alarming, it is recommended to turn off the ignition and call a tow truck to a repair station. This will save money on subsequent engine repairs (continuing to drive the car under its own power in such a situation, you risk serious damage to the engine).
- Typically, removing the oil pump on any car occurs when disassembling the engine.
- Only if necessary, this work is carried out on the car without removing the engine from it.
- Before starting this procedure, first drive the car into the inspection hole.
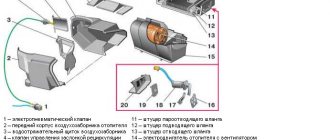
- And immediately purchase everything you need to carry out a full replacement, as shown in Photo No. 2.
Designations in the photo:
- 1 - oil pump
- 2—pan gasket
- 3 - pump gasket
- 4 - sealing ring
- 5 - sensor mounting bracket
Attention: The pumps of the VAZ 2108-1011010 and 2111, 2112-1011010 engines are almost the same, with the exception of point No. 5 - the sensor mounting bracket is different, do not miss this point!
Tip: It is recommended to install only a factory-produced gasket under the pump, since a non-standard gasket may have a thickness that does not meet the specifications and cause problems with the operation of the pump.
Necessary tool
- A set of wrenches (open-end - spanner preferably)
- Socket set and ratchet
- Two strong flathead screwdrivers
- Hexagon set
Instructions
A detailed and sequential process for replacing the pump will be considered for a VAZ-2112 with a 16-valve 1.6 engine:
- Using a special pit in the garage or a lift it is easier to replace the water pump. But not everyone has them, so we will consider the replacement process in a simple garage without a pit.
- Remove the front wheel on the right.
- To give yourself access to the crankshaft pulley, remove the protective plastic splash guard by unscrewing the screws securing the element to the body and removing it.
- Secure the crankshaft from turning. This is in your own interests of safety and convenience, and is also necessary in order not to disrupt the valve timing.
- Loosen the alternator and timing belt using the tension roller, which just needs to be loosened slightly.
- Unscrew the crankshaft mount.
- After loosening the fastening, remove the pulley.
- Next, it is necessary to disassemble the gas distribution mechanism, during which all elements are dismantled - casing, pulleys and rollers.
- Only now we get to the pump. Unscrew its mounting bolts - 3 pieces. Dismantle the device.
- Pull out the pump completely.
- Installation is similar, but done in reverse order.
Maintain consistency so as not to violate the integrity of the “chain” of the system in the end.
A replaced pump will allow you to forget about problems with it for the next 40-50 thousand km.
Necessary tools and equipment
- hex wrench size 5 mm - - wrenches for 17 and 19 - - special wrench for belt tension - - device for fixing camshaft pulleys - - jack - - wheel wrench.
Use a wheel wrench to loosen the front right wheel bolts. Raise the car with a jack, place a stand under it and remove the wheel. Then remove the right side of the engine mudguard.
Partially unscrew the top nut of the generator and slide it towards the engine. Remove the alternator belt from the pulleys.
Secure the crankshaft pulley from turning and unscrew the bolt securing the pulleys on the crankshaft with a 19mm wrench and remove the generator belt pulley. Install the tool and secure the camshafts. Then loosen the nuts on the tension and guide rollers a few turns and release the tension on the toothed belt. The timing belt can now be removed.
Why do you need a pump in a car?
If we talk about the operation of a car engine, then we immediately touch upon the topic of its cooling. Indeed, without high-quality cooling, the engine will not be able to work for a long time and will definitely “boil”. Thanks to the circulation of coolant, it becomes possible to operate the engine at any time of the year under any external conditions.
The power component on the VAZ of the tenth family has a rather complex structure. During the working cycle, the pistons rub strongly against each other, which invariably leads to strong heating of the surfaces. The only way to prevent engine overheating is to constantly maintain the desired temperature in the friction zone through the circulation of coolant. It is for this purpose that the VAZ design includes a cooling system.
Coolant (antifreeze or antifreeze) is poured by the driver into the expansion tank of the car. From it, the liquid is transferred through pipes to the water pump, and from there it goes to the radiator and cylinder block. The water pump (or pump) is designed to pump antifreeze through the system while the engine is running. That is, the pump starts together with the engine and turns off after the driver turns off the car. Without a pump, the entire cooling system can be considered ineffective, since only the pump can create rapid circulation of liquid throughout all parts of the system.
The pump is designed to create the necessary pressure in the cooling system to move the liquid.
The device in a metal case ensures continuous circulation of antifreeze through the cooling system
Tips for choosing
Now a little about choosing a pump. Now the automotive spare parts market offers the widest selection of this unit from a variety of manufacturers. But, unfortunately, there are also a lot of fakes.
When choosing a water pump, it is advisable to give preference to the manufacturer who supplies its products to the automobile plant.
Before purchasing, you need to inspect the pump packaging - it should be made of hard cardboard, with printed information indicating the characteristics of the unit, as well as the manufacturer’s data. There must be a holographic sticker.
Inside, in addition to the assembly, there should be a gasket for it and fastening bolts (but not always), as well as a warranty card.
Attention must also be paid to the pump itself - when checking, there should be no play, and when rotating, there should be no wedging or jamming. Many manufacturers are upgrading pumps, especially the blades.
Many manufacturers are upgrading pumps, especially the blades.
In this case, look for driver reviews on forums about this device model; in most cases you will receive true information.
How to check the pump on a VAZ 2110/2112
The driver, if there is a suspicion of a malfunction of the water pump, can check this unit without going to a car repair shop. In this case, there is no need to remove the pump from the car; the entire verification procedure is completed within 10 minutes:
- Warm up the engine to normal operating temperature (on a VAZ of the tenth family - 91 degrees).
- Put a glove on your right hand.
- Pinch the fluid supply pipe that comes from the radiator with your hand. If the pump is working normally, you will immediately be able to feel the pressure of the antifreeze inside the pipe. If, when pressed, the hose easily compresses, then the circulation of coolant is severely inhibited, which indicates a breakdown of the pump.
To identify pump malfunctions, it is enough to squeeze the antifreeze supply pipe - if the hose resists compression, then the pressure in the system is stable
When performing the check, you must be careful, since the antifreeze gets very hot during engine operation: you can get burned on the hot pipes and surfaces of the engine.
Signs of a faulty water pump
On a VAZ of the tenth family, diagnosing problems with the water pump is quite simple: you need to constantly monitor the “behavior” of your car. There are only three signs of a pump malfunction:
- Unusual noise or grinding noise in the timing belt assembly while driving.
- Pump leaking due to loss of tightness.
- Severe damage to the timing belt (asymmetrical wear, delamination or cracking).
Traces of coolant can be seen both in the timing belt assembly itself and on the asphalt after the car has been parked for a long time.
The main malfunction of the pump on the VAZ 2110/2112 is considered to be bearing wear - if the bearing is badly worn or the timing belt is not tensioned correctly, then it will not be possible to repair the pump.
Signs that your water pump is bad
There are several signs of problematic functioning of a car pump:
- timing noises when driving;
- pump leakage as a result of depressurization;
- belt damage, for example, asymmetrical cracks, peeling.
Drops of liquid can be found on the assembly and on the asphalt surface after the car has been parked there. The pump for this model will have to be changed every 50,000 kilometers.
If you do not replace the pump, the timing belt may break, valve mechanisms may bend, moving parts may jam, or the engine may overheat. When purchasing components, you should clarify:
- branding of the manufacturer;
- number;
- cleanliness of packaging;
- Are gaskets included?
- Is there a quality guarantee from the factory?
A high-quality pump for tens is equipped with a pump that is mounted on the right side of the cylinder block.
Changing the unit to a VAZ 2110-2112 does not require additional equipment or knowledge, and the design itself involves the purchase of wrenches and open-end wrenches.
You will need to remove any remaining fluid before most work on the cooling system is done, as this will help relieve pressure or risk of injury.
If the antifreeze has recently been completely replaced, then you can drain not all the liquid, three liters to eliminate excess pressure. After replacing the old pump with a new one, you need to add fluid to the previous level.
Replacing the pump on a VAZ 2110/2112
One day, the owner of a VAZ of the tenth family will be faced with the need to replace the water pump. Fortunately, the design of the pump itself is quite simple, so the pump rarely fails.
It is recommended to change the pump on the VAZ 2110/2112 every 50 thousand kilometers or at the first sign of a malfunction.
If you do not replace the water pump on time, the consequences for the car can be very unpleasant:
- broken timing belt (a faulty pump wears the belt unevenly);
- expensive repair of the cylinder head (if the drive belt is damaged, the valve mechanisms may bend);
- overheating of the motor (jamming of moving parts, failure).
Choosing a pump for your car
So, you have decided to replace the pump. Now you need to go to the auto store and buy the required element. However, sellers offer a huge assortment of different water pumps for the VAZ 2110/2112 - which pump to choose so as not to go wrong with the price and quality?
The price of a pump for an 8-valve VAZ 2110/2112 engine is from 800 rubles, for a 16-valve engine - from 1 thousand rubles. However, regardless of the cost and brightness of the packaging, when purchasing, you must pay attention to the following details:
- manufacturer (take products only from companies that you know well);
- the pump has its own catalog number (for example, the standard VAZ pump in all catalogs in car stores and on Internet sites is numbered 21081307010);
- the pump is sold in clean, uncreased packaging;
- The kit includes a gasket;
- A factory quality guarantee is provided with the pump.
Car enthusiasts prefer a pump produced by TZA. A water pump from a domestic manufacturer is easy to install, lasts a long time and is inexpensive. However, there is a risk of purchasing a defective product.
The Russian-made product is characterized by affordable cost and high quality work
Where is the water pump located?
On models of the tenth VAZ family, the pump is mounted on the right side of the engine cylinder block. The exact location of the pump is determined by the principle of its operation: the blades of the pump impeller begin to rotate from the energy of the timing belt. That is, the design of the car already initially determined the location of the pump as part of the gas distribution mechanism.
The pump on the VAZ of the tenth family is located as part of the timing unit
Preparing tools
Replacing the water pump on a VAZ 2110, VAZ 2111, VAZ 2112 is a procedure that does not require special equipment or specific knowledge. In addition, on these VAZ models, the design of the machine itself greatly facilitates the work: you will need the usual set of tools:
- wrench 10;
- wrench 17;
- open-end wrench 19;
- socket head 10;
- screwdriver with a thin flat blade.
To replace the pump yourself, you do not need to use professional tools or complex equipment
It is better to prepare a container for draining the antifreeze in advance (one or more vessels that will hold 10–12 liters of coolant). Of course, during replacement it will not be possible to do without a rag to quickly clean up leaks.
Is it necessary to drain all the antifreeze from the system?
Drivers, when independently changing the pump on a VAZ, often wonder about draining antifreeze from the system. How much is it necessary to drain the coolant at all and if drained, how many liters?
There are specific answers to these questions:
- It is necessary to drain the antifreeze when performing any work on the elements of the cooling system. Draining the antifreeze ensures that pressure in the system is relieved and reduces the risk of injury. In addition, when dismantling and installing the pump, antifreeze will constantly leak from the landing zone, which will create a lot of inconvenience and ultimately lead to incorrect replacement.
- Regarding the question of how much antifreeze needs to be drained, there are two solutions. The first is based on caring for the car. As a rule, it is customary to change the coolant along with the pump, so it is better to drain the antifreeze from the system completely. The second option is suitable for those drivers who have only recently replaced antifreeze. In this case, you can drain only part of the liquid from the system (about 2-3 liters) in order to relieve the residual pressure in the pipes.
Draining antifreeze from the radiator cavity
Accordingly, after replacing the pump, you need to fill in the same amount of coolant that was drained before dismantling.
Step by step operating procedure
The water pump is replaced in an inspection pit or overpass. A regular jack will do, but you should make sure in advance that the body is lifted from the front right side and securely secured with additional stops.
The procedure for replacing the pump is identical for VAZ 2110/2112 with engines with 8 and 16 valves.
Replacing the pump involves removing the timing belt and tension pulley
After the initial preparation, you can begin the main work:
- Open the hood and remove the wire from the negative terminal on the battery.
- Unscrew the cap from the expansion tank.
- Get down under the car and place a container under the cylinder block.
- Unscrew the antifreeze drain plug and pour it into a container.
- After draining, install the plug back.
- Next, remove the front right wheel from the VAZ.
- The timing block will open under it - use a 10mm wrench to unscrew the three casing bolts.
- Remove the casing from the machine.
- After this, fix the crankshaft at the highest point of the first cylinder: engage the gear and turn the bolt that secures the pulley with a 19mm wrench. You need to turn it until the mark on the shaft gear matches the mark on the rear casing of the gas distribution mechanism.
- It is better to insert a large screwdriver or a long bolt between the crankshaft teeth to ensure it is static.
- Next, use a 17 key to loosen the tensioner roller, which will entail loosening the timing belt.
- First remove the belt, then the roller itself.
- Remove the five bolts that secure the bottom of the pump to the timing belt.
- Then unscrew the three bolts securing the top of the pump.
- It is easy to pry the pump housing with a screwdriver and pull it out of the socket.
- It is recommended to immediately clean the planting site from dust and old antifreeze. The remains of the old gasket must be removed.
- It is recommended to lubricate the new pump gasket with sealant on both sides and carefully place it in the landing zone.
- Install a new pump onto the gasket.
- Assembly work is carried out in reverse order.
Along with replacing the pump, it is recommended to immediately replace both the timing belt and the tensioner roller.
To replace it, it is better to use a water pump from the same manufacturer that was already installed on the car.
Replacement sequence on an 8-valve engine
Having all this, you can start replacing:
It is advisable to place the car on a viewing hole and jack up the front right wheel. But this is not always possible, so in extreme cases, it is enough to simply turn the steering wheel to the right all the way. After this, remove the right front wheel fender liner protection; We remove the decorative panel from the engine and unscrew the absorber so that it does not interfere. In this case, there is no need to disconnect the wiring and tubes from it; after unscrewing it, it is enough to put it aside. The coolant can be drained immediately or later; Unscrew the bolts securing the plastic protective cover of the drive belt. After this, you can diagnose the condition of the pump. To do this, just start the engine and look at it - if play is clearly noticeable when it rotates, it definitely needs to be replaced. We install TDC on the first cylinder. To do this, turn the crankshaft clockwise until the marks on the timing gear align with the protrusion on the protective screen installed behind this gear. Then we check that the TDC is installed correctly. To do this, remove the inspection window plug on the clutch housing. We make sure that the marks on the flywheel and the housing also match. In this case, the coincidence control must be carried out on the flywheel, and not on the camshaft gear (a slight mismatch of the marks on the camshaft is allowed); We loosen the mount of the generator, feed it to the engine and remove its drive belt; Remove the crankshaft pulley. To do this, you can go in several ways: lock the crankshaft using a powerful screwdriver installed in the teeth of the flywheel and resting on the housing, or ask someone to engage 4th gear in the gearbox and squeeze the brakes. Both of these methods are good, and it’s up to you to decide which one to use; After removal, we check again that the marks match and correct them if necessary. Loosen the tension roller nut to remove tension from the belt. Carefully remove the belt first from the timing gear, and then from the crankshaft, unscrew the tension roller; Remove the timing gear. To do this, through the technological hole, using a wrench, we press against the rear screen mounting bolt to fix it, after which we loosen the bolt with the wrench. Then we check again that the marks match, correct everything if necessary, unscrew the bolt completely and remove the gear
You need to tighten it carefully, since there is a key on the shaft - it is important not to lose it; We unscrew all the bolts and nuts securing the rear screen, which at the bottom are also the pump mount. If the coolant has not been drained, then before unscrewing the mounting bolts, you need to place a wide container under the engine; Having unscrewed the bolts, remove the screen and, using light tapping movements, remove the pump from its place; Before installing a new pump, be sure to thoroughly clean its seat with a knife to remove any remnants of the old gasket. This is necessary so that after assembly there is no misalignment of the pump, this will lead to constant rapid wear of the drive belt; Before installing the new pump, lubricate its gasket on both sides with sealant and give it a little time to dry (10 minutes); We put the pump in place, then the screen, and only after that tighten the bolts that secure them.
Next, assembly is performed in the reverse order. It is important to check that the labels match. After installing the belt, tension it. Next, we check that the assembly is correct - we rotate the crankshaft several times, and then align the marks again. If the marks on the timing belt with the protrusion and the flywheel coincide with the housing, then everything is assembled correctly and you can reassemble the engine and fill in coolant. If they do not match, then you will have to set the marks on the flywheel, remove the belt, adjust the marks on the timing gear and put on the belt
This is necessary so that after assembly there is no misalignment of the pump, this will lead to constant rapid wear of the drive belt; Before installing the new pump, lubricate its gasket on both sides with sealant and give it a little time to dry (10 minutes); We put the pump in place, then the screen, and only after that tighten the bolts that secure them. Next, assembly is performed in reverse order.
It is important to check that the labels match. After installing the belt, tension it. Next, we check the correctness of assembly - rotate the crankshaft several times, and then align the marks again
If the marks on the timing belt with the protrusion and the flywheel coincide with the housing, then everything is assembled correctly and you can reassemble the engine and fill in coolant. If they do not match, then you will have to set the marks on the flywheel, remove the belt, adjust the marks on the timing gear and put on the belt.
DIY pump repair VAZ 2110/2112
The driver does not always have the opportunity to replace a faulty pump. In some cases, it is possible to repair the device by restoring the operating functions of the pump. If the pump has not yet exhausted its service life (50 thousand kilometers), then you can repair it. However, the pump cannot be repaired without using a special repair kit. This is a set of rubber gaskets and parts that most often fail and need to be replaced.
Repair kits for pumps may vary in composition, depending on which spare parts need to be replaced
In addition, you will have to thoroughly prepare for repairs: the place for disassembling and repairing the pump must be clean and level.
How to disassemble a water pump
Once the pump is removed from the machine, it will need to be disassembled. Only after disassembly and thorough cleaning will it be possible to replace the leaked parts of the pump.
To disassemble the pump, it is recommended to follow the following diagram:
- Wipe the product with a dry cloth.
- Unscrew the pump pulley.
- Pull out the thrust ring.
- Use a hammer to knock out the bearings from the shaft.
- Pull the shaft itself out of the housing.
- Unfasten the impeller.
- If something remains from the oil seal, then remove the remaining rubber from the housing.
The procedure for disassembling the water pump is intuitive: until you remove the pulley, it is impossible to get to the shaft and impeller
After this, the cavity of the pump itself must be thoroughly cleaned of dirt and old deposits - you can wash the pump with the same gasoline that is usually filled into the VAZ 2110/2112 tank.
A visual inspection of the pump parts will show which element needs to be replaced. Typically, a pump leak is caused by rotting of the oil seal, and a whistle when the engine is running or a grinding noise at high speeds is caused by wear of the shaft.
Video: disassembling the pump
Replacing the oil seal
An oil seal is a gasket made of rubber and metal inserts. During normal pump repairs, changing the oil seal is included in the list of mandatory procedures, since the gasket is a rubber product in its structure, and therefore wears out quickly.
Replacing the oil seal is not difficult:
- The old gasket is removed from the shaft.
- The landing site is cleared of dirt.
- A new oil seal is installed.
The rubber-metal product that ensures the tightness of the pump is called an oil seal.
Before installing the rubber seal, you can lubricate it with antifreeze so that the oil seal quickly “grinds” to the shaft.
Changing the shaft with bearings
Most often, it is the bearings that have become loose that need to be replaced. But knocking them out of the shaft is a very tedious task. In addition, a hydraulic vice is required, which not every driver has. Therefore, it is easier to replace the bearings along with the shaft.
Again, the procedure for replacing the shaft is not associated with difficulties: a new one is driven in in place of the old shaft.
It is not possible to knock out the old bearings from the pump, so it is easier to replace the shaft along with them
How to replace a pipe on a pump
Sometimes, due to unstable pressure in the cooling system, the antifreeze supply or discharge hoses may become deformed. New pipes cost pennies, and new metal mounting clamps are not difficult to buy.
If the pipe is swollen, this is a clear sign that the rubber will soon burst. Cracks and dents in the tube also indicate the need for prompt replacement.
To make a replacement, you must:
- Use a screwdriver to loosen the clamp.
- Remove the clamp.
- Disconnect the pipe from the pump.
- Loosen the clamp on the back of the pipe and remove the fastener.
- Remove the pipe from under the hood.
The clamp, when compressing the pipe, can severely damage the rubber, which can cause antifreeze leaks
Checking the pump's health
It should be noted right away that in order to identify many problems with the water pump, this device will have to be removed from the engine and disassembled. This is the only way to see dirt, corrosion and traces of cavitation.
But there are a number of signs by which you can determine if the pump is faulty without removing it. Here they are:
- a thin continuous whistle coming from under the engine camshaft pulley. This whistle indicates a faulty bearing.
- coolant leaks, which are visible both on the engine itself and on the asphalt under the car;
- play in the pump, which can be detected by simply holding the pulley and moving the pump up and down with your hand.
Let's look at these faults in more detail.
Pump whistle
The reason for the pump whistling is a partially or completely destroyed ball bearing on the main shaft of the device. Moreover, the pump bearing, as a rule, produces a very high-pitched, piercing whistle, while the whistle of a faulty generator is significantly lower and sometimes turns into a grinding sound. This is affected by the difference in the size of the bearings: the ball bearing on the pump is small, so it whistles very thinly. The generator bearing is twice as large, so the sound comes from it accordingly. So it is almost impossible to confuse the sound of a broken pump and a broken generator.
The problem is solved by replacing the central bearing of the pump. However, there is one caveat: these bearings are practically not sold separately anywhere. And they can only be purchased in conjunction with a new pump. Therefore, the driver, having heard a characteristic thin whistle coming from under the hood, must be prepared to fork out the cash: a new water pump can cost from 2 to 10 thousand rubles (depending on the make of the car).
Coolant leak
Liquid begins to flow from under the pump in two cases:
- the mounting bolts have become loose;
- The sealing gasket under the pump is damaged.
The first problem can be solved by simply tightening the bolts. But a damaged sealing gasket will have to be replaced. Fortunately, it is easier to find a gasket for a pump on sale than a central bearing (and in especially difficult cases, car enthusiasts even order seals via the Internet, from the Chinese on Aliexpress, for example).
It should be noted here that even a new gasket can easily be cut by a pump if the mounting bolts are not tightened correctly
The pump is one of those devices where it is very important not to over tighten it. The bolts must be tightened in a cross pattern: first tighten the upper right one, then the lower left one, then the upper left one, the lower left one, etc.
Only such a tightening scheme can guarantee maximum tightness and tightness of the connection.
d. Only such a tightening scheme can guarantee maximum tightness and tightness of the connection.
Finally, we must not forget about sealants. There are situations when neither a new gasket nor the correct tightening pattern helps get rid of a leak. Then there is only one option left: to use a sealant, and its composition must be very resistant to high temperatures.
The best option here is a professional sealant from ABRO, which has proven itself on all brands of cars.
Coolant leak after replacing heat exchanger
In the vast majority of cases, after replacing the heat exchanger, antifreeze begins to flow not from under the pump, but from under the clamps of the pipe connected to the pump. On most modern cars, pump pipes are made of plastic, and very fragile plastic at that.
Any careless movement when replacing the heat exchanger, if it does not break such a pipe, will at least break the tightness of its connection to the pump. After this, the antifreeze will definitely begin to leak. There are two options to solve this problem:
There are two options to solve this problem:
- if there are no cracks in the pipe, then you can simply tighten its clamps with a flat screwdriver, then let the engine idle for a few minutes, and then check the connection for leaks;
- If the pipe is broken after replacing the heat exchanger, there is only one way out: going to the nearest auto store and replacing it. This part cannot be restored.
The pipes on water pumps are made of very fragile plastic.
Why is a second pump needed in a car's design?
On some modern car models, a second pump is already installed from the factory. This equipment allows for the most reliable engine cooling under any load.
An additional pump on the car is required to create better cooling. If we talk about the owners of the tenth family of VAZs, then most often a second pump is installed to optimize the operation of the stove in winter.
In this case, the pump body is screwed to the motor body with a special bracket
Installing an additional water pump
The main advantage of the VAZ 2110/2112 is that the cars have a simple cooling system structure. Therefore, you can install a second pump and organize a small circle of antifreeze circulation without any problems. To work you need to prepare in advance:
- new pump;
- two hoses (one long, the other short);
- sealant;
- fastening elements (depending on where it will be easier to attach the pump: metal clamps, bolts and nuts).
It is necessary to assemble a low circulation unit from a new pump and hoses. To do this, two hoses are connected to the pump fittings and secured with clamps. It is important to follow the rule: the long pipe is responsible for supplying antifreeze to the pump, and the short pipe is responsible for draining it.
Before installing a new unit on the machine, you need to drain the coolant.
The installation procedure for the assembled unit is as follows:
- Find two hoses near the cooling radiator (one of them supplies antifreeze to the stove, and the other performs a discharge function).
- Disconnect the outlet pipe.
- In its place, attach the assembled unit with the second pump.
- Securely secure the new assembly with metal clamps.
- It is recommended to attach the pump itself to the gearbox housing. You can secure the pump with clamps or bolt it to the bracket.
- Fill with coolant and start the engine.
- Check the second antifreeze circulation circuit for leaks.
The essence of the procedure is to attach a small circle of liquid circulation with a second pump instead of a hose for supplying antifreeze
It should be noted that the additional pump will be started under the influence of the pressure created in the system by the first pump. Therefore, the second pump will last a long time and ensure thorough cooling of the engine even under the most aggressive operating conditions.
Thus, the whole difficulty of repairing and replacing the water pump on a VAZ 2110/2112 comes down to correctly removing the unit from the car and installing it back. Moreover, installing the pump takes much longer due to changing the timing belt and roller. The services of a specialist will cost approximately 1000–1500 rubles, so if you have doubts about your competence, it is better to pay the service station technicians and be confident that the water pump will be replaced correctly.
Symptoms of malfunction
There are several signs of a pump breakdown, and they can be obvious, or the fault can only be determined after diagnosis.
Signals that the water pump has become unusable are:
- Increased noise when the engine is running from the timing belt side, a squeak is possible;
- A constant and significant decrease in the coolant level in the expansion tank and traces of coolant leaks from the crankshaft drive pulley;
- Strong pump play.
As can be seen from the list, all these signs are caused by severe wear of the bearing and seals.
Some argue that a pump malfunction leads to an increase in temperature during operation of the power plant.
But this happens in very rare cases when, due to corrosion, the impeller blades are almost completely destroyed. Because of this, the pump simply physically cannot impart movement to the liquid.
But such a malfunction is an isolated case; in general, the pump cannot affect the temperature regime due to the fact that it is constantly in motion.
But ignoring the problem with the pump’s operation will also not lead to anything good.
In the best case, the bearing and seals will wear out so much that they will not prevent the coolant from flowing out at all.
And since there is a drainage hole in the pump body, the antifreeze will drain through it quickly, and this can actually lead to overheating of the engine.
It is much worse if the bearing collapses due to severe wear and leads to jamming of the pump.
The result of this is a belt rupture and possible collision of the valves with the pistons. And this is already a major expensive repair of the power plant.
Recommended.
Check the pump every time the drive belt is replaced. Well, if any of the signs of malfunction appear, you should immediately check the condition of the pump and, if necessary, replace it.
Let us note here that increased hum and squeaking can be caused not only by the pump, but also by the tension roller, so the pump is not necessarily the cause of the noise.
But if a faulty element is identified, it is worth checking both of these details. Fortunately, they are located nearby, so it is not difficult to determine whether the pump or the roller caused the increased noise.
HOW TO DETERMINE FAILURE OF A VAZ 2112 PUMP
The pump is a device with blades, centrifugal type. It is driven by a timing belt via a crankshaft pulley.
The device is housed in an aluminum housing, inside which the roller rotates in a double-row bearing, with a supply of grease for the entire period of operation. The outer ring of the bearing is secured with a screw.
The toothed pulley is pressed in front of the roller, the impeller is mounted at the rear end. The end of the impeller is held by a thrust ring made of a graphite-containing composition.
There is an oil seal underneath it. The one-piece design does not allow for high-quality repair of the unit, therefore, if a breakdown is detected, a complete replacement of the pump on the VAZ 2112 is necessary.
Factors determining the malfunction of the VAZ 2112 pump
So:
- One of the main signs of pump failure is the formation of play in the drive pulley of the structure. In this case, the pulley begins to dangle, which indicates wear of the bearings and imminent failure of the pump.
- Worn bearings can make a characteristic noise, and due to bad bearings, the tension roller can wear out the timing belt. You can identify such a defect by touch by removing the timing belt and turning the pump pulley by hand or rocking it from one side to the other; if there is a gap, it will be immediately visible. As a result, very soon the belt can jump off the pulleys, and this contributes to the impact of the pistons on the valves and deformation of the latter. Urgent repair of the water pump or its replacement should save the situation.
- If you find traces of coolant near the drain hole located at the bottom of the pump housing, you need to pay attention to the stuffing box seal. The faulty element cannot be used further; the leak will intensify, which can lead to big troubles, including the engine jamming due to overheating. In this case, the pump on the VAZ 21124 needs to be replaced as soon as possible.
Replacing the pump on a VAZ 2112 car
The procedure for replacing a VAZ 2112 pump includes removing the pump from the engine.
For this:
- The wheel nuts on the right front wheel are loosened.
- The car is jacked up and the wheel is removed.
- To access the crankshaft pulley, a self-tapping screw is removed from the engine splash guard.
- The fixation to the generator bar is loosened, a thin long bolt is unscrewed that holds the tensioner to the generator belt, then the generator is pulled by the belt (see Generator repair: we do it all ourselves) almost all the way into the engine.
- The fastening bolt at the engine pulley is unscrewed.
Tip: To unscrew the bolt, you need to lock the crankshaft, otherwise it will turn along with the fasteners.
To perform this operation, you will need outside help to engage fourth or fifth gear and press firmly on the brakes. Using an extension cord and a 17mm wrench, unscrew the bolt. So:
- Having released the generator from the belt, the pulley is removed from the crankshaft.
- Support the engine sump on a wooden spacer. In this case, the standard jack must be left in place for insurance purposes.
- The gas distribution device drive is completely disassembled: the front casing cover, rollers, belt, toothed pulley on the camshaft, and rear casing cover are removed.
- The bolts securing the pump are unscrewed, as shown in the photo.
Releasing the pump from fixation with three bolts
- Due to the large width of the device's toothed pulley, the spar prevents the pump from being pulled out. Therefore, using a pry bar or crowbar, the engine is moved away from the spar.
Tip: In order to avoid damage to the elements, it is necessary to place a small piece of wood between the spar and the mount.
- The pump is pulled out
Removing the VAZ 2112 pump
Installing a new pump
So:
- The old gasket is removed with a scraper or knife. Care must be taken not to damage the cast iron surface of the block.
- A new gasket is installed. Made from cardboard, lubricated on both sides with sealant, placed on the pump, then the unit is installed on the block.
Advice : When installing a new gasket, it is better if it is made of paronite, the price of which is slightly higher than cardboard; there is no need to use sealant for it. It is necessary to ensure that all holes match on the gasket and flange of the new pump.
- Final assembly is done in reverse order.
How to correctly replace a VAZ 2112 16 valve pump can be seen in the video.
If the operating instructions for the car are followed, the pump on the VAZ 2112 16 valves is replaced in a timely manner, the car will operate normally for a long time.
Belt installation
Pass the right half of the belt from the inside of the guide roller and, without allowing any sagging, place it on the camshaft pulleys. When putting on, the right side of the belt must be tensioned in the areas between all three pulleys.
After installation, tighten the belt with a tension roller and check the installation according to the marks. If the marks match, put the generator belt pulley in place and turn the crankshaft 2 turns and again check that the marks match. If the marks do not match, reinstall the belt.
conclusions
Summing up our rating, it is very important to note that truly high-quality models of coolant pumps were presented here, which have proven themselves to be the best among a large number of VAZ-2112 owners, otherwise what choice you make depends only on you
The pump is a simple assembly that consists of a housing, a bearing and an impeller. This cooling system pump circulates the coolant. If the pump does not work, then the engine will overheat. What is the pump's lifespan?
which pump to choose for VAZ
Reasons for a dying pump: Poor circulation of coolant, extraneous sounds from the timing belt casing.
VAZ pump malfunctions
The causes of breakdowns can be various, for example, the formation of play or jamming of the bearing. It is not uncommon for the impeller to start spinning freely, but separately from the shaft. If the pump is leaking or making noise, then it also needs to be replaced.
The service life of the pump depends a lot on the quality of the pump. For example, a defective or low-quality pump can work for only 10 thousand km. If the pump lasted more than 100 thousand km, then it is generally accepted that it was a high-quality pump. From the factory, VAZs are equipped with TZA pumps, which have a long service life.
How to distinguish a fake? The pump must be in a high-quality box, inside it is a warranty card with the date of manufacture and stamps and a gasket. There is a holographic sticker on the pump.
How to change the pump on a VAZ 2110?
None Which pump is better to choose?
So, let's vote and leave.
pump reviews
- Which pump did you choose?
- How long did the old pump last?
ps All off-topic comments will be deleted.
| Which is the best pump to buy for VAZ? | How long did your pump last? |
Keywords:
modification of the engine cooling system
The thorny path to replacing the timing belt and rollers has been completed, along with the water pump (coolant pump). It became thorny, firstly, due to the fact that for two years or 25 thousand kilometers I drove with a belt installed by the previous owner, which involuntarily destroyed the stereotype that you can’t trust car salesmen. He was a normal guy, he said to replace it in the spring, I replaced it two days later... The old belt, by the way, proudly demonstrated by the master (“Christina”), at the time of replacement, turned out to be cracked at least one of the teeth.
The pump has also suffered over the past years - the play was no less proudly demonstrated, and upon leaving the service center I personally noted a decrease in the noise level from under the hood. The replacement of the latter was dictated more by the expediency of combining work than by real suspicions of an imminent end. The 124th engine does not bend the valves when the belt breaks, it was possible not to worry, but... perfectionism is a serious disease.
After all, thorniness is also due to the specifics of the choice of spare parts. I mean it's hard. And this is what was replaced (price + delivery cost): - INA timing drive kit
(Slovakia) - 1390+600=2000 rub.
// alsport.ruAccording to the assurances on the website “ Used in motorsport.
Improved timing belt design from INA. Instead of neoprene, enriched nitrile is used, because When heated, neoprene becomes rigid and loses its elasticity. “
The kit from Priora, sent earlier by mistake, turned out to be equipped with INA rollers with a Contitech belt.
And here is pure INA.
— coolant pump TZA Sport (Tolyatti) — 503+325=828 rub. //nbklada.
Design features:— New 8-blade impeller 21118 with a modified profile and direction of the blades, productivity above 170 l/min for use in internal combustion engines operating with increased loads;— Cassette-type oil seal from MTU, made in Italy;— Bearing from KINEX ” manufactured in Slovakia. This allowed: - to increase the pump performance by 20-40%; - to improve the operation of the internal combustion engine cooling system; - to improve the operation of the vehicle interior heating system;
— increase the working life of the pump by 40%.
The pump change was also marked by a replacement of the coolant - there is no need to skimp on antifreeze after last year's problems with antifreeze - AGA Z42 antifreeze
(10 liters of potion);
SCT fuel filter
(unfortunately there was no Knecht Mahle);
10W40 MotorGold oil
(5 liter canister, manufactured in 2012 - not only can this oil be bought in only two stores in the city, but also their 12th year can be considered a fresh batch...)
with a Knecht Mahle filter
;
oil seal
closest to the headlights due to detected fogging (Balakovo, FPM tires). Total: 960+130+(1100+130)+100=2420 rub. The total cost of the work was 1900 rubles. Some expensive update came out (Price: 7,200 ₽ Mileage: 126,960 km
- carfrance.ru
- xn--2111-43da1a8c.xn--p1ai
- www.drive2.ru