The clock was first installed on the VAZ 2103. At that time, the presence of this device on the car panel was considered a luxury for examples of the Soviet automobile industry. Today it is unlikely that such a device will surprise anyone, but it cannot be said that the VAZ 2107 watch is a useless element of the interior. Moreover, tuning enthusiasts also fell in love with them, installing other devices in their place, for example, a voltmeter, or replacing the standard clock with a more interesting option - an electronic clock with a set of additional functions.
Connecting a VAZ 2107 watch
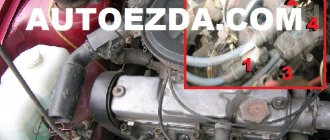
When assembling the “beard” of a VAZ 2107, beginners often encounter the problem of connecting electrical appliances. Moreover, all of them, be it a cigarette lighter or a watch, have no secrets. There are three wires connected to an electromechanical clock: “minus”, clock power and backlight power. The minus is connected to a terminal located directly on the case; further connection of the VAZ 2107 watch can be done literally “at random”. The remaining two wires can be connected in any order. If the clock does not go, but the backlight lights up, you should simply swap the wires.
Malfunctions
The standard VAZ 2107 clock is not the most “vitally important” device, however, when it is standing, it causes certain inconvenience and can disorient you in time. Therefore, their malfunction, like any other device or car system, must be eliminated. To restore their functionality, it is necessary to determine why the clock on the VAZ 2107 does not work. In principle, there are few reasons for the malfunction:
- fuse F6, located in the fuse block, has burned out;
- the power (ground) terminal connected to the clock has fallen off or come loose;
- The clock power cord is damaged;
- The clock mechanism has failed.
The fuse can even be checked visually. To do this, just remove it from its seat and inspect the thread. If the fuse is blown, you should replace it with another one of the same rating. However, fuses often burn for a reason, but when a short circuit occurs in the circuit. It can occur if the terminal of the positive wire has fallen off and touched a metal part of the body, or if the insulation of the power wire is damaged and “shorted” to ground. Therefore, before replacing the fuse, and especially if it is working and the clock does not work, you need to check the condition of the wire and power terminals. Therefore, the watch will have to be removed.
Next, you need to check whether the terminals of the wires suitable for the clock have come loose or oxidized, as well as how tightly they sit on the contacts.
You can check for a short or break in the power wires by ringing them on the housing or on the terminals of the corresponding fuses.
Oxidized terminals must be cleaned, but if they are loose and do not fit well on the contacts, lightly press them with pliers. If there is damage to the wire insulation, it can be repaired by wrapping it with electrical tape.
Functions of the VAZ-2107 dashboard
The VAZ-2107 dashboard, or torpedo, is a means of displaying information about the functionality of the vehicle. First of all, it should provide a good overview of all sensors of the measuring instruments for the driver. At the same time, its device should be easy to operate.
The dashboard displays the following information:
- the condition of all operating systems of the VAZ-2107, especially those that are designed to ensure traffic safety - braking, car alarm, passive safety;
- digital indicators of vehicle movement characteristics - speed, engine, etc.;
- correct use of the vehicle as a whole (covering the operation of the engine, chassis, transmission, electrical equipment);
- other necessary information (for example, the clock shows the time).
As a conclusion
Changing the lamps on the headlights of a VAZ 2107 is not a difficult task. The main thing is to act carefully, because not so often a living person looks into them. Some parts may become “bitten” and will not want to be removed the first time. With a lot of force, there is a chance of breaking them. For example, when replacing dimensions, they often jam in the reflectors. There have been cases in my practice where they were “torn out” with a piece of that same reflector, and this was a replacement for the entire headlight.
So, you need to be careful, the “Seven”, although a strong machine, can tolerate and forgive you a lot, but some of its elements require a certain “tenderness”. A car is like a girl - the way you drive it is the way you will live with it - a popular automotive saying.
Good luck to everyone on the roads!
Good afternoon dear friends. Many Classic car owners do not like the backlighting of the instrument panel. The question arises whether you need to either change the lamps to brighter ones, or carry out tuning - upgrading the lighting of the VAZ 2107 dashboard. And it happens that you need to change the light bulbs for a completely banal reason - one of them has burned out. Today we will look at the process of replacing the backlight and alarm lamps of the VAZ 2105-07 panel . It is these two Zhiguli models, because their devices are similar.
Replacing burnt-out lamps on the dashboard of a VAZ Semerka
First of all, before you start replacing, you need to find out what kind of light bulbs are used on classic VAZ models . Because it will be a shame to buy the wrong one, or with a different base. And find out after the device is completely disassembled.
So, how are light bulbs used:
- Lighting for the speedometer and tachometer and the entire panel as a whole: power 3 Watt, base type – T3W,
- Signaling lamps for turning on the dimensions, high beam, parking brake, opening the air damper (choke for carburetor modifications), low battery charge, oil pressure, direction indicators: baseless linden lamps W1.2W, power 1.2 W.
In some modifications, older models, alarm lamps with a T3W type socket with a power of 3 Watts can be installed in the dashboard. Here, unfortunately, you can’t guess. The figure below shows the appearance of all the light bulbs used on the VAZ 2107 to get an idea of what they look like.
How to Replace Dashboard Bulbs
- First of all we remove the “Seven” tidy to gain access to the mounting board where they are installed
- We dismantle the burnt lamp. She removes it from the board by turning its socket 90 degrees. Turned and removed from the instrument panel
- If you are using a lamp with a W1.2W base, then simply pull it towards you and it will “come out” of the socket. If the type of lamps installed is T3W, then removal from the socket is carried out by turning it 90 degrees.
Install new light bulbs in reverse order. If you are the happy owner of a dashboard with W1.2W lamps, then in the markets you can buy light bulbs assembled with a socket. It is enough to mount it into the board without bothering with its removal from the socket. Because there were cases when baseless lamps, type W1.2, got stuck in the socket and it was impossible to remove them, or their seat was damaged.
Conclusion
Thus, you can not only replace a burnt-out lamp, but also modernize the instrument panel of the VAZ 2107 by installing LED lamps in them. But you need to do this wisely, because there are some nuances that we will talk about in the following articles.
Good luck to everyone on the roads.
Join the group and you will be able to view images in full size
What to do
The cigarette lighter is not directly responsible for the operation of any component of the car, but its operation negatively affects the comfort of the driver and passengers of the car. If the device is damaged, it must be repaired or replaced.
Where is the fuse for the cigarette lighter?
The VAZ-2107 cigarette lighter fuse is located in the fuse and relay mounting block. In VAZ cars this block is located in the engine compartment on the passenger side. To gain access to the fuse, you must remove the transparent plastic cover of the mounting block. The cigarette lighter fuse is marked F 6 and is rated for a current of 10 amperes.
How to disassemble the cigarette lighter
The socket and removable cartridge are inexpensive parts that can easily be found at any auto store. If they stop working, it is impractical to repair them; a complete replacement is performed. To do this, disconnect the ground bus from the battery and disassemble the socket fixed on the front panel of the VAZ-2106, performing the following procedure:
- remove the heater cartridge from the socket;
- we pick up the panel on which the clock and cigarette lighter are located and drag it with a flat-head screwdriver until the latches click;
- carefully remove the dashboard; there may be short wires behind it;
- remove the dashboard connection terminals;
- unscrew the locking nut;
- remove the outer casing along with the backlight;
- remove the internal cigarette lighter socket.
Installing a Euro cigarette lighter on a “classic”
04/01/2018 by admin | 0 comments
Like all owners of classic Zhiguli cars, after purchasing the car I had a cigarette lighter installed, the design of which probably goes back to the USSR. Since I am a non-smoker, my DVR worked through it. But when I bought a USB charger to recharge my tablet or phone, it turned out that it did not work in this cigarette lighter. It is simply short and does not reach the positive contact at the bottom of the “well”. Well, besides this, the original cigarette lighter had one significant drawback, in my opinion - it consists of two parts, which are fastened together with a very “liquid” nut. When moving and connecting/disconnecting a load, it becomes loose, which is why the cigarette lighter begins to “fall apart”.
Therefore, I bought a cigarette lighter from a Niva VAZ-2123 at a car store. At the same time I bought a block with wires for it, but as it turned out later, I did it in vain. The wires in this block are thin, with a cross-section of 0.5 mm, and most importantly, the “female” terminals in this block are somehow not standard, they are already 6 mm and shorter, therefore, ordinary “female” terminals cannot be installed in this block.
Well, then, it was necessary to remove the insert from the console, remove the clock and auxiliary signal lights from it, and disassemble the cigarette lighter, because it cannot be removed without disassembling it. And then I stepped in, for some reason I decided that the cigarette lighter was “tightly” included in the wiring, so, as you can see in the photo above, I bit off the wires with wire cutters. But there is no need to do this; in the depths near the stove there are insulated connections on the terminals through which the cigarette lighter is connected. You just had to disconnect the terminal connections and then you could easily remove the cigarette lighter from the insert.
Now that there is a console insert with the old cigarette lighter removed, you need to remove the plastic backlight rim on the new cigarette lighter.
Then we take the console insert, a round file and the backlight rim and bore a hole in the console where the old cigarette lighter previously stood. You will have to bore from approximately 25mm diameter to 29mm diameter. Periodically it is necessary to do “fittings” to see how the backlight rim fits in the resulting hole. When the hole is bored to the required diameter, we snap the backlight rim into it, and then snap the cigarette lighter into this rim. I got it like this, the cigarette lighter sits dead, no hint of vibration.
Now, since I decided to give up using the block, I had to make wires to connect the new cigarette lighter. To connect, I took wires with a cross-section of 1.5 mm, crimped the “mother” terminals on one end of the wires and covered them with heat shrink. At the other end of the wires I crimped the male terminals. These terminals had to be shortened a little with wire cutters, because there were some shortened “mothers” on the mating part. The black wire goes to ground, the red wire is the cigarette lighter itself, the yellow-green wire is the backlight when the lights are turned on.
Now all that remains is to put everything together. Replace the clock, auxiliary indicators and connect the cigarette lighter. After connecting the cigarette lighter, I insulated the connection of the red and yellow-green wires, the black one, since this mass may not be insulated. Well, after all the work is completed, you need to check whether it will work.
And then at first a “surprise” awaited me. The cigarette lighter and clock did not work after assembly. Since I didn’t disconnect the battery when I “bite off” the old cigarette lighter, during work I accidentally shorted the positive wire to ground. Because of this, the 10A fuse F6 in my fuse box burned out. After I replaced it, both the clock and the new cigarette lighter worked.
Now everything works well - both the USB charging and the power supply for the DVR. The cigarette lighter itself is firmly installed. As you can see, my on-board computer is not installed in place, but this is due to the fact that one of the segments on its screen burned out. I have already ordered new displays, as soon as I receive them I will repair them and return them to their place.
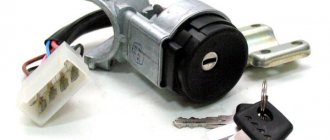
Dismantling and installation of VAZ 2107 watches
You have to take off your watch to check it, repair it, tune it, or replace it with a more advanced version of the device. Before removing the watch, you must disconnect the ground terminal from the battery. The removal procedure is slightly different on models before and after 1993. In the first case, the sequence is:
- remove the three plates covering the instrument cluster mounting screws;
- Unscrew the screws and lift the dashboard;
- release the clock fastening brackets and remove them from the panel;
- disconnect the terminals of the wires connected to the clock.
To remove the watch on a “Seven” older than 1993, you must perform the following operations:
- unscrew the screws securing the center console and remove it;
- unscrew a couple of screws located at the bottom of the ashtray;
- remove the radio;
- Unscrew a couple of screws securing the radio frame;
- remove the decorative plate from the frame of the upper ventilation nozzles that covers the screw;
- unscrew the screw;
- Unscrew the 4 screws of the lining installed under the control panel for the interior ventilation and heating system;
- dismantle the switches installed under the central heating and ventilation nozzles of the cabin;
- unscrew the screw holding the instrument panel;
- pull out the instrument panel, disconnect the wire terminals from the clock;
- remove the panel along with the ventilation nozzles;
- unscrew a couple of screws securing the clock;
- remove the watch.
Installation of the clock is carried out in the reverse order of dismantling.
Car cigarette lighter illumination
Sometimes a light bulb burns out. This occurs due to old age or a small short circuit. You need to diagnose the problem and then replace the backlight bulb with a new one.
- Remove the wire from the battery.
- We take out the metal cartridge.
- Remove the central plastic cover.
- Disconnect the power wires.
- Unscrew the fixing nut.
- Remove the housing along with the backlight bulb.
- We replace the burnt out element with a new spare part.
- We assemble everything according to the diagram in reverse order.
PROMOTION: SALE OF NEW CAR 2022 PRODUCTION
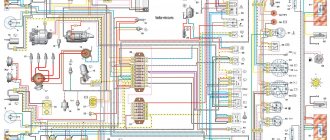
Electrical circuits for VAZ 2107 cars with injection and carburetor engines
The electrical wiring of all versions of the VAZ 2107 is the same, with the exception of the engine compartment wires. The electrical network is built according to a single-wire circuit, the second conductor is the car body and the crankcases of the units. When using VAZ 2107 electrical circuits, you should take into account the likelihood of a restoration repair being carried out on a particular vehicle, since sections of the wiring may have been replaced.
Features of standard electrical wiring
First you need to clarify what exactly needs to be connected if the installation is performed without autorun:
- Ignition control;
- Power supply for the alarm itself;
- Door switches;
- Handbrake switch;
- Signal lamps (2 wires).
As you can see, the number of elements here is kept to a minimum. But even using this, that is, a minimum set of points, will allow you to quickly connect a turbo timer. Simply, in cars of the 2107 family, the ignition support relay is installed as standard. And you need to use this.
Look at the diagram and you will understand what we are talking about:
In general, the figure shows all the important elements:
- Ignition support relay.
- Outputs for light signaling (blue and black-blue). The 8-pin connector is located in the steering column.
- Door control wire. It is located in the side tunnel near the clutch pedal.
Make T-branches and connect any signaling. By the way, the power supply to the lamps (second photo) is connected through fuses. Which is true for any car, not just the VAZ-2107.
Adjustment process
After connecting the laptop to the car’s on-board computer, you have the opportunity to monitor all the parameters of the vehicle in its various systems and see a list of errors that negatively affect the operation of the internal combustion engine. To identify errors, the data obtained in this way must be checked against the basic parameters. In most cases, the program itself indicates a deviation from the norm. If not, then you need to look for the error by its code in the catalog.
After determining the causes of deviations from the norm, errors can be easily eliminated by adjusting certain parameters that affect the operation of the injector.
Removing the panel
Any work related to the on-board electrical system of the VAZ-2107 requires first disconnecting the vehicle’s battery. Replacing light bulbs is not actually a repair, but there is still a risk of electric shock. For this reason, be sure to disconnect the negative cable from the battery.
Next, climb into the cabin and remove all the handles that control the heater and ventilation. Additionally (if available), the radio tape recorder is pulled out.
After this, you need to unscrew the nut holding the lever that resets the daily mileage counter. Remove it along with the washer, and push the handle itself inside the panel.
The next step is to unscrew the screw located on the upper right corner of the ventilation and stove control panel. He hides behind a decorative plug. The latter must be carefully pryed with a knife or flat screwdriver and pulled out.
Remove all the other 4 screws holding the dashboard in place and carefully slide it out towards you.
Further:
- unscrew the nut of the speedometer drive cable and disconnect it;
- also remove the vacuum pipe from the econometric fitting;
- disconnect the wire blocks - there are three of them.
Now all that remains is to pull the dashboard out of the cabin. The backlight and control lamps are easy to replace - just turn them in any direction until the protrusions on the bases coincide with the slots on the board. After this, the product can be easily removed. A working light is placed in the vacant space.
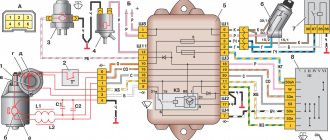
Pinout of the old instrument cluster (with oil pressure indicator)
In addition to the presence of an oil pressure indicator, it is worth noting that this instrument panel does not have an air damper indicator lamp (choke), and the emergency oil pressure lamp is located next to the pressure indicator. Because of this, it contains lamps for low brake fluid levels and fog lamps.
White 6-terminal block X1:
- Gasoline level sensor
- Turn signal indicator lamp
- Battery charge sensor (voltmeter -)
- Gasoline level warning lamp
- Overall plus (+)
- Battery charge sensor (voltmeter +)
White 8 terminal block X2:
- Fog lamp warning lamp
- High beam warning lamp
- Dimensions indicator lamp
- Empty
- Battery charge indicator lamp
- Brake fluid level warning lamp
- Empty
- Parking brake warning lamp (handbrake)
Orange 6-terminal block X3:
- General minus (-)
- Tachometer
- Instrument lighting
- Oil pressure sensor
- Oil pressure warning lamp
- Coolant temperature sensor
What lamps to install in the instrument panel for lighting
On the VAZ 2107 car, simple incandescent light bulbs with a tungsten spiral are used for instrument lighting and display. With the development of industry, LED lamps of suitable sizes began to be produced. Despite the fact that they are more expensive, they began to replace incandescent lamps.
- cleaner light;
- less power consumption;
- durability.
Incandescent lamps
AMN 12-3-1 lamps are installed to illuminate the instrument panel.
Brand A 12-1.2 lamps are installed as signal lamps.
LED bulbs
As mentioned above, LED bulbs have a number of advantages over incandescent bulbs, so you should consider changing them. Selecting the size and power of lighting is quite simple.
You just need to take into account that the battery charging indicator lamp must be connected to the nominal resistance of the incandescent lamp previously installed. Otherwise the control will not be correct. Types of light bulbs for illumination and indication are shown in the photo below.
Preparation
- If the low beam on a VAZ 2107 has disappeared and as a result of the check it is found that the lamps are to blame, then you should purchase new products. This model uses the AKG12-60+55 modification with an H4 socket; this marking indicates that the product has a power of 60 W for high beam and 55 W for low beam; you can purchase such an element at any store that deals in spare parts for domestic cars.
The working process
- A huge advantage of the work is that, unlike modern models, access to the headlights is not limited in any way; this greatly simplifies doing the work yourself and allows you to achieve the best result, since you are in complete control of the process.
Important! To prevent the battery contacts from oxidizing during operation, they should be protected with lubricant; if there is no special composition, then ordinary solid oil would be an excellent option - it will protect lead from oxidation and ensure excellent contact over a long period of time.
- If there is no low beam on a VAZ 2107 on only one side, then you can replace one lamp, although experts advise installing two at once, since the light may vary. One way or another, the work begins with any headlight that is convenient for you, first wipe the inside, since most often it is dirty and debris can get inside later.
- First of all, it is necessary to remove the plug, which covers the installation site of the light bulb and serves as protection against moisture and dirt getting inside the housing. This element is removed very simply: grab it and turn it counterclockwise until it comes off, usually this happens in half or even a quarter of a turn.
Advice! When disconnecting a block, it is better to immediately check how well the wires fit, since long-term use may cause the connection to break.
- Next you will see a spring clamp that presses the lamp to the body and ensures its immobility during operation. To release it, you need to press the element on top and carefully move it to the side, everything is very simple and very quickly, when you see this knot, you can easily figure out how this is done.
Wires for connecting electrical appliances
| Connection type | Section, mm 2 | Insulation color |
| Negative terminal of the battery - vehicle ground (body, engine) | 16 | Black |
| Starter positive terminal - battery | 16 | Red |
| Positive contact of the generator - plus battery | 6 | Black |
| Generator - black connector | 6 | Black |
| Terminal on the generator “30” – white MB block | 4 | Pink |
| Starter connector “50” – starter relay | 4 | Red |
| Starter Start Relay - Black Connector | 4 | Brown |
| Ignition switch relay - black connector | 4 | Blue |
| Ignition switch output “50” – blue connector | 4 | Red |
| Ignition switch connector “30” – green connector | 4 | Pink |
| Right headlight plug - ground | 2,5 | Black |
| Left headlight plug - blue connector | 2,5 | Green, gray |
| Generator output “15” – yellow connector | 2,5 | Orange |
| Right headlight connector - ground | 2,5 | Black |
| Left headlight connector - white connector | 2,5 | Green |
| Radiator fan - ground | 2,5 | Black |
| Radiator Fan - Red Connector | 2,5 | Blue |
| Ignition switch output “30/1” – ignition switch relay | 2,5 | Brown |
| Ignition switch contact “15” – single-pin connector | 2,5 | Blue |
| Right headlight - black connector | 2,5 | Grey |
| Ignition switch connector “INT” – black connector | 2,5 | Black |
| Six-pin block of the steering column switch - “ground” | 2,5 | Black |
| Two-pin block of the steering column switch - glove box illumination lamp | 1,5 | Black |
| Glove compartment light - cigarette lighter | 1,5 | Black |
| Cigarette lighter - blue block connector | 1,5 | Blue, red |
| Rear window defroster - white connector | 1,5 | Grey |
How it works and its purpose
The device is extremely simple: it is a car socket connected to the car's on-board power supply, and a heating element located in a remote socket. The heater is a nichrome spiral pressed into a ceramic core. The remote cartridge, receiving power, heats up the filament.
Functions and operating principle
In addition to its intended use, you can connect many external devices to the VAZ cigarette lighter socket, as well as:
- charge mobile devices;
- connect a DVR, navigator, car vacuum cleaner;
- turn on the source of external lighting (carrying);
- power the compressor to inflate the wheels.
The device consists of two detachable parts, each of which has its own functions:
- A socket fixed by its body to the car body. The socket body serves as the negative contact. In its metal rod, separated from the body by a layer of dielectric material.
- The removable cartridge is a two-contact removable element, made in the form of a metal casing with a dielectric handle, which serves as a portable source of a nichrome spiral heated to the ignition temperature.
When the cartridge is pressed, it connects with a metal rod in the center of the housing, which acts as a positive contact, and is fixed in the pressed position by the force of bimetallic strips located on the side. Through the clamping plates, negative power is supplied to the outer casing of the cartridge. Between the power poles of the cartridge there is a heating element - a nichrome spiral.
Replacing the standard clock of a VAZ 2107 with digital ones
The standard clock is not informative enough, and it looks too standard. Therefore, many owners of the “Seven” change them to more advanced models. Usually this is an electronic watch with a voltmeter function. Such a device not only looks more modern and attractive, but also allows you to control the voltage of the on-board network. Installing an electronic clock on a VAZ 2107 is easy. On the market you can find a wide range of electronic watches for the “seven” with different display colors and functionality.
A good option is a watch with alarm, calendar, voltmeter and thermometer functions. The most advanced model has two temperature sensors - internal and external, which allows you to control two temperature parameters at once.
Such clocks fit perfectly into the place of the standard ones, and connecting them does not require the installation of additional power circuits. The only thing you should take care of is to install an external temperature sensor and run a wire from it to the location where the clock is installed.
If the electronic clock does not have a function for measuring external temperature, its installation is completely similar to the installation of a standard clock and does not require additional actions.
AChK-7 watch in VAZ 2106 - logbook Lada 2106 Constructor for the soul 1989 on DRIVE2
In general, I broke my beloved watch that I had since I bought the car. They went through 100 autopsies and 3 different scales. At first I illuminated them simply with diode bulbs (for which I drilled holes in the housing), and then there were diode strips. After the final demise of the watch, I traveled with it for another 2 months and the same amount without it (with a hole in the dashboard). I’ll say right away that I didn’t want to buy an electronic watch, it looks very collective farm and cheap in the car. I thought about taking an old-style watch from disassembly, but one day I saw a watch from a VAZ 2107 with a dial and hands designed for backlighting.
Common malfunctions of VAZ 2107 watches and their modernization
The main highlight of the cars of the domestic automobile industry is the installation of a clock in the car interior, starting with the VAZ 2103 model. This important element is so loved by car owners that when a malfunction occurs, the question immediately arises of how to repair the clock on a VAZ 2107. To repair this device, you will need to initially understand the reasons why malfunctions occur.
Reasons why the cigarette lighter does not work
There are certain factors that affect the performance of a part. You need to understand the structure of the cigarette lighter and understand why it does not work on the VAZ 2107.
Among the most common problems it is worth noting.
- Fuse failure. If one or more powerful devices are launched into the cigarette lighter socket, the circuit current may exceed a critical value. At 10 Amps the fuse element will burn out. Additionally, the clock and radio will stop working. The repair is carried out simply according to the scheme - just get to the mounting block and replace the blown cigarette lighter fuse.
- Bad connection. Over time, the contacts oxidize, causing the cigarette lighter to stop working. The reason for the appearance may also be the connection of a fuse with a high resistance, for example, a 15-amp one. If the VAZ 2105 cigarette lighter stops working, you must first remove the metal cartridge and check its contacts for the presence of oxides. During repairs, it is recommended to clean the contact areas. Before replacing the cigarette lighter or fuse, you need to remove the negative terminal from the car battery. This circuit will eliminate the possibility of a short circuit.
- Burnt out filament element. On the classic, inside the cartridge there is a nichrome spiral, which can burn out due to age. Repairing the fault consists of replacing the cigarette lighter and installing a new element according to the diagram.
- Due to old age or due to the fact that the wires can short out, there is a possibility of electrical wiring breaking or circuit burnout. The fuse trips. Such a malfunction of the VAZ 2107 cigarette lighter is diagnosed using a multitester. It is necessary to ring the circuit, diagnosing the integrity of the wires. In this case, it is the wiring that needs to be repaired or replaced, not the incandescent element.
How to connect
You can connect the radio to the VAZ-2106 via the ignition switch, but this scheme is considered less attractive, since you won’t be able to listen to the radio with the engine turned off. The standard connection diagram involves the use of standard wiring. Among other features of connecting the VAZ-2107, we note the following points:
Are you a car driver?! Then you can take this simple test and find out. Go to test »
- It is forbidden to connect directly to the battery, as this can lead to rapid wear.
- To eliminate the possibility of battery discharge, a power button is embedded in the yellow wire.
- There is no standard fuse in the classic assembly. To install it, you need to change almost the entire electrical circuit. The easiest way is to purchase a power cable that already has a safety element built into it. A 20 A device is required for normal starting.
The service life of the speaker system largely depends on the correctness of the created power system. It is recommended to insulate the wire; the contacts are connected by soldering or using special adapters.
Speakers
In order to connect the radio to the VAZ-2106, you should connect it to the speakers. Among the main recommendations we note the following:
- The speakers are being installed and sealed tightly. Otherwise, vibration may occur.
- Most attention should be paid to correct cable routing. At the point of contact with metal, high-quality insulation should be carried out, since vibration can cause the insulation to rub through.
- The connection procedure involves the use of special adapters. In addition, connections can be made by soldering; all connections are insulated.
A modern radio has appropriate outputs for speakers. The power supply network should have a minimum number of connections, as they may cause increased resistance.
Subwoofer
When improving the sound system of the car in question, a subwoofer is often installed. This element is designed to output low frequency sound. Among the connection features, we note the following:
- A modern device has a corresponding output for connection.
- For a speaker like this, it is recommended to use a larger gauge wire.
It is recommended to lay the cable under the vehicle's skin. The radio tape recorder is connected to the VAZ-2107 using special chips.
Antenna
Before connecting a car radio to the VAZ-2107, you should consider the correct position of the antenna. Various artificial interference can cause signal quality to deteriorate, resulting in extraneous noise. Among the antenna connection features, we note the following:
- There is a corresponding connector for connecting an external device.
- If you do not have the required plug, you can purchase it and solder it to an outdoor antenna.
- A high-quality connection requires insulation using electrical tape or sealant. Too much humidity can cause corrosion, which will degrade the signal quality.
Installing and connecting the speaker system takes a relatively small amount of time. Most attention is paid to laying the cable to the power source, since it uses a battery.
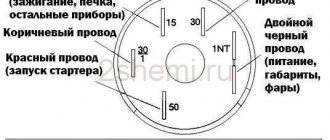
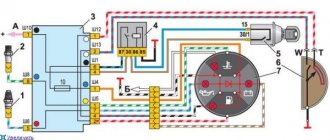
How to use the ignition switch
Any alarm equipped with auto-start is usually equipped with 5 power terminals:
Cord 3 here is the control one; it is connected to the starter terminal. And on the blue wire, that is, on terminal 15/2, the voltage may disappear when the starter is running, or it may remain on it all the time. When setting up, select one option.
VAZ 2101-2107 cars have their own characteristics. The coil of the additional relay shown in the diagram cannot be connected to the ignition cord going to the standard relay. The line is simply not designed for additional load!
Let's see what the ignition switch looks like in reality:
If you really need autostart, the starter cord (red) will have to be cut. Let's list what the correspondence between the lock and alarm cords looks like. The alarm cable will be indicated on the left:
- Green – free;
- Blue – free;
- Red – pink;
- Black-yellow thick – red (tap to starter);
- Black-yellow thin – red (bend to the lock);
- Yellow - blue thick.
In theory, everything turns out simple.
Of course, you can install the autostart system yourself. But it is better to entrust this task to a professional electrician. The three cords leading to the alarm must carry significant current. In new VAZ models the number of these cords will be no less.
Help with choosing a part
Today, there are many options for the VAZ 2107 cigarette lighter available on the market. The average price of a part is 200 - 400 rubles for a standard element and 500 - 600 for a European cigarette lighter. It is advisable to choose the latter option. It has several advantages relative to the classic part.
- Reliable fixation. The European cigarette lighter is securely held in the socket, and the fixing nut does not unscrew.
- The appearance and backlight are prettier.
- A modern car lighter allows you to connect several devices at the same time.
Features of the procedure when replacing a short European cigarette lighter
One of the problems with the classic device is weak contacts. When driving on broken roads, the seats become loose, as a result of which the retaining ring can fly off, which can lead to a short circuit. Therefore, many owners decide to buy a short Euro cigarette lighter, also suitable for the VAZ 2107.
Its installation is carried out according to the diagram.
- The disassembly procedure is similar to the previous procedures.
- The diameter of the Euro cigarette lighter socket is slightly larger. Therefore, you should bore the old hole with a file to a suitable size.
- Install the green part of the backlight.
- We mount the landing socket.
- You need to buy a standard three-pin connector at the store. The yellow wire is soldered to the yellow, the center green to the red, and the blue to the negative black.
- Next, all that remains is to assemble the device according to the reverse diagram of disassembly and check its serviceability.