Reverse parking is one of the most difficult exercises during the driving test. And in the ordinary life of a novice motorist. Only practice, a sense of the car’s dimensions or technical progress can help here.
Smart Sensor Wireless Charger Car Holder
The car wireless charging holder with touch sensor SMART SENSOR CAR WIRELESS CHARGER serves as a reliable stand for the gadget in the car, and also represents ...
Read more …
The first assistant when reversing is parking sensors - ultrasonic sensors installed in the rear bumper and sending an audible signal into the cabin when dangerously approaching an obstacle. The famous phrase “Madame parks by sound” has taken on a new meaning. But this method of warning will only help you understand that you are critically close to an obstacle. Visual contact can make the process of driving and parking in reverse easier. And then cameras came to the rescue.
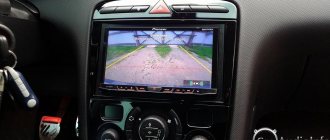
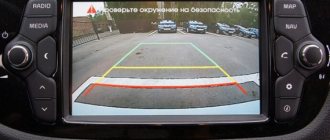
A miniature device that is installed in the rear of the car and broadcasts the image to a monitor in the cabin. Modern devices also have dynamic marking lines that help determine the desired steering angle for movement along the optimal trajectory.
In premium cars or expensive mid-range and budget models, such cameras can be installed from the factory. But what to do if the camera is not included in your package? The answer is simple - install it yourself or in a service.
Smart Sensor Wireless Charger Car Holder
The car wireless charging holder with touch sensor SMART SENSOR CAR WIRELESS CHARGER serves as a reliable stand for the gadget in the car, and also represents ...
Read more …
How to choose a camera
The modern electronics market, and especially China, is overcrowded with a variety of cameras, and this makes choosing the right thing more complicated. In order to make your work easier, decide on your priorities, what worries you more – price or quality. Not everyone needs high-definition cameras, or cameras that can show even in low light. For some drivers, an inexpensive rear view camera for the radio is enough.
What parameters should you pay attention to if you decide to purchase a higher quality product, then in this case there are at least five points that need to be taken into account when purchasing:
- What resolution does the camera record in? The higher the video resolution, the better the recording quality. And high image clarity is not always needed.
- The next point is the camera’s sensitivity to lighting. With cheaper models, low-light recording quality can be very poor. Therefore, if, due to circumstances, you often use a car in the dark, then this point is worth paying attention to.
- If, before purchasing, you have already decided where to install the rear view camera, then you need to pay attention to the installation method of this particular model.
- The next point is this viewing angle that the camera lens captures. Usually it is in the range from 120 to 180 degrees. It is better to take something in between these two indicators, so that you have a good view of the rear view, but do not have a panorama, because it distorts reality.
- Selecting the monitor on which the camera will display the image. But if you already have a radio with a screen in your car, then you just need to think about how to connect the rear view camera to the radio.
Wireless connection
If you want to simplify the installation process, you can use a wireless connection. For this purpose, special radio modules are used. There are also radio modems on sale that are already combined with a video camera.
In this case, the need to lay wiring inside the car is eliminated. It is enough to power the radio modules and connect them to the camera and mirror. Power can be supplied to them either directly from the on-board network (in this case, they will be constantly energized after turning on the ignition), or from reverse gear.
How and where should it be installed
Later in the article we will look at how to install a rear view camera. There is more than enough space in the car to install a video camera, but we need the most advantageous position. The camera eye must have a good view, which is not limited to any parts of the machine. Any camera will reveal its full potential if it is installed in the most advantageous location.
In our case, such a place is a niche above the rear bumper of the car; the camera should be placed in its upper part above the license plate number of the car. What this gives is viewing angles, your car radio will only show the road and not parts of your car. But it must be positioned so that it is not too recessed, but also does not stick out.
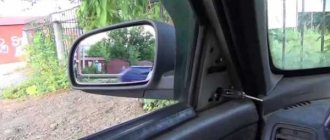
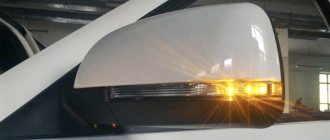
LEFT MIRROR
The view in the mirror should reflect the horizon line, 60% of the mirror space - the earth, 40% - the sky. The check is carried out by reviewing your vehicle. In the mirror you need to see the handles of both doors (the front door is in the lower right corner) and the side of the car. The reflection of road markings shows the position on the road.
The procedure and diagram for connecting the rear view camera
And now in more detail about how to install and connect a rear view camera to a Pioneer radio. Why go to this model, because it is the most common. If we take into account the unsafety of our video camera, and the best view, then its place should still be above the number, outside.
It should be installed closer to the edge to improve visibility, but not so that it is exposed. The installation of the camera itself is not complicated. The camera has the bracket necessary for installation; you only need to drill a couple of holes for the mounting bolts and one hole for the cable.
And then comes the inclusion of the rear view camera in the general electrical network of the car. If you are not strong in electrics, then it is better to turn to car service specialists, but if you have at least basic knowledge, then you will be able to figure it out on your own. So, the order of connection in stages:
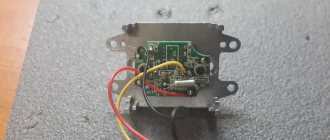
- Any camera has two wires, one for transmitting the video signal from the camera to the monitor, and the second wire for power. Since the camera itself has short wires, you will need to extend them so that they are enough from the front panel to the end of the trunk (as a rule, an extension cord for the video signal is included in the kit).
- Where can I get power for my video camera? Usually the camera is connected to the rear lights. Therefore, immediately after reverse gear is engaged, the rear view camera also turns on.
- All wires running throughout the cabin and in the trunk must be secured and hidden. This will help avoid unexpected network breaks while driving.
- If you use a monitor instead of a radio, you will need to find a power source for it as well. If you have a Pioneer multimedia radio, this issue is resolved automatically.
Connecting a reversing camera to a Pioneer radio
Now we will talk specifically about how to configure and connect the reverse camera to the Pioneer radio. There are small nuances here that mislead everyone. We connect the camera to the reversing light, all the power is on the camera, then the wire through which the video signal will go. In Pioneer this is a brown tulip not to be confused with a yellow one. Go to the settings, find the section in the rear view camera menu, set the item to on, and switch the polarity to battery mode.
Our camera is working, you can check this by going to the main menu and selecting the camera icon, but it will not turn on automatically. This can be fixed by connecting the purple wire to the rear light (where the camera is). As a result, when reverse gear is engaged, the light comes on, power is supplied to the camera, and the radio understands that it is necessary to switch to reverse gear.
The entire connection diagram for a rear view video camera is quite simple, and therefore most drivers often cope with installing it themselves. In cars equipped with an automatic transmission, random activation of the rear view camera may occur.
To eliminate this problem, you need to install an additional camera turn-on delay sensor. In each car model, the camera installation may differ, but in small details, the connection principles are similar. The connection process is more complicated for video cameras that transmit a signal via radio, but they have the advantage that several of these cameras can be connected. There are more and more cars on city streets, so a rear view camera is already a necessity. It will not only help you park correctly, but will also preserve evidence of your innocence in the event of a collision.
Often, a reversing camera is installed after purchasing a new radio; for this case, we have an article “how to connect a radio” in which you will learn about adapters, adapter frames and much more.
Connection via filter or relay
Sometimes, when connecting the camera to the power supply of the rear lights, strong interference, stripes, and complete loss of the picture are observed. This may be explained by the design features of a particular car model. To solve this problem, power filters or connection via a relay are used.
The relay ensures a stable supply of constant voltage to the camera input when the back light signal is activated.
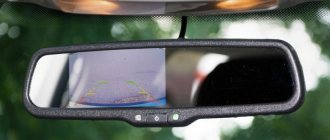
Minimalism: choosing a mirror for a car with a rear camera and a DVR - specific models
When purchasing a mirror with a navigator and recorder for a personal car, the owner does not have to think about its location on the windshield. The gadget will definitely not interfere, since it is installed on a standard mirror surface. There is no need to worry about his situation either. The built-in front camera is based on a spherical hinge, so it can be freely adjusted to the desired position of the smart device.
Fans of a budget solution, which combines only 2 functions: a video recorder and a rear view camera, should not worry. It is worth noting that devices of this class are designed in such a way that sometimes it is necessary to dismantle the standard mirror. However, this is not about the next person involved in this segment.
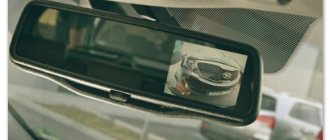
Navitel MR250
This is a device with a mirror plane into which a 5-inch IPS display with a resolution of 854x480 is integrated. Let's take a closer look at the factory configuration:
The cost of the device is 4,900 rubles. The closest competitor is Phantom RMS 430 (3,000 rubles).
Special abilities
Regardless of where you install the DVR, you can make the most of its capabilities. Special functions include the following:
- G-sensor. Its activation indicates a vehicle collision. In this case, photo recording is blocked to avoid overwriting by a third-party device. The file must be deleted manually from the memory card; the sensitivity of the sensor is adjusted in the setup menu.
- File blocker. Serves to protect materials from accidental deletion or overwriting, configured manually.
- Parking management. After activating this option, you can detect external vibration effects, after which the recorder will turn on for 15-20 seconds, followed by shutdown if no problems are detected. In this case, the video material is blocked automatically.
- Motion detection . This option is similar to the previous function; in stand-by mode, it allows you to identify the action directly from the setup menu. The XX symbol will appear in the central part of the screen, indicating the possible movement of a third-party object within a radius of three meters from the vehicle. In this case, the DVR starts automatically recording for 15-30 seconds.
The features of the device in question include the placement of a fixing device inside the rear view mirror. This solution makes it possible to place the device so that it does not interfere with the view, capturing the necessary moments.
Main characteristics of the device
Many people wonder how to choose a mirror video recorder. In fact, it is better to purchase a product from the leader - Car DVR Mirror.
The instructions for this mirror video recorder suggest the following functions:
- CMOS type matrix;
- optical lens with a rotation angle of 140°;
- 4.3 inch LCD display;
- presence of G-sensor;
- possibility of photographing;
- shooting video at 30 frames per second;
- built-in speaker and microphone;
- main ports – USB and mini-HDMI;
- Russified menu;
- Possibility of using microSD card up to 32 GB.
Article on the topic: Toyota Corolla 1.3, 1.4, 1.6, 1.8 fuel consumption per 100 km
Installation options
You can connect a video camera to the navigator in 2 ways - wired and wireless.
Wired connection
This technique will require the following parts:
- fasteners;
- RCA adapter, which will be installed at the input of the navigation device;
- cables with output connectors;
- KZV.
The wired connection type involves the following stages:
- The rearview camera is firmly fixed above the license plates using self-tapping screws, near the lighting elements.
- A wire is passed through the backlight hole into the interior.
- The power cable is connected to the wire that supplies power to the rear brake lights.
- The ground cable is connected to the car body anywhere.
- After this, you need to check the reliability of the connected electrical wiring and fastening.
At the final stage, you need to connect the video camera wire to the navigator, and connect the other wire of the device to the car cigarette lighter.
In this case, the KVZ will turn on only when the car is driving backwards, and the image from it will be displayed on the display of the navigation equipment.
Wireless connection
Motorists note that the wireless connection method is the simplest.
To do this, we attach the KVZ above the license plate, after which we connect the device to a wireless radio transmitter.
There are 2 cables on the transmitter. The first (ground) is attached to the car body, the second (power) is connected to the power cables of the brake lights.
ADVICE FROM EXPERIENCED MOTORISTS
Increasing personal safety while driving.
- Try to be more visible on the road. Don't forget about outdoor lighting - your headlights will be reflected in the mirrors of other cars.
- Be aware of the maneuver, move smoothly. Remember to have a turn signal. When changing lanes smoothly, possible troubles from the blind spot are significantly reduced.
- Don't be lazy to turn your head. As a rule, to move from lane to lane, lateral reflection alone is not enough - you need to inspect the “blind” zone live (at the same time, your neck will warm up).
- If possible, avoid the blind spots of neighboring cars - you may not be noticed when maneuvering. Do not maneuver yourself near the right front wheel of heavy trucks - all trucks have a “blind” zone here.
TOP 10 best mirror DVRs
A standard mirror in a car is good, but its capabilities are strictly limited. For this reason, recorders are installed in its place. But such devices must not only perfectly perform the direct function, but also have a good reflective layer with which one could see the situation behind even without an additional camera
It is also important to make sure that the screen size and layout, installed operating system and additional features are suitable for you. Some DVRs do not have them at all, while others offer radar detectors, the ability to install software, and other options.