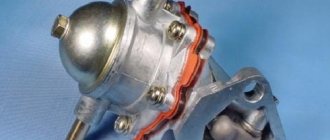
The fuel pump in a car is designed to supply gasoline from the fuel tank to the engine. For carburetor cars, mechanical pumps are used.
Due to the short distance between the carburetor and the fuel pump, fuel is supplied at low pressure. Cars with an injection-type fuel system are equipped with electric fuel pumps that supply gasoline under high pressure.
The operation of such a pump is controlled by an electronic system that takes into account the throttle position, as well as the air-fuel ratio.
Basic fuel pump malfunctions
The fuel pump in the Prior may operate intermittently due to low-quality fuel. This is due to the fact that a fine fuel filter is installed here after the fuel pump.
At the inlet there is only a filter mesh that performs rough cleaning. The gasoline at some of our gas stations is so dirty that the mesh gets clogged quite quickly. The engine does not start well or stalls during operation.
The car jerks along the way and slowly picks up speed. If the filter mesh is partially clogged with debris, the optimal supply of gasoline to the engine is disrupted in different operating modes. When the pump is unable to maintain the required pressure in the fuel system 3.7-4.0 atmospheres , improper mixing of air and fuel occurs. As a result, the car loses speed.
In addition, even a well-warmed-up engine after a short stop can then start only after prolonged operation of the starter.
Unstable operation of the power unit is most often a consequence of a faulty fuel pump. First of all, you need to check the pressure level in it.
If after stopping the engine the pressure in the pump drops too quickly, then there is obviously damage to the diaphragm, as well as the sealing gasket. In this case, the gasket should be replaced, and the diaphragm should be reinforced with a special film.
Features of fuel filters for the Lada Priora car
VAZ 2170 fuel filters have their own characteristics.
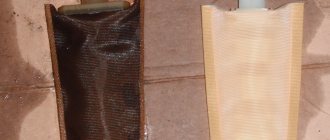
- The coarse filter (FGO) is a fine mesh made of petrol-resistant plastic and capable of trapping solid impurities and dirt larger than 80 microns. It is made in the form of a flattened bag with a pipe in the middle, attached to the fuel pump using a clamp on the fitting.
Fine mesh filters gasoline before it enters the pump - A fine filter (FFO) consists of porous paper assembled into an “accordion” in a cylindrical body made of metal or polyamide. It traps impurity particles 50 microns in size and smaller. For connection to the fuel system, the filter housing has an inlet and outlet fitting with protrusions for clamps.
Fine filter traps small particles of impurities
It is noteworthy that these consumables are suitable for almost all injection VAZ models, from the “ten” to the “Kalina”. Only the latter use plastic clamps to secure the hoses (must be included in the kit), but for the Priora they are not needed.
It is quite difficult to make a mistake when purchasing a coarse filter - it is unified for the entire family of front-wheel drive VAZ models. The original product costs about 50 rubles.
You should not purchase mesh from dubious retail outlets. A fake can quickly fail, clogging the fine filter.
There are a number of things to consider when purchasing FTO.
- you need to make sure that the size of the filter matches the size of the housing and pipes - some foreign cars use very similar filters;
- the fittings must have protrusions for fixing the fuel hoses;
- preference should be given to familiar brands, avoiding Chinese manufacturers.
The size of the fine filter housing is unified for all injection VAZ vehicles
The cylindrical body of the part is held in place by a standard clamp designed for a diameter of 56 mm. The dimensions of the nozzles where the hoses with wire clamps are put on are 8 mm.
The FTO body can be made of metal or black plastic. The manufacturer installs both types of filters on VAZ cars - it doesn’t matter much.
The following fuel filter manufacturers have proven themselves well in the post-Soviet space:
- FILTRON (Poland);
- BOSCH (Germany);
- SCT Germany;
- "Salyut", Samara, Russia;
- UFI (Italy).
The filter housing can be made of metal or black plastic
Among the inexpensive products manufactured in the Russian Federation, we can highlight.
Table: price of fine filters for VAZ 2170
| Company name - |
manufacturer
FTO prices are current as of September 2022.
Video: review of fuel filters for VAZ
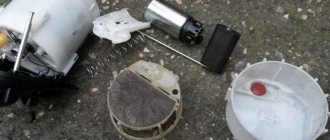
Removing and disassembling the fuel pump
The fuel supply mechanism in the Priora is located in the gas tank, so to get it you need to:
- Remove the rear passenger seat. The latches holding it in place are on the sides.
- There is a hatch in the bottom of the car, secured with two self-tapping screws. Having removed it, we gain access to the fuel pump, which is fixed in the fuel tank with a flat metal ring.
- Remove the ring, which is held in place by nuts screwed onto eight threaded pins spaced evenly around the hole in the gas tank.
- We remove the two fuel hoses and remove the retaining ring.
- We disconnect the electrical connector through which power is supplied to the pump located in the plastic casing.
- We take out the housing; this must be done carefully so as not to damage the float, thanks to which the filling level of the gasoline tank is shown on the instrument panel.
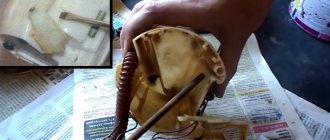
- The next step is to pull out the pump itself, bend the four latches located on the body, and take out the fuel pump, at the bottom of which there is a coarse mesh.
As a rule, the entire mesh looks quite dirty, and its central part is literally clogged with various debris. To remove the old mesh, you just need to grab it on all sides with your fingers and pull it towards you, or pry it with a flat-head screwdriver.
The most common reasons when the Check Anger light comes on on a Priora
Lada Priora Sedan Logbook Replacing valve seals
But the Priora has the most common breakdowns. To begin with, it is worth listing the main sensors included in the Priora ECM.
- Mass air flow sensor (MAF).
- Throttle position.
- Camshaft positions.
- Crankshaft.
- Knock sensor.
- Oxygen sensor (2 pcs.).
- Speed.
- Rough road sensor.
And also the actuators can make the “Check” light up.
- Idle air control (IAC).
- Fuel injectors (4 pcs.).
- Ignition modules (4 pcs.).
- Canister valve.
- Electric fuel pump.
All these components are activated through the computer, and therefore, if their operation fails, the “Check” light immediately lights up.
MOST COMMON ECU ERRORS THAT CALL THE “CHECK LIGHT”
In the first place, of course, there will be malfunctions of the oxygen sensor. These devices are installed in the exhaust manifold (sensor No. 1) and after the fuel afterburner (catalyst), No. 2. They read the percentage of CO content in the exhaust gases. Due to soot from burnt fuel, they most often deteriorate. The car begins to lose power, the “Check” light comes on. After all, the computer receives a signal that there is too much fuel.
Alas, it is only possible to accurately determine the reason why the signal may have come on using software diagnostics.
On the second place, the mass air flow sensor deservedly stands. A thin thread made of a special alloy changes resistance depending on the amount of air passing through the nozzle. The malfunction is characterized by severe engine malfunction. The revolutions “float”, the power drops, and, of course, the “Check” light comes on. And also checking only with diagnostics through the program.
And the camshaft sensor closes the top three. Its malfunction is characterized by an increase in startup time. Sometimes there may be slight jerks when accelerating. Again, there is no way to determine a breakdown without a program.
PRIORA ACTUATORS
Here in the first place is the IAC, a device that regulates the supply of additional air bypassing the throttle valve. It works by means of a micromotor that extends and retracts the shutter mechanism. If there is a malfunction, the engine will not start at idle. Or, conversely, it increases the speed to 1500-2000. "Check" lights up
Then the ignition modules. When it fails, the motor “troubles” and the speed “floats”. Power is lost. And as a result, the “Check Anger” icon lights up.
Faulty injectors give similar symptoms. It is interesting that all breakdowns of actuators, with certain skills, can be diagnosed without a computer. At least they will make the “Check” signal light up. This is done by either replacing it with a known-good unit, as with IAC, or by replacing it in places, as with ignition modules or injectors. And only the adsorber valve requires connecting equipment.
So what can we say. There is only one conclusion. If the “Check” indicator light on the instrument panel lights up, you need to do computer diagnostics in any case. This is the surest way out.
How to measure the pressure in the fuel system?
The easiest way to measure pressure is with a special device - a pressure gauge. The kit also includes an adapter and drain. Pressure can be determined using an air pressure gauge. This device is present in almost every motorist, as it is used to measure tire pressure. A normally functioning pump in a VAZ 2110 should have a reading of 2.8-3.2 atm. You need to connect the pressure gauge and check what the indicator is with the engine not running, but with the fuel pump on. It must be no lower than 2.8 atm.
How to remove the fuel level sensor Priora/Granta
You will need : remove the fuel pump, prepare a flat-head screwdriver and a marker.
Removing the FLS (fuel level sensor):
- Slide the fuel module cover and disconnect the wire from the pressure regulator.
- Disconnect the block from the fuel pump by squeezing the lock with a screwdriver.
- Release the 2 FLS latches and move it along the grooves towards the cover.
- Remove the Priora FLS.
Replacing the coarse filter in the tank
Lada Priora Sedan Snezhka Logbook Replacing the support bearing
This is a more difficult job than replacing the barrel, the sump under the tank. In terms of tools, the difference is not very big, but there is a little more work. Here you will need:
- 10mm socket wrench.
- Screwdrivers (curly and regular).
- Pliers.
- A rag or clean rag.
Access to the fuel pump module is located directly in the Priora's interior. This is the hatch under the rear
seat. It rises easily, just push the latch. When access to the mounting window is open, just unscrew 2 screws and the hatch can be easily removed. And below it is the module. Place a rag around the hole. In any case, there will be residual gasoline leaks. They are bad for paint. It's better to let them end up on rags. Disconnect and move the wire connector aside. Remove the plastic fuel lines. Unscrew the 8 x 10 nuts with a socket wrench and set aside. Remove the metal rim securing the module from the studs. Remove the entire assembly.
Carefully! There is gasoline inside it! When removing it, you need to tilt it a little so that it merges, and at the same time, do not bend the lever of the Priora fuel level sensor.
Disassembling the module and replacing the filter
After dismantling the Priora unit, it is better to transfer it to a clean, preferably metal, table or workbench. And there, after draining the remaining fuel, disassemble. Almost the entire module body is made of plastic, with the exception of the fuel pump itself and some parts. It is held together mainly with latches, and therefore does not require much effort when disassembling.
First, bend the 2 antennae of the Priora fuel level sensor mount and push it up until it comes completely out of the grooves. Using a flat-head screwdriver, disconnect the return pipe and move it slightly to the side. The lower part, which houses the pump and filter, is connected to the top cover by 2 straight metal pins. On one, a spring is installed between the parts of the module. On the other, there is a release ring for fixation. Press down on the assembly cover from above, release the ring and remove it with pliers. The module cover will begin to come out. From the inside, the fuel pump is secured with 3 latches. Their tongues protrude above the side. Press them inward and remove the pump along with the filter. The filter is attached to it with a regular toothed washer, on a special pin. Simply pry it off with a flat screwdriver and remove it. When installing a new filter when replacing it, you just need to put it on and lightly tap it so that the washer locks into place. Everything can be assembled in reverse order.
Attention! All work on replacing the fuel filters of the Priora, as well as other cars, should be carried out as far as possible from open flames
Gasoline vapors can cause a fire, and with the module removed, the gas tank is practically open! Extreme caution is required!
Actions after replacing fuel filters
But this is not all over. The fact is that now, after replacing the filters, the Priora’s fuel system is empty. You shouldn’t force the starter, wasting the crankshaft. You need to do the following. Through the same bypass nipple on the nozzle frame, bleed the air.
It's better to do this together. One presses the valve, and the second turns on the ignition. But without starting! The starter should not be turned. As soon as fuel sprays out of it, release the valve and screw on the cap. Now turn off the ignition. Wait 5 seconds, and turn it on again, start it after the pump is activated. If the engine is running smoothly, turn on the gas once and turn it off. Now, the replacement of Priora filters is complete. We can go on the road.
An interesting video about replacing the fuel filter-sump on a Priora.
- How to change the cabin filter of Lada-Vesta
- How to change spark plugs on a Priora
- How to revive car wipers
- The wipers press weakly against the windshield, what should I do?
Why do you need pure gasoline?
The trick is that fuel enters the Priora cylinders through a system of electric injectors. Their inlet nozzle diameter is extremely small. Therefore, it is necessary to supply fuel that is as purified as possible. After all, debris that gets into the nozzle can not only clog the nozzle, but even damage it. And then a replacement will be needed.
How does the fuel filtration system work?
On cars like the Priora, equipped with an ECM, three stages of gasoline purification are installed:
- Coarse fuel filter.
- Fuel sump.
- Mesh in the nozzle.
Coarse fuel cleaning includes a specially shaped plastic, petrol-resistant mesh. It is attached to the Priora electric gasoline pump. It, in turn, is secured in a special glass in the gas tank. This device is called a fuel pump module. Passing through this mesh, gasoline is purified from most of the fragments that contaminate the fuel. That is, pieces of various materials.
Important! Usually this filter on the Priora is changed after 50,000 kilometers. But it is much more reliable to change it together with the sump
There is no difference between replacing fuel filters on an 8- and 16-valve Priora engine.
Second level of protection
This is the same sediment filter for Priora fuel. It is built into the gas pipeline system and is located under the bottom of the Priora, behind the gas tank. This filter is made of metal, although it has a filler inside for the finest fuel purification. In addition, it is designed inside in such a way that it condenses and does not allow any water that accidentally gets into the gasoline to pass through. It is recommended to change it after 30,000 kilometers. But practice shows that it is better when it is replaced after 15-20 thousand. It is attached to the bottom, and plastic hoses with latches are put on its pipes.
Attention! You need to follow the arrow drawn on the filter housing so as not to confuse the direction of fuel supply.
Last screen
After all cleaning, gasoline enters the Priora fuel frame. There are nozzles here that inject fuel directly into the air flow going into the cylinders. So, directly in each of them, there is a tiny mesh at the entrance. This is the last line of defense for the nozzle nozzle. Everything that could bypass the previous filters ends up here. Unfortunately, this element can no longer be replaced. This mesh can only be cleaned, or replaced along with the nozzle.