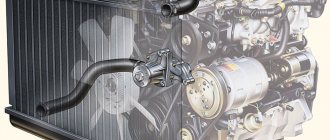
A car engine, like any internal combustion engine, heats up during operation, so it needs to be constantly cooled. Cooling systems are designed for this purpose. According to the principle of operation, they are of two types: liquid and air. The first ones are most widespread, although they are more complex structurally. “Air vents”, despite their simplicity, are much more prone to overheating.
Since all engines today operate with liquid cooling, in the engine compartment of any car there is a small container made of translucent plastic with a lid, designed for pouring antifreeze. This is the expansion tank of the engine cooling system. For different engines, the volume of the expansion tank ranges from 1.5 to 8 liters.
His purpose
What is the expansion unit used for? The fact is that any liquid increases in volume when heated. Thus, the volume of water when heated to 100°C increases by 4.5%, antifreeze and antifreeze - by up to 6%. To prevent the coolant from pouring out of the system when it is heated, an expansion tank is needed, which is a kind of buffer or compensator.
Until the middle of the last century, there were no expansion tanks under the hood, since ordinary water was used as coolant, and the role of a compensator was played by the upper radiator tank, which was not topped up “to capacity.” With the advent of ethylene glycol-based coolants (antifreeze), the coefficient of volumetric expansion of which is greater than that of water, additional expansion tanks appear so as not to enlarge the radiator.
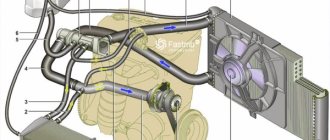
Thus, the expansion tank (EB) is designed to compensate for the volumetric expansion of the coolant as its temperature increases. The RB is located in the engine compartment so that the fluid level is approximately at the middle of the height of the tank.
In this case, the liquid in the radiator and tank is located at the same level according to the principle of communicating vessels. Since the RB is located above the radiator, the expansion tank cap is used as a filler neck, which will be discussed below.
Video description
Repairing a car's expansion tank.
Sealing
Motorists patch up minor damage. Special sealant for cars “DoneDeal” is a temporary measure to eliminate cracks. Under the influence of an aggressive coolant environment, the product quickly loses its fixing characteristics. The mass is applied to a previously cleaned and degreased surface and left for 4 hours to polymerize.
The action of epoxy adhesive is similar in characteristics to sealant. Cracks in the plastic tank are filled with a liquid composition and dried. The downside of resin is that it requires careful preparation of the working surface. The problem area is cleaned of debris, degreased with a solvent, and then the mass is applied.
Repair options Source drive2.com
Cold soldering
If you don’t have a soldering iron, use special glue to seal cracks. The fixing composition "3M DP8005" is suitable for plastic. The two-component option, due to adhesion, helps to seal polymer joints without preparation. The chemical is resistant to moisture and aggressive liquids. The high price is the only drawback of the product.
When working with plastic, motorists recommend Hosch glue. The two-component mass is intended for sealing cracks and holes in polymers. The seam retains strength and elasticity at high pressure (up to 12 atm) and low temperatures.
Having decided how to seal the expansion tank, you can begin the procedure. Before use, the surface of the plastic is cleaned of dirt, wiped with acetone, and left to dry. The liquid ingredient is applied to the damaged area. From the second bottle, the area is treated with granulate, then again with glue.
Two-component product Source tapes-store.com
The fixing solution sets within a few minutes. When the components of the composition come into contact, steam is released and the temperature rises. After drying, the tank is connected to the cooling system and liquid is poured.
When working with through cracks, the cold welding method is combined with a sealant. The outside of the damaged area is filled with glue, and an additional agent is used from the inside. The expansion tank dries for a day, then it is checked for leaks.
Design and operation
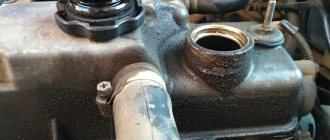
The expansion tank consists of a polypropylene body, a cover and two pipes for connecting hoses of the liquid system. Using the lower hose, the device is connected to the cooling line, the upper one serves to remove vapors and air bubbles from the system. On modern models, float coolant level sensors are often installed.
For this option, the expansion tank is equipped with another neck on top, intended for installing a sensor. Several control marks are applied on the side surface of the container, from the bottom - min to the top - max. The coolant level should be located in this interval.
How does the device work? First, a little theory. The table shows the operating temperature conditions of modern engines. As we can see, the engines operate in critical temperature conditions.
| Engine temperature, °C | Working | Short term |
| 80 — 100 | 120 — 125 | |
| Boiling point of liquids, °C (at atmospheric pressure) | water | 100 |
| antifreeze | 105 — 110 | |
| antifreeze | 120 |
To raise the bar for permissible temperature, designers increase the pressure in the coolant (more than atmospheric), due to which its boiling point increases. To do this, the system is closed hermetically and excess pressure is maintained in it. For different engines, this value ranges from 0.1 to 0.5 bar (kg/cm²).
At the same time, significant vacuum (more than 0.03 - 0.1 kg/cm²) in the free space of the expander is unacceptable, since air will be sucked into the system, which will lead to the appearance of air pockets that impede coolant circulation and, consequently, to engine overheating . Maintaining the coolant pressure at the required level is the responsibility of a special regulator located in the filler cap.
Possible problems
Proper surface cleaning is the key to successful repairs. After a long period of use, the coolant in the reservoir is difficult to wash out. Motorists often use special cleaners, washing powder or citric acid solution.
In case of extensive contamination, the expansion tank is cleaned with fine gravel. The container is filled 15% with the dry ingredient, then filled with warm liquid and dishwashing detergent. The tank is gently shaken, trying to hit all the walls. The components are drained and the interior is washed with plenty of moisture.
Possible errors during repair Source drive2.com
“Atas Dimer” helps with traces of antifreeze. Concentrated alkaline substance copes with tough dirt. To operate, 15% of the liquid introduced into the container is sufficient. The expansion tank is shaken and left to work for 10 minutes. After time, the structure is filled 50% with warm water. The walls are cleaned with a long-handled brush. After the procedure, rinse thoroughly.
After gluing, the remaining fixing agent must be removed. The fresh mass is removed as it is released with a cloth. If the seam has already polymerized, then the defects will have to be cut off with a knife. Irregularities are smoothed out with fine sandpaper.
Tank cover - two in one
So, the RB cover, in addition to its protective function, also performs the task of a pressure regulator. As stated above, the pressure inside the tank should be up to 1.1 - 1.5 kg/cm². How is this achieved?
For this purpose, two valves are mounted in the lid: safety and vacuum. The first is a spring-loaded rubber diaphragm that is pressed from the outside and releases when the pressure exceeds the force of the spring. The second consists of a rubber washer with a small spring installed inside a large one.
At operating coolant temperature, both valves are closed, the pressure in the tank does not exceed the design pressure. Since the expansion tank is hermetically sealed, the pressure increases as the temperature rises, causing the safety valve to open and release some of the air vapor, returning the valve to its previous position.
The absence of a safety mechanism would lead to coolant leaks, damaged connections, and even rupture of the cooling radiators and heater.
After stopping the engine, the liquid in the system cools and decreases in volume, which leads to a vacuum inside the tank. The result may be air leaking through the connections, which will lead to the formation of air bubbles during subsequent startup. And this can lead to overheating and engine failure.
This is where another small valve comes to the rescue - a vacuum valve. Under the influence of vacuum, it opens and equalizes the pressure in the tank with atmospheric pressure.
RB malfunctions and causes
Decrease in coolant level:
- leakage of the plastic body of the tank due to aging of the material, in particular, this was a chronic disease of the tanks of VAZ cars;
- The safety valve does not work, as a result of which increased pressure squeezes antifreeze through the joints.
Engine overheating:
- due to decreased volume of liquid due to leaks;
- The vacuum valve does not work, resulting in air appearing in the liquid (“airing”).
Visible fluid leaks:
- expansion tank is leaking;
- safety valve malfunction.
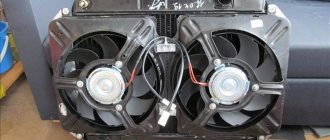
Checking the functionality of the lid
Simplified test: are the valves working?
We start the engine and, being careful, unscrew the cap: if you hear the hissing sound of a deflated chamber, the bypass valve is working (however, whether it is correct or not is unknown).
After removing the cover, squeeze any hose of the cooling system with your hand. Continuing to hold it in this way, put the cover in place. If it then regains its shape, the vacuum appears to have been filled. But if, even before starting the engine, the hoses look like they are flattened, the vacuum valve is definitely not working.
More accurately, the safety valve can be checked using a pump and pressure gauge. We connect the pump to the lower supply pipe of the tank, and plug the upper one using improvised means: a bolt or a cylindrical drill that fits tightly into the supply hose.
We create pressure with the pump and control the moment when the safety valve is activated (hissing sound). The pressure value recorded on the device scale shows the actual response pressure.
If the safety valve is too tight, it can be repaired. Why spend extra money when it is enough to shorten the pressure spring by one or two turns, and the spring will become softer. The assembly is easy to disassemble, the main thing is not to lose small parts. And don't overdo it by biting off the coils. Do this little by little and check the results.
Adding coolant
The liquid level in the tank is controlled by two extreme marks: min and max. How to properly add coolant to the expansion tank:
- Check the fluid level on a cold or cooled engine (let it cool thoroughly).
- Open the RB cover (if the engine is not cool enough, grab the cover with a rag) and slowly turn it until steam comes out.
- Add liquid without reaching the max mark.
- Close the lid and start the engine with the heating off. Warm up the engine for about 3 minutes at 2000 rpm and wait until the forced cooling fan turns on.
- Check the coolant level and add it to the max mark.
A little advice: monitor the external condition of the tank and all elements of the cooling system. Fluid leaks in the engine compartment often indicate a malfunction of the expansion tank, primarily the cap.
As follows from what has been written, it actually depends on such a seemingly secondary unit as the expansion tank of the cooling system how stably the engine of your car will operate.
Troubleshooting methods
The leak in the plastic tank is repaired. In terms of durability, the design is inferior to new parts, although it will allow you to delay replacement. Let's look in detail at how to seal the expansion tank.
Sealing
Holes in plastic containers are eliminated using high temperature and reinforcing elements. During soldering, the polymer softens, acquiring the desired shape. The reinforcing structure increases the bond strength after hardening.
Soldering is considered a professional repair method. The procedure requires tools:
- soldering iron;
- metal scissors;
- a piece of fine mesh.