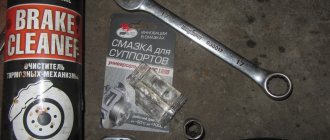
Hello, in this article you will learn how to replace brake hoses on a VAZ 2101, 2102, 2103, 2104, 2105, 2106, 2107 in a garage. Brake hoses are an integral part of the brake system, they are a flexible connection between the brake pipe and the caliper. Hoses are constantly exposed to various influences. When braking, a huge amount of pressure is generated inside the hose, which is necessary to move the brake cylinder, which moves the brake pads. From the outside, the hose is exposed to dirt, snow, sand, water, and at the same time, it also bends all the time while the wheels rotate. As we can see, brake hoses are constantly in difficult conditions, so from time to time they need to be inspected for cracks, because if cracks appear, they can disperse under pressure and brake fluid will flow out, which means that the effectiveness of the braking system will sharply deteriorate and in a short time the brakes will fail altogether. To replace brake hoses you will need: pliers, open-end wrenches 10, 14 and 17. The cost of brake hoses on the automobile market starts from 300 rubles, but it is better to buy better hoses.
First of all, jack up the car and remove the wheel. Then we take pliers and remove the locking plate, it is located at the end of the brake hose
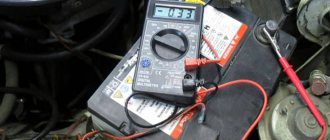
Next, use a 17 wrench to hold the brake hose, and use a 10 wrench to unscrew the brake pipe (after unscrewing, brake fluid will flow from the tube, plug it, for example, the cap from the fitting for bleeding the brake system)
How to replace the speedometer cable on a VAZ 2101-VAZ 2107?
Note! The brake system has circuits, on the classic they are located transverse to each other, that is, the rear brake circuit (Both rear wheels) and the front brake circuit (Both front wheels), as we said above, if the rear circuit hose breaks, for example, then both the rear wheels stop braking (the circuit completely fails) and vice versa, but we’re not talking about that, we want to say a few words about pumping the brakes, when it comes to the brake system, pumping the brakes is always affected, for pumping you need brake fluid, so stock up on it in advance , also take into account the very contours of the brake system, based on them, when working with the front part (For example, you are changing the brake hoses in the front part), bleed only it, when working with the rear part (For example, you are about to change the rear brake hose), bleed the rear ones You don’t even have to get the wheels close to the front end, don’t forget about it!
1. Let’s start with the front brake hoses, even if you have them intact and do not need to be replaced, you don’t need to immediately scroll further and look for information on replacing the rear brake hose (It’s given in paragraph 2), because the hoses (both front and rear) ) are replaced in the same way and after reading this paragraph, you will know what we did not indicate in paragraph 2, well, let's start! To replace the hose at the front, remove the wheel (How to remove a wheel, read the article: “Replacing wheels in a car”) and use a wrench to unscrew the bolt that secures the hose to the caliper (see photo below), then remove the bolt and there will be copper washers on it (Two, indicated by red arrows), they must be replaced with new ones, they play the role of some kind of seals, and when installing old ones (Compressed washers), it is possible that brake fluid will flow through the place where the hose is connected to the caliper.
Note! During operation, the brake fluid will still slightly pour out of the brake reservoir so that this is not significant (Be sure to do this operation), while unscrewing the bolt that secures the brake hose to the caliper, pinch it as shown in photo 1, thereby when the hose is disconnected, a small part of the brake fluid will pour out of it, all of it will not pour out since the hose will be pinched, after which you will need to unscrew the brake hose where it is attached to the brake pipe (This is the other end of the hose, for more details on how to disconnect it, read in point 2 below) and after that, you will simply need to disconnect the hose, but here too there is an incident, when the hose is disconnected, brake fluid will flow out of the tube, to prevent this from happening, plug the tube with something, for example, a bolt of a suitable diameter or a plug, See photo 2 for more details! (If you don’t need this, to pinch the hose, to plug the hole, then just take a rubber bulb and use it to take all the brake fluid from the brake reservoir, but after replacing the hoses, in this case you will have to bleed all 4 wheels, and by the way, this fluid don’t pour it back, it will already be spoiled)
2. We proceed to removing the rear brake hose, it is attached in exactly the same way as the front one, only in the place where the front hose is bolted to the caliper, the rear one is screwed on with a nut (see small photo), but at the other end, the brake hose in exactly the same way as the front one is attached (in paragraph 1 we did not describe the process of disconnecting the hose from the brake pipe, but only described how to disconnect it from the caliper), so in order to disconnect the hose from the brake pipe, you will need to unscrew it (Red arrow) but in While you are turning the tube with a wrench, hold the hose nut with the other (Indicated by a blue arrow) and as soon as the tube is slightly loosened, use pliers to remove the locking bracket (Indicated by a green arrow) and disconnect the brake hose from the tube; in the reverse order, the hoses are connected exactly like this when the work is completed, fill in the brake fluid and bleed the brakes in the car (How to bleed the brakes, read the article: “Bleeding the brake system on a classic”), then make sure that the fluid is not leaking from anywhere, and if possible, fix the problem.
Additional video clip: Watch two videos that clearly show the process of replacing the front brake hoses and the rear hose (about the front hoses, the top video, about the rear, the last one).
Purpose of flexible pipes
All drivers know how the brake system works on a VAZ 2107 car. The principle of its operation is simple, and is implemented through a set of parts that create the system. One of the important parts is a short flexible rubber hose (piping) connecting a metal tube (coming from the main brake cylinder) to the working cylinders (calipers) of each wheel. There are a total of three hoses installed on the machine, consisting of a rubber sheath, which ensures flexibility.
Why can't a car design do without rubber hoses in the brake system? The wheels are connected to the body through a suspension that is designed to smooth out vibrations. If you do not use rubber hoses, then under the influence of constant loads experienced by the wheels, their accelerated damage would occur.
For the manufacture of flexible hoses, reinforced rubber is used, which is highly resistant to moisture and oils. The front wheels use two flexible hoses, while the rear wheels only have one. On the front wheels they are connected directly to the calipers, but their rear design is somewhat different. Using a flexible connector, the metal tube running along the rear axle to both rear cylinders is connected to the tube on the car body.
This is interesting! The design of the VAZ 2107 brake system also contains rubber hoses connecting the expansion tank to the main cylinder, but they are rarely changed, since they are practically not tested.
Device design
There is nothing complicated in the design of a flexible connector, as it might seem at first glance, but it is this element of the system that is subject to heavy loads. After all, this connection not only experiences constant vibrations when the car moves, but also heavy loads in the form of high pressure. To prevent the hose from causing an accident, they must be changed regularly, without waiting for complete wear. On average, their service life does not exceed 3-4 years.
Before identifying the need to replace the device, let's consider its components:
- Reinforced rubber - base.
- Fittings that have two crimping belts, which are made specifically to prevent damage to the connection when pressure increases. At one end the fitting has an internal thread, and the other for the front wheels has an eyelet with a hole, and for the rear wheels there is a conical tip with a thread.
The weakest link of such a connector is the rubber base, which, under the influence of various factors, becomes unusable.
When to change hoses
Many drivers wonder how often and when they need to change rubber connectors. It all depends on the nature of your driving and how often you use the car. If the driver rarely uses the brake pedal, the hoses can last more than five years. However, this does not mean at all that if the machine is not in use, then the connectors will not need to be changed. Eyeliners are negatively affected not only from the inside (from high pressure), but also from the outside when the material is exposed to water, dirt, sunlight, and chemicals.
What brake hoses should I buy and what spare parts should I buy to replace the brake hoses?
Brake hoses have proven themselves well , they are of good quality and a little expensive. If you want to save a little, you can buy brake hoses produced by DAAZ , which are also of good quality.
You should also buy copper washers 1.5 mm thick, brake fluid, which is necessary for bleeding the brake system. I recommend buying brake fluid DOT 4 400 grams.
VESKO-TRANS.RU
AutoNews / Reviews / Tests
- Home
- Auto garage
- Replacing Piston Rings for VAZ 2107
Replacing Piston Rings for VAZ 2107
Replacing pistons and piston rings VAZ 2107
Replacing piston rings and pistons on a VAZ 2107 is done in cases where the gap between the surface of the ring, piston and the working surface of the cylinder increases, which in turn is accompanied by an increase in oil consumption, a decrease in engine power, and also an increase in fuel consumption. Typically, wear of the pistons is accompanied by wear of the compression rings, and it may also be necessary to bore the cylinder block. Major repairs with block boring must be carried out in a special workshop, because it is unrealistic to carry out such work without special abilities and experience; the most that can be done is to remove and replace the pistons and piston rings.
To replace piston rings and pistons, you need to drive the car into a pit; you will need a standard set of tools. The order of repair work is as follows:
- Drain the engine oil from the engine crankcase by unscrewing the drain plug on the pan. Also remove the pan by unscrewing the bolts securing it with a 10mm socket wrench.
- Remove the cylinder head, having previously removed the air filter, the cylinder head cover and unscrewing the nuts securing the head, remove it from the block.
- We remove the pistons alternately, starting from the first cylinder. We unscrew the nuts securing the connecting rod caps, remove the steel-aluminum liner from the cap and push the piston assembly with the connecting rod upward.
- We remove the piston and connecting rod assembly and secure it in a vice. Using a screwdriver, we remove two compression rings and one oil scraper ring (if the pistons are removed to replace the rings, if the pistons themselves need to be replaced, then there is no need to remove the rings). Using an iron mandrel of suitable diameter, knock out the pin and remove the piston.
Replacing the piston after overheating of a VAZ (classic). Do it yourself!
The video turned out to be very long! Anyone who wants to find out a lot from what is not written in more than one book...
Part 5 Lada Overhaul of VAZ 2107 (1600) Preparation of piston rings for installation
Showed how you can remove and disassemble the engine at home from a VAZ
classic, without winch. I tried...
This completes the disassembly process. Now we need to pick up new pistons. Take the new piston and stick it into the cylinder, the regular piston should slowly lower under its own weight. If the piston fails or does not move, then it does not fit. Also, when selecting, keep in mind that the internal diameter of the cylinder will initially be somewhat smaller, so make the assessment here and there in the middle part of the cylinder.
The next step is to select the rings. Insert the ring into the cylinder and lower it slightly downward, slightly above its middle part. The gap between the ends should be less than 0.2mm or two blades wide.
Next, you need to select a pin for the new piston. Lubricate your finger with engine oil and insert it into the piston. It should be inserted with the usual pressure of a huge finger and should not fall out when positioned vertically. The finger should not fit freely into the connecting rod head; it will have to be seated on the hot side.
Once all the elements have been selected, you can begin assembly. First we assemble the piston and connecting rod with a pin. To press the pin, you will need a special mandrel and a gas burner to heat the connecting rod head. The assembly order looks like this:
- Insert the retaining ring into the piston boss on one side.
- Clamp the connecting rod in a vice, heat its head to 240V°, put on the piston and insert a pin using a mandrel, which will simply fit into the heated head. Push your finger until it rests against the locking ring. Install the second stopper.
At the final stage of assembly, install two compression rings and an oil scraper ring. Lubricate the rings, their grooves and the connecting rod with engine oil. Push the piston into the cylinder from above and secure the connecting rod to the crankshaft. At this point, the repair work on removing and replacing pistons and piston rings of the VAZ 2107 has been completed.
How to change front brake hoses on a VAZ 2107
Good afternoon dear friends. The brake system of any car includes brake lines and rubber hoses. The latter have the ability to “crack” during operation, losing their tightness. If there is no tightness in the system, brake fluid leaks out, which means there will be no effective brakes, resulting in an accident or expensive body repairs.
To avoid this, you need to monitor the condition of the brake hoses. If cracks and breaks are observed on their surface, replace them urgently. Today we will learn how to independently change the front brake hoses on a VAZ 2107 , and a specialist will show on video how to do it correctly, reveal all the secrets and nuances of replacing them using the example of a Lada 2106.
Let's sum it up
Tuning a car's brake system is a very responsible job. Unsuccessful modernization of the appearance of a vehicle or its interior will only affect the unpresentable appearance of the car. A mistake in upgrading your brake system could cost you or other road users your life. Take responsibility for modifications that affect the vehicle's braking system. Buy only certified high-quality spare parts from reputable manufacturers. Proceed to independently improve the brake system of your car only if you are completely confident in your abilities and capabilities.
vote
Article rating
Rear Brake Hose Installation
Further installation should be performed in the reverse order of disassembly.
Welcome, friends, to the DIY car repair website. The importance of the braking system is beyond doubt. Not only the length of the braking distance, but also life depends on the quality of its work.
That is why it is so important to check the main components of the system, top up brake fluid in a timely manner, change brake pads and discs.
Don’t forget about checking the “circulatory system” of the brakes - special hoses.
It is with their help that the working fluid is supplied to the main components. Faulty or damaged tubes can lead to brake failure.
Further consequences are unpredictable. To eliminate such problems, it is important to know when to change the brake hose and how to do it correctly.
Work procedure
Chevrolet Lacetti CDIX Logbook Replacing rear brake discs and pads
Rear brake pipes VAZ 2109
Before you take action, you need to prepare first. During the preparatory work, it is necessary to clean the surface of the fitting tubes from contamination.
You also need to apply a special compound to all threaded connections, this will make it much easier to unscrew the nuts. In addition, you need to prepare a wrench, spare brake fluid for topping up, a small container to drain the remaining fluid from the system and a suitable vinyl tube.
For convenient repairs, it is recommended to install the machine either on an overpass or on a pit for inspection:
- First, use a Phillips screwdriver to unscrew two self-tapping screws that secure the tube to the body of the vase.
- Using a suitable wrench, unscrew the 2 fittings through which the tubes are attached to the hose with the regulator.
- The tube is removed.
- After all necessary work has been carried out, the tubes are installed in the opposite order to dismantling.
- Add brake fluid.
- The quality of repaired brakes is checked.
On newer VAZ models, the tubes are first unscrewed from the main cylinder and brake hose, only after that the holes are plugged. In this case, you will have to unscrew the 3 fastening nuts and remove the plastic covering.
Next, dismantle the metal plates and disconnect the necessary tubes from the clamps; if they are damaged, they will need to be replaced.
Note! New elements must be secured in the opposite order. To check the quality of work, it is necessary to bleed the system. It must be done to eliminate excess air.
Replace the rear brake pipe of a VAZ 2109
Signs of air penetration into the system are considered to be increased travel and softened sagging of the brake pedal when pressed.
It is necessary to follow a certain sequence of bleeding the brakes:
In addition to changing the brake line, the brake hose may also need to be replaced.
Required Tools
- Special split wrench “8/10” for unscrewing brake pipes
- Open-end wrench "17"
- Socket wrenches for “14” and “10” or heads for the same bolts
- Pliers or round nose pliers
To replace the front brake hoses on a classic, you will need a narrow metal brush to clean the bolted joints from dirt and a rubber cap to “plug” the metal tube. This cap can be taken from the bleeder fitting of the working brake cylinder. We'll talk about how to use it below. I advise you to buy new copper sealing washers in the amount of 4 pieces.
How to repair brake pipes
This process requires the car enthusiast to have extensive locksmith skills and the ability to use special tools. Repairs are carried out in cases where it is not possible to replace the damaged line; it involves saving money on the purchase of a new pipe system and extends the service life of the old one.
To carry out repairs you must:
1. Unscrew the damaged tube from the cylinder or brake caliper.
2. After disconnecting, it is necessary to cut off the damaged area using a pipe cutter.
3. Clamp the tube 50 millimeters from the edge of the cut and chamfer the edge of the tube using a drill.
4. Remove all that remains of the chips and insert a fitting intended for connecting the tube to the brake operating mechanism into the cut area.
5. Insert the end of the tube into the special equipment and flare it. The main line that has undergone repairs must be purged with compressed air. And only after this is it installed with a working mechanism or another pipeline system using an adapter.
As for the length of the tube, this parameter depends on the car model. On some cars, the brake pipes have a reserve that allows you to shorten the pipe and reconnect it to the working mechanism. The metal from which the brake tube is made is flexible, so there should not be any difficulties with its position.
Features of the braking system of classic Lada cars
The first cars of the model in question rolled off the assembly line about 40 years ago, and therefore many of its components seem somewhat exotic to modern car enthusiasts. For this reason, before pumping the brakes yourself, it would be a good idea to become more familiar with their design specifics. Without understanding the principles of operation, it is impossible to provide competent maintenance, much less repair of any unit.
So, first of all, it should be said that you intend to bleed a hydraulic, dual-circuit brake system. This is exactly what was installed on all Zhigulis, including 2106.
The bottom line is that the hydraulics are divided into two completely unrelated units. In general, this scheme is used on many cars in one variation or another. The Italian prototype of the Zhiguli had parallel contours, that is, the blocking was carried out along the axes - front and rear.
This measure is designed to increase the safety level of 2106. In the event that one working cylinder fails, stopping is ensured by the second. It is quite convenient and, what is important, very reliable.
The 2106 brake system contains a special fluid that circulates in sealed lines. Its composition promotes the transfer of kinetic impulse without loss of its intensity.
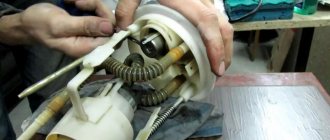
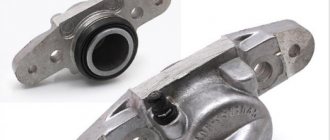
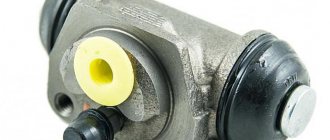
Before us is the brake cylinder and new cuffs.
In order to change the cuffs you need to disassemble the cylinder. On the cylinder itself we see the main bolt, 2 bolts that act as a retainer for the pistons and a boot. It was from this that the brake fluid was leaking. The side where the boot is located, the cylinder is attached to the vacuum booster and there is fluid leaking between the brake cylinder and the booster. At the top we see 2 pipes for the working cylinders, as well as a hole for the front and rear brakes.
- In order to disassemble, you need to unscrew the main bolt and two bolts - the clamp. We disassemble with a key 12.
- We unscrew the main bolt, inside of which there is a spring and a seal. Brake fluid may leak.
- We remove the boot, press on the place where the boot was, and all the filling of the cylinder comes out from the opposite side. Having taken everything out of it, we will change the cuffs. The cuffs are easy to remove, the main thing is not to confuse the new and the old.
So, we have freed the pistons from the cuffs.
How to change a brake hose on a VAZ 2106
Hello, in this article you will learn how to replace brake hoses on a VAZ 2101, 2102, 2103, 2104, 2105, 2106, 2107 in a garage. Brake hoses are an integral part of the brake system, they are a flexible connection between the brake pipe and the caliper. Hoses are constantly exposed to various influences. When braking, a huge amount of pressure is generated inside the hose, which is necessary to move the brake cylinder, which moves the brake pads. From the outside, the hose is exposed to dirt, snow, sand, water, and at the same time, it also bends all the time while the wheels rotate. As we can see, brake hoses are constantly in difficult conditions, so from time to time they need to be inspected for cracks, because if cracks appear, they can disperse under pressure and brake fluid will flow out, which means that the effectiveness of the braking system will sharply deteriorate and in a short time the brakes will fail altogether. To replace brake hoses you will need: pliers, open-end wrenches 10, 14 and 17. The cost of brake hoses on the automobile market starts from 300 rubles, but it is better to buy better hoses.
First of all, jack up the car and remove the wheel. Then we take pliers and remove the locking plate, it is located at the end of the brake hose
Next, use a 17 wrench to hold the brake hose, and use a 10 wrench to unscrew the brake pipe (after unscrewing, brake fluid will flow from the tube, plug it, for example, the cap from the fitting for bleeding the brake system)
Now you need to unscrew the locking plate fastenings on the brake caliper
The next step is to unscrew the bolt securing the second end of the brake hose using a 14mm wrench
We do the same on the other side; if necessary, install the brake hose in the reverse order. Since air has entered the brake system, it will need to be bled.
We hang and remove the front wheel.
Auto repair school - Do-it-yourself car repair
Jun 14, 2022 VAZ 2101, VAZ 2102, VAZ 2105, VAZ 2106, VAZ 2107, Zhiguli, Classics by admin
Let's return to our immortal and beloved Classics ! In this article we will look at the process of replacing the front brake hose on VAZ-2101, VAZ-2102, VAZ-2104, VAZ-2105, VAZ-2106, VAZ-2107, Classic cars . I hope that it will be useful to you and after reading it, you will be able (or will have information) on how to replace the front brake hoses yourself. I, in turn, will try to describe the replacement process in as much detail as possible and warn you about possible problems that may arise during operation. Pay special attention to the list of necessary tools and the quality of purchased spare parts. In general, please…..
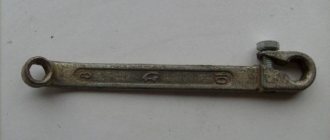
Let's start, perhaps, with the tool that you will need to replace the front brake hose on a VAZ-2101, VAZ-2102, VAZ-2104, VAZ-2105, VAZ-2106, VAZ-2107, Classic car : 14mm socket wrench, socket wrench for 10, pliers, an open-end wrench for 17, a rubber cap from the bleeder fitting (after disconnecting the tube and hose, it will be necessary to “plug” the brake pipe to prevent brake fluid leakage), special keys for unscrewing the brake fittings for 10 - split or crimped (photo 1).
The presence of at least one special key is necessary. Without it, in 9 out of 10 cases, you will not unscrew the brake pipe fitting!
What you should pay attention to when purchasing spare parts... First, we buy brake hoses from “Balakovo” or “Dimitrovgrad” production. Hoses from these manufacturers, although not cheap, are of high quality and durable. As they say - time-tested.
Included with the front brake hose are two new copper sealing washers. When purchasing washers, you should pay attention to their thickness. According to the standard, the thickness should be 1.5 mm . But unscrupulous sellers may sell washers of thinner thickness (see photos 2 and 3), using which you will not be able to tightly tighten the brake hose bolt.
We can also advise you to buy a new brake hose mounting bolt. This is not necessary, but believe me, this cheap detail can save quite a lot of nerves. Since the old bolts are generally very stretched (photo 4) and even with new copper sealing washers, such a bolt will have to be pulled long and hard until there is no brake fluid leakage (and don’t forget that the threads in an aluminum brake cylinder are very easy to break).
We're done with the tools and spare parts. Now let's move on to a step-by-step description of replacing the front brake hose on VAZ-2101, VAZ-2102, VAZ-2104, VAZ-2105, VAZ-2106, VAZ-2107, Classic cars :
1. Use pliers to pull out the fixing bracket (photo 5)
2. Using an open-end wrench size 17 and a special clamp wrench 10, unscrew the brake pipe fitting (photo 6). We disconnect the hose and brake pipe, and put a rubber cap on the end of the pipe.
3. Using a 10 mm spanner, unscrew the fastening bolt securing the brake hose bracket (photo 7), if you have one, of course))).
4. Using a 14 mm socket wrench, unscrew the bolt securing the brake hose to the brake cylinder (photo 8). We remove traces of dirt and sand from the brake cylinder.
We carry out assembly in reverse order. We install the brake hose as shown in photo 9, with the bevel down. We install two sealing copper washers. When tightening the brake hose and tube, tighten the tube fitting and do not twist the hose, thereby preventing the brake hose from twisting.
When using an article or photographs, an active direct hyperlink to the website www.avtorem.info is required!
Did you like the article? Share it on your page!
Installation nuances
- The fitting of the new hose on the caliper side must be screwed on with a special cut-out downwards. Otherwise, it may rest against the brake pipe of the cylinder and break it.
- If, when dismantling the old front brake hose, the tube fitting was rotated along with the tube, then installation of a new one begins by screwing it to the iron tube. We fix it with a split wrench, and with an open-end wrench we twist the hose and tighten it.
- We tighten all threaded connections carefully so as not to strip the threads. We clearly get into it and try. They should twist without much effort. If you feel that it is difficult to “go”, then separate them and try to get clearly into the thread again.
- You need to tighten everything without any hassle, the threads are small, and the metal is fragile, you can tear it off and then nothing will be able to eliminate the brake fluid leak unless you pull the fittings and bolts.