Every car owner is careful about his car. It is imperative to monitor the operation of many mechanisms, and in particular the transmission. The VAZ 2109 gearbox is very durable and unpretentious in its maintenance, but still, there are some subtleties that need to be taken into account when working with it. The VAZ 21099 gearbox is a mechanical system that performs its actions with the participation of the clutch pedal. Assembling and disassembling this mechanism can be done independently, but you need to have some skills in order not to cause damage.
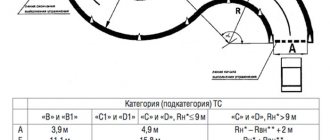
Checkpoint diagram
Designations
The VAZ 2108 gearbox is practically no different from the subsequent model. The repaired system does not make unnecessary noise, all switchings are smooth, the car drives without jerking, at the required speed.
The main thing that is needed is to constantly monitor its condition, control work processes and not subject it to strong stress. The VAZ 2108 gearbox is reliable, as well as low maintenance costs, since Russian parts are much more affordable than foreign ones.
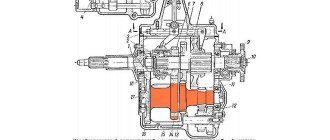
Gearbox operation diagram
To improve vehicle performance and reduce fuel consumption in manual manual transmissions, first of all, the rational selection of the number of gears, the size of gear ratios, as well as improving the quality of the gear shift process are taken into account.
At the same time, the latter is given great importance, since smooth gear shifting ensures increased reliability of vehicle components and reduced driver fatigue. To achieve this, all forward gears in the gearbox are synchronized. The operating principle of the synchronizer is based on equalizing the rotation speeds of the secondary shaft and the freely rotating constant mesh gears on it. The figure on the right shows the principle of operation of the synchronizer when engaging fourth gear in the following clutch position:
I. When the clutch 38 is in the neutral position, the locking blocks 7 of the retainer are in the center of the grooves of the hub 37 and do not act on the blocking rings 36. There is a uniform lateral gap “b” between the protrusions A of the blocking ring and the grooves of the hub, and between the projections A and the blocking rings 7 there is a gap “ s" (see "Operation of the synchronizer").
II. When the fourth gear is engaged, the sliding clutch, moving towards gear 39, carries with it the crackers 7, which rest against the protrusions A of the blocking ring, i.e. the gap “c” is selected. With further movement of the clutch, the blocking rings press the blocking ring against the conical surface of the synchronizer ring of gear 39. Under the influence of friction forces between the conical surfaces of the blocking ring and the synchronizer ring and the inertia of the synchronized masses, the blocking ring rotates relative to the hub until the ring protrusions touch the side walls of the hub grooves, i.e. . the gap “b” is selected, and on the other side it is doubled.
III. Due to the circumferential displacement of the blocking ring by 1/4 step, the side bevels of the sliding clutch rest against the side bevels of the blocking ring, and further axial movement of the sliding clutch 38 stops until the angular speeds of the fourth gear gear 39 and the secondary shaft 15 are equalized. At this moment the friction of the friction cones of the blocking ring and gear 39 stops, as a result of which the force pressing the beveled surfaces of the teeth of the clutch and ring disappears.
IV. The released clutch is easily connected to the crown of the blocking ring, and then to the synchronizer ring, connecting it to the hub.
When the gear is fully engaged, the gaps between the cotters and protrusions A of the blocking ring and the grooves of the hub are restored.
The figure on the left shows torque transmission diagrams when all gears are engaged.
With the gear shift lever in neutral, the engine running and the clutch engaged, torque from the engine is transmitted through the clutch to the input shaft 13 of the gearbox. From the drive gears of the primary shaft, torque is transmitted to the gears of the same name on the secondary shaft, which, without having a direct connection with the secondary shaft, will rotate freely on it. Torque is not transmitted to the main gear and differential.
When 1st gear is engaged, the synchronizer sliding clutch 33, moving towards gear 32, connects the synchronizer ring of the 1st gear gear with the synchronizer hub, rigidly connected to the secondary shaft. The torque from gear 32 is transmitted through the clutch to the synchronizer hub and from it to the secondary shaft. Through gears 14 and 22, torque is transmitted to the differential. The differential box, rotating together with the axis of the satellites, distributes torque through the teeth of the satellites and semi-axial gears to the front wheel drives.
When the second gear is engaged, the clutch 33 connects the driven gear 34 of the second gear with the synchronizer hub, and the torque from gear 34 is transmitted through the sliding clutch 33 to the synchronizer hub and to the secondary shaft.
Third and fourth gears are activated by another synchronizer. When engaging third gear, clutch 38 connects gear 35 to the synchronizer hub, and when engaging fourth gear, gear 39 connects to the hub of the same synchronizer. The torque is transmitted through the connected gear and hub to the secondary shaft. Similarly, the fifth gear synchronizer clutch 41 connects gear 40 to the synchronizer hub, and through it to the secondary shaft.
Reverse gear is engaged when the car is completely stopped. When selecting reverse gear, move the gear shift lever to the left all the way with increased resistance and forward. In this case, the reverse intermediate gear 29 connects the reverse drive gear of the input shaft with the ring gear of the sliding clutch 33 of the synchronizer of 1st and 2nd gears. Due to the intermediate gear, the transmitted torque changes its direction. Simultaneously with engaging the reverse gear, the reverse light turns on, since the fork 27 presses the reverse switch rod, and the lamp circuit is connected to the current source.
A clear separation of the lines of III-IV gears and reverse is achieved by a spring clamp 44 (see Fig. 17), which ensures a sharp increase in the force for selecting reverse gear at the beginning and a drop at the end of the selection stroke.
Gearbox parts are lubricated by spraying oil onto the gear rims. To improve the lubrication conditions for the needle bearings of the secondary shaft gears, radial holes are drilled in the gears between the ring gears through which oil is supplied to the bearings.
First speed is not fixed
When starting to move from a standstill at first speed, especially from difficult ground such as sand and snow, you have to hold the gear shift lever, since it does not hold on its own, the gear is switched to neutral. There can be three reasons for this failure:
- The link is loose and does not fix the fork;
- gear and coupling wear;
- displacement of the engine on the mounts and knocking out the box.
The condition of the fasteners of all parts and assemblies should be completely checked. The gearbox is rigidly fixed to the engine. However, when the motor slides on cushions, the first speed may be knocked out. Tighten all bolts and check the rigidity of the mounting on the body. You can do this kind of work yourself.
Fasten the link more rigidly to the shift lever, select the backlash, because it is responsible for fixing the lever in the desired position. To do this, you need to put the car in a pit. Open the lid and check
Pay special attention to the condition of the gearing
When worn, gears can slip and jump out without transmitting torque. When you press the lever with your hand, the clutch adheres forcefully and engagement occurs.
New box
There are problems when the car is picked up from a service station, but the gearbox of the VAZ 21093 does not engage the speed. At the same time, when the engine is not running, the shift lever moves smoothly, without a crack. As soon as you start the car, the gears stop shifting. First of all, check the movement of the gear and yoke along the splines - along the axis of the shaft
Since you have opened the box, pay attention to the position of the driven disk, whether it is installed correctly
If malfunctions are discovered shortly after servicing the car at a service center, you should not tinker with it yourself. Send your car back and let the locksmiths find and fix their problems themselves. Remember that you do not have to pay for reworking low-quality repairs.
design features of the gearbox of cars VAZ 2108, VAZ 2109, VAZ 21099
Gearbox design features
Depending on the vehicle configuration, a four- or five-speed gearbox can be installed, combined with a differential and final drive, the gear ratio of which can have several values (see “Technical characteristics of vehicles”). The input shaft 23 (Fig. 5.7) is made in the form of a block of drive gears, the drive gears are in constant engagement with the driven gears of all forward gears. The drive gears are located on needle bearings on the secondary shaft 33. In addition to them, two synchronizers are installed on the secondary shaft of the gearbox. The main gear drive gear is made together with the secondary shaft. The differential is two-satellite. The preload in the differential bearings is adjusted by selecting the thickness of the ring 4. The driven gear 34 of the main gear is attached to the differential box flange. The gearbox control drive consists of gear shift lever 38 (Fig. 5.8), ball joint 36, rod 34, gear shift lever 19 and gear selection and shift mechanisms. A lever 20 is attached to the inner end of the rod 19, which acts on the three-arm lever 11 of the gear shift mechanism. This mechanism is made as a separate unit and is attached to the plane of the clutch housing 23. Two axes are fixed in housing 1 (Fig. 5.9) of the gear shift mechanism. On axis 4 there is a three-arm gear shift lever, two locking brackets 8 and 13 and a bushing 12. Another axis 3 passes through the hole in the hub of the locking brackets, securing them from turning. The arm of the gearshift lever 2 is used to engage forward gears, the arm of the lever 11 is used to engage reverse gear, and the third arm is used by lever 20 (see Fig. 5.8) of gearshift lever 19. A lock 9 is mounted in the hub of the gear shift lever (see Fig. 5.9). A fork 10 for engaging reverse gear is installed on axle 7.
Rice. 5.9. Gear shift mechanism:
1 — gear shift mechanism housing; 2 — gear shift lever (forward); 3 — guide axis of locking brackets; 4 — gear shift lever axis; 5 - spring; 6 — retaining ring; 7 — reverse fork axis; 8.13 — locking brackets; 9 — gear shift lever lock; 10 — reverse fork; 11 — gear shift lever (reverse); 12 - thrust bushing For a five-speed gearbox, the primary and secondary shafts at the exit from the crankcase are extended. On this part of the shafts there are drive 8 (Fig. 5.10) and driven 2 gears of the fifth gear and its synchronizer 3. For a five-speed gearbox, bushing 12 (see Fig. 5.9) is not installed in the gear shift mechanism. Gearboxes are available with different final drive ratios. To distinguish the secondary shafts, grooves are machined on their gear rims: two on the left (the shaft crown is located to the right of the observer) - for a seventeen-tooth rim, one on the left - for a sixteen-tooth rim, one on the right - for a fifteen-tooth rim. The driven gears of the final drive are marked with a gear ratio (for example, 65/15). To distinguish gearboxes by their final drive ratios, they are marked with paint. The marking is applied to the upper part of the gearbox housing: 01 - for gear ratio 3.9; 02 - for gear ratio 4.1; 03 - for gear ratio 3.7; 00 - for gear ratio 4.1 five-speed gearbox.
Replacing a component such as oil
For the VAZ 2109 car to function properly, its systems and components must be coated with oil. In the case of the VAZ 2109 car, the manufacturer does not indicate the exact characteristics of such an element as oil, so you can use both engine and transmission oil. The following recommendations can be given here: if the VAZ 2109 car mainly drives around a big city, then preference should be given to this type of motor oil, and if the car is driven on the highway, then gear oil is quite suitable. Also, when pouring oil into the box of a VAZ 2109, you need to pour a little more oil than it should be, you shouldn’t skimp. This approach will allow covering all parts of the system, even those located at the exit from the crankcase.
Useful tips
It is extremely important to monitor the serviceability of the gearbox, and if signs of breakdown are detected, fix them immediately. Do it yourself or with the help of a car service - this is your personal decision.
When operating a car in city conditions, you have to change gears more often. Therefore, it is recommended to use motor oil here. This ensures that the synchronizers remain effective longer. Transmission oil is better suited for highways, increasing the life of bearings and gears, although the synchronizer lasts less.
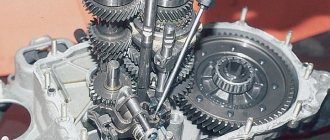
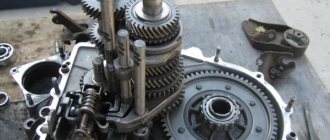
Device
To understand the essence of repairing, disassembling and assembling a gearbox, first of all you need to get acquainted with its structure. In the case of the VAZ 2109, the box structure is as follows:
- On the input shaft there is a block of drive gears that are in constant mesh with the driven gears of the gears when moving forward;
- The second shaft has driven gears with needle bearings. There is also a pair of synchronizers located there;
- The secondary shaft is created together with the drive gear of the main transmission;
- The driven gear of the main gear is attached to the flange of the two-pinion differential box;
- Differential bearings are always mounted with interference, which is adjusted by selecting rings of different thicknesses.
Backstage
If the gearbox on a VAZ-2109 is ringing, don’t be upset. All owners of "nines" have this problem. Moreover, the rocker rings both on “killed” and on relatively fresh cars. The AvtoVAZ representative office itself is aware of this defect. And vibration occurs due to the incorrect location of the support points of the internal combustion engine and the gearbox. As a result, the nodes vibrate, and the ringing is transmitted to all other parts, including the slide. Some solve this problem by installing an o-ring in the rocker area, others get used to it and drive like that, with a ringing sound.
Malfunctions and their elimination
Gearbox repair largely depends on the nature and type of fault. There are several options for the breakdown of this unit, in each of which appropriate actions should be taken to eliminate them.
In most cases, problems with the gearbox are eliminated by dismantling and disassembling it. Do not take on this type of work without the proper skills and experience.
Dismantling
To dismantle the box, we recommend that you rely on the instructions, strictly follow the sequence and reinforce your skills with visual videos.
- Disconnect the negative terminal from the battery and drain the oil from the gearbox system.
- Unscrew the bolts that hold the crankcase guard in place and remove it.
- Disconnect the ground (wire) from the clutch housing.
- At the end of the clutch cable, loosen the tension on the nuts slightly.
- Remove the cable end from the clutch lever.
- Disconnect the block from the traction relay.
- Disconnect the wire going to the starter traction relay.
- Dismantle the starter itself directly.
- Disconnect the drive rod from the joint tip. We are talking about traction, which switches gears.
- Disconnect the cable from the car's speedometer drive.
- Unscrew the tie rod ball joint.
- Remove and press the steering rod hinge pin out of the strut swing arm.
- The shank of the inner CV joint of the front wheel drive should be pressed out and moved to the side.
- Disconnect the second CV joint.
- Remove the clutch housing shield.
- Release the gearbox from the fasteners holding it to the engine.
- Remove the box.
Be sure to move it horizontally away from the motor before directly removing the box. Then disengage the input shaft. Be careful not to damage the clutch spring petals.
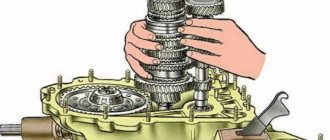
Disassembly
Having removed the gearbox, you can proceed directly to the main thing - disassembly. This will allow you to change damaged elements as you work, identify existing faults and solve problems on your own.
- Clean and thoroughly wash all external surfaces of the gearbox.
- Place the box in a vertical position and remove the back cover.
- Remove the clutch cable bracket, then use a rubber hammer to knock the rear cover off the gearbox.
- Remove the old gasket. She will be replaced.
- Engage any of the two gears - 3 or 4.
- Unscrew the bolt that holds 5th gear, then turn it on.
- Simultaneously turning on the indicated speeds will allow you to fix the shaft and prevent it from turning.
- Unscrew the nut on the secondary shaft, and then on the primary one.
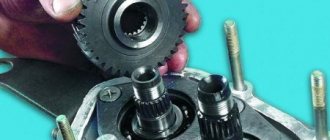
- Remove the 5th speed synchronizer along with the fork.
- Remove the fork from the coupling. Remove the synchronizer as carefully as possible. If you allow the clutch to move away from the hub, the spring-loaded balls that secure the synchronizer will simply fall apart.
- Remove the 5th speed synchronizer locking ring.
- Remove the 5th speed driven gear from the output shaft.
- Remove the thrust ring located on the needle bearing.
- Remove the needle bearing itself from the 5th speed gear.
- Remove the drive gear from the drive shaft and remove the bearing plate.
- Now the needle bearing bushings should be removed from the secondary shaft, and the thrust washer should also be removed.
Where to buy a used box for a Zhiguli?
Any vehicle unit, the gearbox, is no exception, has its own safety margin and amount of working resources. At the end of the latter, it is time to think about replacing the transmission unit. Today, several options are available to solve the problem. The simplest and first thing that comes to a car owner’s mind is buying a new box. But enthusiasm in this regard often dries up after a short monitoring of prices for these units. A new box requires a serious investment. Is there a way to save money?
Let's go to the secondary market
Logic dictates that spare parts can be found cheaper on the secondary market. And indeed it is. It is not difficult today to buy a used manual transmission or gearbox for a VAZ 21099, the price of which is determined by its condition. A large number of offers are found on the Internet. Conventionally, the secondary market can be divided into three sectors:
- private;
- garage;
- professional.
The first two provide for the implementation of transmission units either by the Zhiguli owners themselves or by individual craftsmen
Such offers can attract the buyer's attention based on financial criteria. But if you are looking for a product for the query “gearbox for VAZ 2108, 2109, 21099, price, used 5-mortar”, do not rush to choose by cost
Assess all the risks and benefits of each proposal.
In the professional sector, it is also easy to find out how much a gearbox costs for a VAZ 2108, 2109, 21099; the price varies depending on the current safety factor of the unit. Refurbished components are offered for sale, fully ready for use. The choice in favor of such a box can be considered rational. Unlike private owners, professionals provide a guarantee on used units.
Choosing a service provider
If you need a used gearbox for a VAZ 21093, the price of which is reasonable and the quality is high, contact our workshop. We will also select transmission units for nines and ninety-nines.
All units offered for sale have been restored by our craftsmen. When performing major repairs, original VAZ spare parts were used. Complex troubleshooting is carried out using a special tool. The techniques used allow us to guarantee the quality of the overhaul.
Used boxes for VAZs are almost always available in our workshop. This allows you to optimize the replacement process and simplify the ordering of units. Do you want to purchase a used box to replace one that is worn out or damaged in an accident? Contact us by phone, mail, or come directly to the workshop to discuss the details of the transaction!
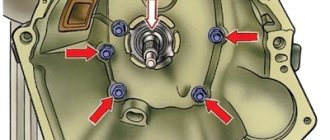
What to pay attention to
So, following the instructions, we disassemble the gearbox of your VAZ 2109. Along the way, pay attention to the following points:
- Bearings. When they wear out, a noise from the box occurs. Plus, worn bearings negatively affect the condition of other gearbox elements;
- Synchronizers and sealing washers. If their condition leaves much to be desired, then the gears shifted poorly precisely because of them. Replace them;
- Clutch system, cotters, coupling hub clamps. All this must be replaced separately if there are signs of wear or defects;
- Blocking rings, synchronizers. If there are chips or nicks, don’t even think about alternative solutions, replace them immediately;
- Bearing tracks. Over time they wear out. If signs of wear are found, perform a complete replacement. In this state, they were only a short time away from breaking;
- Gap between gears and locking rings. Normally it is no less than 0.6 mm. In case of deviations, there is only one solution - replacing the rings;
- Retaining rings. If elasticity is lost, these elements must be changed, since they will no longer be able to perform their functions.
When assembling the gearbox, do not forget to lubricate the new gaskets with a layer of lithol. And when pressing the oil seals, do it with the working edge inward. The metal clip should be located on the outside.
During the process of reassembling the gearbox, all rubbing components should be treated with oil, and do not forget about the sealant for connecting the clutch housings and gearbox. Doing everything yourself is quite possible.
If you find an error, please select a piece of text and press Ctrl+Enter.
Reinstalling the gearbox
Gearbox assembly:
- we change all non-working elements;
- workers clean with a rag;
- assembly is carried out;
- degrease parts with threads;
- if necessary, lubricate the elements;
- change gaskets;
- insert the balls and bearings into place;
- we assemble the synchronizer;
- We put all the springs in place and tighten the bolts. When assembling, lubricate all connections with sealant;
- attach the box to the engine;
- add oil;
- connect the battery;
- we start the car and check it.
The VAZ 21099 gearbox is adjusted during assembly. Also, after installing the gearbox, you need to adjust the gearshift lever. It is important to adjust the gearbox and gearshift lever correctly.
It should be remembered that prevention can help avoid repairs and troubles along the way. Taking good care of the gearbox is the key to its long-term operation.
Gear shift technique
Gear shift technique
What I would like to share with you!
In non-professional circles, and often in professional ones, there are a lot of misconceptions about gear shifting. The purpose of this article is to tell you how to do it correctly. We do not set ourselves the task of covering all aspects and talking about all the intricacies of gear shifting, for example, how and in what cases you can shift without using the clutch. We want to explain the correct basic technique. This will answer almost all your questions and dispel any confusion, allowing you to confidently and correctly change gears both on the track and on the street.
The article is written taking into account a manual gearbox with synchronizers, i.e. an ordinary “handle”, which is installed on almost all cars from Nine to Zonda. The materials for this article were collected from many professional sources.
So, we hope that everyone reading this article understands why you need to change gears - to keep the car in the desired engine power range.
Working with the clutch and gas With the correct gear shifting technique, working with the clutch pedal always looks like this - pressed, released. Except when pulling away, the pedal is never released (and certainly not depressed) slowly. It is quickly squeezed out (preferably to the floor, especially when shifting down) and quickly released. There is no need to hit the pedal or throw it. Everything is done smoothly, but quickly, as, indeed, with all other elements of car control. The gas pedal is released when changing gears to relieve the load on the gearbox.
Switching to a lower gear For “advanced” drivers, let us immediately clarify that switching to a lower gear occurs only in order to maintain power. The brakes are used to stop, not the engine. The pads cost pennies and are cheaper than gasoline and a clutch. It is especially important not to engage in nonsense on a slippery/icy road - unfulfilled (or incorrectly performed) throttle adjustment can lead to a skid (drift on front-wheel drive cars) and subsequent ditch, and no abs will save you.
First, we will explain what a gas booster is and why it is needed. Imagine that you are driving 60 km/h... Suddenly a fancy Sky with neon lighting “flies up” to you from the left and starts honking and accelerating. Of course, your action is to move on and I’m not in a hurry. But suppose you decide to answer the “challenge”. You need to shift from 5th gear to 2nd. If you simply depress the clutch, engage 2nd gear and release the clutch, the car will jerk very strongly, and the clutch with the gearbox will have a hard time. Why is this happening?
Release the gas, press the clutch pedal and change gear. The engine speed drops to idle, and the clutch rotation speed increases, because the wheel speed remained the same, but the gear ratio increased.
Now the difference between the speed of the engine and the gearbox is 4000 rpm. If you release the clutch, the engine and wheels will have to match speeds very quickly. The engine will spin up sharply to 5000 rpm and will transfer a lot of stress to the wheels (equivalent to a sharp, brief application of the brakes), which in this case may lose traction if they are subject to strong lateral forces or if the road is simply slippery. If you release the clutch slowly, the stress will be much less, but then the clutch will burn.
To avoid this, it is necessary to add gas, i.e. press the gas a little before releasing the clutch. This is done very quickly: the foot hits the gas pedal, in our case quite deeply, almost to the floor, and instantly releases it. Immediately the clutch is released, and the right foot presses on the gas again, but this time to accelerate. The purpose of accelerating in this case is to raise engine speed to 5000 rpm or a little higher. If you do everything correctly and then quickly release the clutch, you will not feel anything at all, and the car will begin to smoothly accelerate when you press the gas again.
Simply and easily. Not so. You almost always need to downshift before turning, i.e. when you slow down. And when you brake, your foot is not on the gas, but on the brake...
Of course, we can assume that in this case you need to slow down in advance, then right before the turn, change gears with a full throttle and into the turn... We think there is no need to explain that in this case there is no talk of any competition at all. To go really fast, you need to brake hard before the turn and at the beginning of the turn. And then the desired gear must be engaged in order to begin accelerating before the apex.
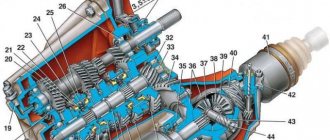
VAZ-2109 gearbox design
Transmission
1 – rear cover of the gearbox housing; 2 – drive gear of 5th gear; 3 – ball bearing of the input shaft; 4 – drive gear of the 4th gear of the input shaft; 5 – input shaft; 6 – drive gear of the third gear of the input shaft; 7 – gearbox housing; 8 – drive gear of the 2nd gear of the input shaft; 9 – reverse gear; 10 – reverse intermediate gear; 11 – drive gear of the first gear of the input shaft; 12 – roller bearing of the input shaft; 13 – input shaft oil seal; 14 – breather; 15 – coupling flange; 16 – clutch release bearing; 17 – coupling guide sleeve; 18 – roller bearing of the secondary shaft; 19 – secondary shaft; 20 – satellite axis; 21 – speedometer drive gear; 22 – axle gear; 23 – differential box;
24 – satellite; 25 – clutch housing; 26 – oil drain plug; 27 – driven gear of the main gear; 28 – adjusting ring; 29 – tapered roller bearing of the differential; 30 – axle shaft seal; 31 – driven gear of the 1st gear of the secondary shaft; 32 – synchronizer of 1st and 2nd gears; 33 – driven gear of the second gear of the secondary shaft; 34 – retaining ring; 35 – persistent half ring; 36 – driven gear of the third gear of the secondary shaft; 37 – synchronizer for 3rd and 4th gears; 38 – driven gear of the fourth gear of the secondary shaft; 39 – ball bearing of the secondary shaft; 40 – driven gear V of the secondary shaft transmission; 41 – 5th gear synchronizer; 42 – needle bearing; 43 – gear shift fork.
Gear shift drive
1 – gear shift lever; 2 – lever axis; 3 – gear lever pin; 4 – ball joint of the lever; 5 – protective cover of traction; 6 – gear shift drive rod; 7 – gear selection rod lever; 8 – gear selection lever; 9 – gearbox housing;
10 – clutch housing; 11 – gear selection rod; 12 – rod bushing; 13 – rod seal; 14 – protective cover; 15 – hinge body; 16 – hinge bushing; 17 – hinge tip; 18 – clamp.
Description of design
The gearbox is manually shifting, mechanical, two-shaft, with four or five forward gears and one reverse gear, with synchronizers in all forward gears. It is structurally combined with the differential and main gear. The production of four- and five-speed gearboxes with indexes 2108 and 21083, respectively, has now been discontinued. Box 2109 is supplied to the conveyor and for spare parts. It is distinguished by a different location of the crankcase ventilation breather - on the clutch housing (it used to be on the rear cover), the presence of an oil level dipstick, and a different lubrication system. Gear ratios remain the same. The gearbox housing consists of three parts (cast from aluminum alloy): clutch housing, gearbox housing and cover. To improve heat dissipation, their surface is ribbed.
The input shaft is index 21083. It is made as a block of drive gears, which are in constant engagement with the driven gears of all forward gears. The secondary shaft is also with index 21083. Its gears rotate on needle bearings. The main gear is machined integrally with the shaft.
Some 2109 boxes are equipped with 2110 shafts (the gears of the secondary shaft 2110 rotate on bushings to reduce noise). The main gear gear is removable and splined. It is fixed on the shaft with a locking ring. Inside the secondary shaft 2110 there is a groove for supplying lubricant to the gear bushings.
Gears are cylindrical, helical, constant mesh, with the exception of the spur gear in reverse gear. Each gear has an additional spur ring, to which the sliding clutches of the synchronizers are connected when the gear is engaged. Gears 2108 have radial holes for oil supply (splash lubrication), gears 2110 are lubricated with oil coming from the shaft. Gear sets are not interchangeable due to the difference in mounting holes and are supplied with the shaft.
The front shaft bearings are roller, the rear are ball. The radial clearance in roller bearings should not exceed 0.07 mm, in ball bearings - 0.04 mm. Under the front bearing of the secondary shaft of the 2110 shaft box there is an oil sump that directs the flow of oil into the shaft.
Differential - conical, two-satellite. The main drive driven gear is attached to the differential box flange. The speedometer drive drive gear is pressed onto the differential box, rotating the driven gear located in the speedometer drive housing, which is attached to the gearbox housing.
The gearbox control drive consists of a gear shift lever, a ball joint, a rod, a gear selection rod and gear selection and shift mechanisms.
A lever is attached to the inner end of the rod, which acts on the three-arm lever of the gear selection mechanism. This mechanism is made as a separate unit and is attached to the plane of the clutch housing.
The gear selection mechanism housing has two axes. One has a three-arm gear selector lever and two locking brackets. The other axis passes through the holes of the locking brackets, which prevents them from turning. One arm of the gear selector lever is used to engage forward gears, the other is used to engage reverse gear, and the third arm is used by the gear selector rod lever. A reverse fork is installed on the axle. Gear selection mechanisms 2108 and 21083 are installed on four- and five-speed gearboxes, respectively. The 2108 mechanism does not have a spring on the axis.
The gearbox is filled with transmission oil at the factory, designed for 75,000 km. It can be replaced with “Lukoil TM4-12”, “TNK TRANS KP” (80W-85; GL-4), from imported ones “ESSO GEAR OIL TDL” (75W-90, 80W-90; GL-4/5) are suitable. and "MULTIGEAR S" (75W-90; GL-4/5).
Characteristic
As we said earlier, a 4-speed transmission was also installed on the car. The assembly of the gearbox for the VAZ-2109 of this type did not last long. Therefore, it is now very difficult to meet “short-winged” cars with a 4-speed manual transmission. It's practically a rarity. 95 percent of the “nines” came with a more modern, 5-speed manual transmission. It was two-shaft, with synchronizers in all gears (except reverse). Structurally, this gearbox is combined with the main gear and differential. It differed from the 4-mortar in a different location of the crankcase ventilation pipe. It was located on the clutch housing (previously it was on the rear cover). A dipstick also appeared. But the gear ratios remained the same.
In Russia, these cars stopped being produced back in 2004. But you can still find spare parts for the VAZ-2109 gearbox in stores. Their price is quite reasonable. If necessary, you can buy a complete transmission for 5-6 thousand rubles.