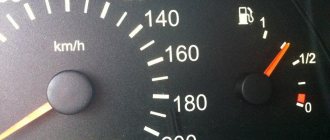
...And I thought I had a lot of fuel, but it turns out it’s flowing by...
In general, immediately after buying the car, I went to the gas station, fed the horse, inserted the gun, locked the lever, and went to the cashier to pay “to the full.” I stand, stand... And then I decided to go out to the car. I look, and under the car there is a puddle the size of Lake Baikal! I immediately took out the gun, scratched my turnip and returned to the seller, and he explained to me that I needed to fill it a little at a time, because... The tank was changed, and the neck was not adjusted... Well, ok! And so I suffered for almost three months, I even learned to “write” at a gas station so that gasoline would not leak out. But it still leaked out, only I didn’t see it anymore, because... assembled in the lower casing...
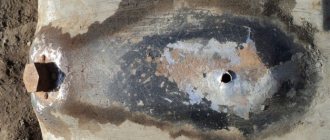
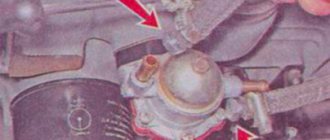
So, here we go! I did everything at home, using only a jack, no holes or lifts. Behind the wheel under the neck there is a casing, it is attached to clips, I saw only two, I picked them out (immediately for ejection), I did not see the two on top, but they came off easily. Immediately before my eyes is this picture:
But gasoline flowed into this lower casing and accumulated there, so I did not see that gasoline was spilling.
I thought about taking out the neck, so I unscrewed the lid glass; it was held on by two of the three bolts (the bolts on
The reasons for damage to fuel tanks can be different, in one case it is rust, in another it is a normal trip on Russian roads. A small blow and almost immediately we begin to smell gasoline in the cabin. The fuel level arrow also tells us that gasoline is leaking. How difficult is it to repair a fuel tank yourself?
If the gas tank is leaking, it is not safe to drive with such a breakdown, so do not put off repairing it for a long time. Before starting work, it is recommended that you familiarize yourself with:
General rules for repairing a gas tank
1. To drain gasoline from the fuel tank, you will need to tilt the car to one side with a jack and use a tube.
2. Repairing the gas tank without removing it or whether it is better to dismantle it is decided depending on accessibility to the place of damage and the type of repair work.
Folk way to repair a gas tank
Do you know how our grandfathers used to repair a fuel tank in the field? If a small crack appeared in the fuel tank, the hole was shaped into a round shape using a screwdriver. Next, we selected a bolt of suitable size for this hole and tightened it, first we put rubber washers on it (from the wheel chamber).
If you look at the old 130 ZILs, you will notice that their tanks are completely riddled with bolts, which suggests that this method is quite reliable and durable. Currently, this method is being used by truck drivers.
A leak in a car's fuel tank can be sealed using fiberglass and epoxy glue. In this case, the reliability of the gluing site will be much higher than when using cold welding for gluing.
Purchase the necessary materials to complete the work. In this case, prefer domestic two-component epoxy glue. When choosing, take into account the seller's recommendations and instructions on the packaging.
Locate the leak on the gas tank. If it is located in a hard-to-reach place, remove the gas tank and dry it thoroughly. Clean the gluing area with sanding paper with a rough surface (to improve adhesion). Degrease the surface with acetone. The quality of gluing directly depends on the quality of degreasing!
According to the instructions on the package, prepare epoxy glue and pour it into a suitable container. If you have to glue on the corners and edges of the tank, give it a thicker consistency. Cut the fiberglass into pieces so that their edges protrude a few centimeters beyond the crack. Impregnate the fiberglass itself with epoxy glue.
Reasons for failure
You may need to replace the filler neck for the following reasons:
- Corrosion of a metal fuel pipe due to its prolonged contact with aggressive liquids (gasoline, diesel fuel).
- Cracks in the tube. Most often, cracks occur in tubes made of plastic, but metal tubes can also be vulnerable to mechanical stress.
- The neck breaks off due to material wear. A rather rare phenomenon that can be observed on some Mercedes models.
Patriot Garden T 1.6/300 F EPG
Ekaterinburg
2014-03-10 04:33:32 7 years ago
Tell me exactly where the filler neck and the plug for filling the gearbox oil are located. I couldn't find it according to the instructions.
Answers 5
2013-12-31 21:00:00 7 years ago
2013-12-31 21:00:00 7 years ago
The instructions are correct, but in reality there is neither a container for lubricant nor a neck.
2013-12-31 21:00:00 7 years ago
This means the gearbox does not require forced lubrication. Such designs of gearboxes exist; they mainly use nigrol as a lubricant.
2013-12-31 21:00:00 7 years ago
This is probably a bad translation of the instructions. There is still a hole for oil filling. If you look at the gearbox from the front and left, then (with the cutters removed) you can find the head of the M6 bolt. This is the “neck”. We unscrew the bolt and see a gear with traces of grease...
2019-09-17 20:50:37 1 year ago
lay it on its left side, remove the cutters. On the side surface of the gearbox, find the screw at M5. Unscrew it, place it vertically and fill it with oil for gearboxes and transmissions to the bottom edge of the hole, I don’t remember exactly which one, since it’s all at the dacha. If you spill a little, wipe it off and tighten the screw. Put everything in place and dig, dig and dig.
Didn't get an answer to your question? You can view the instructions online
You have entered the wrong email address
Write the reason for your negative rating of the question
Write the reason for your negative rating of the answer
Thank you for your rating
Symptoms of failure
The main symptom that may require you to replace your fuel filler neck is a fuel leak. You can find out about this by simply looking under the car or examining the condition of the fuel pipe on the lift. It is also possible that, due to a loose lid, the failure warning lamp is activated, which informs the self-diagnosis system of a leak in the fuel evaporation recovery system.
The smell of gasoline in the car interior may also indicate a malfunction of the neck. However, the most unpleasant symptom is water in the tank, which enters the system due to corrosion. In this case, the procedure for replacing the filler neck must be carried out as soon as possible - otherwise you may have problems with the fuel pump and filter.
Which option is more convenient - left or right?
As surveys have shown, when designing a new modification of a car and the location of the gas tank, car designers adhere to safety rules, since factories are interested in ensuring that refueling a vehicle (including from a can) is safe for both the driver and passengers, and for service personnel at the gas station .
Judging how convenient the option of placing the tank on the left or right is a waste of time. After just a few visits to the gas station, the driver gets used to the location of the hatch, and there is absolutely no difference from which side to refuel the car.
Why did it happen so?
Perhaps the automatic requests do not belong to you, but to another user accessing the network from the same IP address as you. You need to enter the characters into the form once, after which we will remember you and be able to distinguish you from other users exiting from this IP. In this case, the page with the captcha will not bother you for quite a long time.
You may have add-ons installed in your browser that can make automatic search requests. In this case, we recommend that you disable them.
It is also possible that your computer is infected with a virus program that is using it to collect information. Maybe you should check your system for viruses.
If you have any problems or would like our support team, please use the feedback form.
strong air flow from the neck to fill the engine with oil! (topic closed)
Nissan Almera 2001 mileage 126000. Good afternoon everyone! Today, with the engine warm and running, I unscrewed the filler cap to fill the oil, after which I placed my palm over the neck, as a result of which I felt a strong flow of air, which causes oil to splash out. IS THIS NOT A NORMAL PHENOMENON. I tried using the search engine, but it didn't help me.
12/14/19 – reply | quote | #
Greetings! My name is Mikhail, sorry for being off topic, I want to express my gratitude to you and your site. Thanks to you, I was able to remove the scratches my wife caused in the parking lot on my own.
It all started when my wife passed her license and began to often take my car to get to the nearest shopping center. There were no signs of trouble, but one day she said with tears in her eyes that she had rubbed herself against a pole in the parking lot. I still don’t understand how it was necessary to manage to do this, but with women everything is possible, you understand)) The scratch was deep enough, but there was no money or time to bother with painting. That's why I simply ignored the scratch. A week ago I came across Artem Shevchenko’s blog, who in his article told how to get rid of scratches in 10 minutes. At first I didn’t believe it, but I decided to try it anyway and didn’t regret it at all. The method worked 100%, there was not a trace left of the scratch, and nothing was visible at all from any angle. In general, I’ll keep the intrigue, for those who want to quickly get rid of scratches, come and read the article on Theme’s blog, I guarantee you won’t regret it.
Arrangement of elements
| Replacing the filler neck | * | * |
| Pos. | Spare part no. | Name |
| A | — | Option 110 |
| B | — | Option 90 |
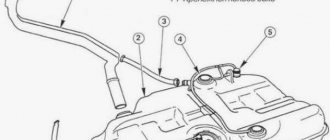
| 1 | — | Fuel system radiator |
| 2 | — | Fuel filter |
| 3 | — | Fuel tank |
Review
The fuel supply system includes the filler pipe and hose, fuel tank (including sensor assembly and vent system), fuel filter, fuel cooler, bleed valve and fuel connecting lines.
The return flow from the engine returns to the filter. To prevent waxing of the filter at low temperatures, a thermostatic diverter directs the heated return flow back through the filter to the engine. At higher temperatures, the return flow is diverted back into the tank.
Fuel filler neck with cap
The fuel filler neck is located on the panel in the right rear quarter, behind the hatch. The sunroof is opened by an electrical switch on the instrument panel that controls the release solenoid.
The filler hole is closed with a plastic cap on a thread that screws onto its neck. The cap is ratcheted to prevent overtightening and provides a seal around the neck to prevent fuel vapors from escaping. The filler cap has a valve that releases excess fuel pressure to the atmosphere at approximately 0.12 - 0.13 bar and opens in the opposite direction at a vacuum of approximately 0.04 bar.
The filler hole is connected to the fuel tank via a molded, flexible, high-density polyethylene (HDPE) hose.
Repair of door lamps
There was a burnt-out diode in the lampshade (a small black part - we are not talking about an LED) - we replaced the diode with a working one and replaced the light bulbs with T10 W5W LEDs from Aliexpress. Quite bright, covered in silicone. Links to products in China – 10 pcs. T10 W5W (current price $1.80)
Many motorists are familiar with the situation when the fuel tank cap refuses to open.
Such a small thing, which few car owners pay attention to, can cause serious inconvenience if it is impossible to open it, especially if this happened right at a gas station, while the car has an empty gas tank. At such moments, some motorists manage to achieve their goal in various ways, showing incredible ingenuity, while others, on the contrary, may panic, especially if the service is far away
The gas tank flap often does not open in cold weather, but trouble also happens in warm weather. Despite all the working order of the mechanisms that drive the vehicle, the car will go nowhere until it is refueled, so if such a problem arises, you will have to take measures to eliminate it. Depending on the reason that provoked the situation, different ways to resolve the issue are used.
Fuel tank
The fuel tank is located at the bottom of the vehicle, between the chassis side members.
The support is attached to the chassis with six screws. When the mount is attached to the chassis, the tank is protected by foam pads adjacent to the chassis center cross member. Additional protection is provided by a protective cover, which is installed in the front right corner of the tank.
The fuel tank is made of HDPE. The fuel tank is a sealed unit with the only possible access to the inside through a hole in the fuel pump module flange located at the top of the tank.
The reflective metal coating is attached to the tank with two threaded rivets and serves to protect the tank from heat generated in the exhaust system.
Is there a pattern for cars from a certain country?
Car enthusiasts are mistaken in asserting that the location of the fuel filler neck may somehow be related to the requirements of technical car production in a particular country. As such, there is no single standard for the location of the neck for a car manufacturer, and in fact everything is much simpler than it seems.
When designing a vehicle, design specialists take into account:
- driver convenience when refueling from a canister on the road;
- a point of gravity that allows maximum safety for the movement of a loaded or empty body at maximum speed.
And it was the latter that became the prerequisite for the fact that in the Moskvich modification 2140 or 2141, an unstable and very inconvenient car to operate at high speeds, the fuel tank played the role of a counterweight, preventing the rear part of the spring vehicle from “flying up” when driving without a load.
Fuel tank ventilation system
The filler pipe is equipped with a ventilation system, thanks to which air and fuel vapor are forced out of the tank during refueling and released into the atmosphere through the filler neck.
The breather outlet in the tank serves to control the "full fill" height of the tank. When fuel closes the outlet, fuel vapor and air are blocked from leaving the tank. As a result, the fuel filler pipe is “back-filled” with fuel and the fuel nozzle is cut off. The location of the outlet is such that when the nozzle is turned off, the space for fuel vapor is approximately 10% of the total tank capacity. By providing space for vapors, the Roll Over Valve (ROV) is always above the fuel level, allowing vapors to escape and ventilate the tank.
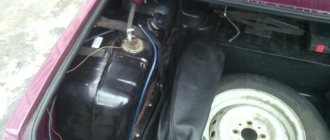
Protection against gasoline drainage Club of classic VAZ-2107, VAZ 2106 lovers
The idea with a limit switch or a reed switch is good, but it didn’t suit me due to the lack of an alarm on my car (like many classic drivers). I don’t install an alarm because I think that no one but me needs this car. Even if they climb in for a ride, they won’t be able to start it (there are mechanical anti-theft devices), and there’s not much to steal from it.
The idea of removing the tank and moving it to the left wing, or welding the neck inside the trunk, or welding a mesh into the neck did not work, due to the high labor intensity of removing and washing the tank, etc.
Having examined the filler neck of my car in more detail, I discovered that there was a small step of 1-1.5 mm in it. width. (Marked in the photo with an arrow.)
My car is 92. therefore, the neck is with an external thread, but I looked at younger cars that have a neck with an internal thread; such a step also exists.
Then the pneumatic cylinder body was drilled out from the shoulder side so that the filling nozzle could fit into it freely. On the other side, a piece of pipe of the same diameter is welded to increase the length. The bottom of the resulting glass was tightly welded and using a grinder and a 5mm drill, many holes were made in the bottom and walls of the glass.
I inserted this glass into the filling neck, and so that it could not be taken out from there, I opened it along the edges, closer to the walls of the neck. After that he was stuck there tightly.
True, later it had to be taken out from there using a curved reinforcement because... At first I didn’t make enough holes, the gasoline didn’t have time to flow through them and the refueling nozzle shot off. It was VERY difficult to get him out of there. So you need to immediately make as many holes as possible, at least 2 times more than in the photo, because they show the original version.
The glass in the neck looks like this:
Of course, not everyone has a housing from a KamAZ auxiliary brake pneumatic cylinder lying around in their garage, but you can use any pipe of a suitable diameter instead. Somewhere I even saw that a similar glass was made from an old shock absorber. The main thing is that the resulting glass clings to the step in the filler neck.
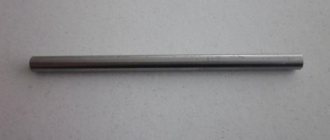
Therefore, a sketch of a glass with dimensions is attached:
It is advisable to take the tube for the glass from a soft metal, and the core from a hard one, in order to eliminate the possibility of sparks during core work.
After such protection, there were several attempts to drain, but the pioneers did not get gasoline, the hose did not fit into the tank... After a while, even the attempts stopped, apparently all the drainers in the area already knew that they would not be able to drain my car.
True, such protection has a small disadvantage. It is necessary to ensure that the level of gasoline in the tank is below the level of the bottom of the glass. In my case it turned out to be about 20 liters, which is enough for city driving. And on a long trip, you can fill up the tank full, but you will still run out of gas.
In my opinion, the combination of such protection with a limit switch or reed switch, for Zhiguli cars with alarms, makes the car practically impossible to drain.
Fuel level sensor
The fuel level indicator sensor is located inside the fuel tank. The sensor assembly assembly is accessed through an opening in the top of the tank. The block flange is fixed in working position and sealed using a steel retaining ring.
The fuel sensor assembly includes a top cover flange that contains an electrical connector for connecting the sensor and two steel fuel line connections.
The flange is sealed by a rubber seal installed between the flange and the retaining ring housing.
The top cover is attached to the swirl chamber assembly using two spring-loaded steel struts. Springs securely fix the vortex chamber at the bottom of the tank.
The vortex chamber ends with a cavity in which the fuel level indicator sensor is located.
The vortex chamber plays the function of preserving the fuel supply, ensuring that the fuel intake is always carried out below its level. This is achieved by using a reverse flow directed into the vortex chamber, and the jet pump provides additional flow into the chamber formed by the fuel remaining in the tank, and the operation of the jet pump is ensured by the reverse flow. In addition, there is also a bypass valve at the base of the vortex chamber assembly. When the fuel tank is full, fuel pressure keeps the valve lifted off the seat and fuel can flow into the swirl chamber. As the fuel level in the tank decreases, the fuel pressure in the tank drops, causing the valve to close. When the valve is closed, the fuel is held in the swirl chamber.
Flexible pipes connected to the top cover provide fuel supply to and return from the swirl chamber.
The fuel gauge sensor is equipped with a potentiometer that operates using a float element. . The float element rises and falls depending on the fuel level in the tank and accordingly moves the potentiometer.
The voltage to the potentiometer is supplied from the instrument panel. The output resistance of the potentiometer changes depending on the fuel level. This resistance is displayed on the instrument panel using the fuel gauge.
The warning light installed on the instrument panel turns on when the amount of fuel in the tank drops to 10 liters.
Roll Over Valves (ROVs)
Two ROV valves are located on the fuel tank support structure and are connected via tubing to the fuel vapor separator. The phase separator, also installed on the internal bracket, is connected by a tube to the fuel tank ventilation fitting on the fuel priming pump flange. ROV valves contain check valves that close when the vehicle rolls over, thereby preventing liquid fuel from leaking from the tank through the breather tube.
Repair of power window buttons
Perhaps not everyone knows that the front power window buttons have two down and two up positions. If you press until the first click, the glass moves as long as you hold it; in the second position, the glass rises or lowers all the way. They don’t know because the buttons don’t work that way))))) This can be fixed. You need to remove them and disassemble them
When disassembling them, please note that there is a self-tapping screw under the sticker in the center of the block
The inside of our module was perfectly clean. No oxides, no broken soldering. We simply wipe the points on the board where the buttons press with a cotton swab soaked in alcohol - and the buttons miraculously work as they are supposed to.
Fine fuel filter
The fuel filter removes particulates from the fuel and also separates water that accumulates at the bottom of the filter.
The fuel filter is located on the chassis to the right of the fuel tank. Fuel supplied to and returned from the engine passes through a filter. Connections are made using quick-release devices.
The rear steel cover is secured to the chassis side member using four M8 threaded screws.
The filter is screwed to the mounting plate with two M8 threaded bolts.
The steel protective cover is secured to the back cover using a special lock with a 1/4 turn.
The filter is equipped with an internal air venting device, which ensures that air enters the engine along with fuel only in small, controlled quantities.
The thermostatic diverter valve is fully closed at 45 degrees Celsius and directs fuel directly into the tank. When the diverter is open, fuel is recirculated through the filter to the engine.
Can you smell it?
In most cases, access to the pump module is possible from inside the passenger car (often with the rear seat removed or raised). But it happens that you have to remove the entire tank from the car, and this is almost impossible without a lift or a garage pit. However, sometimes the pump works properly, but the tank still needs to be removed due to damage. How is that possible, you ask, since it is very durable? This is true, but... A bad head can break something else.
In my practice there were three illustrative cases. In the first, the owner of a “middle-aged” foreign car complained about a grinding noise coming from under the bottom while driving. It seemed to her that the muffler was sagging and touching the asphalt. Looking under the bottom with a flashlight, I discovered that one of the steel bands on which the fuel tank hung had burst due to age and corrosion!
the hole was like a chisel, a random stone “caught” on the highway would not leave one like that. Then we managed to “unfold” the hole a little, drain the remaining fuel, remove the fuel intake, climb inside the tank with our hands and seal the hole with a “sandwich” of a bolt with a nut and four washers (two steel and two rubber). “Sandwich”, I must say, served for several years.
craftsmen are afraid to approach gas tanks with a welding machine, even if the container has been empty or filled with water for a week (everyone is well aware of the consequences of an explosion of fuel vapor). And a new tank, even without fuel equipment, costs 30-40 thousand rubles. We managed to get by at a lower cost: the damage was sealed with a “cold welding” compound.
Fuel cooler
The fuel cooler uses coolant from the radiator to reduce the temperature of the fuel returned to the tank from the high pressure fuel pump.
The cooler is fixed to a bracket, which, in turn, is mounted to the inner left rail of the chassis. The bracket has two grooves into which the plastic protrusions of the cooler housing are inserted. The cooler is mounted on the bracket using an M8 threaded bolt.
The cooler is equipped with four quick-release connections. Fuel inlet and outlet; supply and return of coolant.
Low fuel level indication and run-dry strategy
The “run-dry” strategy is used to maintain the fuel system fill level close to the conditions of fuel depletion in it. It ensures that a minimum amount of fuel always remains in the vortex chamber.
A yellow light on the instrument panel lights up, warning of low fuel level (next to the fuel level indicator), that is, that there is no more than 15% left in the tank. The fuel gauge indicates that the tank is empty when there is still 11% fuel left in the tank.
When 4 liters of fuel remain in the tank, the run-dry strategy is initiated. Engine misfire occurs after approximately 1 mile (1.6 km), after which the engine stops. The engine can be restarted in misfire mode and will continue to run for another mile until the engine stalls again. This can be repeated until the tank inlet appears above the fuel level, causing the engine to experience fuel starvation and permanent loss of power. Restarts after stops in run-dry driving mode are not recommended.
Repair of the trunk release button PASSAT B5 station wagon
Remove the trunk lid trim (4 screws and many clips around the perimeter). We had difficulty removing the key - the bolts on the mounting frame were rusty and did not turn - we simply bent the key mounting frame, and then aligned it again and cleaned it to a shine. The key turned sour and was motionless. The microphone was faulty. We developed a key, installed the microphone as it was - that is, completely different))) And now the key performs its function. You can attach a button with a Soviet-style microswitch.
You can also buy such a key entirely on Aliexpress for little money. But I didn’t buy such a button - I don’t know its quality and I didn’t have time to wait either.
And also pay attention - the keys for the station wagon and sedan are different: 3B9827566C - station wagon 3B9827566D - sedan. Alikas are full with the letter D - but they are not suitable for a station wagon
Mitsubishi Eclipse slut carrier › Logbook › Fuel tank filler neck repair!
...And I thought I had a lot of fuel, but it turns out it’s flowing by...
In general, immediately after buying the car, I went to the gas station, fed the horse, inserted the gun, locked the lever, and went to the cashier to pay “to the full.” I stand, stand... And then I decided to go out to the car. I look, and under the car there is a puddle the size of Lake Baikal! I immediately took out the gun, scratched my turnip and returned to the seller, and he explained to me that I needed to fill it a little at a time, because... The tank was changed, and the neck was not adjusted... Well, ok! And so I suffered for almost three months, I even learned to “write” at a gas station so that gasoline would not leak out. But it still leaked out, only I didn’t see it anymore, because... assembled in the lower casing...
So, here we go! I did everything at home, using only a jack, no holes or lifts. Behind the wheel under the neck there is a casing, it is attached to clips, I saw only two, I picked them out (immediately for ejection), I did not see the two on top, but they came off easily. Immediately before my eyes is this picture:
But gasoline flowed into this lower casing and accumulated there, so I did not see that gasoline was spilling.
I thought about taking out the neck, so I unscrewed the lid glass; it was held on by two of the three bolts (the bolts on
Toyota Corolla BMW -Vlad's Fighting Machine › Logbook › Replacing the gas tank neck
Hello, everyone who has come here and intends to read the text below and look at the pictures.
There are no boobs here! I'm not against boobs and in general I'm all for it, but you won't see them in my blog, at least not yet. In my blog you will find almost manuals on mutual respect for the Toyota Corolla E120! In general, I think that everyone should respect their car! She's driving you! In joy and in sorrow, in sickness and in health. You especially understand the happiness of owning a personal car when you are sick. But it happens that your faithful assistant is also sick. Well, then we will help him, just as he helps us! I'm sick
Before New Year's Eve, I saw that the car was sick... Snot is flowing onto the asphalt somewhere in the area of the rear left wheel and it stinks of gasoline... Well, I think we hit the tank.
I signed up for the service (a few words about the service at the end)
in order to make a diagnosis.
Diagnosing
Upon arrival at the service, I described the symptoms to the guys:
1) Well, actually gasoline is dripping under the left rear wheel 2) If the tank is full, it leaks heavily. 3) Starting from the forecastle on a level area there is no dripping. 4) But, from the same forecastle, when parking with an obstruction to the left (driver's side below the passenger's side), it drips. When parking with such a blockage, it does not drip from tank 14 5) It does not drip from the forecastle when parking with the muzzle higher than the rear.
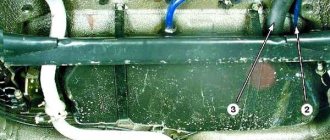
Well, what to do... You need to watch. They removed the “felt” from the left rear wheel arch (where the neck is). We look: the tank is dry and without any hint of corrosion. The hoses are intact. The neck is corroded in places and quite deep. They calculated that the neck itself was leaking, and there was no hole as such. Gasoline oozed between flakes of corrosion from both tubes (main and thin) at the same level. The places where it oozed are marked in red. The photo even shows that in these places the tubes are thinner due to deep corrosion...
Searching for spare parts
First of all,
we look at the catalogues... A new original costs about 5000 rubles.
The toad almost turned blue... The substitutes don't break. I thought about looking at BYD or Geely, but either it was not available, or I don’t remember why I abandoned this idea. My second thought
is to cut off the rot and replace it with a gas-resistant hose.
An option worthy of life, but personally for my understanding is not pleasant. If there is a pipe from the factory, then there must be a pipe! Thought three
- Drome.
It’s somehow deaf on the drome. In general, all the proposals came down to ordering the original... We don’t give up
- local analysis.
I called. Where there is, the price tag is not humane, the condition is unknown... Don’t despair
- Avito! This option burned out, but not the first time. I found a guy who has been dismantling a Corolla sedan for a long time with a strong side impact on the left side. We called, agreed, and arrived. The car has almost been torn apart, but the neck is still there - the condition is almost perfect. Fastenings too. But... During the disassembly process, it turned out that the neck was clamped with metal after the impact. We parted on the condition that tomorrow the guy would send a mechanic to the body and cut out the pipe. For several days I pestered the guy on the phone and now, after another call, he tells me: “We got it out, but there’s a problem. Come and take a look." I arrived and took a look. The neck is also deformed. Moreover, in the last few cm the thin tube is broken and the thick one is bent. Take it, he says for 800. Like knock here, build there. I compared the genital organ to the respiratory organ and decided that this was a half-measure with inevitable hemorrhoids and refused. Back on Avito! I find an advertisement for a Corolla derbana in the area of moving to the zoo. By the way, we took a bumper for Veniamin from the guys there. I came and inspected it. There is corrosion, but the tubes are sealed. And we will give corrosion a mind. This is what I bought for 1000 rubles.