Using immo in any car, including Lada Priora, the engine is blocked, which prevents the possibility of car theft. The need to disable the immobilizer on the Priora may arise if the device malfunctions.
Lada immobilizer malfunction (Kalina, Priora, Granta)
After entering the code, hold down the gas pedal until the Check indicator appears on the instrument panel again (no more than three seconds). If the first number is 3, then press the gas three times, and the Check indicator on the device will light up again. If it goes out, this indicates that the first digit of the combination has been accepted; all that remains is to write it into the ECU memory. Why doesn’t the engine start? The fuel pump doesn’t pump, the starter doesn’t turn. Why doesn’t the engine start? The fuel pump doesn’t pump, the starter doesn’t turn. All causes of immobilizer malfunctions. Decoding Lada immobilizer signals. How does an immobilizer work?
How to disable the blocker on Priora?
To independently remove and turn off the system, you will need a K-Line class adapter. It will need to be connected to the computer and the blocker itself. You must first download software to change the firmware on your PC.
The procedure may differ depending on the board in the installed immobilizer - M73 or M74.
Step-by-step instruction
A guide that will allow you to remove immo on the M73:
- The Openbox program is installed on your computer or laptop. The blocking device is connected to the PC. The utility starts and the standard EEPROM firmware is read.
- Data about the installed software is saved in the computer's memory. They will be needed in case the removal procedure fails.
- Then the HxD file editor is downloaded and installed. The downloaded firmware opens on the computer. At the very beginning of the text you need to add a line that consists of the characters FF. The changes are saved.
- The edited file is loaded into the memory of the microprocessor module. It is possible to use ready-made software options; you can search for them on the Internet.
- The module is then disconnected from the computer and installed on the car.
If the Priora uses a January 7.2 microprocessor unit, then to disable the immo, you need to assemble a circuit that has a positive cable switch.
After this, the procedure is performed as follows:
- ChipLoader software is downloaded and installed on the PC. The program version must be 1.97.7 or higher.
- The utility is launched and the required type of microprocessor module is selected in the main window.
- The unit itself is connected to the computer. The main program window opens, where you need to select the connection setup option.
- Basic firmware data is downloaded from the Eeprom memory card.
- Then you need to click on the “remove immobilizer” button. This will cause the utility to automatically adjust the basic parameters in the memory file.
- Then the software closes. The module is disconnected from the computer and installed back on the car.
The Xilvlik channel talked about the process of disabling the standard blocking device.
If the car is equipped with an immobilizer with an M74 board, then the shutdown procedure is as follows:
- The battery in the vehicle is disconnected. The block with wires is disconnected from the microprocessor unit.
- A cable harness made according to the diagram shown in the photo is connected to the device. It is recommended to use a double switch. This will allow voltage to be applied to the device in stages.
- The circuit is connected to the battery and to the PC using a VAG-COM cable.
- The first button of the switch is activated, with its help an impulse is sent to allow the programming procedure to be carried out.
- The WinFlash program runs on your computer or laptop. A settings window opens where you need to select the module type. The information transmission speed parameter is also indicated here. When performing a task, it is recommended to specify a minimum value.
- The second button is activated. Then a message about the start of communication with the module will appear in the main window of the utility.
- The standard software of the blocking device is saved, and the Eeprom memory is changed to a new one. The flashing procedure will take some time.
- If the process is completed, the program is turned off and the device and wiring are disconnected.
- The unit is then connected back to the vehicle. After this, it will be necessary to adapt the zero voltage of the throttle valve. To accomplish the task, you need to accelerate to about 4 thousand revolutions per minute, and then slow down the engine several times. The second speed is used. You need to brake to about 1 thousand rpm.
Photo gallery
Circuit for disabling the blocker
Reading the Eeprom Memory File
Removing immo information from the firmware
Diagram for connecting a module with an M74 board
IMMOBILIZER? IMMOBILIZER GLUE? STARTER DOESN'T TURN, PETROL PUMP DOESN'T PUMP, VAZ, LADA
The learning process itself is written in the instructions, but, as often happens, desires are far from reality. There are some peculiarities in this process and they should be taken into account when starting the immobilizer for the first time. BI BSK VAZ (VAZ on-board control system display unit) VAZ 2114 2113 2115 display panel and display unit. IS THE IMMOBILIZER ACTIVATED OR IS THE IMMOBILIZER GLUCCH? THE CAR WILL NOT START, THE FUEL PUMP WILL NOT PUMP FUEL, THE STARTER WILL NOT Crank. VAZ 2110, 2111, 2112, VAZ 2114, 2115 LADA, etc.
What to do if the immobilizer stops working?
If the device does not work, the lamp on the dashboard flashes and the ECU does not see the blocker, the cause of the malfunction may be oxidation of the contacts on the connector.
The problem is solved like this:
- The bolts installed under the steering column in the car's interior are loosening.
- Using flat pullers, the column protective casing is divided into two parts.
- Next, the plug should be disconnected from the immobilizer, but first you need to remove the connector from the guides. To do this, you need to apply a little pressure on the block. Then the car owner presses the opened latch and disconnects the connector. The second part of it will remain under the plastic lining of the panel.
- Using a screwdriver with a thin tip or a sewing coal with a large eye, clean the oxidized contact elements.
- To avoid such problems, the plug is treated with copper grease. Moreover, both pads are cleaned. Copper grease ensures high-quality conductivity and high anti-corrosion characteristics. The substance is applied using a screwdriver or needle.
- The two parts of the connector are then connected to each other. The correct operation of the immo is diagnosed. If the device is functioning, all components are assembled.
If cleaning does not help, then the immo problem may lie in the operation of the chip resistor.
To replace a part with your own hands, do the following:
- The locking device is being removed from the vehicle. To carry out the task, the side covers on the console inside the car are removed. The controller clamps are unscrewed, as well as the terminal clamps that are screwed to the microprocessor module.
- The control devices are disassembled for soldering a working resistor chip. To carry out the task, a PC is connected to the microprocessor module via a special cable. The program for reading the software is launched, the firmware file is saved into the computer memory. In particular, we are talking about FLASH and EEPROM. The chip resistor itself is soldered from the main board of the device.
- New firmware is installed in the control unit.
- A new resistor chip is soldered. Before connecting the power unit blocking control module, the immo is disabled. This will prevent its possible activation during installation. The module contacts are used to disconnect. First of all, the 12-output plug is disconnected.
- Conductors numbered 9 and 18 are disconnected from the block and shorted with each other. After this, the blocks are connected to the control unit, then the device is mounted in the installation location.
The Immobox channel talked about self-diagnosis of anti-theft locking devices in Priors and other cars.
Hooray! Immobilizer disabled! Now I start the car with a key without a chip
You take out the key, the immobilizer blinks, it blinks constantly. When they installed the alarm in the cabin, they said that the immobilizer was turned off. Has anyone encountered this problem or has any advice? This video is just my emotions from the joy of the moment, I have long wanted to do this, and finally it happened, the built-in immo has been put to sleep _))))) It’s no secret that for many owners of the domestic Lada, be it ten, Kalina or Priora, the built-in immo is pure evil , and indeed, this thing won’t save you from modern car thieves, but it will add trouble to its owner. Just imagine, you went on vacation to the seaside, and suddenly your car refuses to start, what should you do? Should I wait until they send me a spare chip key by mail?
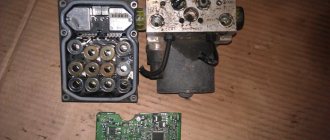
Characteristics and principle of operation of the blocker on Priora
Priors can use two types of immo - APS-4 and APS-6.
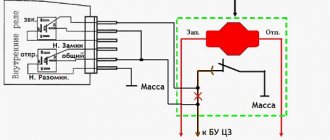
The first ones began to be installed on VAZs back in the early 00s and are considered less reliable. In the blocking device on Priora, the main role is played by the PIC16С65В controller and the K-Line bus. And the main element of the microprocessor module for working with the blocker is the physical section EPROOM. The latter records a special file with the same name, contained in the memory of the ECU (electronic control unit). It stores immobilizer learning combinations and it is this element that is responsible for the safety of the vehicle. If the file is activated and the blocker does not send a signal, the microprocessor module opens the ignition circuit and turns off the fuel supply system.
In more detail it looks like this:
- The driver, approaching the car, presses a button on the remote control.
- The doors open and the key is inserted into the ignition.
- A signal comes from the chip and is fed to the antenna adapter.
- The ring-type antenna begins to read the pulse from the chip. This element is made of a large number of turns of copper wire. The antenna adapter itself is located around the ignition switch cylinder.
- The pulse, after reading, is transmitted to the microprocessor module. The control unit begins diagnosing the signal and compares it with the normalized one. As a result, it gives a command to allow or prohibit the start of the power unit.
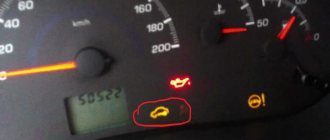
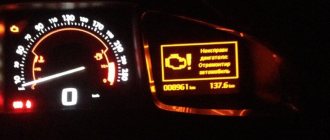
- If the key is not recognized and the device begins to block the main components, then an indicator is displayed on the control panel indicating a faulty immobilizer.
Auto electrician Sergei Zaitsev spoke about the principle of operation of the standard anti-theft system.
Where is the immobilizer located?
In the first models of vehicles with security devices, the immobilizer unit was located separately. But in Priors it is installed in the electrical package. The device is mounted in the car radio compartment, slightly below the central part of the console in the cabin. The microprocessor module is also located here.
Engine blocking with car alarm
If there are installed anti-theft systems, electrical equipment is responsible for blocking the engine start. Immobilizers or car alarms may be faulty and cause constant or occasional failures during operation.
It should be added that the severity of the problem will depend not on the specific model or brand of car, but on the complexity of the installed anti-theft security system.
Accidental activation of the engine lock function
First of all, carefully study the displayed icons on the alarm key fob. A common cause of blocking is accidental activation of additional functions. It is also necessary to monitor the readings of the LED indicator light (if equipped) in the vehicle interior, which serves as a light indicator of the alarm status. Flashing LED lamps in most cases indicate that the anti-theft function of the immobilizer is activated in the menu.
If, after turning the key in the lock and turning on the ignition, the warning lamp blinks frequently (for example, the StarLine car alarm) before starting the engine, and a pictogram with the inscription “immo” is displayed on the key fob itself:
- One way to solve the problem is to remove the key from the lock, after which you just need to press the button to open the central door lock on the key fob.
- You can also get out of the car, set the alarm to security mode, then disarm it and then start the engine.
In other words, you need to make sure that the alarm operates in the normal mode that is familiar to the owner. Up to 30% of cases of engine start blocking by alarms occur due to accidental changes in program settings. The driver’s task is to disable all unnecessary functions in the settings.
Using the StarLine alarm as an example, let us note that this system has the option of “two-stage” unlocking. Activation of the function may occur accidentally; a separate icon will light up on the key fob screen. To turn it off, you must hold down button 3 on the key fob. The key fob will emit two beeps, after which button 3 is pressed once again. Then button 1 is pressed for a few seconds, then the security functions are removed;
Where is
In the LADA Priora car, the automatic anti-theft system (APS) is structurally built into the electrical package unit (comfort unit). Depending on the year of manufacture of the car, its location may be different. In early Priora models, it was located under the center console (beard), which is located in the middle of the dashboard. Under the electrical package unit in these models there was an electronic engine control system (ECM) or an electronic control unit (ECU).
In subsequent modifications of the Lada Priora car, the comfort unit, in which the immobilizer is located, was placed on the left side of the mounting block by the designers. The latter contains relays and fuses. Due to the fact that the electrical package unit is fixed to the surface of the body, behind the mounting block, it is difficult to get to it.
According to factory technology, to dismantle the comfort unit, it is necessary to disassemble part of the instrument panel, which is long and difficult. But there is another way:
- Before performing any operations on the vehicle's electrical equipment, be sure to remove the contact terminal from the negative electrode of the battery. Remove the plastic panel from under the steering wheel by unlocking the mounting fasteners.
- The mounting block becomes visible, behind it the assembly with the immobilizer is screwed in a perpendicular position. Blindly, use your hands to approach the 3 wiring connectors of the electrical package unit and disconnect them.
- Using a bell wrench with a working head of 10, unscrew the 2 mounting bolts that hold the electrical package unit by touch. The bolts are not visible, they are located behind the fuse box.
- Carefully remove the assembly; it can only be removed in one position.
Problem Resolution
What to do if the immobilizer blocked the engine from starting? First of all, make sure that it itself is functioning normally - the indicator on the dashboard (if there is one) indicates that the chip code is not recognized. If the indicator “shows no signs of life” when you turn on the ignition, then you should probably start by checking the electrical system - perhaps the fuse has blown in the section of the circuit where the immobilizer unit is powered.
Re-register a key that is not recognized by the system - this solves the problem. However, there are two ways to program the immobilizer. In the first case, which is used on most foreign cars, programming of key codes is carried out by a dealer diagnostic scanner, via an internal network (the request goes to the manufacturer’s servers). The entire set of keys is registered at one time, since at the beginning of the training procedure, data on previously registered keys is erased from memory. So the owner himself cannot do anything with the immobilizer: he turns to the official dealer of his brand or to a company specializing in such work. As a matter of fact, the existence of universal devices for training immobilizers “plays into the hands” of car thieves. And you should approach the choice of a company offering immobilizer training services more carefully - the car owner will not control how many keys are actually registered, and there may be an “extra” one for the future.
The second method of training the immobilizer involves the presence of a master key in the kit, which is used to program the others. This allows the owner to perform immobilizer training himself, but only if the master key itself is recognized. For example, the APS-6 unit, which is very familiar to VAZ owners starting with Kalina, has a similar learning mechanism.
You will also be interested in:
To program “working” keys using a training key on the APS-6 unit, you need to:
- After closing the doors, turn on the ignition with the learning key.
- Wait at least 6 seconds, then turn off the ignition. The immobilizer indicator will blink rapidly, indicating the start of the learning procedure.
- Insert the registered key into the lock and turn on the ignition. Do this before the immobilizer light goes off. The buzzer will beep three times, indicating that the chip in the key has been recognized and read. If the indicator goes off and there are no beeps, this means either that the ignition is turned on too late (repeat step 1 onwards) or that the immobilizer is faulty.
- Wait until two more beeps sound. This confirms that the key code is stored in the controller's memory.
- Repeat steps 3 and 4 for the remaining keys.
- After turning off the ignition with the last key you registered, with a pause of no more than 6 seconds, you need to reinsert the training key into the lock and turn on the ignition. First, three beeps will sound, then two more.
- Turn off the ignition, but do not remove the key from the lock until you hear a single signal. The blinking frequency of the immobilizer indicator increases. If not, go back to step 1 and try again. A secondary error will clearly indicate that training with this master key is impossible. Therefore, contact the service.
- When a single signal is heard, you need to quickly turn on the ignition. The buzzer will sound three times and the immobilizer indicator will go off. After 2-3 seconds, turn off the ignition. The car will respond by flashing the hazard lights and beeping.
- Remove the learning key. Before checking the operation of the registered key, wait at least 10 seconds.
The procedure looks complicated, but it ensures that the user cannot accidentally trigger relearning by simply using the master key to turn on the ignition.
In some systems without a master key, the manufacturer provides emergency PIN codes for key programming. On old Renaults, the PIN code is calculated through the Trantir program using the code printed inside the key body; on Kia/Hyundais up to 2007, it is determined by the last digits of the VIN, even without special programs (online services), and so on. The code entry itself is performed both by standard means of the car (Renault has an interior door lock button) and through the diagnostic connector. In this case, you will have to buy an adapter for old cars with inexpensive devices like VAG K-Line from Aliexpress. You can find the necessary software on the Internet. The already mentioned Kia/Hyundai uses the Cascade program, in which the immobilizer learning process is interactive and placed in the corresponding menu item.
Bypass immo using crawler
You can bypass the engine blocker by breaking the conductors. To complete the task, you will need to dismantle the protective cover on the steering column, which is secured with two self-tapping screws.
After this, the following is done:
- There are two thin cables going to the ignition switch; either of them (green or white insulation) must be cut.
- Then you need to connect a two-wire loop from the break point to the bypass module.
- This element is connected instead of an inductive loop. Then the chip is installed. It is installed in the standard key. The lineman is connected to the anti-theft installation.
If it is necessary to disable the security system, the loop contacts must be closed. The use of special Starline bypass modules is allowed. The device model VR-03 can function with any anti-theft systems.
FakeHeader
Comments 18
When you "reboot" your industry, the keys must and should learn smoothly. Why was the eeprom reset during the firmware update?
The principle is the following. The ECU contains FLASH and EEPROM. If they want to improve (change) the performance of the engine, they change the Flash. If they want to turn off immo or register new keys, or if it costs something else, they overwrite the EEPROM. But if the ECU is a replacement and the firmware is pre-installed into it, which is radically different from the required one, for example, the firmware and the car differ in the presence (absence) of a CAN bus, or the ECU from a UAZ is installed on a Prioress (or vice versa), so . so yes ! Only in these cases are both the firmware and eeprom overwritten
I have a slightly different problem: I have never had problems on the go. And when I start it, sometimes it doesn’t start—the starter spins, but to no avail. I look at the flashing yellow car... For the first time I can’t understand that we’re not starting. Now I just turn off the ignition, take out the key (you can also lock and unlock the doors with the key), after which the ignition is not a problem. This happens about 1 time out of 20. A problem, of course. But while I'm driving, that's why there's no red key, that's why I'm driving
Projects for domestic Lada Priora cars include special standard anti-theft devices. If such devices do not work properly, owners are forced to look for ways to disable the immobilizer on Priora.
The principle of operation of the immobilizer in Priora
How to activate the immobilizer?
What is an immobilizer for?
How to disable the immobilizer
Comments and reviews