Replacing the exhaust pipe on a VAZ 2101-VAZ 2107
Welcome! The exhaust pipe of a car's exhaust system - not many, but still most people who have an idea of what a car is, know that its exhaust system is divided into three parts, which includes the exhaust pipe, as well as a resonator and the most important rear part of the muffler, its By the way, you see it on the street, you can even say every day (If you pay attention to it), because it sticks out from the back of the car, usually on cars of the VAZ family, this part of the muffler is located under the bumper, on expensive foreign cars such as Mercedes, etc. .
This part is located in the bumper itself, so that you at least have some idea about this part, then in this case, look at the photo below and you will understand what we are talking about, but still, now we are not talking about that, but about replacing the exhaust pipe on cars of the classic family, therefore Let's return closer to this topic. Note! To replace the exhaust pipe (by the way, it is also called the pants of the car exhaust system), you will need to stock up on: A basic set of wrenches, which should also include a “13” wrench, and if possible, then stock up on an extension cord with a “13” coupling head, because the intake pipe is attached very inconveniently and it is not so easy to get to it, so immediately take with you (If you have these tools) a wrench and it would be best to choose the so-called cardan joint, then the work will be done more or less easier!
By the way, we also recommend that you stock up on either a caliper or a straight (without bends) metal ruler, since the intake pipes at the moment are not always made with high quality, for example, there are counterfeits, etc. And with the help of these things, it will be possible to determine how smooth the mating surface on your pipe is, thereby it will be possible to determine in advance whether there will be a tight connection between the pipe and the exhaust manifold or not, in general, you will learn about this a little later!
And in conclusion, let’s note one nuance: when replacing this pipe with a new one, always buy a gasket for the exhaust pipe of the muffler (that’s what it’s called) while standing in the auto shop, because the old gasket burns out and shrinks over time, and therefore when you start putting it on the new pipe, then you will no longer get a normal connection for this pipe, thereby the system in this place where the old compressed gasket will be located will be depressurized!
Summary:
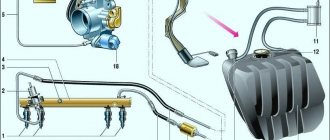
Where is the exhaust pipe located? It can be seen in two places: namely, its beginning can be easily seen in the engine compartment of the car, and you can see the continuation and tip of this pipe only by looking under the bottom of the car in the front part; for a more detailed location of this pipe under the bottom, see the photo:
When do you need to change the exhaust pipe? It is replaced in different cases, but basically it needs to be changed when it burns out badly (through), when air begins to leak through the formed hole in a given pipe, and the changed sound of the engine will tell you about this, because as a rule, if one of the parts of the muffler If it burns out, the engine starts to work louder than it was before, over time it even starts to irritate.
This pipe also needs to be replaced if it is deformed, because due to its deformation, the exhaust gases do not have time to completely exit the car’s engine, as a result of which all that part of the exhaust gases that did not have time to exit returns again to the engine and ends up in the cylinders themselves, because of this, the car loses its speed characteristics because the exhaust gases go back into the engine.
How to check the exhaust pipe for so-called defects? In fact, there is nothing complicated about this, firstly, let’s clarify one detail, we will check this pipe not for defects (Although you can say so) but for the evenness of the mating surface of this pipe, because as we already mentioned a little earlier when -the rolling surface of the receiving pipe must be perfectly flat, and bending it can ultimately lead to the system losing its tightness and, as a result, the sound of your engine increasing when driving.
In general, to check it, pick up a caliper or a metal ruler and, applying the caliper or ruler to the mating surface of the receiving pipe, check it for evenness in at least two places, a deviation of more than 2 mm, or no traces of rough surface treatment are allowed.
Exhaust system VAZ 2107 price and troubleshooting
Causes of strong white smoke from the exhaust pipe
A striking situation arises in many exhaust system repair services.
There is a list of services for the repair and replacement of individual components, but they offer to replace everything completely. It was as if everything had broken at once. Whether this is inexperience or other reasons is unknown.
Some breakdowns
The exhaust system of the VAZ 2107, the price of which can be impressive, does not always provide for the need to contact a car service if a breakdown occurs with it. There are malfunctions of the muffler itself, the exhaust manifold, corrugations, and neutralizer. The muffler most often fails due to low-quality gasoline and mechanical failures. On average, this unit lasts about three years.
Here we can advise you to refuel only at proven gas stations, and be careful when driving over obstacles in nature. When replacing, buy a quality product
A VAZ 2107 exhaust system diagram may be needed if you intend to make repairs. Many questions arise when the neutralizer fails. The replacement just costs a pretty penny. Many car owners simply throw it away. Even in this case, some work needs to be done. There is a way out of this situation. In place of the standard neutralizer, you can install parts from another manufacturer. They are much cheaper and have good quality. The main thing is to first find out what reviews there are about this part. This is not a problem when purchasing. Both the seller and other buyers will advise.
The exhaust system of the VAZ 2114, the price of which is 500 rubles, may require the installation of a flame arrester. One feature must be taken into account here. Not every flash arrester will fit your vehicle. You will have to look for one that is suitable for your brand. The metal catalyst is mostly praised. According to reviews, such failures are much less common.
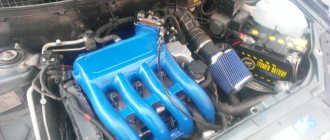
Recommendations for tuning
Problems with the exhaust system, admittedly, occur quite rarely. But sometimes drivers need tuning. When remaking this unit, do not forget about the need to reprogram the ECU. If changes have been made to the design, then you need to inform him about it. Otherwise, interruptions will occur and the injector may behave inappropriately.
Many car owners like to install devices that change the exhaust sound. This is where your imagination can run wild. A device for every taste. You can make the car quiet, or you can turn your horse into a sports car. It will roar like at a race. Mostly young guys love such tricks. This does not bring any benefit to the car. Only the owner’s “rating” increases in the eyes of some public.
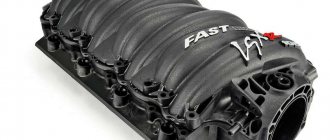
Alternative options for modifying the unit
If there are no problems with the exhaust system, then tuning can be done. The second tuning option, on the contrary, brings considerable benefits to the exhaust system. All parts from the exhaust manifold to the muffler are rigidly connected. When moving, vibration occurs, and therefore cracks and breaks occur. What can be done in this case? There is only one way out - installing corrugations. Then the entire structure is divided into two independent parts. Vibration will no longer have an effect. Frequent visits to a car service are eliminated.
To install the corrugation, you will have to contact the craftsmen. This work requires tools that the average car owner will not have in his garage. The VAZ exhaust system, the price of which should interest you before purchasing, can not only be repaired by the car enthusiast himself, but also tuned.
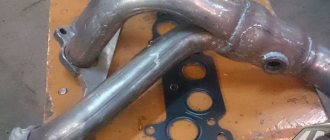
Reception pipe: what is it and what are its functions
The exhaust pipe of the muffler is an important element in the exhaust system of a car. It performs a complex and important function, removing exhaust gases that accumulate in the exhaust manifold of a car engine. Having passed through it, the exhaust gases end up in the muffler catalyst. If the vehicle's exhaust system is not equipped with a catalyst, then the exhaust gases end up directly in the front (additional) muffler.
The exhaust pipe is an important part of the car exhaust system, the strength of which is subject to increased requirements.
What is a muffler for?
The exhaust system of any vehicle is based on the use of a special element called a muffler. Operating a car without a muffler is basically impossible.
The muffler is designed to perform two main tasks:
reduce exhaust noise;
transform the temperature and pulsation of the exhaust.
The rationale for using a muffler is explained by the fact that the exhaust gases, after exiting the engine cylinders, have very high pressure and temperature. At the same time, sound waves are launched ahead of the gases in the exhaust system, which can make very loud noise during the exhaust. The muffler converts sound waves into heat energy, thereby reducing the amount of noise created by the exhaust. However, all modern mufflers in some way affect engine performance, since the transformation creates counteraction, due to which engine power is reduced.
The end of the pipe should protrude no more than 5 cm beyond the car body
Removal process
In the process of removing an element of the exhaust system from a VAZ 2107 (injector) for its subsequent replacement. The following tools will be useful to you:
To figure out how to remove the muffler from your VAZ correctly and replace it. Please read the following instructions carefully:
After this, the product can be freely removed to be replaced with a new one, which is installed in the reverse order.
Please note that the connection between the muffler pipe and the resonator pipe is located in front of the rear axle. The ends of the pipe with slots and female-male fasteners are tightened using a coupling. Removal of the product can be complicated by corrosion, which develops under the influence of temperatures and lubrication.
For this reason, moisten corroded parts with an anti-corrosive agent in advance (motor oil or brake fluid will also work). If you are planning to install a new muffler, it would be a good idea to purchase new suspension rubber bands (1 for the rear and 2 for the center location).
Let's figure out what the muffler consists of. In the photo above:
It is not difficult to understand which part has failed - we drive onto an overpass or inspection hole and start the engine. Usually, the muffler itself most often burns out, because it is inside it that moisture accumulates and it rots. The resonator breaks down less often because water condensation does not occur in it, since the vapors are blown into the main muffler. The service life of the exhaust pipe exceeds the service life of other parts of the exhaust system by several times.
Attention: Any work related to the replacement or repair of the exhaust system must be carried out only after waiting for all its parts to cool completely.
How to change the muffler on a “classic”
Replacing the muffler on a VAZ “classic” is not particularly difficult. It is necessary to first drive the car onto an inspection hole or overpass. If it is not possible to use the pit, you can raise the rear left side with a jack. The main thing is to make sure that the car is stably raised above the ground.
The easiest and most convenient way to get to the muffler is to drive the car onto an overpass
Preparing tools
In the matter of self-service or repair of a machine, a major role is played by the timely preparation of all those tools that may be needed in the work . To remove the muffler and install a new product in its place, you will need the following set of tools and auxiliary materials:
screwdriver with a thin flat blade;
brake fluid or WD-40.
How to remove a part
The order of work can cause difficulties only if the fastening joints are heavily rusted. Therefore, it is recommended to follow the following plan to make the work easier:
Treat all nuts on the clamps with WD-40 or brake fluid. The nuts are exposed to high temperatures during engine operation and therefore quickly stick to the body. Let the lubricant saturate the metal well for 10–15 minutes.
After this, you can try to unscrew the nuts with a wrench. In this case, it is enough to unscrew only one, since the other can simply be torn off.
After that, you will need to very carefully tap the junction of the main muffler and the resonator with a hammer and chisel. This is the only way to separate them in the future and remove them.
Use a screwdriver to press out part of the pipe so that the muffler can be pulled out of the resonator cavity.
After this, you can remove the three hanging elastic bands. Exhaust pipes are attached directly to the exhaust and on the sides of the resonator barrel.
Carefully remove all parts of the muffler from under the car.
Red arrows indicate bolted connections
How to install a new jammer
Accordingly, after dismantling, you can immediately install a new muffler. To do this, it is best to immediately buy new rubber rings and seals, since old ones are usually unsuitable for reuse:
First, the rear part of the “silencer” is installed, which is attached to three hanging elastic bands.
After this, fix the front part of the muffler with new bolts and make sure that the connection is securely fixed.
All gaskets must be replaced with new ones.
Before installation, be sure to remove all stickers from the case, as they may catch fire when heated.
The procedure for removing and installing the muffler is very simple. The only problem is unscrewing or tearing off the bracket nuts.
see also
Comments 9
Is there any gasket between the resonator and the catalyst?
it seems no, there is a metal-graphite one before the catalyst, if I’m not confused
I'm fine, it doesn't stick, mostly on asphalt. I didn’t even know about 6s
And there are holes on the asphalt))). On the Euro-3 jig, where the kat was not thrown out, the loaded one moved over a particularly prominent speed bump, and was hit by a can of kat so much that the middle steering rod had to be changed. Another friend of mine had the same problem. And when I took my four, at the first opportunity I threw out the cat and inserted the pipe.
“The donkey trampled and trampled, which should not have been done, because the trampling attracted Shai-Hulud, may the World be purified by his deed!”
>the article comes from the “six” My friend, “article”. >lubricated all the bolts with copper grease, and on top of that with graphite grease, just to be sure. It’s not worth it, really, it will be fine even with graphite... It looks like I seasoned the salad with sunflower oil, but I still dropped a little olive oil. In general, such cracks can be cooked and cooked, and you don’t need a new one, but it costs much less. Of course, if they’re brewed by weirdos, it won’t work for long... Thanks for the report!
The exhaust also needs to be changed, the resonator has holes...
Yes, it’s better to change in the summer than to freeze in winter or spend money on services
Lada 2107 › Surprises, replacement of manifold gaskets
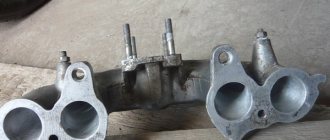
Having completed the plumbing work, I decided to check the condition of the inlet pipe and exhaust manifold. Several reasons prompted me to do this: — engine tripping when warming up; - a gradual drop in engine speed when warming up (rarely - up to a complete stop) and then a spontaneous sharp increase in speed; - steam from the exhaust pipe when warming up (perhaps it’s condensation, but I’m paranoid :)) - engine shaking when starting - almost imperceptible when cold and intensifying as it warms up (as with a crooked clutch disc); — excessive heating of the carburetor body; — traces of either oil or coolant with soot at the junction of the intake pipe and the cylinder head.
In general, a number of symptoms could indicate a burnout of the head gasket, but at the same time: - there are no traces of oil in the expansion tank and the antifreeze is clear, like new; — there are no bubbles in the expansion tank either during or after warming up the engine; — there is no emulsion on the MZG cover or on the dipstick; — the oil is simply dark, with no signs of coolant getting into it.
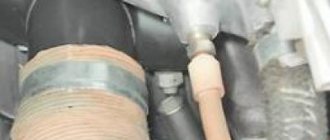
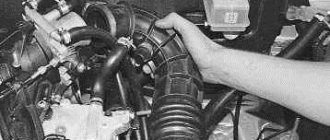
Therefore, I decided to check these gaskets first, buying 2 pieces for 54 rubles. Moreover, the operation as a whole is simple. I unscrewed the starter shield mounting nut and the M6 bolt of the shield from the exhaust manifold studs (it’s inconvenient to turn, especially when putting everything back together). The heater tube was not yet screwed to the water pump and manifold after replacing the pump. I removed the air filter housing, disconnected all the hoses from the intake pipe and carburetor and crawled under the car to unscrew the clamp securing the exhaust pipe to the gearbox bracket. The first surprise awaited me there:
The speedometer drive seal no longer holds
Okay, we'll deal with this problem later...
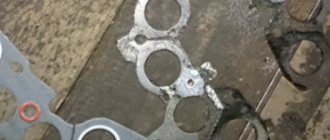
I disconnected the exhaust pipe from the exhaust manifold flange and removed the old gasket. More precisely, there were 2 gaskets there. Apparently, last time I put together an issue this way due to inattention - here’s another surprise