And the cold is coming again. For those whose interior heater on a VAZ 2107 does not heat well, the question arises - how to make the “stove” heat better? Most 7 car owners are dissatisfied with the operation of the stove or interior heater. Indeed, the stove efficiency of the classics of this brand is very low.
But this problem can be solved by modifying the stove yourself. To improve the operation of the heater, you do not need special tools or skills; everything is done using improvised means.
The design and principle of operation of the VAZ 2107 stove
By its principle, the design of the stove on the VAZ 2107 is quite simple, so it’s not difficult to understand it.
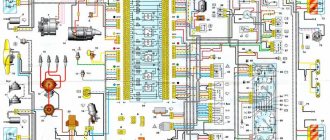
Diagram of the heating system VAZ 2107
Heating system operation diagram:
- Through an opening in the hood, outside air enters the air intake chamber. An air supply cover is installed inside it, which, if necessary, can open or block the air flow to the stove radiator;
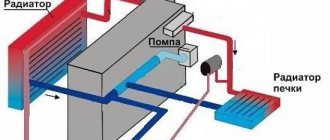
- The heater radiator is connected to the engine cooling system through the underwater and outlet pipes. Through them, heated antifreeze (coolant) enters the heater radiator and heats it. The flow of antifreeze is regulated by the heater tap: it can be opened at full power, partially or completely closed;
- An electric fan is installed behind the heater radiator. Turning on, turning off and adjusting the fan speed, as well as controlling the air supply cover and the heater valve is carried out from the passenger compartment. Rods extend from the control lever bracket to the controlled units;
- Cold air, passing through the stove radiator, heats up and the already warm air enters the system, and is then distributed through the air ducts. Connecting and disconnecting the air supply to a specific air duct is carried out using a damper system, and the direction of airflow is regulated by deflectors.
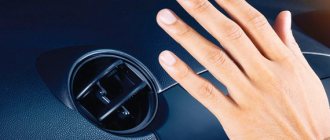
What should I do if the windshield defogger does not work?
Before we talk about why the windshield defogger does not work, let’s consider the operating principle and design of this system. Structurally, the ventilation and heating system of VAZ models of the Samara family is designed so that air enters the cabin through the cracks at the top of the dashboard, central and side nozzles, heated footwells and through the lowered door glazing. To increase the force of air flow, a fan is provided in the system.
Design features
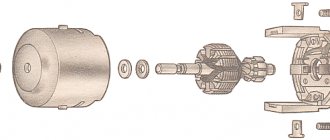
Electric motor. The commutator electric motor of the fan is powered by direct current; for more information about electric fans, see the website. To control the fan speed, a four-position regulator is provided on the dashboard. The rotation speed of the electric motor is changed by connecting or disconnecting additional resistors. When the engine is turned on directly (without resistors), the rotation speed will be maximum. The electric motor cannot be repaired and if it fails, it is replaced along with the fan wheel. The only thing that can be done to maintain the engine is to clean the manifold if necessary.
Why might the stove not heat up?
So, the stove does not work, it blows cold air. Since this system is quite simple, there are not many possible breakdowns, and many of them can be eliminated without incurring huge costs.
Main malfunctions and ways to eliminate them:
- Airing the system. If the antifreeze has recently been replaced, there may be an air lock in the stove system, as a result of which it will heat very poorly. In this case, you need to open the heater valve, and then carry out the standard procedure for removing air from the cooling system.
- There is scale on the heater tap, which prevents antifreeze from flowing through it. A faulty faucet prevents you from turning the stove on or off. Plain water may be the culprit of the problem if the car owner used it as a coolant in the summer. Deposits clog the tap hole and it has to be cleaned or replaced.
- There is scale or dirt in the heater radiator, while the underwater pipe is hot and the outlet pipe is cold. The formation of sediment is a natural process, even if you use only high-quality antifreeze. But VAZ drivers often make do with plain water, which causes corrosion of the metal elements of the cooling system. Rust settles in radiators and gradually damages them. You will have to remove the stove and try to clean it, and if that doesn’t work, then replace it.
- The pump does not pump. This is already serious, and is fraught with not only discomfort during the trip, but also overheating of the engine. The pump breaks down from scale deposited on it, the impeller can be worn down by solid particles and simply fail due to age. You need to check the condition of the drive belts, and if they are in order, replace the pump itself.
- In the heater radiator, the heat exchanger partition, which distributes the flow of liquid, has shifted. In this case, the antifreeze will enter the side tank of the radiator and immediately exit through the second pipe, without entering the honeycomb, then both pipes will be hot, and the radiator itself will be cold. It will have to be replaced; it cannot be repaired.
Rear window heating repair
To troubleshoot the heated rear window, you should start by determining the cause of its failure. If the individual threads of the heating element do not heat up, the threads have broken somewhere.
Repair in this situation consists of restoring the electrical circuit. To do this, you can try to restore the heating circuit using a special conductive glue, or solder the disconnection point. At the gluing site, the glass will heat up more due to the greater resistance in this section of the circuit, which can lead to the glass breaking.
We recommend not doing these “things” for the sake of saving, but simply replacing the rear window with a heating element. Believe me, you will spend much more time and money, worry about soldering, and in the end, you will still come to the conclusion - buy new glass.
Option 2 - not a single heating thread (strip) heats up
Connection diagram for heated rear window of VAZ 2106
- faulty button (switch), relay, rear window heating fuse
- wires are damaged
- tips are oxidized or poorly connected
- The contact from the glass heating element has become disconnected.
Replace faulty switch, relay, fuse, wires with new ones. Clean and crimp the terminals. If the terminal is unsoldered from the heating element, replace the glass with the heating element.
First of all, you need to check the heater valve. It opens and closes with a special cable. If its tension has weakened for some reason, then when you turn the lever, the faucet either does not open at all or moves literally a few millimeters. It will need to be tightened.
It is easy to check the performance of the radiator itself by warming up the power unit while the fan is not working. All you need to do is gently touch the antifreeze supply and discharge pipes with your hand.
Often, over the summer, the heater valve manages to sour, as they say. Therefore, when an attempt is made to open it, the damper simply breaks off and the drive roller remains in place. Such an element will have to be completely replaced with a working one.
If the cooling fluid level is very low, this will cause the radiator to remain relatively cold. Here you will need to look for a leak and replenish the coolant volume.
If the thermostat breaks down, it needs to be replaced with a new one, and the air lock is removed by pumping antifreeze through the system.
A failure of any main element of the heating system should be suspected only when warm air stops flowing into the cabin altogether. If its supply is limited only in several directions, then most likely we are talking about local breakdowns.
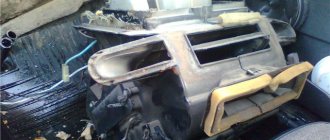
Replacing the VAZ 2107 stove
If the cause of the breakdown is in the heater radiator itself, you will have to remove it for replacement or repair. The procedure for dismantling is as follows:
- Disconnect the negative terminal of the battery;
- Before disconnecting the heater radiator pipes, drain the antifreeze from the system;
- Find the clamps that secure the stove pipes and remove them;
- Remove the pipes;
We disconnect the pipes from the stove in the engine compartment - Remove the rubber seal from the partition of the engine compartment;
- We dismantle the “torpedo” in the cabin and disconnect all the wires that go to the cigarette lighter, clock, etc.
Unscrew the torpedo mount from the bottom and sides - Unscrew the fasteners on the crane drive and remove the drive cable;
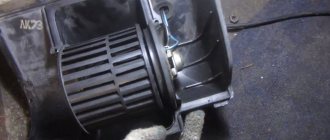
- Using a screwdriver, press out the brackets securing the fan casing. Remove the casing or move it down and to the right, this will make it possible to remove the heater radiator; Unscrew the screws of the fan casing
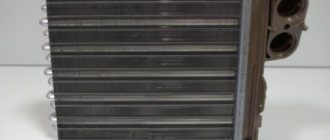
- We remove the heater radiator.
We take out the heater radiator
If the dismantling descriptions seemed complicated to you, below, in the video, you can clearly see how the whole process happens step by step.
The removed radiator must be washed, checked, and then repaired or replaced with a new one. Installing a new radiator is done in the reverse order. After installing and filling in antifreeze, the engine must run at high speeds to remove air pockets from the cooling system.
How to fix antifreeze leaks and bad smells
First you need to conduct a complete diagnosis of the car's cooling system. This can be done in the garage, even without special skills, just inspect the car for leaks. To do this, you need to open the hood, check the integrity of the pipes, hoses and covers. The condition of absolutely all elements must be assessed, and if there is damage, replacement must be carried out.
Antifreeze can also leak due to a malfunction in the crankcase of the power unit. Such a breakdown gradually leads to disruption of the functionality of the engine. To detect the problem, you need to inspect the oil tank cap from the inside. If there is a white coating on it, this means that coolant is getting into the engine crankcase. If the liquid gets directly into the car interior, then, as a rule, we are talking about a malfunction of the radiator. When a leak forms, some of the antifreeze leaks into the cabin, and the driver just notices a characteristic sweetish smell. To fix this problem, you will have to replace the radiator with a new one. In this case, the spilled liquid must be completely removed. Some car owners use old newspapers to do this and soak the leak area. Others use a plastic bottle to collect the liquid. A small hole is made in its cap, and the bottle itself is compressed to release air. The lid with the hole is immersed in the collected puddle, the moisture is sucked into the container. In several approaches, the liquid will be collected, and its remains will need to be wiped off with a cloth. Some causes of leakage can be even more difficult to identify
If there are no visible signs of a leak anywhere, but the smell is constantly present in the cabin, you should pay attention to the radiator of the heating system. Sometimes coolant leaks from the heater
Then the smell will be not just sweet, but burnt. In this case, as a rule, the leaked liquid goes under the mat. To fix this problem, you need to disassemble the stove body and replace its radiator. Sometimes it seems that the reason is in the radiator itself, and that the tubes connected to it are to blame. To prevent and eliminate leaks, it is worth treating the joints with sealants. But the best solution would still be to replace the problematic tubes.
vote
Article rating
Possible stove repair
What can be repaired in a stove radiator? Unfortunately, not in all cases it can be revived, but sometimes self-repair really helps.
- An old-style copper radiator can be soldered if it leaks. This will be faster than looking for a new radiator of the same type. With aluminum everything is much more complicated; welding will be required, but it can still serve if it gets to a good craftsman. However, only metal parts of the radiator have a chance of successful repair; plastic cannot be restored.
- You can wash the inside of the stove yourself. To do this you will need a Karcher, which can supply water under pressure. Water is poured into the radiator until clean water comes out.
- You can also clean the inside of the radiator using citric acid or caustic soda: dissolve it in water and pour it into the radiator for an hour. If the solution is poured out dirty, repeat washing until all contaminants are gone.
Below, in the video, there is an example of how you can clean a stove radiator using citric acid at home.
Common problems and solutions
Despite the simplicity of the design, the heating system of the VAZ-2107 fails quite often. Its most vulnerable places are:
- heater valve;
- fan (electric motor);
- stove radiator.
The heater valve of the “Seven”, like all classic VAZs, breaks down most often. Its most common malfunction is a leak caused by depressurization of the housing. This problem can be solved by replacing the spare part. Repairing the faucet is impossible in most cases.
Another common failure is a broken drive cable. To replace it, you will have to dismantle the tap, because it is impossible to get to its fastening on the side of the locking device without removing it. You should also monitor the cable tension. If you allow it to sag, the faucet valve will not open completely.
As for the fan, it cannot be called reliable. Usually it fails with the onset of cold weather. The cause of an electric motor malfunction, at best, is worn out bearings or brushes, at worst, a break or short circuit in the windings. Repairing the electric motor or replacing it can correct the situation.
The heater radiator also has two “diseases”: leaking and clogging. The first malfunction can be caused either by mechanical damage or by chemical processes. Today, radiators are made of aluminum alloy, which is not particularly resistant to technical fluids. And if old copper radiators could still be soldered, then modern ones can only be replaced.
Heat exchanger clogging also occurs as a result of chemical processes. Scale gradually settles on the walls of the device tubes and over time limits the normal circulation of the coolant. This leads to the fact that the air pumped into the cabin does not warm up to the required temperature. You can get rid of this problem by flushing the radiator with special liquids, or, in extreme cases, by replacing the device.
Heating and ventilation system
1 – air duct for heating the windshield; 2 – air supply cover; 3 – radiator; 4 – radiator casing; 5 – heater tap rod; 6 – outlet pipe; 7 – underwater pipe; 8 – heater tap; 9 – right air duct for heating the side window; 10 – side window heating nozzle; 11 – right air duct damper; 12 – additional resistor; 13 – air distribution cover; 14 – air duct damper for heating the windshield; 15 – fan electric motor; 16 – fan impeller; 17 – internal ventilation air duct; 18 – lever of the air distribution cover; 19 – outer lever of the windshield heating air duct damper;
20 – control lever bracket; 21 – control handle for the air duct dampers of the heated glass; 22 – air supply cover control handle; 23 – heater tap control handle; 24 – draft of the air supply cover; 25 – draft of the windshield heating flap; 26 – left air duct for heating the side window; 27 – central ventilation nozzles of the body interior; 28 – nozzle blade; 29 – nozzle; 30 – nozzle lever; 31 – gear wheel of the nozzle damper drive; 32 – rear seal of the air supply pipe; 33 – air supply pipe; 34 – front seal of the air supply pipe; 35 – air supply pipe valve; 36 – air supply pipe latch; 37 – damper with a gear sector.
Heater operation diagram
1 – air distribution cover; 2 – fan electric motor; 3 – impeller; 4 – heater tap; 5 – underwater pipe; 6 – outlet pipe; 7 – radiator casing; 8 – air supply hatch cover; 9 – hood;
10 – air duct for heating the windshield; 11 – air supply pipe; 12 – housing of the central ventilation nozzles of the body interior; 13 – control lever bracket; 14 – control handles; 15 – radiator; 16 – air duct damper for heating the windshield; 17 – internal ventilation air duct; 18 – air distribution cover lever
Other problems with the heating system
Although heater radiator breakdowns occur most often, there are other malfunctions that can be easily fixed with your own hands:
- Fan motor failure. Problems are created by the rotor bushings, which on the “original” motor are made of low-quality material. As soon as the heating system fan begins to whistle, it needs to be replaced with a non-original one, in which bearings are installed instead of bushings.
- Heater valve wear. It suffers from scale, dirt, and simply wears out. Cranes are usually not repaired, but replaced. It is better to replace a faucet with a ceramic core; it is much more reliable and durable than a metal one.
- Breakage of control unit rods. Everything is clear here: what should be regulated is not regulated - check the condition of the rods and their connection. Sometimes the problem is solved in just half an hour.
More complex work, such as tuning or modifying the stove, is no longer considered troubleshooting. Of course, the stove on a VAZ opens up endless possibilities for improvements and additions, but you can get by with what you have at the moment. The main thing is that everything works as it should, and then you definitely won’t freeze in winter.
It is better to check the heating system before the time comes to use it. In the summer it is more comfortable and easier to do repairs; you can take your time and look for high-quality and inexpensive spare parts, and generally come to the cold season fully armed. In most cases, when the VAZ 2107 stove does not heat, you can correct the situation yourself. You just need to have straight hands and the desire to do the repairs correctly and efficiently.
Step-by-step instructions for replacing the radiator
What should I do to get the stove working again? First of all, replace or repair the radiator; to do this, follow these steps step by step:
- Drain the coolant into a container.
- Unscrew the 2 clamps located on the pipes of the old device from the engine compartment and remove the hoses.
- Unscrew the rubber seal retainer and then remove it completely.
- The interior of the VAZ-2107 will also have to work. Remove the panel where the radio is located, using a screwdriver or a 7mm wrench, unscrew the fastening element of the heater valve drive cable.
- Don't put the screwdriver down; you'll still need it to remove the spring-shaped brackets. There are four of them, the parts are located on the casing of the ventilation equipment.
- Slightly lower the cover downwards and then move it to the left.
- The radiator can now be pulled out.
- Proceed to inspect the old unit. Which product can not be changed? If there are no traces of leaks on the metal tubes, there is no corrosion. Corrosion is cleaned out, and leaking metal pipes are replaced. It happens that the heater tap lever is jammed, the point is that it no longer opens or there are problems with closing. When reinstalling radiator components, remember that good gaskets seal the fit of the parts to each other. Each gasket should be covered with silicone sealant; screw them securely, but without overtightening the fasteners.
- Rubber hoses that carry coolant along the entire path are also subject to lubrication with sealant.
- Assemble and mount the radiator exactly as indicated in the instructions, but in reverse order.
- If necessary, add antifreeze.
- All that remains is to turn on the ignition and check how tight the connection of the pipes with the hoses of the VAZ-2107 is.
Let's sum it up
As you can see, even taking into account the simplicity of the design, repairing the VAZ 2107 stove can be a labor-intensive procedure due to difficult access to certain elements of the heating system.
Moreover, if such a need arises, modification and tuning of the VAZ stove, as well as maintenance and replacement of the VAZ 2107 heater with your own hands can be done independently in the conditions of an ordinary garage.
There is air in the engine cooling system: symptoms of airing, reasons for the formation of an air lock. How to bleed the engine cooling system.
Antifreeze boils and bubbles in the expansion tank. Causes of antifreeze or antifreeze boiling, main faults, troubleshooting, recommendations.
Reasons why coolant starts to leak. How to find the location of an antifreeze or antifreeze leak yourself. Useful tips and tricks.
Causes of air in the car engine cooling system and symptoms. How to remove an air lock from the cooling system, tips and tricks.
Why does the engine overheat or boil while the cooling radiator is cold? Signs of engine overheating, how to prevent serious consequences.
The VAZ 2110 heater does not work: the main reasons why the VAZ 2110 stove does not heat well. Diagnostics, replacement of VAZ 2110 heater radiator, modification.
Dismantling algorithm
VAZ cars of the classic family, which includes modification 2107, are good because to remove the heater radiator you do not need to dismantle the front panel, so the work of removing the heat exchanger of the interior heating system is not difficult. No specific tools are required, just 8 and 10 size screwdrivers and wrenches are needed.
Algorithm for removing the heater radiator:
Video: VAZ 2107 Replacing the heater radiator
- Drain the coolant by unscrewing the drain plugs on the engine and main radiator.
- On the left side of the engine shield (standing in front of the car) we look for two rubber tubes through which coolant is supplied and discharged to the heater. We loosen the clamps of these tubes and tighten them.
- We unscrew the screws securing the rubber seal through which the metal radiator pipes pass. Let's remove the seal.
- We move to the salon.
- We dismantle the shelf under the storage compartment on the passenger side. To do this, you need to unscrew the screws that secure it.
- Remove the lower part of the center console. It is attached to the floor and front panel with self-tapping screws. Since keys, a cigarette lighter, and a clock are installed on the lower part, after unscrewing the fastening elements, we move the box toward you (by turning on the reverse gear at the gearbox) and disconnect the wiring going to the indicated elements (it is better to mark the wires so as not to confuse them during assembly). After this, the box can be removed from the cabin.
- Unscrew the control mechanism cable from the antifreeze supply shut-off valve.
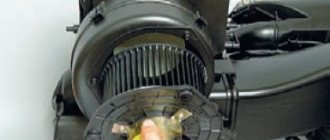
- We disconnect the lower part in which the fan is located from the stove body. It is attached to the top of the case using 4 latches installed on the sides. Use a screwdriver to pry up the latches, after which the lower part of the case will drop down. We move it to the side or completely remove it, having first disconnected the power wires of the fan motor.
- After dismantling the bottom of the case, you will have access to the radiator, which can be removed by pulling it down using the metal pipes.
Radiator installation
Note that this is only one of the methods for disassembling the stove on a VAZ-2107. It is not necessary to drain the antifreeze; you can disconnect the rubber tubes without removing them, and 1.0-1.5 liters of coolant will flow out of the cooling system, which are topped up after assembly. The main thing is that after disconnecting the tubes, lift their ends up and secure them in this position.
During the disassembly process, you can immediately disconnect the pipelines from the radiator along with the shut-off valve and then remove the heat exchanger itself.
What are the reasons for the ineffective operation of a car heating system?
So, let's figure out why, when the fan is turned on, in heating mode, only cold air enters the cabin, and why only when the internal combustion engine is warmed up does the stove begin to provide the long-awaited warmth?
First of all, drivers, especially those without experience, must make sure that the car’s heating system has actually been put into operation.
If the stove is turned on but does not work at all, then you should check to see if the fuse has failed. A special electrical diagram will help in this matter, which can be found on the Internet resource.
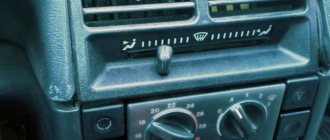
It is imperative to check the correct location of the so-called oven sliders, with the help of which the supply of both cold and hot air is adjusted. In order for heat to flow inside the cabin, 2 “sliders” must be placed in the center, and 1 and 3 should be located in the right corner of the front panel of the stove.
The fuses are all intact, but the heating system still only blows cold air, then you should look deeper for the causes of the malfunction.
What to consider when choosing a location for the stove
Designing the house
The first and immutable requirement when choosing the location of the stove is the complete design of the house. That is, the location of the stove in the house should be planned simultaneously with the walls. In this case, it will not happen that one room will be unbearably hot, and the other will be bitterly cold. And it’s much easier to pour the foundation under it before the floors are laid.
But there are other rules that should be followed.
Under no circumstances should the foundation for the stove be connected to a common foundation. Over time, the house will definitely shrink and the least that will happen is that the stove will become covered with cracks, from which wisps of smoke will constantly curl, making it impossible and even dangerous to stay in the room. Well, at most it will simply warp and require a lot of repairs. The location must be selected in such a way that the chimney is in close proximity to the internal main wall
It will be possible to support the pipe on the ceiling beam. Be sure to take into account the layout of the house. Number of rooms and windows. The need to heat the second floor, if there is one
And the material from which the house is built. Next, the approximate heat loss of the entire structure is calculated. From here the heat transfer of all surfaces of the stove is calculated. The design of the furnace itself must also be thought out in advance. Well, one last thing. If the house is too large and one heating device is not enough, you should calculate how many stoves will need to be installed and in what places.
The need to heat the second floor, if there is one. And the material from which the house is built. Next, the approximate heat loss of the entire structure is calculated. From here the heat transfer of all surfaces of the stove is calculated. The design of the furnace itself must also be thought out in advance. Well, one last thing. If the house is too large and one heating device is not enough, you should calculate how many stoves will need to be installed and in what places.
Many years and even centuries of experience show that building too many chimneys means consuming an increased amount of firewood. There is no need to make a separate stove for each room. This is why it is called an ideal location, because with a minimum of space, the largest possible area is heated.
And one more important fact
A stove, no matter what type of fuel it is heated with, is a device around which some amount of garbage, dirt, ash, soot and other dirty substances always accumulate. Therefore, it is better to make the firebox hole in the room that is closest to the front door. Then you won’t have to carry firewood, buckets and bags of ash across the whole house
Believe me, after these voyages the rooms will definitely have to be cleaned
Then you won’t have to carry firewood, buckets and bags of ash across the whole house. Believe me, after these voyages the rooms will definitely have to be cleaned.
Common problems and solutions
Despite the simplicity of the design, the heating system of the VAZ-2107 fails quite often. Its most vulnerable places are:
- heater valve;
- fan (electric motor);
- stove radiator.
The heater valve of the “Seven”, like all classic VAZs, breaks down most often. Its most common malfunction is a leak caused by depressurization of the housing. This problem can be solved by replacing the spare part. Repairing the faucet is impossible in most cases.
Another common failure is a broken drive cable. To replace it, you will have to dismantle the tap, because it is impossible to get to its fastening on the side of the locking device without removing it. You should also monitor the cable tension. If you allow it to sag, the faucet valve will not open completely.
As for the fan, it cannot be called reliable. Usually it fails with the onset of cold weather. The cause of an electric motor malfunction, at best, is worn out bearings or brushes, at worst, a break or short circuit in the windings. Repairing the electric motor or replacing it can correct the situation.
The heater radiator also has two “diseases”: leaking and clogging. The first malfunction can be caused either by mechanical damage or by chemical processes. Today, radiators are made of aluminum alloy, which is not particularly resistant to technical fluids. And if old copper radiators could still be soldered, then modern ones can only be replaced.
Heat exchanger clogging also occurs as a result of chemical processes. Scale gradually settles on the walls of the device tubes and over time limits the normal circulation of the coolant. This leads to the fact that the air pumped into the cabin does not warm up to the required temperature. You can get rid of this problem by flushing the radiator with special liquids, or, in extreme cases, by replacing the device.
Heating and ventilation system
1 – air duct for heating the windshield; 2 – air supply cover; 3 – radiator; 4 – radiator casing; 5 – heater tap rod; 6 – outlet pipe; 7 – underwater pipe; 8 – heater tap; 9 – right air duct for heating the side window; 10 – side window heating nozzle; 11 – right air duct damper; 12 – additional resistor; 13 – air distribution cover; 14 – air duct damper for heating the windshield; 15 – fan electric motor; 16 – fan impeller; 17 – internal ventilation air duct; 18 – lever of the air distribution cover; 19 – outer lever of the windshield heating air duct damper;
20 – control lever bracket; 21 – control handle for the air duct dampers of the heated glass; 22 – air supply cover control handle; 23 – heater tap control handle; 24 – draft of the air supply cover; 25 – draft of the windshield heating flap; 26 – left air duct for heating the side window; 27 – central ventilation nozzles of the body interior; 28 – nozzle blade; 29 – nozzle; 30 – nozzle lever; 31 – gear wheel of the nozzle damper drive; 32 – rear seal of the air supply pipe; 33 – air supply pipe; 34 – front seal of the air supply pipe; 35 – air supply pipe valve; 36 – air supply pipe latch; 37 – damper with a gear sector.
Heater operation diagram
1 – air distribution cover; 2 – fan electric motor; 3 – impeller; 4 – heater tap; 5 – underwater pipe; 6 – outlet pipe; 7 – radiator casing; 8 – air supply hatch cover; 9 – hood;
10 – air duct for heating the windshield; 11 – air supply pipe; 12 – housing of the central ventilation nozzles of the body interior; 13 – control lever bracket; 14 – control handles; 15 – radiator; 16 – air duct damper for heating the windshield; 17 – internal ventilation air duct; 18 – air distribution cover lever