The electric motor of the heater fan (ME-255) of VAZ 2104, 2105, 2107 cars is supplied with voltage from terminal “30” of the generator.
The following is an electrical diagram for switching on the electric motor of the heater fan of VAZ 2104, 2105, 2107 cars
There is an additional resistor in the electric motor switching circuit. It is secured with two spring washers in the heater fan housing. When voltage is applied to the electric motor through a resistor, the motor shaft rotates at a reduced frequency.
The ME-255 DC electric motor itself is excited by permanent magnets.
Notes and additions
— On VAZ 2104, 2105, 2107 cars with mounting block 40.3722, the electrical circuit of the heater motor is protected by fuse F1.
More articles on electrical equipment of VAZ 2104, 2105, 2107 cars
Everywhere on the Internet they tell you how to install a 4-position regulator from Kalina, the principle of which is to switch 4 power resistors of different values. But we will take a different path - we will solve the issue radically, using modern technologies. We will make a smooth speed controller.
The description for the set says: “Dimmer of incandescent lamps 12V/50A The device is designed to adjust the brightness of incandescent lamps operating on direct current with a power of up to 600W (50A). ... The proposed device can be used as a power regulator for various heaters operating on DC voltage, for example, car seat heaters or engine heaters. The device can be used to regulate the speed of powerful DC motors. The use of modern element base made it possible to increase the efficiency of the regulator to 99% and minimize the dimensions of the device.”
The stove fan consumes up to 6 amperes, so this regulator is suitable. We will collect and watch. To be continued…
UPD. In the comments to the set I found the following dialogue: Evgeniy58 11/17/2016 04:16 Hello. I connected this regulator to the electric motor of the stove, adding a diode between the motor terminals. The motor constantly beeps during operation, is it possible to increase the PWM frequency in this circuit beyond the audibility range? How to do it? +1 Advisor 11/17/2016 10:11 Replace capacitors C2 and C4 with a nominal value of 2.2nF and 22nF, respectively, the beeping will stop.
If it beeps, I know what to do.
Also, the stove fan itself was replaced with a fan from Luzar luzar.ru/catalogue/elektr…telya-2101-2107-lfh-0101/ Its advantage is that it is not on bushings, but on ball bearings. Luzarov fans are also balanced, which significantly reduces operating noise. When I replaced the engine radiator fan with a Luzarov one, it began to work silently and blew twice as well. The staff member was yelling so loudly that the howl could be heard from the cabin. I think the stove fan will also show its advantages.
Continued 09/24/2017 Now the task is to put all this on the car. The electrical diagram for connecting a classic stove fan is known to everyone
I decided to keep the selection of options as follows: The first position of the switch is to supply voltage to the motor through the shunt, as before - fixed half speed. The second position of the switch is to supply voltage through a smooth control circuit. However, looking at the adjustment connection diagram, it becomes clear that voltage must be supplied to the motor from points 2 and 3, and the motor will not have direct contact with the GND contact, only through transistor VT1 of the smooth control circuit.
How the stove 2107 works
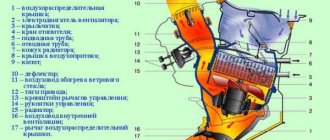
So, the heating system of the VAZ 2107 includes:
- heater;
- fan;
- heater control unit;
From the outside, air enters through the air intake into the casing of the air intake chamber. The camera is located in the engine compartment (in the area under the windshield). The air is then redirected to the heater, where moisture condensation occurs.
An important element is the heater radiator on the VAZ 2107, which heats up due to the circulation of coolant (coolant) in the engine cooling system. In this case, the air temperature changes due to the opening and closing of a special tap (VAZ heater tap), which reduces or increases the flow of heated coolant entering the heater radiator.
You can control the crane thanks to the presence of a regulator in the cabin, which is connected to the crane using a flexible rod. The air flow into the cabin is supplied by the heater fan, and the intensity of the supply will depend on the rotation speed. The VAZ 2107 heater motor is responsible for the operation of the fan. The fan rotation speed changes due to the use of a resistor.
By the way, if the car is moving at high speed, the heating system can supply air to the cabin even when the VAZ 2107 heater fan is turned off. The fact is that the air flow from outside is capable of creating pressure in the air supply box, due to which heated air penetrates into the cabin.
The heating system itself is simple. Air ducts can direct heated air to the feet, the driver, the windshield and side windows, etc. You can control the stove, change the temperature, and select the blowing direction using the knobs on the dashboard.
The handle at the top is responsible for adjusting the position of the heater tap. By moving the handle as far as possible to the left, the tap closes completely, and to the right will mean full opening.
The middle handle changes the position of the air supply cover, which allows you to adjust the intensity of the hot air supply. The handle on the bottom allows you to control the dampers of the heated glass air ducts. If you move the handle to the right, the air flow goes to the side windows, while the left position allows you to blow the windshield.
Interior ventilation
Outside air can enter the vehicle interior:
- with the door windows down;
- through the upper nozzles on the instrument panel, if you move distribution lever 7 (Fig. 9) and lever 6 for controlling the air supply hatch cover to the right;
- through the side nozzles 1 on the instrument panel, if you move lever 6 to the right and lever 7 to the left;
- through the holes of the heater casing, if you open the heater cover with lever 9 and move lever 6 to the right;
- through the central nozzles 4 directly from the air supply box when the car is moving, if the regulators 2 open the nozzle flaps (summer airflow).
By moving lever 3 in the horizontal and vertical directions, the direction of the air flow from the nozzle changes.
In the middle position of lever 7 and in the right extreme position of lever 6, air will flow through both the top and side nozzles.
If the vehicle is moving at low speed, you can increase the amount of incoming air by turning on the electric heater fan with switch 10.
VAZ 2107 heater fan does not work
Hello. This time I will write about possible reasons why the heater motor on a VAZ 2107 may not work. These reasons can also be attributed to other classic models such as VAZ 2105, 2106, 2101, 2103, 2104.
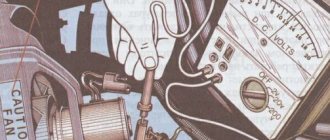
To check all possible malfunctions, you need to have at least a test lamp, or better yet, a multimeter.
If you find out that it is the heater motor that has broken down, then read the article.
To understand what can break and why the VAZ 2107 heater fan may not spin, you need to consider the electrical circuit for powering this motor.
Causes and signs of heating fan failure
The list of reasons why a VAZ 2107 stove fan may break is small. Here he is:
- breakage of the blade in the impeller. As mentioned above, the furnace fan impeller on the VAZ 2107 is unreliable because it is made of very fragile plastic. To make matters worse, the fragility of this material increases in the cold. Therefore, you should not be surprised that the impeller breaks in the most severe frost;
As a rule, the plastic blades in the impeller of the VAZ 2107 break at the root
If the brushes in the VAZ 2107 motor are worn out, the fan will not rotate
The signs by which you can recognize a breakdown of a heating fan are also well known. Let's list them:
- After turning on the heater the fan does not make noise. This means that either the motor is broken, or it is working properly, but the current supply to it is interrupted. This usually occurs due to a blown fuse responsible for this section of the vehicle’s on-board electrical network;
- The rotation of the heating fan is accompanied by a loud grinding or crackling noise. This means that a piece of the blade has broken off from the impeller and is hitting the inside of the furnace casing;
- The furnace fan rotates with a loud, continuous squeaking noise that gets louder as the speed increases. The source of the squeak is the bushing in the fan. Over time, it wears out, and play appears on the fan, which causes a characteristic creaking sound.
About lubrication of the heating fan VAZ 2107
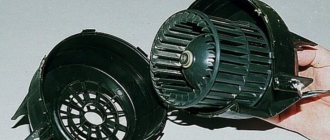
In short, lubricating the fan on a VAZ 2107 is a pointless task. Now more details. All heating fans on the VAZ 2107, regardless of the year of manufacture of the car, are equipped only with bushing bearings. As mentioned above, the bushing wears out over time and begins to creak piercingly. If the play resulting from wear of the bushing is small, then the creaking can be eliminated with the help of lubricant. But this is only a temporary measure that will lead to nothing, because very soon the lubricant will run out, the play will increase, and the fan will creak again. Therefore, the only rational option in this situation is to replace the furnace fan with a new one. Moreover, it is desirable that the new fan be equipped not with a bushing, but with a ball bearing, which will last twice as long.
By the way, about fans with ball bearings. Lately it has become extremely difficult to find them on sale. It is difficult to say what causes this. Perhaps this is due to the venerable age of the machine itself, which was discontinued a long time ago. So car owners, in search of the necessary spare parts, increasingly have to resort to a wide variety of tricks. For example, one driver I know thought of ordering a stove fan... on Aliexpress! When I heard about it, I didn't believe it. In response, the man took out his smartphone and showed me auction lots with fans. Where the VAZ fans came from at the Chinese online auction is a big mystery. But the fact remains a fact. By the way, they cost only a third more than domestic ones. This is likely an additional charge for delivery (even though the website proudly states that delivery is free). The parcel takes an average of one and a half months to reach our country.
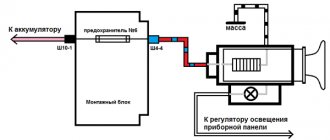
Connection diagram for heater fan VAZ 2107
The diagram shows how the stove fan (4) is powered. Power from the battery, through the mounting block (1), goes to the ignition switch (5) and again goes to the mounting block (1). In the mounting block (1) it passes through fuse F1 (10 amperes) and goes to the stove speed switch button (2). Next, power from the button goes either through the resistance (3) to the motor (4), or directly to the stove motor (4).
The VAZ stove fan will not work if any of its circuit components is faulty. You can determine the reason why the VAZ 2107 heater fan does not work:
- There is a fault in the mounting block.
- The contacts of the heater fan speed switch are burnt out.
- The speed control resistance has burned out.
- There is a malfunction in the heater motor itself.
Let's take a closer look at each of the faults.
How to remove air from the engine cooling system.
The process of removing an air lock on cars is almost the same, be it Kalina, Priora, Granta, Hray, Vesta, VAZ 211(0-5), 2101-2107, Opel, Daewoo Matiz, Nexia, Nissan Almera, Gazelle Business, Audi 80-100 , BMW E39, Peugeot, Chevrolet Cruze, Skoda, Mazda, Mitsubishi Lancer, Suzuki Grand Vitara, Niva, UAZ, Volkswagen, Ford, Renault Duster, on Chinese Lifan and even on premium class cars.
There are several options for removing an air lock from the cooling system:
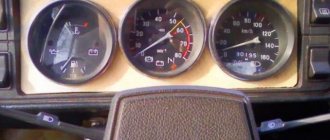
Malfunction in the VAZ 2107 mounting block
If the stove stops blowing air, then first of all look to see if fuse F1 in the mounting block is intact. Usually, if this fuse blows, then the heated rear window and reverse lights stop working along with the heater. This fuse must be rated 10 amps. No more and no less. If you install a fuse of less than the nominal value, it will constantly burn out, and if you install a fuse of a higher nominal value, it is possible to burn the mounting block. If you have a fuse of a higher rating (as in the photo below), then the likelihood increases that the mounting block has failed and the plus is not supplied to the speed shift button. How to find out, read the next paragraph.
Anti-fog protection for windshield, front door glass and rear window
To protect the windshield and front door windows from fogging, it is enough to direct cold air onto them, for which:
- close the heater cover with lever 9;
- move lever 6 to the right, and set lever 7 to the middle position;
- Install the guide vanes of the side nozzles so that the air flow is directed towards the front door windows.
If you need to warm up the incoming air a little, move lever 5 of the heater valve control partly to the right. If necessary, turn on the electric heater fan.
To protect the rear window from fogging, turn on its electric heating with switch 8.
Contacts of the heater fan speed switch are burnt out
You checked the fuse and saw that it was intact. Let's dig further. Now we take and remove the gear shift button from the panel and disconnect the wires from it. Afterwards, we reliably connect one end of the indicator light to ground, and alternately insert the other end into the removed terminals of the wires disconnected from the button. The ignition must be on!
If the light does not light up, then power is not supplied to the speed switch and the mounting block is most likely faulty.
If the light comes on when testing one of the contacts, it means either the button or something else is faulty. How to find out? Very simple! To do this, we make a jumper from a regular wire, from the contact, during the test of which the indicator light came on, to one of the other two contacts. The stove motor will work if the button is faulty. If the motor does not work, then it is the motor that is faulty.
Explanation of symbols
Knowledge of the definitions of the 2107 Lada electrical circuit will help you quickly locate the required wire, diagnose it, identify and fix the malfunction. Of course, when replacing the cabin filter or changing the oil, such information will not be useful, but in specialized matters, deciphering the symbols will significantly simplify the repair process.
- 1 – headlights VAZ 2107;
- 2 – side turn signals;
- 3 – battery;
- 4 – starter activation relay;
- 5 – carburetor electro-pneumatic valve;
- 6 – internal carburetor switch;
- 7 – generator system 37.3701;
- 8 – gearmotors for headlight cleaners*;
- 9 – fan motor activation sensor;
- 10 – electric motor of the engine cooling fan;
- 11 – sound signals;
- 12 – ignition distributor;
- 13 – spark plugs;
- 14 – starter;
- 15 — coolant temperature indicator sensor;
- 16 – engine compartment lighting;
- 17 – critical oil pressure indicator sensor;
- 18 – warning lamp for insufficient brake fluid level;
- 19 – windshield wiper electric motor;
- 20 – power system valve control unit;
- 21 – ignition coil;
- 22 – electric motor of the headlight washer pump*;
- 23 – electric motor of the windshield washer pump;
- 24 – mounting block;
- 25 – windshield wiper relay;
- 26 – hazard warning and direction indicator relay;
- 27 – brake light switch;
- 28 – reverse lamp switch;
- 29 – ignition relay;
- 30 – ignition switch;
- 31 – three-lever switch;
- 32 – alarm switch;
- 33 – plug socket for a portable lamp**;
- 34 – heater heater fan switch;
- 35 – additional switch for the heater electric motor;
- 36 – indicator lamp for turning on the heated rear window;
- 37 – indicator lamp for insufficient brake fluid level VAZ;
- 38 – signaling unit;
- 39 – electric motor of the stove fan;
- 40 – glove compartment lighting lamp;
- 41 – lamp switches on the front door pillars;
- 42 – switches for warning lights of open front doors***;
- 43 – alarm lights for open front doors***;
- 44 – connecting block;
- 45 – cigarette lighter;
- 46 – hours;
- 47 – instrument lighting switch;
- 48 – diode for checking the serviceability of the warning lamp for insufficient oil pressure and brake fluid level;
- 49 – fuel level indicator;
- 50 – indicator lamp for insufficient gasoline level (fuel reserve);
- 51 – speedometer;
- 52 – control lamp for turning on the direction indicators on the dashboard;
- 53 – warning lamp for the carburetor air damper opening;
- 54 – indicator lamp for battery charge indicator;
- 55 – switch for signaling that the carburetor air damper is slightly open;
- 56 – instrument cluster;
- 57 – econometrician;
- 58 – lamp switches on the rear door pillars;
- 59 – coolant temperature indicator;
- 60 – tachometer;
- 61 – handbrake indicator lamp;
- 62 – low oil pressure indicator sensor;
- 63 – indicator lamp for high beam headlights;
- 64 – signaling device for turning on dimensions;
- 65 – voltmeter;
- 66 – parking brake warning switch;
- 67 – external lighting switch;
- 68 – rear window heating switch;
- 69 – rear fog light switch with on indicator*;
- 70 – fog light circuit fuse;
- 71 – interior lighting lamp****;
- 72 – rear lights;
- 73 – fuel level indicator and fuel reserve sensor;
- 74 – pads for connecting to the rear window heating element*;
- 75 – license plate lights.
* Some models have headlight and windshield wipers installed together. **Models up to 2000. ***Cars that came off the assembly line before 1998. ****One lamp in the center of the roof (before 2000) or two lamps located in the body pillars after this date.
Malfunction in the heater motor itself
Before disassembling the panel and stirring up the interior, check whether the mass going from the heater motor to the body sits well. It often happens that this wire simply rots.
If you have a multimeter, you can ring it. To do this, take out the speed switch button and disconnect the contacts from it. Now, in the continuity mode, connect one probe of the multimeter to ground, and check the wires with the others one by one. If the motor and ballast resistance are working properly, the multimeter will beep when checking two of the three wires. If the ballast resistance is faulty, then the multimeter will beep when checking one of the three wires, and if the heater motor does not work or does not have contact with ground, then the multimeter will be silent.
Stage two - processing of the workpiece
The future air intake on the hood of a VAZ 2107 or any other car should dry well for a maximum of two days. After this, the resulting workpiece must be trimmed off. Be sure to remove everything unnecessary inside and make a hole through which air will then circulate. If defects are noticed - irregularities or protrusions - they can be removed using sandpaper.
When the surface of the workpiece has taken its final form and there are no defects left on its surface, it should be treated with mastic. It should be mastic with fiberglass. If you couldn’t find it, another one will do. The procedure is necessary in order to hide minor irregularities and gaps in the workpiece. Apply in a thick layer. During the procedure, it is necessary from time to time to apply the workpiece to the place on the hood where it will be installed later. If during fittings it turns out that the part does not fit tightly to the hood, the gaps can be quickly eliminated.
Then the surface is treated with putty. It is recommended to first apply the composition in a thick layer, then distribute it over the workpiece, gradually adding material, but in a thin layer. When the putty has dried, sand it with sandpaper. The result is a perfectly flat, smooth surface. Therefore, if any are noticed, it is necessary to either take up the sandpaper again or apply an additional layer of putty.
There is nothing left until work on the part is completed. It should be primed, then treated with a degreasing solution and finally painted. The painting process takes place in several stages. This is, in fact, application, then drying - no more than twenty minutes. An additional layer of varnish will need to be applied on top. The procedure must be repeated three times.
Frequent malfunctions of the VAZ 2107 stove
mashinaa.ru
The most typical malfunctions of the VAZ 2107 stove include:
- Air entering the cooling system. This usually happens after the system has been filled with antifreeze. Removing the airlock normalizes the heating process of the interior.
- When the heater tap is open, coolant does not flow into the radiator. This most often occurs when water is used as antifreeze. Scale forms in the system, clogging the faucet and impeding the passage of coolant. The problem is eliminated by dismantling the tap and then cleaning or replacing it.
- Poorly functioning or failed water pump. If the pump does not pump coolant, this can lead not only to a lack of heating of the interior, but also to more serious problems, such as engine overheating. The water pump does not work, as a rule, when the generator belt breaks, as well as when it jams as a result of wear on the bearings.
- Clogged stove radiator honeycomb. In this case, the supply pipe will be warm and the outgoing pipe will be cold. The radiator often becomes clogged when water is used as a coolant, as well as when oil or additive particles enter the system to eliminate leaks. Cleaning or replacing the radiator will help restore normal operation of the stove.
- Displacement of the partition according to the website mashinaa.ru in the radiator. If both radiator hoses are hot, but warm air does not enter the cabin, then most likely the partition in the radiator has shifted. The only solution to the problem is to replace the radiator with a new one.
If an oily residue appears on the floor or glass, you should look for an antifreeze leak, which may be:
- on tap;
- on pipes;
- on the radiator.
If a faucet or pipe is leaking, it should be replaced. A leaking radiator can be temporarily sealed, but it will still need to be replaced soon.
The list of possible stove malfunctions is not limited to this.
It can be quite difficult to get to some elements of the VAZ 2107 heating system
Installation
The new electric drive is installed in the reverse order. Do not forget to check the functionality of the purchased unit before installation. This will avoid unnecessary steps to re-disassemble the heater. Check if the engine is functioning
Fortunately, just connect it to the battery installed on the car directly.
When replacing the fan, it makes sense to also inspect other elements of the heating system of your “Seven”. Make sure that:
- there is no damage to them;
- the seal is not broken.
Pay special attention to the heater valve and radiator. Timely detection of problems will allow them to be eliminated with minimal expenditure of money and time.
This video will give you a better idea of the process:
The stove doesn't work in summer
Sometimes during the warm season it is impossible to turn off the stove by setting the upper handle of the control unit to the extreme left position. If you cannot turn off the tap, the tap itself or its drive cable is faulty. The tap can be found under the instrument panel on the passenger side. If you also cannot close it manually, you should not apply much effort. The faucet may break and antifreeze may leak into the cabin.
You can replace the faucet after purchasing a new one at any car service center. However, you can try to do this yourself. It should be noted that changing the faucet with your own hands is quite inconvenient due to its location. First, open the hood and disconnect the pipe going to the tap. Since coolant will flow from the pipe, it is necessary to place a previously prepared container under it. After this, you need to remove the storage shelf and, using a 10mm wrench, unscrew the two nuts securing the faucet to the heater body from the passenger seat. Then the tap is removed from the studs, removed and replaced with a new tap in the reverse order.
The reason for the inability to turn off the heater is usually a faulty heater valve.
Preparatory work
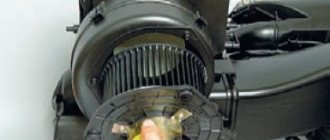
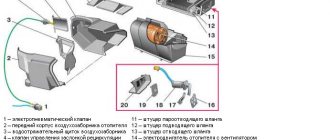
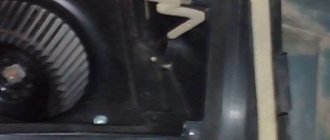
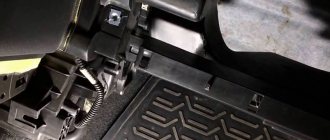
Without removing the torpedo, you will not be able to remove the fan from the VAZ-2107, no matter how hard you try. Therefore, you will have to disassemble it. For this:
- disconnect the negative connector from the battery;
- remove the shelf at the front passenger seat;
- remove the glove compartment.
We remove the interior heating control levers without removing the panels yet. Proceed with caution - they are very fragile. Then we completely disconnect all the terminals from the electrical appliances installed on it and only after that we completely dismantle the torpedo.
Selecting replacement parts
The rotten underbody of a car requires painstaking and lengthy repairs. To thoroughly check the condition of the body, it is recommended:
- Free the car interior from the interior, remove the floor.
- Drive the car onto an overpass or turn the car over, in good lighting, tap the bottom with a hammer, having previously cleared it of dirt and dust.
- Carry out a thorough inspection, determine the degree of corrosion and the depth of the lesions.
- For inspection, you need to use a powerful lamp or a portable mirror; with this tool you can inspect pockets, sinuses, and other hard-to-reach places.
If significant pockets of corrosion are identified, the bottom is rusted through, then it is necessary to digest the body, strengthening the damaged areas with sheets of metal. The following aspects are taken into account:
- The recommended thickness of the welding sheet is 1-2 mm.
- When working with thin overlays, it is necessary to ensure optimal temperature conditions.
- Thick metal is more difficult to weld, but is harder to damage.