Almost all modern cars, with extremely rare exceptions, are equipped with on-board computers. Some companies use the simplest solutions, others try to provide car owners with the most technologically advanced, informative and efficient car computers.
On-board computers (OB) are designed to display basic and additional information related to the operation of the engine, various systems and auxiliary mechanisms. The data is displayed on a special display. The on-board computer collects information from all controllers and sensors and displays it on the screen.
Using this device, the driver can not only monitor the consumption or mileage of the car, but also find out in time about emerging problems in the operation of the vehicle. If the BC detects problems or disturbances in the operation of the engine or other systems, then the corresponding lamps on the dashboard light up and error codes appear on the computer screen.
As the faults that caused the error are eliminated, it needs to be removed. This is not always easy to do, since some codes still remain in memory after resetting the BC. Therefore, you should choose the optimal way to solve the problem.
Reset errors
Errors can appear for a variety of reasons. Moreover, most often car owners encounter errors in the operation of the power plant.
The control system, with which the on-board computer is connected, combines a huge number of sensors and monitors the functioning of various components, mechanisms and systems. We should not forget about the differences between the cars themselves, equipped with different on-board computers, electronic control units and sets of sensors connected to the BC.
On some machines, errors appear only when there are serious problems. It also happens that the electronics do not react to minor faults. But gradually, automakers are moving away from these shortcomings, trying to make cars as functional and smart as possible. That is, they enable the driver to find out about certain problems in time, simply by seeing the corresponding notification on the display of the on-board computer.
Motorists are interested in how to remove errors from the on-board computer. Here it is worth understanding that the BC closely interacts with the electronic control unit. It is with this that the on-board computer is connected, and then the information is transmitted to the BC and displayed on the display in the car’s interior. This allows you to install it separately even on cars without a factory on-board computer. To do this, purchase an appropriate device, connect it to the computer and install it somewhere in the area of the center console or dashboard.
For most budget cars, as well as for cars with outdated BCs, errors are reset by performing several sequential actions. Namely:
- the engine warms up to operating temperature, according to its characteristics;
- the positive terminal is removed from the battery;
- the battery remains disconnected for 5-15 minutes;
- after this the terminal returns to its place;
- the key is inserted into the ignition switch;
- the key is turned to the position before directly starting the engine;
- all indicators and lamps on the dashboard should turn on;
- in this state, the ignition key is left for 1-2 minutes;
- the key returns to its original position.
In certain situations, this method really allows you to get rid of errors. When all the steps have been completed, you need to start the engine again, leave it idling without pressing the gas pedal.
KIA Spectra perfectum › Logbook › A little about the fuel consumption readings on the on-board computer.
After installing the on-board computer, according to the instructions, I configured it, or rather, corrected fuel consumption and calibrated the tank as follows: There are two possible ways to correct fuel calculation readings. In the first case, the user independently calculates and enters the flow correction value with an accuracy of 1%. In the second case, the user enters only the reference value of fuel consumption, and the MK correction is calculated automatically with high accuracy. It is recommended to use the second method for correcting fuel consumption readings. An example of correcting the fuel consumption indication for method 2. It is recommended that before starting correction using method 2, set the fuel consumption correction using method 1 so that the fuel consumption at idle speed with a warm engine is approximately 1 liter per hour . 1. Filled a full tank of gasoline to the filler neck. When refueling, I made sure that the gun did not turn off as a result of “splashing” before the fuel level reached the level of the neck. 2. Reset the average parameters in the display. 3. Watching the indication of fuel consumption for the trip on the MK screen - the “Average / Reset” display, I drove more than 25 liters of gasoline without refueling, approximately 25.5. 4. I refueled again, taking into account the features of step 1, with fuel “to a full tank”, 28 liters came in. 5. Entered the “Settings” display and indicated the reference consumption 8. The computer calculated and memorized the consumption correction, so to speak, according to my usual driving in Murzilka, it is described that after performing the above, the fuel consumption correction will be automatically calculated and set by the MK with high accuracy. In the future, if everything was done correctly, the values of the indicated and reference flow rates, measured according to the method of points 1 - points 4, should coincide. Next, we calibrate the tank: To correctly display the remaining fuel in the tank in the indicated modes, the user needs to perform a linear calibration of his FLS at two points - with a full and empty tank, for example, with a residual value of 6 and 42 liters in our case, the reserve is 6 liters (empty tank) and full, fully filled tank as I got 53 under the neck! liters To do this: 1. drove off the gasoline until the lamp of the remaining fuel in the tank of 5-6 liters began to light up. 2. Place the car on a level surface, start the engine, turn off additional electricity consumers - dimensions, headlights, fans, etc. so that the on-board voltage during calibration matches the voltage during movement. 3. Switch to the “Sources” list in the “Settings” display. Make sure that the “Tank Cal” mode is selected. 2". 4. In the settings, I set the remaining fuel in the tank to 6 liters 5. After exiting the Settings display (by briefly pressing the “PARAM” button), the value of the remaining tank will be equal to 6 liters or the set value. 6. Filled the tank full up the neck, and added 1 liter to the fuel consumption meter per trip. 7. Placed the car on a level surface, started the engine, turned off additional electricity consumers - dimensions, headlights, fans, etc. so that the on-board voltage during calibration matches the voltage during movement. 8. Switched and set the parameter “Linear tank”. 9. Went into the settings and set the remaining tank balance to 50 liters 10. Calibration for the tank remaining value of 50 liters in the “Tank calibration” mode. 2” ended with a tank remaining value of 50 liters! For even more accurate calibration, you can calibrate the tank using 7 points, but I’ll try this in the future, now, in principle, it shows with an accuracy of up to a liter. Let’s continue the experiment) After reading how many people measure consumption, I became very curious how much Bortovik will show me and how true the opinion of spectra drivers is about its efficiency) After the New Year holidays there was a road from Lipetsk to Bryansk and this is what the bortovik showed me when driving on a winter highway at an average speed of 90 km/h with a loaded car and automatic transmission
I was driving on instruments)))
average consumption 7.6 liters per 100 km
but recently I drove record-breakingly economically
average consumption was 6 liters per 100 km
I wanted to note that at the last measurement, when it took me 5 liters for 80 km of the way from work to home, I was driving like a pensioner calmly at a speed of 70-80 km/h. In short, I felt sick) And if you push the slippers to 110-120 on the highway, it will be 8 -8.5 liters but I rarely drive like that now)
Very often the machine begins to show insufficient performance or increased consumption. The fact is that many cars are equipped with a built-in computer that adjusts all sensors in accordance with the mode given to it by the driver. But drivers change the type of driving and, therefore, the mode as a whole. In this case, the computer simply cannot adapt to the changes and works as before.
For this reason, all sorts of problems begin with internal equipment, and gasoline consumption increases. This problem can occur on almost all modern computers, for example, on Toyota. If the computer on this car fails, there is nothing left to do but reset the computer on the Toyota.
Software error checking and removal
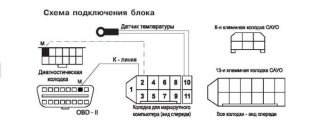
Before removing errors from the on-board computer, you will need to connect to the brains of your vehicle; for this, sometimes you have to remove some trim elements to get to the diagnostic connector. When you remove the panels yourself and connect to the BC, there is no need to be afraid. This is a common practice among motorists.
On most cars produced after 2000, the connector for connecting to the electronic control unit is standard and is called OBD2. As for its location, it is often in the area of the pedal assembly, near the steering column or in another place. It’s easier to look at the instruction manual for your specific car and find the connector.
On older cars, connectors were sometimes installed somewhere under the hood or in places where many would not even expect to see them. And in such situations, it is better to foresee the need to purchase an adapter in advance. Otherwise, it is not always possible to connect a standard adapter to outdated connectors.
If the malfunction itself is eliminated, but the error codes are stored on the on-board computer screen, and simply resetting the battery terminal does not help, then you have to use the software capabilities. There are two options here.
- Try to do everything yourself, purchasing the necessary adapters and adapters as needed, and then follow the instructions, performing all the necessary steps sequentially.
- Contact the service center. Many car services have in their arsenal special scanners and modern equipment with up-to-date software. This allows them to connect to different BCs and ECUs, thereby reading and resetting errors that appear on any model and brand of car.
The option with a diagnostic center is not the worst if you do not have relevant experience in working with a car, and also you do not want to buy your own scanner with all the accompanying devices and software.
After checking at the service station, they will tell you which problems are current and which errors are simply stored in memory, despite the elimination of the faults themselves. They reset errors not just on the display, but from the memory of the control unit. Therefore, the code will not be displayed on the screen.
How you can be deceived at a service station
As usually happens - this error light came on, we arrived at the service station, left the car there, returned it - the error check does not light up, took the money and goodbye. No one is going to explain anything (they are making money off this mistake), at best they will say the sensor was malfunctioning or they refueled with the wrong fuel
You don’t even suspect that they simply reset the engine error for you, wasting 5 minutes of time and writing whatever you wanted, you paid for services not provided and next time you will come to them again. No, of course, the error check warns of possible problems with the engine, but often even service stations limit themselves to resetting it, and do nothing further if it does not light up again.
I don’t want to generalize, of course they don’t cheat everywhere, but they start with the simplest things, that’s one hundred percent. And the simplest action in our case would be to reset the error.
Drawing conclusions
The on-board computer is an important component of any modern car. With its help, you can obtain useful information, find out in time about problems with the engine and other systems, and read malfunctions using special codes that appear on the display.
Each machine may have its own fault encryption methods. Therefore, it is unlikely that you will be able to find universal lists with codes and their decoding. To understand what exactly happened to the car, you should look at the owner's manual and read about your standard on-board computer. If you installed the BC yourself, then the manual should also contain information about errors, their codes and explanations.
Using an adapter and a smartphone with the software, in some cases the phone screen will display not just error codes, but also their meaning. This depends on each specific situation.
On-board computers come in different types, functionality and have different capabilities. They also have their own nuances regarding cleaning and zeroing. In some places you need to hold down a button, in others you need to perform a combination of actions. You should take into account the BC model and build on the instructions for it. Do not try to remove errors yourself without first determining the cause of their occurrence on the on-board computer screen.
After resetting, retraining is often required. This is also not the easiest task, but you can do it yourself without turning to a car service center or diagnostic center for help.
Built-in ECU reset tools
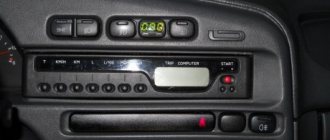
A complete reset of errors is carried out through the diagnostic block - this is the law. Secondary on-board comments, read frivolous ones, can be deleted from memory using standard means. This is the dashboard and on-board computer control keys.
- Press and hold the daily mileage button.
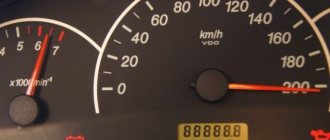
- Turn on the ignition, the daily mileage button is still clamped. The instrument panel will enter self-test mode when all needles move from the minimum to the maximum value. The button can be released.
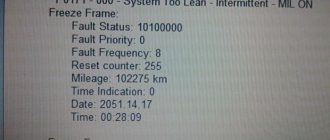
- Press the daily mileage button again and again. Numbers and dashes will appear on the monochrome display. Each cell is responsible for a specific set of errors. If there is a dash in the cell, then there are no comments from the on-board system. If it is a number, then you should look for its decoding in a specialized manual for diagnosticians.
- You can reset errors in the same mode by holding down the odometer button for 2-3 seconds.
ECU records in old foreign cars with monochrome displays are reset in a similar way. As for new cars with display instrument panels and multimedia-intelligent control systems, here frivolous comments can be eliminated through the intelligent system menu. Serious errors can only be removed with the help of diagnostic equipment, through the block; removing the battery terminal is pointless.
Wait until the “check” goes out on its own. The simplest method because you don't have to do anything. The computer system in most vehicles will automatically recheck for problems that may activate the error light. If it is a minor problem, it will automatically correct itself and the check will go off. However, if the check light is still on after three days, you need to apply the methods mentioned above to reset it.
If this continues to happen despite the following reset procedures, you should take your vehicle to your nearest auto repair shop and have it diagnosed by a professional mechanic. Professional diagnostics use more sophisticated tools and can identify precise problems.
REMEMBER: You can always contact our car service center, where your car will be happy to receive professional technical assistance. You can also make an appointment with us for a scheduled technical inspection! Please familiarize yourself with our car repair and diagnostic services.
Situations while driving when the check light comes on
Let's consider several typical situations when a driver needs to urgently respond to the Check engine being turned on:
- When the engine starts, the check light comes on and goes out almost immediately. He did not highlight any serious problems in this situation. Check the gas cap. Most likely it is not screwed on properly.
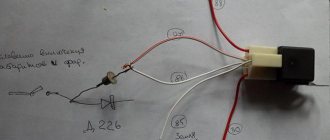
- The indicator light came on while driving. This situation indicates an electrical circuit break. These could be loose contacts, disconnected wires, including the battery. Check all attachments.
- The indicator flashes when moving. Stop and without turning off the engine, listen to the noise from the engine. You need to check the oil volume. However, this is already a fairly serious call, so you need to get to the auto repair shop as soon as possible.
- The check light blinks, but the engine runs great, no noise is heard, and there are no interruptions. This indicates a malfunction in the ignition system. You should pay attention to the serviceability of the spark plugs and the quality of gasoline.
- And if in the same situation, the indicator lights up continuously. This is a sign of an incorrectly set spark plug gap. Adjust according to the norm (no more than 1.3).
- A constantly glowing Check Engine indicates problems with the ignition system insulation. Have it tested at a diagnostic center.
- The check light comes on when you start driving and does not go out. Faulty fuel pump. Listen to the noise, if you identify characteristic sounds, dismantle it and wash off the dirt from the insides and filters.
- The check engine light is constantly on. This is accompanied by an increase in the temperature of the antifreeze (up to 90 degrees). Here we are talking about serious problems in the engine. It is better to stop driving and call a tow truck to a service center.
Setting the diagnostic test mode (self-diagnostic mode)
How to do this is usually described in the user manual that comes with the car.
In any case, before starting to resolve the error on the Nissan Qashqai experimentally, you must follow the following sequence of actions:
- warm up the engine to the sixth mark on the scale;
- turn off energy consumers, such as headlights, audio system, navigator, stove, etc. (absolutely all of them must be turned off);
- turn off the engine;
- turn on the ignition for 3 seconds;
- five times within five seconds, quickly and powerfully press the gas pedal all the way, completely removing your foot from the pedal;
- wait 7 seconds;
- press the gas as far as it will go and hold for 10 seconds.
The CHECK Engine icon will then flash. This means you have entered test mode. After releasing the gas pedal, count the flashes: successively 10 long-10 short, again 10 short-10 short. This is how the system signals you that everything is fine. This is a code that can be written as 0000.