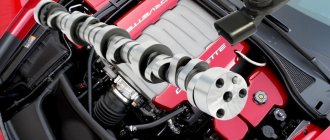
The Lada Priora phase sensor or camshaft position sensor is a device that is used in a car to determine the initial engine operating cycle and generate a pulse signal.
Using a magnetic field, the sensitive part of the device responds to the rotation of the camshaft in the car and transmits signals to the electronic engine control system. The operation of the sensor directly affects the fuel injection system. If the prior phase sensor malfunctions, the ECU does not receive a signal from it and rearranges the injection operation into pairwise parallel mode. As a result, you lose all the benefits of the phased fuel injection system, which directly affects increased fuel consumption, incorrect engine operation and loss of power.
Actually replacement
- If you checked the sensor before replacing it, then I think there is no point in explaining where the DPRV is located. Getting to it is not easy, because access is hampered by the camshaft pulleys and neighboring units. Turn off the power supply to the sensor.
- Then, using a “10” wrench, unscrew the two fastening bolts. During this manipulation, be vigilant and careful not to accidentally drop the bolts and washers, then it will be quite difficult to get them out. As a rule, it is quite difficult to unscrew the second bolt due to its inaccessibility, so often during dismantling, many simply break off the second ear, after which they remove the fragment. If you are sure that the phase sensor is not working, then such dismantling is, in principle, not terrible, but if you are not sure, then there is a possibility that you will break a completely working sensor.
- After the sensor is removed, it can be inspected in more detail or checked for faults. If there are traces of mechanical damage from the pulleys on the DPRV, assess the extent of the damage and repair or completely replace such a sensor.
- Next, using a hexagon, you need to unscrew the fastening screws of the casing. They are located along the edges at the top, there is also one at the bottom left and one in the center, one under the ledge. We take out the casing along with the screws.
- Set the 1st cylinder to the TDC position, then match the marks so that on the camshaft pulleys they fall under the slots on the plastic boot. Both marks must be placed at the top. To check that the crankshaft is correctly aligned, you can use the special transmission inspection window. This can be found on an 8-valve engine, but on a 16-valve engine it is quite problematic. Therefore, I would recommend using the ring gear on the accessory pulley as your guide. The crankshaft position sensor should look at the 20th tooth, or rather at its beginning.
- If everything matches, we determine the condition of the curtain; it should not have any defects; for this we use the slots in the intake camshaft pulley. The gear should not play or wobble. If a phase mismatch or damage to the above elements is detected, you will have to disassemble the timing drive.
- If everything is in perfect order, install a new camshaft position sensor, turn the crankshaft, making sure that the shutter does not touch the phase sensor and proceed to the final assembly, it is performed in the reverse order.
Instructions for removing and replacing the camshaft position sensor Priora 16 valves
If there is a suspicion that the phase sensor itself (and not its circuit) is faulty, then it needs to be removed and checked. If it is found to be faulty, it must be replaced.
To remove the DPRV on a Priora, you will need to perform the following steps:
- Turn off the ignition (it is not necessary to remove the terminal), and disconnect the power plug.
- Using a 10mm wrench, unscrew the two mounting bolts.
- If access to one of them is free, and you can get to it with a regular ratchet, then access to the second is limited.
- To unscrew it, you will need to use a curved spanner or a socket and a “5” hexagon (shown in the photo below).
- Before unscrewing the DPRV mounting bolts, you need to remove the generator belt.
- Next, we gain access to the fasteners and unscrew them.
- After this, we remove the phase sensor and proceed to check or replace it. The product is installed in a similar way. When installing, be sure to pay attention to the presence of a rubber O-ring. The manufacturer recommends tightening the mounting bolts with a torque of 6-8 Nm.
Belt size
VAZ 2112 gearbox design 16 valves
The performance of the gas distribution mechanism drive on any type of internal combustion engine is important. Not only the efficiency of the engine, but also its power performance depends on this. In order for them to correspond for a long time to those declared by the manufacturers, it is necessary to carefully monitor the condition of all components and assemblies of the motor. Any Priora timing engine has a toothed belt in the drive. Its length, width, and number of teeth depend on the type of power unit installed on the machine.
You can find out which part is on the car from the car’s operating instructions, or dismantle the old one and carefully study it.
If a VAZ 2108 engine is installed, then it will have 111 working teeth with a width of 19 mm.
The VAZ 21126 engine has two camshafts in the timing belt, so the length of the drive increases. The number of teeth on such a product will already be 137, and the width will increase to 22 mm.
Sensor cost
There are several types of phase sensors, differing not only in design, but also in the manufacturer.
Phase sensor for 16 valve engine
| Manufacturer | vendor code | Price, (rubles) |
| LADA | 21120-3706040-00 | 490 |
| Pegasus | 2112-3706040-04 | 265 |
| VOLTON | VLT2112-3706040-04 | 260 |
| Kaluga | 21-3847AT | 240 |
Phase sensor for 8 valve engine
| Manufacturer | vendor code | Price, (rubles) |
| LADA | 21110-3706040-00 | 415 |
| RHOMBUS | 361-3847 | 260 |
| VOLTON | VLT2111-3706040 | 285 |
| Kaluga | 48-3855000 | 280 |
What is needed for replacement
Replacing the cylinder head gasket of a VAZ-2112 16 valves with your own hands
Basically nothing special. The only thing you need to do this on a Priora is a 10mm wrench with a cardan and a ratchet wrench. This device allows you to unscrew bolts located in hard-to-reach places. From the outside it seems that this phase sensor is located accessible. Directly on the engine block head, on the radiator side. Right next to the timing belt housing.
But it's not that simple. The fact is that modern Prioras are usually equipped with air conditioning. In this regard, an air conditioning compressor is mounted in place of the generator. And the generator itself stands above it and completely blocks the approach to the sensor.
The service technicians even suggest dismantling the generator to replace the Priora phase sensor. However, this is not necessary. Since removing the generator on this engine version is a very complicated procedure. You can do it on your own and without such difficulties:
- Open the hood of the Priora.
- Disconnect the negative terminal of the battery.
- Remove the connector from the phase sensor.
Attention! Be sure to check the condition of the wires and connector chips! Carefully inspect all three incoming wires. It may well turn out that the problem lies with her and not with the sensor.
- Use a wrench to unscrew the upper sensor mounting bolt.
- Feel for the bottom one with your hand and put the key head on it.
- Insert the adapter with the cardan into the key and unscrew the bolt.
- Remove the Priora phase sensor.
- Insert new one.
- Tighten the bolts by hand.
- Tighten them with the wrench in reverse order.
Then everything is simple. Put on and snap the connector chip and connect the battery.
Necessarily! Connect diagnostics and reset accumulated errors. The new type of ECU installed on the Priora can store such faults in memory, and simply removing the battery terminal does not always help.
Replacement option for Priora with 8 valves
Here everything is much simpler. The camshaft timing control device is located at the camshaft output above the gearbox. It is located in a special glass and is secured with 1 bolt. Replacing it is generally not difficult. Simply disconnect and check the wires, and then, after unscrewing 1 bolt, replace the part, checking the position of the sealing rubber before installation. That's the whole operation.
In the video below, replacing the phase sensor on a 16-valve VAZ engine and repairing the connector:
- Phase sensor "Lada-Priors"
- Outer CV joint of "Lanos"
- How to change the outer CV joint on a Kia Spectra car
- What is the outer left CV joint of a Chevrolet Cruze car?
About the consequences of a malfunction of the Priora DPRV
The phase sensor on the Priora affects the correct functioning of the engine. The malfunction of this element leads to a number of the following negative consequences:
- Reduced power and dynamic performance. This is due to the fact that when the ECU does not receive a signal from the DF, it goes into emergency mode. In this case, not phased fuel injection occurs, but pairwise parallel injection.
- Fuel consumption increases by approximately 10-20% (0.5-1 liter).
- The engine warm-up speed decreases, which leads to frequent turning on of the cooling fan.
- Problematic or prolonged engine starting (starts up 2-3 seconds after turning the key).
- Reduced service life of the catalytic converter, the cells of which receive unburned fuel and are burned.
That is why it is extremely important to pay attention to this element. The cost of the product is low, but in order to correctly determine that the above consequences arise due to a malfunction of the phase sensor, you need to pay attention to the characteristic signs.
This is interesting! The sealing ring for DPRV Priora has serial number 21110-3706042-00.
Basic scheme for supply and exhaust ventilation with air recirculation
Engine valve knock
Most often, to organize supply and exhaust ventilation with recirculation, a scheme based on the use of a combination of a fan coil and a chiller is used. The fan coil replaces the indoor unit of the air conditioner, working as an active battery. This is a prefabricated unit in which there is a drainage system for organizing the outflow of condensate formed in the summer, a fan, a heat exchanger and an air filter. A chiller is a water heater that, depending on the time of year, heats or cools water, which then transfers its temperature to the incoming air.
The temperature of the coolant in the chiller is controlled from the control panel. This system allows for full or partial air heating in winter and air conditioning in summer. The volume of the room does not matter, since there are systems designed specifically for supermarkets and other large buildings. The advantage of this system is the ability to ventilate a large number of rooms in one building under a single climate regime. The air intake and exhaust points from the fan coil unit are routed using standard ventilation ducts.
As for recirculation control, it is carried out using remotely adjustable dampers or grilles, which are controlled from a remote control. The temperature of the incoming air varies depending on the time of year, while the temperature of the supply air supplied to the room should be comfortable. Its required value is set on the control panel. The chiller heats or cools the outside air to a predetermined value; it enters the heat exchanger, mixing with the air returned from the room, as a result of which it leaves the supply diffuser at the optimal temperature.
The amount of air that needs to be taken from the room and mixed with outside air depends on the set temperature parameters in the room. It is by this criterion that the installed position of the dampers is determined. The dampers themselves are mounted at the points of air intake from the room, as well as on the street air intake line. The dampers are controlled synchronized and carried out from the remote control. Its parameters are adjusted by specialists individually in each case.
Repair
Before checking the DPRV or before starting any independent actions, you need to familiarize yourself with the connection diagram for the VAZ 2110 camshaft sensor, as well as the features of its installation in the engine body.
The type of action performed depends on what signs of malfunction have been identified:
- if there is visible mechanical damage to the wiring or exposure of live parts, it must be replaced, but repairs in the form of re-insulation of the wires are also possible;
- If the sensor is mechanically damaged, it must be replaced. It is not recommended to repair or disassemble it;
- if the connector is dirty, it is necessary to reconnect with a visual inspection and cleaning of the electrical contacts;
- Wear of the connection connector requires its maintenance or replacement of the sensor. Maintenance consists of ensuring a tight fit of the connected parts;
- When checking the electrical wiring or sensor with a voltmeter and identifying deviations, it is necessary to replace the faulty element. When connecting the voltmeter probes to the electrical power contacts, the sensor resistance should not be lower than 550 Ohms or higher than 750 Ohms;
- If an internal malfunction of the sensor is detected during computer diagnostics, it must be replaced.
Replacing the DPRV is carried out by disconnecting it, dismantling the faulty one, installing a new one and reconnecting the power connector.
It is important to note that after performing any actions aimed at eliminating identified faults, it is necessary to recheck the engine operation. The operating manual does not recommend disabling the sensor yourself and further operating the vehicle. The operating manual does not recommend disabling the sensor yourself and further operating the vehicle.
The operating manual does not recommend disabling the sensor yourself and further operating the vehicle.
Subsequence
When you arrive at your destination, do not rush to turn off the engine while the air conditioning is running. This will place a greater load on the electrical power conversion system. First you need to turn off the air conditioner while the engine is running. You can do this by approaching your final route in advance. Since the air in your cabin is already cooled, turning off the cooling will not heat up the cabin in a short time. Also, turning off the air conditioner in advance will save you from the formation of a puddle under the car, which is formed as a result of condensation. At first glance there is nothing wrong with this. But it's not quite that simple. Condensation forms on the cooler in the cabin. The coolant passing through it lowers the temperature of the evaporator to very low values. The external hot air meets the cold fixative, resulting in the formation of water droplets. By turning off the air conditioning in advance while the car is moving, you will prevent the formation of harmful microorganisms due to moisture in the air conditioning system.
Troubleshooting Camshaft Sensor (CMP)
If your car’s computer has detected a sensor error and turned on the “Check Engine” icon on the dashboard, then you can easily find out the “error code” yourself, which led to the appearance of the light indication on the dashboard. To do this, we advise each driver to purchase an inexpensive set of diagnostic equipment specifically for computer diagnostics. If you cannot afford to purchase this diagnostic scanner for your car, then contact any inexpensive car service center to diagnose your car, where they will read the “error code” from your car’s computer.
Once you know from the "error code" that your car has a faulty camshaft sensor or related components, you should do a few simple tests. Please remember, friends, that a fault “code” indicating a potential failure of the camshaft position sensor will not necessarily mean that the CMP sensor itself has failed on the car. After all, it is possible that the cause of the malfunction is not in the sensor itself, but in the sensor connector, or there is damage to the wires connected to it, or perhaps the components directly connected to it have failed.
True, you need to remember the following for yourself, in order to more accurately determine whether the camshaft sensor is functioning normally, you will need to carry out (possibly) quite a lot of diagnostics. It is especially necessary to take into account the following in order to check the effectiveness of the CMR sensor signal itself; in some cases, this may require special equipment, without which it will be difficult to determine the cause of the malfunction.
However, you can do a few simple checks yourself using a digital multimeter (DMM).
First, check the electrical connector at the camshaft sensor and the condition of the wires themselves. Disconnect the connector itself and check for signs of rust or dirt. For example, the same fuel. All this can interfere with good contact for the transmission of electricity.
Next, check for damage to the wires, namely, whether the wires are torn or showing signs of melting from nearby hot surfaces.
In addition, please make sure that the camshaft sensor wires do not touch the spark plugs or ignition coils, which could cause interference and prevent the sensor from transmitting the correct signal.
After the above checks, use a digital multimeter that can test alternating current (AC) voltage or direct current (DC), depending on the specific type of camshaft sensor used in your vehicle.
Also, before testing, you need to set the correct electrical parameters on the multimeter for a specific type of CPM sensor. Typically, such information is indicated in the vehicle repair and maintenance manual.
Some camshaft sensors allow you to create a splitter for the electrical circuit of the CMR sensor; this is done primarily in order to read the signal directly from the sensor itself during its operation in the car.
If the type of your sensor does not allow you to connect the multimeter wires to it, then you can simply disconnect the connector from the sensor and attach a copper wire to it, thus inserting it into each sensor connector.
You can then connect this connector back to the sensor, being careful not to short the wires themselves during testing. If you use (apply) this method, do not forget to first insulate the wires with electrical tape
Three-wire camshaft sensor testing
If, after self-diagnosis of the camshaft position sensor, you determine that it is fully operational, then there may be a breakdown or malfunction in the vehicle components associated with this sensor.
With similar problems with the car, the cause of the malfunction may also be a badly worn timing belt. This can cause the camshaft and crankshaft to become out of sync. Ultimately, this camshaft sensor may send the wrong signal to the car's computer. Ultimately, this leads to incorrect ignition and incorrect fuel injection.
How to check the Priora phase sensor
In order to identify malfunctions in the operation of the device, you need to pay attention to the following signs:
- the appearance of the “Check Engine” indicator on the instrument panel;
- identification of error codes 0343, 0340 when connecting an on-board computer or diagnostic device;
- noticeable increase in fuel consumption;
- regular, unstable engine operation;
- general deterioration in vehicle dynamics (reduction in engine power).
Now about diagnostic methods.
For a 16 valve engine, the test is carried out using a conventional multimeter. For this you will need:
- The measuring device itself. Measure and check the total voltage in the vehicle network (with the ignition on).
- Now you need to make sure that the device for determining the camshaft position is provided with the necessary voltage from the on-board network. To do this, attach the probes of the multimeter to the contacts of the chip (central connector). The voltage must be at least 12 volts. The white-black connector should produce 4.5-5 volts.
- If the indicators from the previous step are within normal limits, then it’s time to check the performance of our sensor. To do this you will need to remove it from the block. Then connect the device to the connectors of the chip using small wires. Measure the voltage parameters at pin “B” (should be at least 0.9V). Turn on the car's ignition. Bring a thin metal plate to the measuring element of the sensor (place it in a special slot) and look at the multimeter display; its readings should change and be about 0.4 V. If the measurement readings have different values, the sensor is faulty.
Now let's talk about how to dismantle the device itself to determine the position of the camshaft.
Features of the principle of operation of the DPRV on Priora
It should be noted that Priors use two types of camshaft sensors. For engines 21114 with 8 valves, it looks like this, as shown in the photo below.
They are called end caps. Below is a diagram indicating the numbers of original parts.
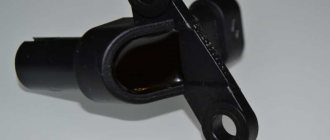
For 16-valve Priora cars, this sensor has a different appearance. The main difference is the presence of a slot (slot) at the end. Due to this gap, such products are called slotted. The photo below shows the appearance of the element.
A diagram indicating the sensor and its fastening elements is presented below.
The difference between the devices lies not only in the design, but also in their location, but you can learn about this in detail below. Next, we move on to consider the operating principle of such elements. Their operating principle is based on the Hall effect, familiar to many from physics lessons. To refresh your knowledge, below is a corresponding illustration.
Both sensors used on Priors have an identical operating principle, so next we will consider how they function using the example of 16-valve engines.
- There is a metal disk on the camshaft timing pulley (it is called a master disk). The design of this disk is not solid, but with a slot. The photo below shows a pulley with a drive disk inside. It is important to understand that this design is used on Priors with 16-valve engines.
- There is a groove (slot) in the tip of the sensor through which the disk rim passes during engine operation.
- When the slot of the master disk passes through the groove of the sensor, a low voltage pulse of about 0V is supplied to the controller (ECU). This indicates that the piston of the first cylinder is at the end of the compression stroke.
On a Priora with engine 21114, a camshaft with a cam is installed, through which the position of the valve timing is determined.
It is important to note that camshaft position sensors come in inductive and digital types. Priors use devices of the second type, which are distinguished by high accuracy and the ability to determine the position of the camshaft at the moment the engine starts.
The camshaft position sensor has three contacts. Two of them are the power supply (plus and minus) of the DPKV, and the third is a signal signal, by which the ECU determines the position of the camshaft at a certain point in time.
Description of the camshaft sensor on the Lada Priora, where it is located, price, articles
Where is it located: in Lada Priora, the DPRV is installed under the camshaft pulley. The situation is not the best, since access is severely limited. It is impossible to unscrew the controller without first loosening the generator belt drive.
The sensor is non-separable; if it fails, it should be replaced with a new one. Installing a new DPRV is not at all difficult. The task is feasible for the average car enthusiast.
The electronic engine control unit systematically monitors the position of the camshaft through the camshaft. The dosage of fuel equipment and the firing of a spark in the combustion chamber of the cylinders depend on the accuracy of the readings and timely transmission.
DPRV affects the dynamics of acceleration, the stability of the engine at idle speed, and the concentration of emissions in the exhaust gases.
Signs of DPRV malfunction:
- Unstable engine operation at idle speed;
- Restarting the engine after stopping it;
- Increased fuel consumption;
- Reduced power of the power unit;
- Passive acceleration dynamics;
- Indicators on the dashboard indicate the presence of system errors;
- The transmission is locked at one speed mode. Switching off the gear after deactivating the ignition. Repeat once, cyclically;
- The car moves jerkily;
- The maximum speed of the car is limited to 80 km/h;
- The engine stalls periodically;
- Misfires when ignition is activated;
- The engine does not start after stopping.
Reasons for wear of the DPRV:
- Expiration of service life;
- Damage to the controller housing;
- Open circuit;
- Short circuit of contacts;
- Sensor break due to impact or collision;
- Incorrect operation of the electronic engine control unit (ECU).
DF on Priora: main types of faults
The resource of the DPRV is quite large, but sometimes already at 100 thousand (some earlier, some later) problems may arise with its functioning. The reasons for the failure of such a product are very different, so let’s look at the most common ones among car owners:
- Mechanical damage to the sensor. It usually manifests itself in the form of chipping of the working part of an element or fastener, and occurs due to contact with the pulley plate.
- The magnet falls out, which can also happen during the operation of the vehicle.
- The sensor power supply is faulty. Most often, the reason is hidden in damaged wiring. However, the possibility of contact oxidation cannot be excluded.
If there is a suspicion of a malfunction of the DPRV on the Priora, then it is necessary to look for the cause of the failure. First, let's find out where the phase sensor is located on the VAZ-2170.
Checking the phase sensor in Kalina
If you suspect that the functionality of the phase sensor is unsatisfactory, you can check it yourself without the need to visit a service center. For “knowledgeable” owners of Lada Kalina 16 valves, the whole process will not take too much time. However, if you have no experience in this matter, the best solution is to meet with an adequate specialist.
We use a tester for diagnosis. We connect the corresponding cables to terminals “A” and “B”. We start the Lada Kalina 8 valve engine and monitor the moment after it stops. We observe a peculiarity in the behavior of voltage: immediately after stopping the engine, the voltage value should be equal to the on-board value for about 8-10 seconds. If such a phenomenon is present, then the circuit is intact. Otherwise, we are dealing with an open circuit or short circuit.
Let’s say the circuit is intact, but we still don’t see any voltage coming in. The controller may be suspect here. The check is also not too difficult. To do this, connect terminals “A” and “C” to the tester wires. When the ignition is turned on, on-board voltage should be observed. If this does not happen, then we continue the persistent search for the cliff.
We connect the block with cables to the sensor, and insert suitable wire pieces into sockets “A” and “C”. We close them, then wait to receive electrical contact. Now the specified segments can be temporarily connected to the output contacts of the tester. We watch the tension. If the phase sensor is in “good order”, then the voltage should be displayed in jumpy pulses. When such a phenomenon could not be detected, you can safely “blame” the phase sensor and sentence it to unconditional replacement.
Hood with recirculation is an exhaust and ventilation device
While when using a flow hood, dirty air leaves the room through an air duct, a recirculation hood has a completely different principle of operation.
Here, there is no element such as an air duct, and the device itself is equipped with effective catch filters. When passing through them, the air is freed from all harmful microimpurities and unwanted odors, and then again supplied to the room.
How does a recirculating hood work?
The recirculation type hood operates in a closed cycle. In fact, it can only be called an exhaust device conditionally, since it does not remove air from the room, but only cleans it and returns it back. Contaminated air enters the device body under the influence of draft created by the fan blades rotating in a plane horizontal to the surface of the kitchen stove.
Moving along a given path, the air mass collides with the coarse filter. Having passed through it, it leaves fatty inclusions, particles of soot and dust on its fine mesh surface.
A hood of this type will help out when the ventilation system of the house is not working at full capacity or the ventilation ducts are so clogged that there is no draft in them at all.
Next, the air flow, under the influence of pressure, passes through a fine filter, where it gets rid of odors and traces of the smallest particles, then returns to the room. This filter is an ordinary cartridge filled with granular carbon. The carbon filter is a disposable product, so when it becomes dirty, it must be replaced.
Since this type of hood does not interact with the ventilation system, designers have developed telescopic hoods. During operation, they create a powerful lateral draft, due to which all dirty air masses are sucked in. As soon as the need for this disappears, the device hides in the countertop. This solution is not only original, but also very convenient.
Purpose and principle of operation of the phase sensor
The standard Priora phase sensor is used to accurately identify the cyclicity of engine operation and, taking into account the information received, transmit it in the form of electronic pulses to the input connector of the on-board computer, which controls the functionality of the power plant.
Briefly, we can say that the purpose of the phase sensor is to determine the angular position of the camshaft of a car’s gasoline unit. The operating principle of this device is based on the use of the Hall effect. On the camshaft pulley of the car there is a welded and specially machined disk of the setting value.
When the disk passes through a special hole in the phase sensor, a voltage signal with a value close to the initial value (slightly more than zero value) is transmitted from the device to the on-board computer. When the disk moves through the control segment for measurements, a translation signal appears, the so-called. reference pulse, with a potential difference of about 5 Volts, which is comparable to the position of cylinder III at the compression point.
In other words, the highly sensitive element of the product responds to the configuration created by the circular rotation of the motor camshaft of the magnetic field. Such a phase sensor for Priora, the price of which is acceptable for Russian car enthusiasts, is a complex of components, where the secondary type device consists of an output cascade, designed similar to an open collector, as well as a semiconductor bridge and a pulse amplifier.
Russian car enthusiasts often ask about the phase sensor, where it is located, how difficult it is to dismantle it, etc. Please be informed that this device is located on the aft drive housing of the DOHC camshafts. Removing and replacing the phase sensor on a Lada Priora will cause some discomfort due to the “blind” search for a hole for mounting the device, but with some skill this will not be difficult to do.
In the Lada Priora car, a phase sensor is attached to both models with an eight-valve engine and those with a sixteen-valve engine. If in the first case its location is in the end plane of the cylinder head near the air purification filter, then in the other on the cylinder head near the first cylinder of the vehicle.
On Lada Priora (eight-valve) cars produced before 2005, a phase sensor was not installed. If the vehicle was not previously equipped with such a device, then this meant a change in the principle of opening injection systems, i.e. the injectors operated in pairs in parallel mode. If the device is installed on a car, then fuel injection occurs in a phased manner, i.e. a specific injector into the corresponding cylinder.
A defect in such a device and rendering it inoperative for one reason or another means that one should expect an increase in fuel consumption, an increase in the toxicity of exhaust gases and problems with diagnosing errors in this device. The main malfunctions of an electronic gadget include the following cases:
- When starting the power plant, the starter spins the flywheel for 3-5 seconds. Next, the engine starts and the “Check Engine” banner lights up on the instrument panel, which means the on-board computer is waiting to receive signals from the device.
- Excessive consumption of fuel.
- Errors in the vehicle self-diagnosis mode when operating the engine unit.
- Reducing the dynamic properties of the vehicle's power plant.
- The motor does not start.
Symptoms of a problem
Even with a significant deviation in the operation of this device, the engine on the Priora will work, but during operation of the vehicle the following signs of malfunction may be observed:
- fuel consumption will increase significantly;
- the toxicity of the exhaust increases, which can be visually determined by the presence of black smoke;
- engine power indicators decrease;
- the engine does not start well;
- The engine is unstable at idle.
If the phase sensor malfunctions, disruptions in the operation of the vehicle's electronic self-diagnosis devices are also possible, but if the system remains operational, then if this part breaks down, the following codes will be indicated: P0340, P0342 or P0343.
How does a car air conditioner work and much more?
It seems to you that the air temperature outside the window is a billion degrees and the asphalt is melting. At this moment you remember the winter cold and snow. You want to breathe cool air. Fortunately, most modern cars are equipped with air conditioning. This allows us to travel by car comfortably even in unbearable heat. But do you know how to use air conditioner effectively?
Turning on the air conditioner in a car has become such an unnoticeable action in ours. We sometimes don't notice when we turned it on. It's like a reflex. Most of us don't even know how the air conditioning system in cars works. Because of this, we often do not use it effectively and do not know how to use it correctly.
Car manufacturers have tried to make air conditioning control as simple and uncomplicated as possible. All you need to do is turn it on and set the required temperature. The air cooling system does the rest for you. But in order to use a car air conditioner more efficiently (for example, to save fuel, which is consumed much more when the air conditioner is on), you must adhere to certain rules.
Our online publication offers you some tips on how to effectively use the air conditioner in your car. But first, let's find out how the air conditioning system works in modern cars.
The automobile air cooling system is a closed circuit in which there is an area of high and low pressure. In the section of the circuit where there is high pressure, the refrigerant (the cooling chemical in this area is in a gaseous state) moves through the system through a special compressor, which is connected by a belt drive to the engine
Have you noticed that when you press the “AC” button (turn on the air conditioning), there is a noise under the hood
This turns on the compressor, which supplies the refrigerant gas to the condenser (radiator), which cools the heated gas, turning it into a liquid state.
Then, on the low pressure side, the liquid, which is under high pressure, flows through the valve into the evaporator. This is where the magic happens. The coolant in the low pressure area has a very low boiling point and when it reaches the evaporator (actually a simple radiator that is located behind the center console) it immediately turns into gas. This process is called evaporation.
If you think back to high school, evaporation is an endothermic process, which means heat is absorbed as it evaporates. Therefore, the evaporator, which is located behind the dashboard, cools the air entering the cabin from the street through the ventilation system.
This cycle then repeats over and over again.
Now that we've learned (for those who didn't know) how air conditioning works in a car, let's take a look at a few tips to learn how to use your air conditioner more efficiently.
Articles
For oxygen sensors, the designation 21120-3850010 was first used. Then an article appeared with the numbers 1118 (see photo). It appears to be a new type of sensor. It will be easier to use BOSCH articles.
Exhaust system of VAZ-21120 engine
We list the article numbers of the remaining sensors:
- Mass air flow sensor (21124 or 21120): 21083-1130010-01, -10, -20;
- Mass air flow sensor (motor 21120 with ECU January 4.1): 2112-1130010, -01;
- TPDZ : 2112-1148200;
- RXX: 2112-1148300-02;
- DPKV : 2112-3847010, -01, -03, -04;
- DTOZH : 2112-3851010, -01, -02, -05;
- Speed sensor : 2110-3843010-13, -18;
- DPRV : 2112-3706040, -02, -03;
- DD: 2112-3855020, -01, -02, -03;
- Oil pressure sensor: 2106-3829010, -01, -02;
- Antifreeze level sensor : 2110-3839310-10, -11, -12, -13, -14;
- Coolant temperature gauge sensor: 2101-3808600, -02, 2106-3828010.
The last three sensors are not connected to the ECU. However, a rough road sensor (2123-1413130) can be connected. It affects the operation of the engine, although it is attached to the body.
Engines with ECU January 4.1 do not have oxygen sensors.
In general, on VAZ-2112 hatchbacks, sensors may be different from those indicated in the list. But then we are talking about an 8-valve engine. And everything that we indicated applies to 16 valves, here is a diagram of this engine.
Maintenance
Don't forget to regularly maintain your car by changing the cabin air filter. You should definitely change this cabin air filter at least once a year. We also advise you to treat the ventilation system with antibacterial sprays every year. To do this, having purchased antibacterial agents (preferably spray, etc.), turn on the engine and start the interior ventilation system, turning off air recirculation. Next, open the hood and spray with an antibacterial agent in the place where air is taken into the cabin. This substance, together with the air, will pass through the entire ventilation system and enter the cabin. This way you will protect yourself from the formation of harmful bacteria and microbes in the ventilation system.
Also, sooner or later you will have to replace the refrigerant in the system. Be sure to have this work performed only by an authorized dealership to avoid damaging the air conditioning system or refilling coolant that is not certified by the vehicle company.