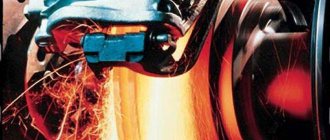
Even those who have little understanding of the structure of a car know where the calipers are and what they are needed for. Well, or at least roughly imagines it. Here they are, visible in the front (and often rear) wheels, so there is no doubt that they belong to the braking system.
The caliper, in fact, is not a complicated device, but it is rationally and intelligently made. It fails quite rarely, especially with normal maintenance. How it works, how it works, what types and designs there are - read on.
VAZ 2110 | Removing, disassembling, checking, assembling and installing brake calipers
Removing, disassembling, checking, assembling and installing brake calipers
The front wheel brake assembly components are shown in the illustration Front Brake Assembly.
Rear brake assembly
Removal and disassembly
Prepare a container to collect the brake fluid.
- Unscrew the caliper installation bolts (there is one bolt on the rear brake mechanism) and remove the caliper from the bracket.
- Remove the brake pads with anti-squeal pads and pad holders.
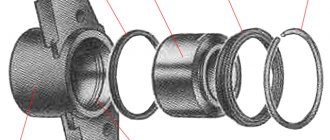
- On the rear brake mechanism, remove the main stud, the guide sleeve with two oil seals and the cover of the main stud.
Do not put your fingers between the piston and caliper while removing the piston using compressed air.
- Use a screwdriver to remove the piston seal:
- On the front brake mechanism;
- Remove the two guide pins from the caliper bracket;
- Remove the guide bushing from the top side of the guide pin;
|
- Remove the two bolts securing the caliper bracket to the steering knuckle and remove the bracket;
- Remove the brake disc and install it in a position rotated 1/5 of a turn from the original;
- Tighten the wheel nuts to 103 Nm;
- Measure the disc runout in this position and record the measurement results;
- Repeat the last three operations for the remaining three positions of the disc on the hub;
- If in any of the positions the disc runout meets the requirements of the Specifications of the Chapter Brake System, install the disc in this position. Otherwise, replace the disc and measure its axial runout again;
- Install the caliper bracket and tighten its mounting bolts to the required torque.
- Assembly and installation are carried out in the reverse order. Please note the following points:
- Do not allow oil and grease to come into contact with the friction linings of the brake pads;
- When installing the boots, make sure that their metal parts fit securely to the caliper bracket;
- Tighten all connections to the required torque;
- After installation, fill the brake system with fluid, bleed it and check the system for leaks.
Assembly and installation
Caliper Lubricant
Is it possible to lubricate the “fingers” with any available lubricant? Unfortunately no. The reason is that the caliper operates at high temperatures, especially if the car is heavy or the driver likes to drive. In this case, both the caliper, the guides, and the lubricant on them heat up.
For this reason, the most common lubricants are no longer needed: they are based on mineral oils and, when heated, liquefy and flow off the metal.
The second reason why you cannot use lithol, grease, or even higher-quality ceramic and copper lubricants is their interaction with rubber boots. Most lubricants damage the rubber, the boots slip out of their places, and the fingers are left without protection.
What to lubricate with?
Only what the manufacturer calls guide lubricant. Bosch, Liqui Moly and other auto chemical manufacturers have such products. One of the indicators that a lubricant is suitable is high-temperature stability, maintaining properties when heated to at least 200 degrees.
Why can the store offer the wrong thing? Simply because there are other lubricants for calipers, such as ceramic and copper anti-squeak lubricants, which are applied to the metal plate of the pads. Yes, they do their job perfectly, but they are not suitable for fingers!
VAZ 2110 | Caliper repair
1. Remove the wheel, having first loosened the bolts securing it to the car standing on the ground.2. Unscrew the hollow bolt securing the brake hose 15 (see Fig. Parts of the rear wheel disc brake mechanism) to the caliper 17. Having disconnected the brake hose, plug its hole.3. Unscrew the two bolts 2 (see Fig. Disconnecting the parking brake cable) securing the caliper, holding the guide pins 3 by the hexagons with a second key.4. Remove the caliper 17 (see Fig. Parts of the rear wheel disc brake mechanism) from the pad guide 21.5. Remove brake pads 18 and 19 from caliper 17. If the pads do not need to be replaced, mark them so that they can be installed in their original places. During operation, the pads break in, so if you swap them, the braking will be uneven.6. Unscrew piston 8 from the cylinder (see Fig. Parts of the caliper of the rear wheel disc brake mechanism) using a special tool or, if it is not available, use, for example, pliers to remove the retaining rings. There are special recesses on the piston for this purpose.7. Remove the protective cap 7 from the cylinder. Replace a cap that is torn, cracked or has lost its elasticity.8. Remove the sealing ring 2 (see Fig. Removing the sealing ring from the caliper cylinder) from the cylinder groove using a wooden or plastic spatula 1 so as not to damage the cylinder mirror 3.9. Inspect the cylinder bore and piston. If there are deep marks, scratches, roughness, etc. replace the caliper assembly.10. Rinse thoroughly with alcohol and dry the piston and cylinder with a stream of compressed air.11. Replace the torn or lost elastic protective covers 5 (see Fig. Parts of the caliper of the rear wheel disc brake mechanism) of the guide pins.12. Lubricate piston 8 and new sealing ring 9 with grease G 052 150 A2 or brake fluid. Replace the O-ring every time it is disassembled, regardless of its condition.13. Install a new sealing ring 9 into the cylinder bore. Replace the ring every time it is disassembled, regardless of its condition.14. Place the protective cap 1 (see Fig. Installing the protective cap on the piston) onto the back of the piston 2, turning its inner edge inside out.15. Carefully insert the outer edge of the protective cap 2 (see Fig. Installing the piston into the caliper cylinder) into the groove of the cylinder 1.16. Screw the piston into the cylinder using a special tool, or if it is not available, you can use, for example, pliers to remove the retaining rings. There are special recesses on the piston for this. 17. Clean the guide pins 4 (see Fig. Parts of the caliper of the rear wheel disc brake mechanism) and the holes for them in the guide 6 of the pads from dirt and old grease. Check: the fingers should move freely in the guide holes without jamming.18. Install protective covers 5 on the fingers, putting the edge of the cover on the shoulder of the finger. Before installation, lubricate the fingers under the covers with grease (lubricant is included in the repair kit). Install the fingers into the holes of the pad guide, putting the edges of the covers on the shoulder of the pad guide.19. Install the caliper in the reverse order, placing the pads in it in accordance with the previously made markings. When connecting the brake hose 15 (see Fig. Parts of the rear wheel disc brake mechanism), please note that a metal spacer must be installed under the tip of the hose.20. Pump the brake system (see subsection 9.9.6) and adjust the parking brake (see subsection 9.9.2).Repair kits
You can purchase special kits designed for caliper repair. But there is no point in purchasing it. It is much better to replace the VAZ-2110 caliper. In this case, you will increase the life of the entire braking system and also improve its reliability. Such repair kits contain the lubricant that is necessary for the piston and guides.
You cannot use graphite lubricant such as CV joint or Litol-24, as this will cause the protective shock absorbers to swell and the guides to simply oxidize. As a result, repairs will not bring the desired effect for a long time.
VAZ 2110 | Front brake caliper
1. Using caution and safety precautions, clean the caliper from brake dust and dirt.2. Secure the caliper holder in a soft-jaw vice and remove the caliper from the caliper holder by pressing the face of the caliper down and removing it from the locating pins. Mark the orientation and remove the spring guides from the caliper holder.3. Using the blade of the screwdriver as a lever, remove the caliper piston dust boot mounting bracket, then, being careful, remove the dust boot in the same way.4. Remove the piston from the caliper using low pressure air supplied to the brake cylinder through the brake hose connection hole. In this case, instead of the brake pads, install a wooden block.5. Remove the wooden block and, being careful, remove the piston. Using a wooden or plastic tool, remove the O-ring from the groove in the caliper bore.6. Check the condition of all caliper parts and replace worn or damaged parts. Check the condition of the guide pins.7. Pay special attention to the cylinder and piston. If there are scratches, marks, wear or pitting, the piston and cylinder must be replaced, which means the caliper assembly must be replaced. Regardless of condition, replace all rubber seals.8. Wash all parts in methyl alcohol or clean brake fluid and wipe them. Use compressed air to clean tubes and holes.9. Install the O-ring into the caliper hole.10. Dip the piston into the brake fluid and apply a thin layer of brake fluid to the piston hole in the caliper. Install the dust boot on the piston so that the inner diameter of the boot fits into the groove of the piston.11. Insert the piston into the caliper and at the same time push the outer edge of the dust boot into the caliper until it locks into place. Install the dust cover mounting bracket.12. Check the ease of movement of the piston in the caliper. If necessary, replace the rubber boot of the dowel pin in the caliper body. Remove the plastic bushing from the pin, then, being careful, squeeze the rubber protective boot and remove it from the hole in the caliper body (see Fig. Removing the plastic bushing from the rubber protective boot, Location of the rubber protective boot of the locating pin on the caliper on models with solid brake discs ).13. In the reverse order of removal, install new rubber protective covers.14. Secure the caliper holder in a vice with soft jaws and install the guide springs in the same position as they were before removal.15. Install the caliper onto the caliper holder locating pins.Replacing brake caliper guides for VAZ 2110, 2111, 2112
Lately, there has been a grinding noise when braking. An inspection of the brake system showed that the discs and pads were in good condition.
One of the reasons for grinding and rattling of calipers may be worn guides. Also, worn guides can lead to uneven wear of the pads (when one of the pads wears out faster than the other). This is exactly the wear that was on the old pads when they were last replaced.
Inspection of the guides showed that they are not jammed, but the lubricant has coked and thickened, and there is also noticeable play.
4 guides were purchased along with anthers, the price was 40 rubles per piece. And also a special lubricant for brake systems BOSCH SUPEFIT (5000000151) for 50 rubles. One bag is just enough for four guides.
It is important to know that not any high temperature grease will work for caliper guides. Do not use ceramic grease or copper-based grease.
These lubricants coke and cause the guides to jam. They can also be aggressive towards anthers. As it turned out later, BOSCH lubricant is not suitable for guides; the temperature range is only -25°C +130°C, which is naturally not enough for this unit. Although the manufacturer claims that this lubricant is universal and is exactly suitable for guides. I found supporting information in the official brochure about the use of lubricant.
We'll ride it for now, and we'll see.
Before replacing the guides, remove old grease and thoroughly wash the bracket. To remove the old grease I used 646 solvent.
Its disadvantage is that it is aggressive to the rubber from which the anthers are made, so after using the solvent, I washed the staples with a degreaser. New lubricant should be applied in a thin layer.
The boots on the new guides turned out to be complete crap, several tore at once, so I had to install the old ones, which turned out to be in good condition. By the way, when assembling, you should first put the boot on the bracket, and then on the guide. This makes it much easier and less likely to tear the boot.
After replacing the guides, the grinding noise when braking no longer bothers me.
https://www.drive2.ru/l/5112419/
next article:
VAZ 2110 | Disc brake caliper
10.5. Disc brake caliper
| GENERAL INFORMATION |
Warning
It is recommended to purchase reconditioned calipers in exchange for removed ones. If you decide to repair (replace caliper parts), then purchase a repair kit. Both calipers should be disassembled and repaired at the same time.
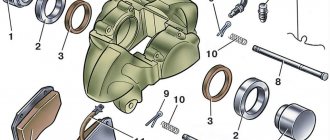
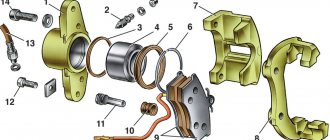
1. Caliper assembly 2. Caliper bracket mounting bolt 3. Bleeding nipple 4. Dust cap 5. Anti-noise spring 6. Caliper guide 7. Pad wear indicator wire 8. Cable sheath mounting bracket 9. Brake disc 10. Inner bolt 6 -faceted head
11. Brake shield 12. Bolt 13. Washer 14. Plug 15. Plug 16. Bracket 17. Cable sheath fastening bracket 18. Piston, cuff, boot and spring ring 19. Repair kit for guide bushings 20. Pads| EXECUTION ORDER |
| 1. Raise the front (rear) part of the car, place it on stands, remove the wheel. |
| 2. Disconnect and plug the brake hose. If the caliper is removed to access other parts, do not disconnect the hose. |
| 3. The procedure for removing the front or rear caliper is described in subsection 10.4 as part of the procedure for replacing the pads. |
| EXECUTION ORDER |
| 1. Remove the dust boot snap ring and rubber boot. | |
| 2. Remove the piston by supplying compressed air from the pump into the cylinder. | |
| 3. Check the piston and cylinder surfaces. If there is damage (scratches, corrosion, chipping), replace the caliper assembly. | |
| 4. If these parts are in order, remove the piston cup using a thin wooden tool. | |
| 5. Remove the rubber cuffs. | |
| 6. Wash all parts in methyl alcohol or brake cleaner. | |
| 7. Using the repair kit, assemble the caliper as shown below. | |
| 8. Dip a new cuff in brake fluid and install it into the cylinder. | |
| 9. Lubricate the caliper cylinders (except the front calipers) and the piston with clean brake fluid. Insert the piston into the cylinder without distortion. Install the new dust cover and secure with the snap ring. | |
| 10. When assembling the front calipers, lubricate the piston with clean brake fluid and place a new dust boot on the bottom of the piston. Holding the piston over the caliper bore, insert the edges of the rubber boot into the grooves of the cylinder, insert the piston until it stops, then insert the upper edges of the boot into the groove on the piston. | |
| 11. Lubricate the rubbing surfaces of the guides and bolts with silicone grease and install them in the caliper. Install dust covers. | |
Main causes of malfunction
The VAZ 2110 caliper is structurally an element that holds the brake pads and is responsible for the degree of their pressure on the brake discs. It is also responsible for uniform wear of the brake pads and guarantees the driver reliable braking in extreme situations. Thus, the importance of the caliper in the operation of the car is difficult to overestimate.
If by this time you have a completely reasonable question, what can happen to the caliper on a VAZ 2110 (2112), we will be happy to answer you. The main cause of malfunctions is “acidification” of the moving elements, coating them with an oxide film, clogging due to the destruction of protective boots or the use of improper lubricant, namely:
Piston mechanism and caliper guides VAZ 2110
A clear sign of problems that the caliper can cause on VAZ cars is uneven wear of the brake pads and an increased braking distance. In this case, the VAZ pads must be changed, and the caliper mechanism itself must be subjected to comprehensive diagnostics:
- check the condition of the piston, its degree of freedom, the presence of moisture, metal oxide, oxide formations and build-ups, the condition of the protective boots;
- Similarly, check the condition of the guides, make sure that there are no uncharacteristic scuffs, abrasions or deformations of the rod on the surface.
We must also not forget about regularly replacing the brake fluid in the system. This should be done approximately every 40 thousand km. mileage of VAZ-2110.
Since brake fluid is hygroscopic, it easily absorbs moisture, thereby oxidizing the piston mechanism and causing it to fail. The piston stroke becomes difficult and uneven wear of the brake pads and wheel wedge occurs.
Please note that the repair kit offered in stores for self-service of VAZ 2110 (2112) calipers contains special lubricant for both the main piston and the guides. The use of Lithol or graphite lubricant leads to swelling of the protective shock absorbers and further souring of the guides. This kind of repair is unlikely to benefit your car.
Brake fluid
Any brake fluid that is used in automotive systems absorbs moisture very well. It is hygroscopic, therefore it oxidizes the piston mechanism from the inside, which leads to failure of structural elements. This makes the piston stroke more difficult and the brake pads wear unevenly.
The front wheels may become jammed. For these reasons, it is necessary to replace the brake fluid. Its service life is about 90,000 km, but not more than two years. These solutions contain many useful additives that improve cooling and increase braking efficiency.
But over time, under the influence of high temperatures and pressure, these additives evaporate. And the consistency of the brake fluid becomes more like water, and this reduces the efficiency of the system.
Do-it-yourself dismantling of the caliper on a VAZ-2110
The very simple design of the product and the triviality of the process of dismantling it allow even a novice motorist to carry out repairs and maintenance. If you carefully follow the recommendations below, you are unlikely to encounter difficulties at any stage of the process. You will save a lot of money spent on a trip to a service station, and a considerable amount of time, because the service time is comparable to the time required to travel to the workshop.
Dismantling VAZ caliper
The sequence for dismantling the product is as follows:
- The first step is to jack up the car and remove the wheel. To be on the safe side, it can then be placed under the bottom of the car in case the jack fails;
- On a VAZ 2112, the caliper is attached to the bracket using two M17 bolts, which you should unscrew. Penetrating lubricant may be needed to strip the bolts;
- If you need to replace the VAZ caliper or carry out a comprehensive repair, unscrew the product from the brake hose. You seal the hose tip and you can begin further disassembling the product.
Procedure for replacing the front brake cylinder on a VAZ 2110-2112
Video instruction
The video was made using the example of a VAZ 2110 car and is equally suitable for both 2111 and 2112. The only way the car parts may differ externally is the brake discs: ventilated or not, as well as their sizes.
Photo report
First of all, we will need to remove the front wheel of the car, after first lifting the car with a jack. After this, using a hexagon, you need to unscrew the two bolts securing the caliper bracket.
Now you can remove the bracket and remove the pads:
Then you can rip off the brake hose with a wrench, but you don’t have to unscrew it completely.
Next, we unscrew two more bolts securing the cylinder to the caliper, having previously bent the two locking plates under them using a screwdriver.
And we move the cylinder to the side, since nothing else holds it.
The hose can now be unscrewed completely by turning the brake cylinder itself several times counterclockwise.
To avoid excessive losses of brake fluid, it is advisable to fix the hose as high as possible, and always with the fitting facing up. You can also substitute a container if liquid suddenly leaks out.
A new front one costs about 500 rubles, so this price is quite acceptable. But the assembled caliper already costs about 2,000 rubles, which is already significant if you suddenly have to change the entire assembly. Installation of this part occurs in the reverse order.
VAZ-2110 caliper maintenance and repairs
It is mandatory to service the VAZ caliper after each replacement of brake pads, as well as in the event of a forced inspection due to its malfunction, for which it is first necessary to check the condition of all rubber elements, shock absorbers and anthers. It is also imperative to replace the grease for the caliper guides. You need a good synthetic based silicone lubricant that can withstand high temperatures.
If you had to buy a repair kit, it contains such lubricant, all the necessary gaskets, new guides and a piston. The price of such pleasure will cost you about 500 rubles. Buying a new VAZ-2110 (2112) caliper, depending on the store and region of Russia, will cost from 1000 to 1500 rubles.
To remove the piston from its seat, it is necessary to create the appropriate force using an air compressor (pistons are repaired one at a time, the stroke of the second is blocked, for example, by a wooden block). With the same success, when removing the product from the car, you can press the brake pedal without disconnecting the VAZ 2112 caliper from the brake hose. It is advisable to use a rubber adapter in order to absorb the sharp impact of the freely moving piston and its “shot”.
Signs of a faulty brake caliper
There are not many signs of malfunction in the VAZ 2107 brake caliper. Here they are:
- The car does not brake fast enough. This usually occurs due to a brake fluid leak. It can escape either through worn hoses or through hydraulic cylinders that have lost their tightness due to wear. The first version of the problem is solved by replacing the brake hoses, the second - by replacing the damaged cylinder;
- constant braking. It looks like this: the driver, pressing the brakes, stopped the car, and when he released the brake pedal, he discovered that the front wheels remained blocked. This happens because the cylinder pistons are stuck in the open position and the brake pads are still pressing on the brake disc, holding it in place. In such a situation, they usually change the entire caliper, since finding new hydraulic cylinders for the “seven” on sale becomes more and more difficult every year;
- squeaking noise when braking. The driver, pressing the brake pedal, hears a quiet squeak, which can intensify with increasing pressure. If you have to brake sharply and at high speed, the creaking turns into a piercing howl. All this suggests that the brake pads in the caliper have completely worn out, or rather, the coating of these pads. The material that covers the front part of the block has increased wear resistance, however, it eventually becomes unusable, being worn down to the ground. As a result, the brake disc is compressed by two steel plates without a protective coating, which leads not only to a loud squeaking sound, but also to increased heating of the caliper.
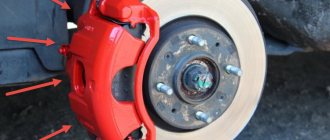
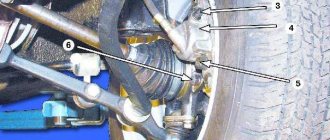
Main elements of the front brake system
- Brake disc – position 1 in the photo.
- Caliper, pos. 3.
- Brake pads – 4.
- Cylinder – 5.
- Piston – 6.
For the front wheel, the brake mechanism has automatic adjustment of the gap between the disc and pads, with a pad wear indicator and a floating caliper. The bracket includes the front brake cylinder of the VAZ 2110 and the caliper; they are secured to each other with bolts. The piston is installed in the cylinder cavity with an o-ring. The optimal clearance between the brake disc and pads is maintained due to the elasticity of the installed ring. How to change the brake cylinder of a device with your own hands is suggested in the article.
Where is the brake caliper located?
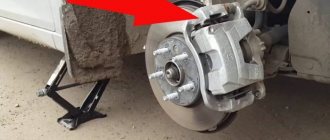
If we take the majority of cars that AvtoVAZ produces, then basically all of them, including the classics, have only two calipers and they are located on the two front wheels, and the rear wheels already have drum brakes and as such they no longer have such a caliper, more For details on where this caliper is located on a classic, look at the photos just below:
Note! In the photo below, the front wheel has already been removed from the car, since a more detailed look at the caliper is only possible with the wheel removed, since it is painfully large and viewing it through the stamped “13” disc is problematic!
The main malfunctions of the front brakes of the VAZ 2110
WAY TO ELIMINATE THEM
The front brake pads are worn out. The pads on one axle are replaced. Air has entered the brake hydraulic drive. The air is removed.Increased brake pedal travel
Leakage of brake fluid in the hydraulic brake drive. Fluid is poured into the reservoir to the upper mark, and an assistant presses the brake pedal. The brake caliper, brake cylinder, hoses, tubes, fittings and metering valves are inspected. Leak locations are determined. Repair or replacement of faulty parts is carried out. In the hydraulic drive system, the brand of brake fluid does not correspond to the recommended one. The system is washed and refilled with new fluid.With constant application of force, the pedal lowers to the floor of the body
The pads are stuck on the disk or fastening parts due to dirt or corrosion. The elements are cleaned.The pedal goes to the floor when pressed for the first time, and then normal movement is restored
Fluid leakage in the hydraulic brake drive Fluid is poured into the reservoir to the upper mark, and an assistant presses the brake pedal. The brake caliper, brake cylinder, hoses, tubes, fittings and metering valves are inspected. Leak locations are determined. Faulty parts are repaired or replaced.Reducing the distance from the floor to the pedal, with a constant force on it
The pistons of the brake cylinders stick or get stuck. The caliper or brake cylinders are repaired or changed. The bolts of the support plate of the caliper are loosened. The bolts need to be tightened. A different type of brake disc is installed, the friction properties of the disc are lost. A disc of the appropriate type is installed. The caliper brackets are loosened. The bolts are tightened. Air has entered the brake hydraulic drive. Remove the air. The pads are deformed. The elements are changed to one axle The running-in of the pads and discs is broken. The mating parts are ground.“Hardness” of the pedal, which occurs when you press the brake pedal
The pistons of the brake cylinders are stuck. Repair or replacement of the front brake cylinders of the VAZ 2110. Hoses, tubes and fittings are bent or clogged. The line is purged with compressed air. All damaged parts are replaced with new ones. The brake fluid is contaminated with oil, which causes the cuffs to swell and, as a result, they become stuck in the cylinder. All cuffs are replaced, the system is washed with DOT 3 fluid or similar, with the same equivalent.To stop the car you need to apply a lot of force or braking is accompanied by pedal compliance
Replacing the front wheel cylinder of a VAZ 2110 car
If it is impossible to eliminate brake malfunctions without replacing the brake cylinder, it must be replaced with a new one. Instructions for dismantling the cylinder:
- The front wheel is removed, near which the part will be changed.
- The brake hose seal is removed from the bracket on the stand.
- The hose tip on the brake cylinder is loosened.
- Using a screwdriver, bend the antennae on the lock washers and unscrew the two bolts securing the caliper.
Tip: To prevent the guide pins from turning, you need to hold them by the hexagon with a second key.
- The bolts are removed, the caliper is removed along with the brake cylinder.
Brake cylinder assembly with caliper
- The brake caliper is unscrewed from the tip.
Tip: Be careful, brake fluid will flow out of the hose. If the O-ring on the tip is too compressed, it needs to be replaced.
- The caliper is clamped in a vice, and both bolts with an internal hexagon are unscrewed, securing the cylinder to the caliper.
- For VAZ 2110, the front brake cylinder is removed from the caliper.
Removed wheel cylinder VAZ 2110
- The retaining rings are removed, being careful not to damage the protective cover.
- The brake cylinder is pulled out, as shown in the photo.
Disconnecting the brake cylinder
- Compressed air is supplied through the hole where the brake fluid enters and the piston is removed from the cylinder.
- Without damaging the cylinder mirror, the sealing ring is removed.
- If you need to replace the front brake cylinder of a VAZ 2110 or the valve itself, you need to unscrew the bleeder valve.
- The cylinder mirror and the working surface of the piston are carefully inspected. If signs of wear, damage or corrosion are found on their surfaces, the cylinder and piston must be replaced.
- A swollen, lost elasticity or damaged O-ring is replaced.
Advice: It is better to change the ring, regardless of the presence of damage, every time the cylinder is disassembled.
- A new O-ring is inserted into the cylinder bore. Before installation, the part is lubricated with fresh brake fluid.
- The edge of the protective cap is inserted into the piston bore.
- Brake fluid lubricates the cylinder bore and the working surface of the piston.
- The piston is inserted into the cylinder and the outer edge of the protective cap is installed into the bore of its body.
- The retaining ring is installed.
- The brake cylinder is installed in the reverse order of removal.
- The guide pins are lubricated with UNIOL-1 grease before installation.
- After the front brake cylinders of the VAZ 2110 have been replaced, you need to bleed the brake system.
How to replace the front brake cylinder on a VAZ 2110 can be seen in the video. Timely and proper care of the brake system of the VAZ 2110 will keep the car in a safe condition when driving, and therefore reduce the cost of repairs after an accident associated with faulty brakes.
>
Other methods for replacing brake calipers
The caliper - thanks to it the car slows down, inside this unit there are two so-called pistons, which, when braking, press on the brake pads and thereby these pads are rubbed into the brake disc, but over time this caliper and these pistons become unusable, and therefore the car may stop braking altogether with the wheel on which the caliper has failed and, in connection with this, the effectiveness of the brakes is significantly reduced, and just imagine if any wheel does not brake when you press the brake pedal, and the three remaining ones will, therefore, as they say, this problem must be eliminated immediately, and few people know how to do this, which is why we wrote this article in which we explained in detail the process of replacing the front caliper.
Note! In order to replace the caliper with a new one, you will need to stock up on: Be sure to have a basic set of wrenches that will contain a “17” and “14” key, and we also recommend that you also use a screwdriver or a bit, otherwise replacement turn out to be more problematic!
And one more thing, to replace the caliper you will need to take with you: Some kind of bright-colored marker, as well as a small piece of rubber tube or a bolt of a suitable diameter that will fit into the inside of the brake hose, if you don’t understand what’s going on speech then read the entire article because it says it all!