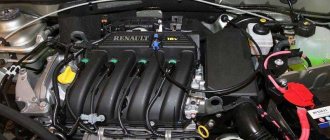
One of the problem areas in the electrical system of the domestic Lada Vesta car is the generator assembly together with the drive belt. The latter is generally a consumable component, the breakage of which causes undercharging of the battery and failure of some electrical appliances. It is quite possible to carry out repair work on your own if you choose original consumables and spare parts.
Downloading a book
After successfully completing the payment (by any method) and returning to the KrutilVertel store from the payment system website, you will be taken to the successful payment page:
The book you purchased will be in your personal account, from where you can always download it.
Please note that after making the payment, you need to return back from the payment system website to the KrutilVertel website. If for some reason you did not return back to the site and closed the payment system tab with a message about the successful completion of the payment, please let us know - we will send you a letter indicating access to download the book
If for some reason you did not return back to the site and closed the payment system tab with a message about the successful completion of the payment, please let us know - we will send you a letter indicating access to download the book.
What belts are installed on the Lada Vesta
The size of alternator straps on Lada Vesta may vary depending on the specific modification. There are different versions for cars equipped with and without air conditioning systems. So, for Vesta with air conditioning, modification 6РК1039 is used, and for those without such an option - 6РК778. Contitech and Gates companies are official suppliers for AvtoVAZ for the installation of alternator drive belts.
The tension and support rollers deserve special attention. They provide the necessary level of tension so that the strap does not fly off, but allows the generator to produce the maximum possible charge for the on-board electrical network. If these parts are made with high quality, then they do not require adjustment for a long time.
Refueling volumes
As mentioned above, three different engines were installed on the Lada Vesta - 11189, 21129 and HR16DE-H4M. It was also equipped with different gearboxes - 2180, 2182 and JHQ. Based on this, some Vesta filling containers have different volumes, while others are the same for everyone.
The following table will help you figure out how much of a particular technical fluid needs to be filled:
| Nominal filling volumes of Lada Vesta | |
| Capacities | Volumes (l.) |
| Engine lubrication system (including oil filter): 11189/21129 (stamped oil sump) 11189/21129 (cast oil sump) HR16DE-H4M | 3,2 (2,9) 4,4 (4,1) 4 |
| Cooling and heating system* : 11189/21129 HR16DE-H4M | 5,95 7,0 |
| Gearbox : Gearbox 2180/2182 JHQ | 2,25 3,34 |
| Hydraulic clutch and brake system | 0,559 |
| Hydraulic brake system (for cars with AMT) | 0,517 |
| Washer reservoir | 4,7 |
| Expansion tank (for cars with 21129 | 5.75 (max) 5.35 (min) |
| Air conditioning system (freon R134 “A”) | 0,475 (± 20) |
*A mixture of coolants of different brands should not be allowed.
In the same repair and maintenance manual for Lada West there are also the following volumes of coolant for the engine cooling system:
- for 11189/21129 with pre-heater - 9.3 l., without heating - 8.7 l.;
- for HR16DE-H4M with pre-heater – 7.6 l., without heating – 7.0 l.
Self-replacement of parts
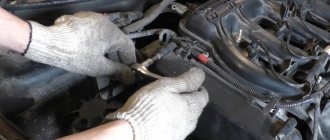
The procedure for replacing the belt drive on Vesta is made difficult by the compact arrangement of the units in the engine compartment. Access to the belts is limited by the closely located side member of the body, so the removal of additional elements is required.
To complete the work you will need:
- lift or inspection hole,
- additional supports to support the power plant.
Carrying out the work requires knowledge of the car's design; if the owner does not have repair skills, it is recommended to transfer the car to a specialized service center.
Required Tools
A set of tools required when replacing timing drive parts on a VAZ Vesta:
- 10, 13, 15 and 17 mm socket wrench;
- 17 mm spanner;
- hex key size 5 mm;
- Torx heads T30, T55 and E12 and a key for installing the nozzle;
- hydraulic or mechanical jack;
- set of flat blade screwdrivers;
- an original key for changing the position of the tension roller (it is permissible to use a tool to remove the retaining rings);
- mounting blade.
Preparing the car
- Open the hood of the car and remove the decorative plastic cover.
- Remove the protective fender liner installed in the arch of the right front fender.
- De-energize the on-board network by removing the terminal from the negative pole of the battery.
- To access the mounting points, you need to jack up the car and then remove the wheel.
- Install a safety support under the body sill to prevent the vehicle from falling if the jack slips or breaks.
- Using a 10 mm socket, unscrew the bolts securing the protective screen located under the engine.
- Loosen the bolt securing the pulley to the engine crankshaft. To perform the operation, you will need the help of a second person who presses the brake pedal.
If there is no assistant, then you need to unscrew the 3 mounting bolts and then remove the starter. To fix the crankshaft, use a screwdriver, which is inserted into the gap between the clutch housing and the ring gear on the flywheel.
- Place a jack under the engine crankcase, having previously installed a wooden spacer, and then remove the cover of the auxiliary drive belt tension roller. To reduce the tension, use a Torx T55 wrench and turn the roller bracket clockwise.
- Unscrew the bolts securing the engine mount; the power unit must be lowered to the ground by 50-70 mm, which will allow you to dismantle the roller and remove the belt from the pulleys. It is recommended to inspect the parts; if worn, a new set (belt and roller) is installed.
Removing the timing belt on VAZ 21129 and 21179 engines
The procedure for removing worn parts on a VAZ-21129 engine:
- To change the belt, you will need to unscrew 5 bolts securing the top plastic cover covering the timing drive.
- Unscrew the bolt and remove the pulley from the engine crankshaft; under the part there is a guide disk, which is also removed from the machine. When removing, it is necessary to control the position of the pulley, which can damage the shaft position sensor.
- Remove the 3 bolts securing the bottom of the protective screen.
- Set the timing marks, turn the engine crankshaft using a bolt with a set of spacer washers screwed into the toe of the crankshaft. It is possible to rotate the shaft by rotating the suspended wheel when 5th gear is engaged. There are marks on the camshaft gears that align with mating parts on the rear of the belt guard. To fix the camshaft gears, devices made of polyurethane bushings with a bolt are used.
- Check the alignment of the mark on the crankshaft gear with the counter rib on the oil pump housing. Loosen the bolt securing the tension roller; the mechanism will rotate automatically under the force of the tensioned drive.
- Pull the belt off the pulleys; if further use of the part is planned, then a mark is first applied to it indicating the direction of movement during operation. If you plan to replace a part, then a set of rollers (tensioner and intermediate) is installed at the same time.
- Check the condition of the pump; if bearing play or antifreeze leakage is detected, the unit must be replaced. Before removing the pump, the coolant is drained from the engine jacket (through a special hole in the block).
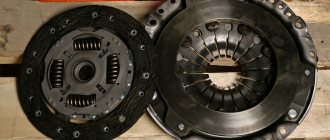
Generator design and functions
A car generator is one of the auxiliary devices without which the operation of a vehicle is impossible. Its task is to provide sufficient electricity to all consumers on the car and charge the battery.
Malfunctions lead to the fact that the battery is left without an assistant; on its own, it can only provide movement for a short distance. To avoid such situations, manufacturers install a battery charging indicator lamp that signals a breakdown.
Generator belt. Photo source: https://www.drive2.ru/l/503533995397480550
The generator is a mini power plant that produces three-phase alternating current. Then it is converted into a permanent one that powers the vehicle's electrical network. The device operates synchronously with the engine, driven by a poly-V-belt that transmits rotation from the crankshaft to the rotor. This generates electromotive force in the stator windings.
To assemble such a device, more than 20 parts are required. Main nodes:
- Rotor. It is an electromagnet whose winding is located around a rotating shaft. Contact between them is ensured by graphite brushes.
- Stator. These are 3 fixed windings made of copper. They are wound on a magnetic core and connected to each other.
- Relay regulator. Its function is to control the voltage at the output terminals at a level of 13.5 V. The relay has overload protection functions. More complex designs have a built-in temperature sensor, which provides a higher voltage supply in winter. At low temperatures, electricity consumption in a car increases. It is installed on the housing using a special brush holder, or inside the generator in one block along with the brushes.
- Rectifier (diode bridge). Its functions include converting an alternating signal into direct current.
- Frame. Made from light metals or their alloys to reduce weight. Since a running generator is subject to heat, the housing has many ventilation holes to ensure that the device is cooled by air currents.
An additional impeller is provided, the blades of which rotate along with the rotor and provide more efficient cooling by increasing air flow.
Location of rollers in Lada Vesta
Before you begin diagnosing or replacing these parts, it would be a good idea to know where exactly the timing system components are located in your vehicle. The rollers, belt and other components are located on the left side of the engine (if you stand in front of the hood). They can be seen if you remove the protective cover. To do this, you will have to dismantle the engine mount and remove the belt of the attachments. Under the cover you will see two large gears. These are the engine crankshaft toothed pulleys. It is on them that we will have to insert labels. Below are two small videos. The one on the left and slightly smaller is the tension roller. As you might have guessed, it is responsible for tensioning the belt. The roller on the right is parasitic. It is needed in order to bend the belt at the correct angle. In addition, it is responsible for stabilizing the belt and eliminating noise and vibration.
Preparing for replacement
Before you begin the procedure for replacing the timing rollers of the Lada Vesta, you must disconnect the negative contact of the battery and remove the keys from the ignition. In addition, you need to let the engine cool. If you carry out replacement on a warm or hot engine, you can get a serious burn. In addition, when heated, timing rollers and gears expand in different proportions. This means that you will not be able to properly tension the belt, which can lead to premature wear.
To replace timing components on a Lada Vesta you will need the following tools:
- set of socket heads and ratchet;
- set of open-end wrenches;
- hexagon 5;
- device for fixing pulleys;
- jack.
Design of VAZ engines
Both models are equipped with gasoline power units. One of them is a new development of AvtoVAZ - the VAZ 21179 engine, with a power of 122 hp. With. and a volume of 1.8 liters. The second is the base engine, 1.6 liters.
As for the regulations, it is recommended to replace it every 180,000 km (for a 1.8 l engine). However, mechanics advise not to take everything to the extreme and change the belt at around 100,000 km. This will avoid very unpleasant consequences.
The fact is that if the belt breaks, the valves on Vesta and X-Ray bend, which means that the engine will have to be overhauled, with the replacement of pistons, valves, guides and other components. And this is a very expensive procedure. Therefore, it is better to play it safe.
The progress of work is demonstrated using the example of a 1.6-liter power unit, since replacing the timing belt on a Lada Vesta and X-Ray with a 1.8-liter engine is more difficult due to the fact that the camshaft pulley is equipped with a phase regulator.
All this is told in the video.
Attachment Drive Belt and Tensioner Pulley, H4M Engine
Checking the condition of the drive belt
Attention: Checking the belts is carried out exclusively on a cold engine or half an hour after stopping it. 1
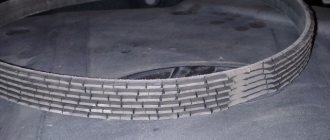
Visually check the belt for wear, damage and cracks on the inside and edges
1. Visually check the belt for wear, damage and cracks on the inside and along the edges.
2. Rotate the crankshaft pulley clockwise twice and ensure that all pulleys rotate before checking the belt tension.
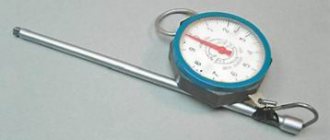
3. Apply a force of 98 N (10 kg) in the place marked with an arrow in the figure.
- Generator.
- Water pump.
- Crankshaft pulley.
- A/C compressor drive pulley (models with A/C) or idler pulley (models without A/C).
- Tension pulley.
- Drive belt.
4. Measure the drive belt deflection using a special device at the point marked with an arrow in the figure.
Adjusting belt tension
| Belt | Tension adjustment method |
| Drive belt | Adjusting bolt on idler pulley |
Attention: - Before checking the deflection of the newly installed belt, you need to adjust its tension. Turn the crankshaft at least two turns, adjust the deflection again to the nominal value to eliminate uneven belt tension between the pulleys
— Tighten the tensioner pulley lock nut by hand and check the belt tension with the nut tightened. — When installing a new belt, adjust the tension according to the specifications in the “New belt” column to compensate for its poor fit to the pulley grooves. — When the deflection or tension exceeds the value specified in the “Maximum permissible value” column, adjust the tension in accordance with the data in the “After adjustment” column. — Before checking the deflection of a newly installed belt, you need to adjust its tension. Turn the crankshaft at least two turns and again adjust the deflection to the nominal value to eliminate uneven belt tension between the pulleys. — When installing the belt, check that it is seated correctly on the pulley grooves. — Do not allow engine oil, power steering fluid or coolant to come into contact with the belt and pulleys. — Do not twist or bend the belt.
1. Loosen the lock nut (A) of the idler pulley by turning it 45º from the installed position.
- Generator.
- Water pump.
- Crankshaft pulley.
- A/C compressor drive pulley (models with A/C) or idler pulley (models without A/C).
- Tension pulley.
- Drive belt.
A. Idler pulley lock nut.
B. Adjustment bolt.
Attention: - If the lock nut is completely unscrewed, it will be impossible to set the required tension on the drive belt with the idler pulley. Never unscrew the lock nut completely (more than 45º)
— Place an alignment mark on the lock nut and use a protractor to check the angle of rotation. Never determine the angle of rotation of the lock nut by eye.
2. Adjust the tension of the drive belt by turning the adjusting bolt.
List of works during maintenance 1 (15,000 km or 1 year)
- Changing the engine oil. The oil filling volume in an engine equipped with a manual transmission is 4.4 liters, and in an engine with an AMT it is supposed to be filled in 3.2 liters. It is recommended to use ROSNEFT Maximum 5W-40 motor oil, catalog number 4 l. canisters - 4291, and price - 900 rubles. There is a more expensive option - MOBIL 3000 5W40 engine oil, which has a catalog number - 150013 (4 liter canister), but the price is already 1,540 rubles.
- Replacing the oil filter. The catalog number is 21050101200500, and the price is approximately 200 rubles.
Checks during maintenance 1 and all subsequent ones:
- crankcase ventilation system;
- hoses and connections of the cooling system;
- coolant;
- exhaust system;
- fuel lines and connections;
- covers for joints of different angular velocities;
- checking the technical condition of front suspension parts;
- checking the technical condition of rear suspension parts;
- tightening the threaded connections securing the chassis to the body;
- condition of tires and air pressure in them;
- wheel alignment angles;
- steering gear;
- checking the free play (play) of the steering wheel;
- hydraulic brake pipelines and their connections;
- pads, discs and drums of wheel brake mechanisms;
- vacuum booster;
- parking brake;
- brake fluid;
- checking the drive belt;
- checking the timing belt;
- accumulator battery;
- spark plug;
- headlight adjustment;
- locks, hinges, hood latch, lubrication of body fittings;
- cleaning drainage holes;
Signs of belt and tensioner wear
The drive and electric current generation system in the vehicle can function correctly for a long time, and the driver does not even have to look into the hood compartment. However, the driver should be aware of the approximate symptoms that may indicate a malfunction of the belt or its tensioner.
The following signs may indicate a drive malfunction:
- characteristic whistle when starting the engine. Indicates a faulty or overly worn belt. It is necessary to immediately check its surface for wear criteria. If almost none are identified, it is worth taking measures to check the degree of tension;
- the appearance of transverse or longitudinal cracks on the surface, scuffs and burrs. If there are too many of them, then it’s time to change the belt drive;
- abrasions on the surface of the roller can lead to uneven wear of the strap and, as a result, to its sagging in certain areas.
When is it time to change?
On Lada Kalina cars, the manufacturer does not regulate the replacement of this part. However, its failure is a common problem. In particular, we are talking about Lada Kalina cars. This applies to both 16-cl and 8-cl engines.
This is what a deformed element of a Kalina generator with an 8-cyl internal combustion engine looks like
Therefore, let’s look at the signs that indicate that the belt may fail in the near future:
- Whistle when moving. As a rule, this whistle appears when the electrical appliances of the vehicle begin to load. For example, if you start the car, and when you press the gas, a loud whistle is heard from the engine compartment, this indicates that the belt is loose. In this case, it must be tightened using a tensioner or replaced.
- Cracks on the strap. If you open the hood, look at the belt and see cracks on it, then you know that it’s time to change the element. Neither tensioning nor adjusting the rollers will help here. The component can be tightened, but this will not be enough for a long time. The only option left is replacement.
- Deformation. As in the previous case, neither tightening the tensioner nor adjusting the rollers will give much effect. You just need to change the element.
- Noise when the engine is running. If the element has already served its service life, this can be understood by the noise that appears when the motor is running. For example, some Lad Kalin car owners report loud knocking and even impacts when the engine is running.
The assembly is disassembled: this is what the strap looks like on the shafts
If the vehicle is equipped with a generator sensor that determines its performance, then it will be easier to identify the malfunction
For example, if you heard a whistle from under the hood, and at this time the indicator on the sensor came on, then you need to pay attention to the strap. This indicates that the belt needs to be tightened, since it may be in a weak state or that its service life has been exhausted.
One way or another, if the slipping and whistling of the strap cannot be eliminated by adjusting the belt or rollers, it needs to be changed.
How to replace the alternator belt on Vesta
To replace the belt of this unit, you need to follow several rules.
Mechanics explain that there is no mechanism for tightening the belt on the Lada Vesta or adjusting it. Therefore, replacement on a Vesta car needs to be done every 90,000 km. Checking the wear of this unit must be done every 15,000 km - as on the nine straight.
When buying a new belt for a Lada vesta without air conditioning, you need to check with retail chain sellers whether the spare part belongs to the corresponding modification of the car.
In order to remove this belt on a Lada Vesta car, you need to:
- drive a car onto an overpass;
- use a jack to lift the right front wheel and unscrew it;
- remove the right fender liner;
- in a car without air conditioning, remove the protection;
- in a car with a manual transmission, remove the clutch hydraulic cylinder;
- in a configuration without air conditioning, remove the starter (with an array of wires), and the bracket (which will subsequently be suspended), block the flywheel;
- using a screwdriver, pry up and remove the plastic cap that covers the roller;
- loosen the nut securing the roller with a wrench;
- insert a bit, up to 28mm long, into the hole on the pulley hub;
- Use a crank to turn the bit counterclockwise to loosen the tension on the alternator belt;
- If the belt is loose, it can be easily removed.
H4Mk engine
One level higher in the xRay line is the H4Mk engine. It is developed by Nissan, and was widely used in the Lada Vesta. Like the previous version, it is installed in tandem with a French manual transmission. This decision had a positive effect on the dynamic qualities of the car. Previously, this engine was installed with the Lada xRay top package and is currently present only on anniversary versions of the car.
- Working volume - 1598 cm3
- Number of cylinders/valves - 4/16
- Timing drive - chain
- Cylinder diameter - 78 mm
- Piston stroke - 83.6 mm
- Power hp/kW - 110/81 at 6000 rpm
- Torque - 156 Nm at 4000 rpm
- Maximum speed - 171 kilometers per hour
- Acceleration to the first hundred - 10.3 seconds
- Fuel consumption - n/a
The engine gave the crossover more serious dynamics, which is especially useful on the highway when overtaking. Acceleration to one hundred is the highest in the line, and is 10.3 seconds, but the maximum speed has increased slightly, to only 171 km/h. Fuel consumption at full speed with this power unit was 6.9 liters, which was the minimum figure in the entire line.
Payment via PayPal
After selecting payment via PayPal, the PayPal payment system will launch, where you need to select the payment method: bank card or PayPal account.
If you already have a PayPal account, then you need to log into it and make a payment.
If you do not have a PayPal account and you want to pay using a bank card via PayPal, you need to click on the “Create an Account” button - shown with an arrow in the picture.
PayPal will then prompt you to select your country and provide your credit card information.
After specifying the information required to make the payment, you must click on the “Pay Now” button.
How to change the timing belt on a Lada Vesta: step-by-step instructions
The procedure for replacing the timing belt on the Lada Vesta involves performing work in the following sequence. By strictly following it, the procedure will go quickly and without problems.
Dismantling
Dismantling procedure:
- Rotate the crankshaft until the pulley marks on the valves align.
- Compare this position with the position of the crankshaft TDC on the cylinder (first in line).
- Remove the rotation of the belt from the bolted parts of the pulleys.
- Carefully remove the mounting bolt on the crankshaft.
- Use a slotted screwdriver to hold the assembly by the gear ring of the flywheel.
- Remove the set of screws and remove the starter.
- Remove the crankshaft pulley and limit washer. Remove the front cover from the front of the structure, one bolt from the top, remove a couple from the bottom.
To prevent the camshafts from turning under the influence of the valve springs when removing the belt, fix the shafts if desired. Install them and secure the locking element between the pulley elements. Reduce the timing belt tension.
Installation
There is no simple mechanism for fixing the crankshaft on a small engine, but there is a mandrel. Find it, route the belt according to the diagram. Then make sure that the mark of the pulley with teeth goes opposite the tidal direction (look for it on the oil-type pump housing). Place the belt on the intake valve timing shaft pulley so that the front part of the belt is stretched, E and F coincide with each other. Do not let the belt loosen and place it on the exhaust camshaft until the C and D marks coincide.
This is what a new timing belt kit looks like
Adjusting the timing belt tension on Vesta
The last stage of installation is tensioning the timing belt, taking into account the manufacturer’s recommendations. Need to:
Rotate the tensioner using the stopper ring remover secured in grooves No. 1. Proceed in the direction of the arrows until marks 2 overlap. Tighten the roller bolt to 33-41 Nm
If the camshaft turns, reduce the belt tension, reinstall the structure, carefully turning the shaft that is installed incorrectly. After turning the crankshaft a couple of revolutions, check the alignment of the marks and the reciprocity of the arrangement of the shafts
Align the marks, if necessary, reinstall the timing belt on Vesta. Then reassemble the parts in reverse order.
You can carry out the work of replacing the timing belt on your own, but this is labor-intensive work.
Replacement requires the necessary technical equipment and experience in carrying out repair work. At the beginning of installation and adjustment of the belt drive, you should remove its casing on the engine by removing the 5 fastening screws. Remove the casing and remove the belt. Using a 17mm wrench, turn the crankshaft using the roller bolts so that the marks on the camshafts coincide with the marks on the plastic casing. Turn until the crankshaft pulley with mark F coincides with mark E. Using the same key, remove the crankshaft pulley and the limiter washer. The remaining part of the casing is unscrewed with a 5-point hexagon: 2 bolts on the bottom and 3 on top. Using a “15” wrench, unscrew the tension roller mounting bolt, after which it is dismantled in the same way as the idler roller. New rollers are put on in their place. Then comes the installation of a new belt instead of the old one. First you should make sure that the marks are still set correctly, then the belt is installed on the camshaft and pulled to the crankshaft with tension. The timing belt tensioner pulley starts it last. Use a snap ring puller to rotate the tension roller until the marks are compatible. Next comes the assembly.
Technology for replacing the drive of auxiliary units on Lada Kalina
- Specifics of the drive circuit on different modifications of Lada Kalina
- Recommendations for choosing a belt drive
- Regulations for periodic inspection and replacement of the alternator belt on Kalina
- Repair technology for the auxiliary drive system
- Tension adjustment
- Useful video tutorials on the topic
- How to replace the alternator belt on Lada Kalina
- How to tighten a belt
Lada Kalina from AvtoVAZLada Kalina The domestic auto industry continues to progress - AvtoVAZ presented a new generation Lada Kalina
. The model is equipped with a Jatco automatic transmission and an improved ventilation and heating system. Representatives of the plant claim that the new car has gotten rid of the problems associated with the electric power steering of the previous series.
This is all wonderful, but it was thanks to the first generation of the VAZ 1118 that repair techniques were developed that can be very useful to owners of new cars. Let's say the procedure for replacing the alternator serpentine belt on Kalina
absolutely the same for both models.
Specifics of the drive circuit on different modifications of Lada Kalina
The factory design provides for different lengths of standard gears, which depend on the configuration of the machine:
- without air conditioning – 882 mm;
- with air conditioning – 1018 mm.
The first VAZ 1118 models without air conditioning and a tension roller are equipped with a poly-V drive with a length of 823 mm
. Thus, with one belt from the crankshaft pulley, not only the alternator, but also the air conditioning compressor can be activated. The roller circuit allows you to adjust the tension.
Recommendations for choosing a belt drive
Gates drive as standard.
.
As a replacement on the first models, you can use Dayco 825
.
Here you need to take into account that elastic specimens are marked with the “ Poly-V
” symbol; if it is absent, the product has a rigid structure.
Alternative drives for VAZ 1118 with air conditioning
- Roulunds Rubber 6PK1015;
- Dayco 6PK1005;
- Bosch 6PK1015;
- Gates 6PK1019.
Alternative drives for VAZ 1118 without air conditioning
- Bautler 6PK883;
- Dayko 6PK888;
- Finwhale BP6 883;
- Luzar LB 0118 1118-3701720 6РК 884;
- Roulunds Rubber 6PK884;
- BRT 882 mm (Balakovo plant).
Drive system repair
Regulations for periodic inspection and replacement of the alternator belt on Kalina
Many new owners of vehicles, either from prolonged joy or out of ignorance, remember the presence of a flexible connection under the hood only after the lamp on the dashboard lights up. The technical documentation of the vehicle indicates operational standards, after which the torque transmission elements must be removed and new ones installed:
- tensioner roller after 60,000 km;
- belt after 30,000 km.
Experts strongly recommend monthly scheduled maintenance of the rubber drive, consisting of simple external inspection steps. The part needs to be replaced if the following defects are detected
- cracks;
- abrasions;
- delamination;
- oiling;
- cuts.
A high-frequency whistle that appears when electrical consumers are turned on also indicates the need to replace the generator belt on Kalina or, at a minimum, to adjust its tension.
Repair technology for the auxiliary drive system
Sequencing
is similar for both models with and without air conditioning and consists of the following items:
- Remove the engine protection.
- Remove the right wheel and fender liner.
- Remove the expansion tank.
- Jack up the right side of the engine and unscrew the mount.
- By tightening the tensioner mechanism pin, loosen the belt tension.
- Remove the drive from the roller and then from all pulleys.
- Install the new part and reassemble in reverse order.
- Adjust the tension.
Tension adjustment
After replacing the alternator belt on Kalina, making a rough adjustment and then starting the engine, it is necessary to more accurately adjust the drive tension
. To do this, we perform the following operations:
- loosen the tensioner rod locknut;
- turn the adjusting pin with a wrench to “8” until the result is achieved;
- tighten the locknut.
When gradually tightening the belt, you can use a simple canter scale, which you need to attach to the key at “8” and tighten the pin counterclockwise to a reading of 2 kg. A normal setting is considered when, with a force of 10 kgf, in the area between the generator and crankshaft pulleys, the deflection value will be within 8-10 mm.
Useful video tutorials on the topic
A video with a step-by-step operation will help you analyze in detail all the nuances of replacing and adjusting the tension
Problems when paying with bank cards
Sometimes difficulties may arise when paying with Visa/MasterCard bank cards. The most common of them:
- There is a restriction on the card for paying for online purchases
- A plastic card is not intended for making payments online.
- The plastic card is not activated for making payments online.
- There are not enough funds on the plastic card.
In order to solve these problems, you need to call or write to the technical support of the bank where you are served. Bank specialists will help you resolve them and make payments.
That's basically it. The entire process of paying for a book in PDF format on car repair on our website takes 1-2 minutes.
If you still have any questions, you can ask them using the feedback form, or write us an email at
Body and interior
The quality of the paintwork on the Lada XRAY is frankly not the best. And although “PUMA” was developed specifically for this car, it also does not shine with quality, although it is better than others...
Another drawback is the XRAY’s poor interior ventilation. In wet weather, to combat glass fogging, it is not enough to simply open the window...
We also recommend that you read
Lada Xray owner reviews
Also on the XRAY the door seals are unimportant. Not only do they “tann” in the cold. They also often break when opening. Take the trouble to treat the rubber bands with silicone grease at least once every 2-3 weeks, this will save you from the unpleasant effects of cold on the seals.
At this stage of operation of the Lada XRAY, the owners and service centers did not find any more serious and critical faults. But not much time has passed. Keep an eye on the future fate of the Lada XRAY on our roads in our next articles.
How to check the belt
If the alternator belt whistles, then every owner of a Lada Vesta will decide on replacing it as soon as possible. However, it is not at all necessary to reach this point. According to the regulations, you can safely change the strap without checking it after 10-15 thousand kilometers traveled.
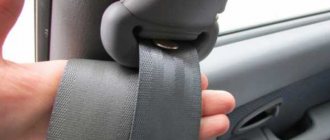
However, if there is a need to check the condition, then first of all we lift the engine screen up to provide access to the unit. With your finger we look for the area in the middle between the generator pulley and the coolant pump. We press on it with a force of approximately 8.0 kgf. The deflection value should be around 12 mm from the original position. If necessary, tighten the belt or replace it with a new one.
Examination
To independently check the condition of the Lada Vesta alternator belt, you need to turn on the speed, and then begin to carefully push the car back, while simultaneously inspecting the component. Moreover, inspection is carried out not only of the external, but also of the internal side - from some angles it can also be partially inspected.
Next, a touch test is carried out. In this case, replacement is necessary in the following cases:
- Cracks appeared on the inside (where the grooves are located);
- The belt is too dry;
- There is a loss of elasticity.
In addition, if a whistle occurs, continuing to operate a sedan or station wagon with this element is not allowed by regulations - this means that the belt slips on the pulleys.
The Lada Vesta generator belt must be checked periodically
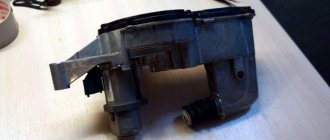
Replacing the generator belt tensioner
Often the alternator belt whistles or wears out due to low tension. The alternator belt tensioner may be either incorrectly adjusted or damaged and must be replaced.
Replacing the alternator belt tensioner pulley
But most often it is not the tensioner that dies, but the roller on it. To be precise, the roller bearing often fails. The bearing can also be replaced if practical.
It’s easier, of course, to buy a video, but the original can be expensive, and it’s difficult to find an analogue in size.
Please note that it is important not only to choose a belt of the same length, but also rollers of the same diameter. Everything must match as originally so that the intended belt tension is correct.
Car enthusiasts also often search for replacing the tensioner pulley as “replacing the alternator belt tensioner pulley.” It is the same.