Actually, it stands but doesn’t really show anything. The indicator from VAZ is installed, but the temperature sensor is from Renault Rapid. The resistance of the pointer and the sensor are different - as a result, the pointer, roughly speaking, shows the average temperature on the moon. The VAZ sensor doesn’t seem to fit (purely visually the diameter is larger + thread for a cone).
Now, actually, the question for knowledgeable people is which sensor to install instead of the standard one so that the indicator readings are correct.
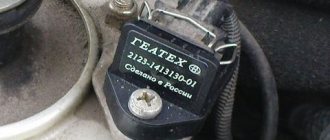
Well, some photos and a wiring diagram for all this. Perhaps it will be useful.
The white wire and the white and black wire go to the indicator light bulb (I connected it like this - white and black - to ground, and the white wire - to the dimensions on the dragonfly. It turns out that the light is turned on - the indicator lights up)
Green - to the temperature sensor, which is located on the engine (located on the left side behind the pump closer to the cabin)
Orange to any positive from the ignition switch (do not throw directly on the battery, otherwise it will work constantly, regardless of whether the ignition is on). You shouldn’t connect it to the white wire either - as soon as you turn on the dimensions, it will lie (mine constantly showed a temperature of 120 degrees)
I also installed the original expansion tank, instead of the VAZ garbage.
The coolant temperature sensor (CTS) is an important element of the engine management system that monitors the coolant temperature in the cooling system. The engine control unit receives information from the DTOZH and, in accordance with it, adjusts the composition of the fuel-air mixture, crankshaft speed, and ignition timing.
Design and principle of operation of the coolant temperature sensor
The “progenitor” of the modern coolant temperature sensor was a thermal relay
, which was installed on some engines (for example, in the K-Jetronic distributed injection system). The thermal relay contact is open - the engine is warming up, the contact is closed - the engine is operating at its normal temperature.
Currently, the basis of the coolant temperature sensor is a thermistor
(a resistor that measures resistance depending on temperature). The coolant temperature is monitored continuously. The material used to make a thermistor is usually nickel or cobalt oxide. The peculiarity of these compounds is that as the temperature increases, the number of free electrons increases and, accordingly, the resistance decreases.
Most often, the thermistor, which is located inside the DTOZH, has a negative temperature coefficient
. The sensor has maximum resistance when the engine is cold. A voltage (5V) is applied to the coolant temperature sensor, and as the resistance changes, it decreases. The engine control unit records voltage changes and, in accordance with it, determines the coolant temperature.
Methods for checking temperature sensors
If the driver wants to make sure that the cause of problems with the car is the antifreeze sensor, then he will have to carry out a simple checking procedure. But before you start, you need to make sure the integrity of the car wiring. As mentioned above, for the sensor to work normally, it must be continuously supplied with a voltage of 5 volts. To make sure that the supplied voltage does not deviate from this value, you should start the car, and then remove the wires from the sensor and connect them to a multimeter. If the device clearly shows 5 volts, then there are no problems with the wiring and you can begin to examine the sensor itself. There are two verification methods. Let's list them.
Hot water test
The sequence of actions in this option is simple.
- The sensor is placed in a pan of cold water. An electronic thermometer is also placed there (it is much more convenient than a regular one, because the measured temperatures will be quite high).
The thermometer and sensor are placed in a container of water
Table: temperatures and corresponding resistances, characteristic of serviceable VAZ 2106 sensors
Checking without an electronic thermometer
This method of checking the sensor is simpler than the previous one, but less accurate. It is based on the fact that the temperature of boiling water reaches one hundred degrees and does not rise higher. Therefore, this temperature can be used as a reference point and find out what the sensor resistance will be at one hundred degrees. The sensor is connected to a multimeter switched to resistance measurement mode, and then immersed in boiling water. However, you should not expect the multimeter to show a resistance of 177 ohms, which corresponds to a temperature of one hundred degrees. The fact is that the temperature of water constantly decreases during the boiling process and averages 94–96 °C. Therefore, the resistance on the multimeter will vary from 195 to 210 ohms. And if the numbers produced by the multimeter differ from the above by more than 10%, the sensor is faulty and it’s time to change it.
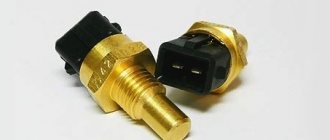
Where is the coolant temperature sensor located?
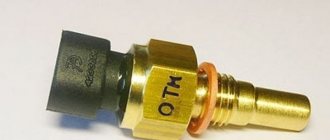
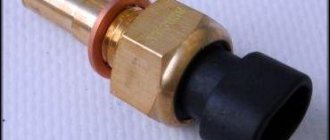
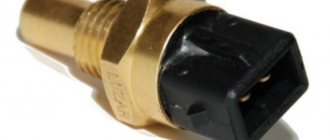
The thermistor is located inside a protective heat-conducting housing, and on the housing itself there is a thread for attaching the sensor, as well as an electrical connector. Typically, the DTOZH is screwed into the exhaust pipe of the cylinder head. Some engines have two sensors at once: one records the temperature at the engine outlet, the second - from the radiator.
The coolant temperature sensor is positioned so that its tip has direct contact with the coolant. Accordingly, if there is little antifreeze in the system, then the DTO indicators may be inaccurate.
Oil pressure
On “sixes” and other classic models, a VAZ 2106 oil pressure sensor of type Mm393A is installed. The pressure indicator works on the principle of converting this parameter, which is created in the lubrication system, into resistance. The oil pressure sensor is installed in the engine cylinder block. A regulator is also installed here, which turns on the oil pressure light.
This element is triggered as a result of the closing and opening of contacts at a particular level of pressure in the system. The corresponding indicator on the control panel may light up if the characteristics are violated, namely, if there is little liquid in the system.
Designation of part elements
How to check the controller? You can check the engine fluid pressure sensor by removing the regulator from its installation location. After removal, you should turn the starter; you do not need to start the power unit. If everything is fine with the supply of consumables, then you need to change the regulator. You can tell about the oil supply by the splashing of liquid from the controller seat.
Signs of DTOZH malfunction
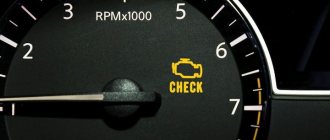
Like any other sensor, the DTOZH can fail, causing engine malfunctions. The first signs by which you can recognize a breakdown of the coolant temperature sensor:
- problems starting the engine in cold weather,
- bad exhaust on a cold engine,
- increased fuel consumption, etc.
Most often, if such symptoms occur, replacing the coolant temperature sensor is not necessary.
. Most likely, the problem is a loose or damaged contact, damaged wiring, or a coolant leak. Therefore, first you should conduct a visual inspection of the sensor for damage or corrosion.
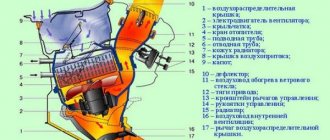
VAZ cooling fan connection diagram
All the main electrical circuits and modifications for connecting the liquid cooling fan (CO) in VAZ cars of various models are provided. What is the essence of VO’s work? An electric motor with an impeller on a shaft is installed inside a rectangular metal frame, with which it is attached to the back of the radiator. When voltage (12 V) is applied to the contacts of the drive, it begins to work, rotating the blades and creating a directed stream of air, which, in fact, cools the antifreeze or antifreeze.
vote
Article rating
Checking the coolant temperature sensor
If the inspection does not produce results, it is necessary to measure the resistance and voltage of the sensor at different temperatures
. After starting a cold engine, as it warms up, the resistance should drop (or increase in the case of a positive temperature coefficient of the sensor) in accordance with normal values.
You can check the coolant temperature sensor yourself
Normal resistance and voltage readings for a NTC coolant temperature sensor
| Coolant temperature (°C) | Resistance (Ohm) | Voltage (V) |
| 4800 – 6600 | 4,00 – 4,50 | |
| 10 | 4000 | 3,75-4,00 |
| 20 | 2200 – 2800 | 3,00 – 3,50 |
| 30 | 1300 | 3,25 |
| 40 | 1000-1200 | 2,50 – 3,00 |
| 50 | 1000 | 2,5 |
| 60 | 800 | 2,00-2,50 |
| 80 | 270 – 380 | 1,00-1,30 |
| 110 | 0,5 | |
| open circuit | 5,0 ±0,1 | |
| short circuit to ground |
Normal resistance and voltage indicators for DTOZh with a positive temperature coefficient
AutoOt.ru » Car repair » Where is the coolant temperature sensor located?
Purpose of the device
DTOZH should not be confused with an antifreeze level controller. If the first is intended to detect the temperature of the power unit, then the second is used to control the volume of consumables - refrigerant. Based on the DTOZH readings, the control unit detects temperature changes and transmits data to the on-board computer about the state in which the engine is operating. Using the controller, engine warm-up, overheating, and the optimal temperature of the operating internal combustion engine are determined. Pulses transmitted to the control module determine the functionality of the internal combustion engine control system as a whole.
We recommend: Road patrol equipment
The engine temperature determines the following nuances:
- fuel consumption per 100 km;
- volume and quality of gases;
- ignition of the air-fuel mixture;
- optimal operation of the gearbox.
All these factors are controlled by a control device, which, based on the information received, determines the optimal operating mode of the engine. Therefore, the performance of the temperature sensor is important for the vehicle. If the device is faulty and sends incorrect pulses to the control module, this can lead to problems.
How does DTOZh affect the operation of the internal combustion engine?
Based on the parameters supplied to the control device, the module performs the following functions:
- Enrichment of the air-fuel mixture or its depletion. If the controller detects that the temperature is too low, it will begin to increase the duration of the signal sent to the injectors, which helps to enrich the fuel mixture. In accordance with the normalization of the temperature regime, the fuel is gradually depleted, which prevents possible excessive consumption of gasoline and reduces the volume of exhaust gases. If the sensor breaks down, it can regularly lower the temperature in the engine, which will lead to fuel contamination and increased consumption.
- The control unit sets the ignition. It can be early or late. If the temperature increases, the control module adjusts the ignition timing to reduce exhaust toxicity.
- Thanks to DTOZH, proper recirculation of gases is performed during warming up. The recirculation valve closes tightly when the power unit warms up. If the car’s engine is still cold, then recirculation will cause fluctuations in idle speed and random engine stops.
- With the help of DTOZH, the control unit purges the filtration system, which traps fuel vapors. To achieve better machine controllability, the carbon filter element is not purged until the engine is completely warmed up.
- Locking of the gearbox torque converter when the internal combustion engine warms up. The control module should not limit the operation of the device until the machine warms up.
- The ECU controls the operation of the unit's cooling fan. Based on the temperature controller readings, the module activates and deactivates the ventilation device to correctly select the temperature of the unit. If the DTOZ gives incorrect impulses, there is a possibility of the motor overheating.
How to check the coolant temperature sensor?
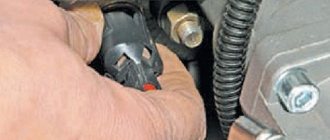
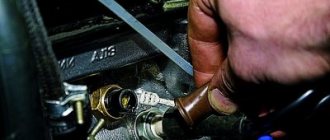
In order to check the device, it must first be removed.
Dismantling is very simple:
- As a rule, the sensor is located on the cylinder head pipe and in order to remove it, you first need to remove the air filter;
- then the negative cable is removed from the battery;
- coolant is drained from the radiator;
- the wiring is disconnected from the device;
- using a suitable wrench (most often 19–21), the tightening is loosened, after which the sensor can be easily dismantled.
After the sensor has been removed, it is placed in a container with coolant and it is gradually heated. The process is accompanied by constant monitoring of the temperature and the readings of an ohmmeter, which is connected to the sensor.
There is a special table corresponding to the coolant temperature and ohmmeter readings.
| Temperature, °C | Resistance, Ohm | Voltage, V |
| 4800 — 6600 | 4,00 — 4,50 | |
| 10 | 4000 | 3,75-4,00 |
| 20 | 2200 — 2800 | 3,00 — 3,50 |
| 30 | 1300 | 3,25 |
| 40 | 1000-1200 | 2,50 — 3,00 |
| 50 | 1000 | 2,50 |
| 60 | 800 | 2,00-2,50 |
| 80 | 270 — 380 | 1,00-1,30 |
| 110 | 0,50 | |
| open circuit | 5,0 + 0,1 | |
| short circuit to ground |
When the readings from your device do not agree with the data from the table, the sensor must be replaced, since it can no longer be repaired.
If it turns out that the sensor is in working order, the fault needs to be looked for further. There may be some problem with the thermostat.
You can see an example of how to check the coolant temperature sensor by watching this video:
What is the sensor used for?
A device or device that shows temperature changes in the cooling system is of great importance for the entire vehicle engine control system. It is he who controls the state of the antifreeze temperature in the overall circuit of the cooling system.
With the help of the sensor data, the engine control system is monitored, the parameters of the engine functionality are adjusted, which are directly carried out depending on the heating and thermal state of the coolant.
What data is most important:
- Quality of the fuel mixture composition;
- The number of revolutions of the crankshaft for a certain period;
- Changing the ignition timing.
The sensor helps determine how quickly the engine warms up during startup, and ensures that it warms up as quickly as possible, and also maintains the same optimal temperature that is maintained under various operating conditions.
Signs of DTOZH malfunction
The liquid cooling sensor, like any other sensor, can have malfunctions that will someday lead to engine malfunctions.
The main signs that indicate a device failure:
- increased fuel consumption;
- poor exhaust when the engine is cold;
- Problems starting the engine in cold weather.
As a rule, if such problems occur, replacement of the sensor is not required. The problem may have arisen due to a loose or damaged contact, a wiring problem, or a leak of cooling fluid.
Sometimes a cold engine stalls and stalls, and its idle speed jumps from minimum to maximum values per minute, and after a few minutes or after a restart the situation is corrected.
This problem can occur due to a breakdown of the cooling fluid temperature sensor.
You can check the condition of the device using an ohmmeter. There is no need to unscrew it. It is not its resistance that is checked, but the mass sensor.
When the sensor is in order, the resistance tends to infinity, but if it is broken, then the resistance is 10 kOhm or less.
Connection to alarm
Typically, the manual for a car alarm provides instructions on connecting all sensors, including temperature ones. For example, in TOMAHAWK and STARLINE systems, one wire is connected to the orange-gray wire of the control unit. In ALLIGATOR - to black and green. The other end is always attached to the mass. In practice, this is equivalent to connecting in parallel to the hood sensor, which is what is most often done in practice.
Advice: laying the wires in the engine compartment must be done so that they do not dangle, but are securely fixed to the surrounding parts using electrical tape or installation clips.
The correct operation of the alarm with auto-start depends on the correct location of the additional temperature sensor. A thermistor made by yourself will cost several times less than a purchased product, and the creator will feel proud of the results of his work.
Source
How to connect the coolant temperature sensor?
The sensor is installed very easily: it is screwed into the mounting socket, after which the thread is tightened and the wiring is connected, the air filter is put in place and the main air flow sensor power supply block is connected.
It is strictly forbidden to use sealant in this case. When the engine is running, the cooling system and metal elements become very hot, and the sealant may melt.
If this happens, the sealant will get into the antifreeze and the cooling system may fail.
Coolant temperature sensor connection diagram:
Replacing DTOZH, video:
Engine temperature indicator: features
Let's start with a common situation. Let’s say that a car has a standard dial temperature indicator, but on such devices the scale may often not have calibrations, and the engine operating temperature needle in the middle position displays the real picture only conditionally.
At the same time, during operation, the driver notices that if the middle on the scale is the norm, then in various situations the needle can rise noticeably higher (for example, in traffic jams). It would seem that the motor is overheating.
Naturally, the movement of the car immediately stops, the owner hurries to turn off the engine and open the hood. However, upon inspection of the unit, there are no signs of coolant leakage. Then the device is restarted and it turns out that the radiator fan does not even turn on, although the device is operational.
When you feel the upper radiator pipe has an acceptable temperature, antifreeze does not “press” anywhere, the lower pipe may be completely cold, etc. Further checking the coolant level and the condition of the antifreeze/antifreeze itself also shows that the cooling system fluid is normal, the interior heater (stove) is working normally, there are no air pockets in the system, and the pump is also working.
It also happens that if you let the engine cool completely, then start the engine and warm up the power unit to operating temperatures, this process can take a long time (judging by the indicator on the instrument panel). In this case, you can notice that although the needle has only risen a little, the radiator fan is already working, the lower radiator hose is warm, etc.
If we consider that everything is in order with the fan and cooling system, then the signs described above indicate a large error or problems with the engine temperature gauge. It is quite obvious that in such a situation it becomes difficult to understand when the engine reaches operating temperatures, whether the internal combustion engine is overheating, how long it is necessary to warm up the engine before driving, etc.
At the initial stage, many drivers begin to look for the cause. Some right away:
Currently reading
Tubeless tire repair kit: how to “heal” punctures?
Winter starting a diesel engine: how to start it correctly...
- flush the cooling system
- change coolant and thermostat
- the standard temperature sensors on the engine and in the dashboard are checked;
- wiring is ringing, etc.
In some cases, the problem can be solved, while in others, it is still not possible to achieve correct operation of the standard temperature indicator. The fact is that often the culprit is control electronic modules that give a certain failure.
Replacing such modules is expensive and impractical. In this situation, a quality solution is a digital engine temperature indicator. Such an electronic sensor has a very reasonable cost (on average, from 15 to 55 USD), and is relatively easy to connect and install. The range of measured temperatures is also very wide (on average, from -65 to +240).
Please note that installation features may differ slightly on different types of internal combustion engines.
- The device is usually powered from the ignition switch.
- The digital panel is installed in a convenient place inside the car.
- As for the sensor itself, for accurate readings it must be immersed in coolant.
In other words, the device must be screwed into the block or cut into the pipe. To do this, some drivers replace the standard temperature sensor by simply screwing in a new one instead. However, this cannot be done on cars with an ECU for a number of reasons.
The fact is that the controller receives readings about the coolant temperature. In this case, it is necessary to separately install the digital indicator sensor, since it is strongly not recommended to remove the standard temperature sensor from the system.
Checking the coolant level
Many car owners often check the coolant level visually without using special instruments. You just need to look at the expansion tank.
If the engine is cold, the coolant should be between the maximum and minimum marks on the reservoir. When the engine is warm, the level of the substance may increase slightly.
If your car is in full working order, then when the antifreeze level decreases, the sensor immediately lets you know about it. The driver sees a special signal on the dashboard and adds antifreeze or coolant.
It is also contraindicated to add water alone. After all, antifreeze has special properties that protect cylinder heads from corrosion.
If checking the coolant temperature sensor does not show the coolant temperature. In this case, you better contact technical service.
In any car, everything is interconnected. The car system could fail for some related reason. For example, you could remove some part located with the sensor and place it incorrectly.
But it also happens that the problem is related specifically to the temperature sensor. The coolant level may be inconsistent or there may be a problem with the coolant level sensor.
The service can replace the sensor, and they provide a guarantee for its high-quality replacement and the correct assembly of all parts in the right places.
Thus, the coolant temperature sensor is a very important component of your car, which requires constant attention and care.
If repair of this device is necessary, then do it efficiently, without regretting the money spent. After repair, the engine will run smoothly, this will be especially noticeable at low speeds.
>
Replacement
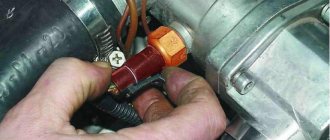
Replacing a faulty DVT is very simple.
Step-by-step instruction:
- Wait until the engine has completely cooled down.
- If necessary, drain the antifreeze from the system.
- Disconnect the negative terminal on the battery.
- Disconnect the plug terminal from the sensor.
- Unscrew the element.
Replacement is carried out in the reverse order. After completing the procedure, you need to turn on the ignition without starting the engine. The ECU must read the new part and conduct internal diagnostics. If the cause of the problem cannot be clarified, it is better to contact a specialized service.
The coolant sensor is a very important part of the car. Therefore, for replacement it is necessary to purchase only original spare parts. You can determine the original production of DTOZH by the article number indicated on the packaging. Sensors for domestic VAZ cars are marked with article number 2101-3808600. The originality of models from foreign manufacturers for VAZ cars and foreign cars can be determined from the table below.
You should not install similar components from cars of other models. The electronic circuit may be different, the sensor will produce premature, late, inaccurate data, which will affect the overall performance of the vehicle. Each sensor is assembled taking into account engine volume, its power, and the total volume of coolant in the system.
The cooling system is an important part of car systems. A faulty sensor can affect both the operation of the engine and the integrity of its components. This part is quite cheap in terms of cost. Replacing it will help avoid a number of engine problems, as well as large financial investments.