Power steering
The steering wheel is the main mechanism for controlling the movement of the car in the desired direction. Sometimes not only the convenience for the driver, but also the safety of his movement depends on how easy it is to operate. Power steering installed on a VAZ 2109 car will help reduce the force on it by almost half, do not create the need to acquire special driving skills, and do not make visible changes to the design of the car. In a word, these are pleasant changes at a low price. The article suggests that you familiarize yourself with the technology of installing the device yourself.
What are the advantages of electric power steering on the VAZ 2109
On a VAZ 2109 car, in addition to the hydraulic booster, you can install electric power steering. Installing such a device in front of the hydraulic booster has a number of advantages:
- Easy to install. The unit is installed in one unit, there is no need to interfere with the engine compartment.
- Greater reliability, which increases due to the absence of a number of elements: pulleys, hoses, fluid.
- Environmental friendliness and energy saving. Power is consumed only when maneuvering, which reduces energy costs and saves fuel.
- Passive safety is ensured in the event of an impact; there is a self-diagnosis system.
- Information content. Increasing the speed of the car will ensure an increase in the force on the steering wheel.
The car owner decides what type of power steering to install. Any helps to reduce the effort applied to the steering wheel and ease of control.
Types of devices
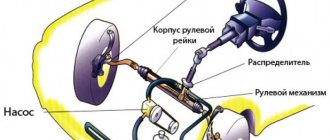
Power steering is a device with which the working fluid creates pressure on the steering rack. Due to this, the driver needs to apply much less force to the steering wheel to move it. There are several types of such equipment, let's look at the main disadvantages of all other models of amplifiers and it will become clear why the power steering was installed on the VAZ 2114, and, in general, on most modern cars. In addition to this, there are such options in the world:
- Electric.
- Pneumatic.
- Mechanical.
The first option is next after the hydraulic one in terms of its prevalence. Its action is based on the use of magnetic forces to rotate the steering axis. But there is also a noticeable disadvantage here - the energy consumption of the battery, which immediately begins to affect the fuel consumption of the car.
The pneumatic one is very complex; there are a lot of elements: a cylinder, a compressor, pipelines and pipes, a reinforcing mechanism, etc. This entire design is very unreliable and the slightest malfunction in the operation of at least one component leads to the absence of an effect as such. The mechanical amplifier looks like a set of different gears in the body and its effect is achieved due to a changed rotation ratio, here there is minimal gain.
Power steering VAZ 2114
That is why today you can most often find power steering on a car; it was precisely because of its reliability, simplicity and efficiency that it was chosen for installation on the VAZ 2114. The most dangerous breakdown that can happen is a leak of working fluid. Next, we will look at how to correctly understand and determine the location of the leak in the system and how to correctly replace the working fluid in a VAZ 2114.
What is power steering VAZ 2109
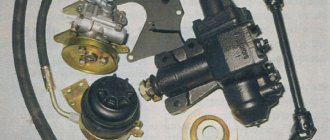
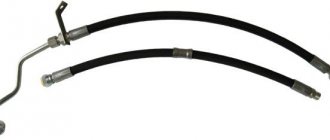
On the first models of VAZ 2109 cars, power steering was not installed. The driver has to mount the unit additionally. It consists of two parts:
- The source of energy, its role is played by a hydraulic pump.
- An actuating mechanism that is usually combined with the steering rack. The general view of the device is shown in the photo.
Installation of power steering VAZ 2109
Before mass use of the device, manufacturers tested the car, which showed:
- When moving the car with numerous turns in a limited space, the steering wheel rotated easily; it was necessary to turn it at a smaller angle than on a car without power steering.
- When driving around the city, after a little skill, the driver only gets pleasure from driving the car.
Tip: When turning the steering wheel at a larger angle than the driver expects, the power steering allows the steering wheel to be turned to the desired angle, the car will easily fit into a smaller radius.
- When driving on a free area, the number of steering wheel turns is three and a half from one stop to the other, with the hydraulic booster three and one third are enough.
- A change in the steering gear ratio led to more precise vehicle control.
- The steering works well at very low speeds in parking mode. Very little effort is applied to the steering wheel.
- Excellent results were obtained when moving at extreme conditions. Increasing speed resulted in a slight increase in steering effort, but feedback was good.
How to install power steering on a VAZ 2109
Instructions on how to install power steering on a VAZ 2109 indicate what is needed:
- Purchase a power steering kit, with all the components: a pump, a special steering gear, a pulley, a hydraulic cylinder, an expansion tank and hoses that can withstand high pressure.
- The pump fixation bracket is installed on the BC head. When installing it, the product needs to be modified: the engine mount is unscrewed, the ears for attaching it are sawed off, the far right mount is sawed off so that it does not interfere.
Installing a bracket to fix the pump
- Instead of the generator, the pump itself is mounted on a bracket.
- The crankshaft pulley is being replaced; the pump will be driven through it.
Advice: It is necessary to take into account that the drive should not go through the chain, but only through the belt.
The steering gearbox is being replaced.
Tip: When installing a new gearbox, you will need to modify the place where it will be mounted. To do this: a hole is cut in the front end shield and the bipod is modified.
- A location is selected for the expansion tank so that it does not interfere with other parts of the engine.
- The hydraulic cylinder is installed according to the instructions included in the power steering kit. Each device manufacturer has its own installation features.
- The entire system is connected by high-pressure hoses and is well fixed.
Tip: It is necessary to ensure that the hoses cannot rub against other elements located under the hood.
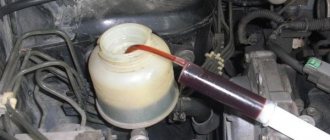
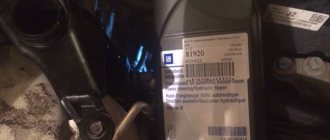
- Special power steering oil is poured into the expansion tank.
- The system is being pumped. In this case, the steering wheel turns all the way left and right; if necessary, you need to add oil to the expansion tank.
- When the liquid stops leaving, you need to replenish the oil level to the top mark of the tank.
- On a VAZ 2109 car, the installation of the hydraulic booster ends with bleeding the system.
The advantages of the VAZ 2109 with hydraulic booster can be seen in the video.
Usefulness of the system
This statement is especially true in large cities densely packed with cars. Parking in a cramped courtyard of a high-rise building late at night in the dark under the critical comments of your neighbors is quite difficult if you have not installed electric power steering on your VAZ 2109. Try to cope without power steering in a dead traffic jam, when a slightly more promising space has become available in the next row and you need to turn it out faster than your neighbor turn the steering wheel to the right all the way, turn it back 15 centimeters, turn the steering wheel all the way to the left, move it forward 20 centimeters, turn it again, turn it back again, turn it out again and drive into the vacant space under the competitor’s nose.
The intensity of automobile life in megacities has recently led to a change in the rules. Just 3-5 years ago, the phrase “I bought a car” meant purchasing a car without power steering. And recently, this means purchasing a vehicle with such additional equipment.
Characteristics
The ESD serves to reduce the force applied to the steering wheel required for maneuvers.
It is optimal for the VAZ 2109 to install an electric amplifier borrowed from the Lada Priora. New AvtoVAZ models are produced on the basis of old ones, so the parts are perfect for nines that have not been produced for a long time.
When choosing an EUR for installation, make sure that it meets the following characteristics.
EUR from Priora
The choice in favor of just such an electric amplifier for the VAZ 2109 is due to its advantages:
- Installation is quite easy;
- The ESD will require a small amount of energy to operate;
- Eco-friendly device;
- Adapts perfectly to AvtoVAZ classics, including nines;
- Allows you to drive comfortably even at high speeds.
Installation
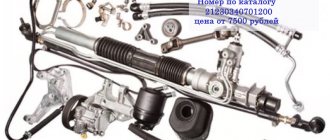
To change the standard steering gear to an electric steering gear, you will need to purchase the following kit:
- New electric booster;
- Wiring kit for connecting the amplifier;
- Installation plate (you can find it on the market, but some people make it themselves);
- Shortened steering shaft driveshaft;
- Protective casing for “ten” with Europanel;
- Steering wheel (it’s better to take one from Kalina);
- Emergency button (located on the panel).
Replacement kit
That's it, when all the necessary components are ready and you are ready to work, you can begin.
- Since we are talking about working on the electrical system, be sure to remove the negative terminal from the battery.
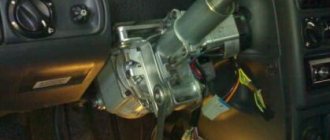
- Remove the steering wheel, remove the protective cover and steering column switches. Don't forget to remove the connecting block along with the switches.
- Unscrew the dashboard trim and remove the instrument cluster. This way you can then connect the control wiring from the electric amplifier.
- Remove the ignition switch. Be careful here. Many people in a hurry tear off the splines of the fastening bots.
- Remove the steering shaft.
- Now in front of you is a disassembled structure, where the rather long studs clearly stand out. They should be shortened. Otherwise, the pins will rest against the new electric power steering mechanism.
- Install the adapter plate. For its installation, the front nuts will fit the old ones. In this case, be sure to replace the rear bolts. Their size should be 4.8 by 50 millimeters and fit 10 keys.
- If you couldn’t find the mounting plate based on the drawings below, you can make it yourself.
Inspection and identification of defects
Carefully inspect the contents and remember (you can take a photo) what was placed where and how (more attention should be paid to the position of the cylinder). You can twist the power steering pulley and carefully use tweezers to check how the blades move in the grooves of the shaft
All parts should be pulled out without effort, since they do not have any fixations, but the central axis is firmly fixed and cannot be removed.
We inspect the shaft from the reverse side, parts (power steering housing and cover wall) touching them, for burrs or grooves, everything is perfect for me.
Now we remove the entire internal economy onto “clean” rags and begin to study it...
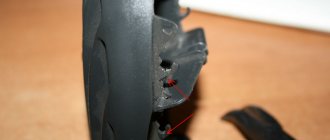
We carefully examine the shaft; all its grooves have very sharp edges on all sides. One of the end sides of each groove has a pronounced sharpness inward, which, when moving the blade inside the groove with a constant slope towards this side, will greatly complicate its movement (this may be the first component of poor power steering performance). The side parts of the shaft grooves are also “sharpened”; this can be felt if you run your finger in different directions along the end (outer circumference), as well as along the side parts of the shaft in different directions. Otherwise the shaft is perfect, has no flaws or nicks.
Functionality check
You should check whether the steering wheel spoke is in a horizontal plane when the car wheels are in a straight position. If even a slight deviation is observed, it is necessary to identify the cause of the malfunction and eliminate it before it develops into a dangerous problem.
If something goes wrong when checking the controls, knocking or other problems appear, remove the suspension control rods and check the condition of the steering mechanism again. This will make sure that knocking and malfunctions are caused by malfunctions of the steering wheel, and not by other reasons, of which there may be many.
Sources
- https://spike.su/index.php/steering-mechanism-car-VAZ-2108-VAZ-2109-VAZ-21099-removal-and-installation.html
- https://expertvaz.ru/2108/rulevaya-rejka-upravlenie-remont.html
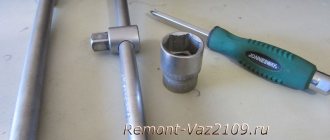
Tools and materials
The list of necessary tools largely depends on whether the steering mechanism will be replaced or repaired.
So, to replace you only need a 13 socket with a wrench and an open-end wrench of the same size, as well as a 22 wrench and a screwdriver.
But during restoration work, you will need significantly more tools:
- A set of open-end and hex keys, a set of heads;
- Hammer;
- Puller;
- Bench vice;
- Jack;
- Narrow chisel (up to 7 mm);
- WD-40;
- Rags;
- Bearing grease (Feol or others)
In addition to the tools, you will also need a repair kit for the steering mechanism.
These repair kits are divided into small and large, although the difference between them is insignificant.
The small repair kit includes:
- All rubber seals;
- Rack stop spring and plug;
- Plastic rack bushing;
- Gear shaft retaining ring.
A large repair kit also includes a shaft with gear teeth and the rack itself.
A repair kit alone will not be enough to restore the functionality of the mechanism; you will also need steering rod silent blocks, a mechanism boot and clamps for it.
Regardless of whether the mechanism will be changed or repaired, first it must be removed from the car.
On which car the removal will be carried out - VAZ-2109 or VAZ-2110, there is not much difference.
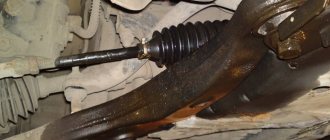
The grenade replacement process in detail
To begin with, before starting the replacement procedure itself, you need to decide on the tools. So, what will be needed when replacing the internal grenade: knobs and heads 13-17, as well as 30; keys 17 and 19; jack; lamp; pliers; CV joint lubrication; wheel wrench; and the spare part itself.
Go!
Now that everything is assembled, you can begin the replacement procedure:
- We remove the lower engine protection.
- Drain the oil from the gearbox.
- Using a wheel wrench, remove the wheel.
- Using a 30 mm socket, unscrew the nut securing the outer CV joint.
- We jack up the car.
- Disconnect the ball joint from the hub.
- We pull out the CV joint from the hub.
- Under the hood, using a pry bar, we pull out the inner CV joint from the gearbox.
- Now, you can pull the shaft drive out, complete with grants.
- For convenience, we clamp it in a vice.
- Using pliers, remove the boot clamp.
- We remove the boot.
- We take out the grenade.
- Installation is carried out in the reverse order, with all consumables replaced. It is necessary to place CV joint lubricant in the boot.
Grenade selection
The choice of the inner CV joint should be taken seriously and carefully, since it is one of the main drive parts of the car. As practice shows, this part quite often fails on cars of the VAZ 2113-2115 family. Therefore, it is worth carefully selecting a spare part not only by price, but also by quality.
Original
2108-2215056 - original catalog number of the internal grenade for the VAZ-2114. The average cost is 2000 rubles . Fitting the fasteners is easy and does not require any modifications.
Analogs
In addition to original spare parts, you can find quite a lot of analogues on the automotive market, which are in no way inferior to the original in quality and price. All of them are certified and recommended for installation on this vehicle. So, let's look at what analogues can be installed on the VAZ-2114:
Some VAZ-2114 owners recommend tripoid grenades for installation.
Elimination of power steering pump defects
The faults have been found, now we begin to eliminate them.
We will need rags, white alcohol, sandpaper with grit P1000/P1500/P2000, a triangular needle file, a drill bit of Ø12mm (or more) and an electric drill. With the shaft everything is much simpler, you will need P1500 sandpaper and with it we begin to clean all the edges of the grooves on the shaft (we clean the outer and side ones on both sides) in all possible ways. We work without fanaticism, the main task is to remove only sharp burrs.
First way.
Second way.
Third way.
For one thing, you can immediately polish both sides of the shaft a little on a flat surface, it is advisable to use P2000 sandpaper.
Next, we need to check the result of our work, we check visually and by touch, everything is perfectly smooth and does not cling.
The most difficult thing will be with the surface of the cylinder; personally, I couldn’t figure out anything simpler than how to make a spherical grinder from sandpaper, a drill and a thick drill (F12). To begin with, we take the P1000 sandpaper and a drill bit that can be inserted into the drill.
Next, you need to tightly screw the skin against the rotation of the drill, two or three turns, there should be no gaps.
Holding the tightly twisted structure, it needs to be inserted into the drill (the skin should also be clamped).
Afterwards, using the most convenient methods for you, we carefully begin to grind the cylinder, you need to grind evenly, press the cylinder tightly and move it relative to the axis of rotation (at maximum speed). As we eat the skins, we change them, eventually we reach the smallest skin P2000.
First way.
Second way.
The desired result is obtained,
Now everything needs to be thoroughly wiped with a trail of white alcohol. The shaft itself with the blades can be rinsed in it.
After we begin the assembly, everything is put in the reverse order of removal.
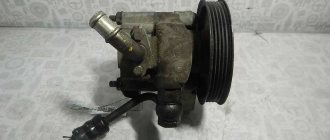
Disassembling the power steering pump
And so, first of all, we remove the pump, you need to drain all the liquid from it (I think everyone can figure out how to remove it and drain the liquid), and on the back cover of the power steering you need to unscrew the four bolts with a 14mm head.
After that, we begin to carefully remove the cover, try not to damage the gasket (this gasket has an internal rubber seal), in the power steering housing we leave the outer part of the “working ellipse cylinder” (hereinafter simply the cylinder). There is no need to be scared when the cover comes away from the body, it may seem that it is coming away due to the action of the spring, when reassembling it will seem to you that it does not fit into place, just continue to carefully and alternately tighten the bolts diagonally, then everything will fall into place .
see also
Comments 61
Is there any difference with the gur from the Priora?
Is there any way to do this without drilling holes in the engine shield?
intermediate shaft from a two-wheeler with a steering wheel? And the rest remains standard?
Well done. I only dream about this in my dreams))
nothing complicated, you just need to find the gur himself at an attractive price
I thought that the power steering couldn’t be stuck on a cap, but then I found this. Cool, good job!)
The other day I bought myself a rack with power steering and a pump, everything is almost new for 4.5 I got this pleasure. I would like to know more about the brackets
Could you post pictures of where and how I secured the tank... and I can’t tighten the belt, what’s the easiest way to do this? and I would also like to surprise you with how you laid the return line
the return line on the right side is secured to the standard bolts of the steering rack boot on top of the heater hoses, the reservoir is secured on an additional support by turning the bracket over and sawing off the excess, the belt is installed like this: you put the generator on, pass the belt and pulley through it, take the steering wheel in your hands and pass it through it belt and pull it with your hands until the steering wheel falls into place; if you put the 940 in, it will whistle!
Could you post pictures of where and how I secured the tank... and I can’t tighten the belt, what’s the easiest way to do this? and I would also like to surprise you with how you laid the return line
I'll take some pictures tomorrow and try to add them
You've started something dangerous, judging by the photos, handsome guy) I thought about installing an EUR for myself, but then I realized that it's not worth it)
Yes, this is a saying) I meant that all this is complicated)
That's lucky! I wish someone would offer me power steering for 5 rubles! And so the topic is off!
Source