For the cooling system of any car, including the popular Lada Priora, it is not the most pleasant moment to be stuck in a traffic jam for a long time. When the car moves without long periods of downtime, the temperature load is removed by the oncoming air flow. There is no such flow when idling. When overheating, the radiator fan automatically turns on, but only if the coolant temperature sensor is working properly. This is a very necessary functional device for a car. If the sensor does not work, replacement is required. In this material we will analyze in detail how the device works and where it is located. No less useful will be information on how to change this sensor on a Lada Priora. To replace, you will need a certain set of tools; such a tool is not a problem for a hundred; it is available in any car service center.
DTOZH design and principle of operation
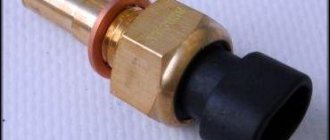
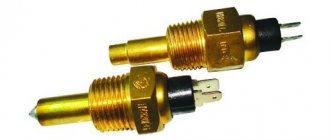
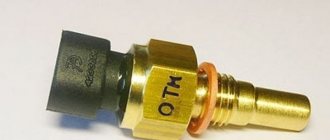
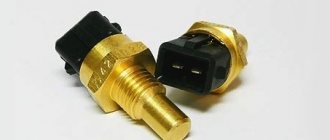
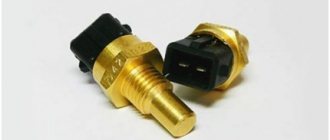
This sensor has a simple design without any complex electronic elements. A thermistor acts as an actuator.
It is the thermistor that regulates the quality and quantity of the fuel mixture during engine starting. That is, when starting in the cold season, the engine needs more fuel; this is built into the electronic engine control unit (ECU). Based on the DTO readings, the ECU passes the required amount of fuel through the injectors for normal engine operation in low temperature conditions.
The operation of the sensor can be noticed by increased engine speeds after start-up, which return to normal as they warm up to operating temperature. The thermistor is sharpened into a metal sensor housing with a thread and has two terminals for the ECU connector.
Also, based on the DTO readings, the ECU adjusts the ignition timing (IAF). The sensor receives power via one of the marks from the ECU with a voltage of 5V, while the second mark is connected to ground.
Since the sensor is in direct contact with the coolant, it estimates the engine temperature directly from the coolant temperature.
Where to buy car accessories
Spare parts and other products for the car are easily available for purchase at auto stores in your city. But there is another option that has recently received significant improvements. You no longer need to wait a long time for a parcel from China: the AliExpress online store now offers the opportunity to ship from transshipment warehouses located in various countries. For example, when ordering, you can specify the “Delivery from the Russian Federation” option.
Follow the links and choose:
| Eunavi 12V universal car auto door lock | YASOKRO car parking sensor, parking sensor system with 4 sensors | Car windshield projector GEYIREN M8 |
| Parking assistance system GSPSCN | Car Rear View Mirror 4.3 inch CCD | Radar detector, voice notification, 360 |
Symptoms of malfunction
The sensor exhibits the following malfunction symptoms:
- The car's dynamics disappeared;
- The temperature readings are no longer displayed on the dashboard;
- The car is idling unsteadily;
- Jerks appeared when driving at constant speeds;
- There are no increased speeds when starting the engine;
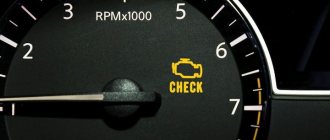
- The cooling fan does not work;
Based on these signs, it can be assumed that the DTOZH is out of order or is giving incorrect readings.
Recommendations for care and maintenance of sensors
- Strictly adhere to vehicle maintenance schedules;
- Buy parts with original catalog numbers. The exact data is indicated in the instruction manual for your technical device;
- Carry out preventative maintenance, install consumables and spare parts at certified service stations. Relevant while the car is under factory warranty. There are frequent cases of warranty cancellation due to third-party intervention.
- When the first signs of engine malfunction appear, contact a service station.
Checking the DTOZH
The temperature sensor is the simplest device, so the principle of checking it is also quite simple.
To check the sensor you will need a multimeter and a thermometer.
The sensor must be checked by measuring the resistance on it as a result of measuring the temperature of the liquid. DTOZH increases its resistance as the liquid temperature decreases.
In order to check it, you need to connect a multimeter set to resistance readings to the ends of the sensor and lower it into a glass of boiling water. The ohmmeter reading should match the temperature reading. That is, using the table, we look for the water temperature and what resistance the sensor should have at that temperature.
Next, we perform the same procedure with cold water and look at the ohmmeter readings. Based on the measurements, we issue a verdict on the sensor.
Below is a table of DTOZH resistance depending on the coolant temperature.
Table of sensor resistance depending on temperature.
Goods and services in Moscow - portal Moskva.tiu.ru
Speed sensor VAZ 2170-2172 Priora, 1117-1119 Kalina (2011-) BAUTLER
Speed sensor 2170-3843010 (02170-3843010) SOATE
Speed sensor 2170-3843010 (533.3843) Kaluga "AutoTrade"
Coolant temperature sensor "AutoTrade" 1118-3808600.2170 (27.3828AT)
Clutch release sensor 1118-3720015 (2170,2190) set 5pcs.
Mass air flow sensor BOSCH - 2110-2112-2170 (0 280 218 116)
Mass air flow sensor BOSCH - 2170 (1118,2123) (control M17.9.7) (0 280 218 225)
Catcollector 11183-1203008-00 (8 cells) 2 sensors (RosKat) round
Throttle position sensor 2112-1148200 Pekar
Catcollector 21116-1203008-20 (8 cells) 2 sensors Eberspächer Germany
Crankshaft angle sensor 2110 (191.3847) AvtoKom Kaluga
Crankshaft angular position sensor 2110 (30.3847 IU (191.3847) EMI Penza
Throttle position sensor 2112-1148200 SOATE (02112.1148200)
Lighting control unit 2170 LUX 12V (522.3769) AVAR Pskov
Reverse switch 2170-3710410 (1118) VZH-7 (1332.3768) Penza EMI
Antifreeze level sensor 2110-3839310-13 (small) 64.3855-01 EMI Penza
Eng.Oil level sensor 21083-3839210 Eng.metal. (64.3855-03) EMI Penza
Phase sensor (camshaft position) 8kl. 2111-3706040 (48.3855) AutoTrade Kaluga
Phase sensor (camshaft position) 16kl. 2112-3706040-01 (4102.3847) EMI
Canister valve 2112-1164200-02, GAZ Euro-2
Mass air flow sensor BOSCH - 2112 (0 280 218 037) Gazelle, Sobol, Volga doors. 405,406
Eng. Idle air regulator 2112-1148300 (VSM 0112) StartVolt
Ing. Idle speed regulator 2112-1148300-04 (02112-1148300-04) SOATE TM
Adsorber valve 21103-1164200-02 (16kl.) Euro-3
Speed sensor 2108-2110 without wire (02111.3843010) SOATE
Speed sensor 2110 (35172.03) with wire round connector
Speed sensor 2110 (301.3843) with wire, square connector 6 imp.
Split gears 16V steel with phase sensor Lada Priora, VAZ 2170, 2171, 2172
Coolant temperature sensor for VAZ 1117-19, VAZ 2170-2172 “Pekar” cars
Timing gears split 16V steel with phase sensor SPORT VAZ 2170, 2171, 2172
Reverse gear sensor for VAZ 2170-2172 “Pekar”
Coolant temperature sensor VAZ 2110-2115, Kalina, Priora, Niva Chevrolet (with ECM) LUZAR LS0112
Oxygen sensor fake Lada Priora VAZ 2170, 2171, 2172
Extension oxygen sensor Lada Priora VAZ 2170, 2171, 2172
Coolant temperature sensor VAZ 2107, 2108, 2112, Niva Chevrolet (with ECM) KALUGA 423.3828 pcs
21720-3724248 Parking sensor harness
Mass air flow sensor (MAF) since 2005 VAZ 2109-2115, Kalina, Priora, Niva Chevrolet HOFER HF218116
Coolant temperature sensor VAZ 2113-2115, Lada Kalina, Priora, Niva Chevrolet HOFER HF750930
Coolant temperature sensor VAZ 1117-1119 Kalina, 2123, 2170-2172 Priora (2008->), n/a
21703-8121210 Outside temperature sensor Korea
Replacing the sensor yourself
Replacement is not a complicated process, but it has its own characteristics that must be observed when working.
Necessary tool
- Key to "19"
- Ratchet
- Head at "13"
- Screwdriver “+” or “-”
Replacement with coolant drain
Attention :
The coolant temperature sensor must be replaced with a cold engine.
- Remove the negative terminal from the battery. In order to protect yourself and the car from a short circuit.
- Remove the mass air flow sensor (MAF) chip.
- Unscrewing the clamps on the intake receiver corrugation, remove the air filter housing along with the mass air flow sensor.
- We remove the DTOZH chip.
- Next, you need to drain the coolant.
- Using a 13 key, unscrew the coolant drain plug in the cylinder block and drain the coolant into a 10 liter container.
- Using a key set to “19”, unscrew the DTOZH from the thermostat housing.
- We install a new DTOZH.
- We assemble everything in reverse order.
- After filling the coolant, do not forget to check its level.
Replacement without draining coolant
- To replace the coolant sensor without draining the coolant, you must prepare a new sensor to quickly replace it.
- We approach the DTOZH and begin to unscrew it, having previously prepared a new sensor and placing a cloth under the thermostat so as not to fill the gearbox with antifreeze.
- We unscrew the sensor and sharply remove it, and plug the hole in the thermostat with a finger.
- Next, we take a new sensor and also try to insert it into the hole in the thermostat as quickly as possible and screw the new sensor into place.
- Then we assemble everything in reverse order.
Don't forget to check the coolant level and add it if necessary.
The DTOZH has been replaced as you can see, there is nothing complicated about it.
Operating principle
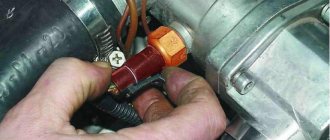
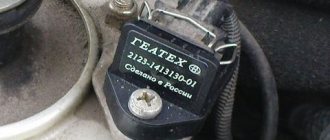
DTOZh "Priora" is installed directly in the thermostat housing. This allows for maximum pulse accuracy. Since DTOZH is always in contact with antifreeze, it can almost instantly detect the slightest changes in temperature. It also quickly transmits signals to the ECU. Based on the information received, the car’s brain adjusts the engine operating parameters, changing the composition of the fuel mixture.
If the antifreeze level is too low, the controller will receive incorrect data and the engine may run rough. This is also observed due to sensor failure.
Coolant temperature sensor on Priora 16 valves
The Priora 16-valve coolant temperature sensor is no different in design from the 8-valve one. Essentially, these are the same device that measures the temperature of antifreeze.
A distinctive feature of the Priora is the presence of two detectors that are not connected to each other. One works only with the dashboard, transmitting measurement data to it, while the other coordinates its work with the brains of the car. Together with them, ensuring uninterrupted engine operation by turning on additional cooling systems if necessary.
Temperature and coolant sensor
The detector operates based on the principles of resistance. Being a thermistor, the device's resistance values are directly related to changes in coolant temperature.
Based on the readings of this meter, among other things, the on-board computer makes a decision on the supply of air and fuel to the engine.
That is why when they talk about a malfunction of the DTOZ, they also talk about increased fuel consumption.
What problems arise?
The coolant temperature sensor in the Priora 16 valves, as already mentioned, is no different from others, and therefore has the same problems, methods of treating and diagnosing them.
In the event of a malfunction of the detector communicating with the instrument panel, the only signal about this will be a missing or deliberately incorrect temperature value. The cause of the malfunction may be:
- breakdown of the indicator itself on the tidy;
- wiring fault;
- failure of the detector itself.
As can be seen from the list, the breakdown is not always caused by the meter itself, but as practice shows, much more often problems arise with the wiring. It is worn out or dirty.
Malfunctions in the operation of the second meter are more significant. Despite the fact that the causes of the malfunction remain the same, the ways to notice the malfunction are completely different and have a whole list of symptoms:
- increased fuel consumption;
- the engine stalls and may not start immediately;
- car power drops;
- You can hear the hum of constantly running fans of the propulsion system.
The Priora coolant temperature sensor is located above the flywheel housing and is inserted into the engine block near the thermostat. It is from there that it is necessary to begin checking the malfunction by inspecting the electronic cable and “ringing” its contacts.
To make it easier to work with the detector, it is best to remove the pipe connecting the air filter and the throttle assembly.
After checking all the contacts, you can start working with the meter itself, and for this you should already turn off the power to the car and be sure to drain the antifreeze.
If the antifreeze is not drained in advance, then when you unscrew the meter, it can come out on its own under pressure, and it will be good if it does not turn out to be hot at that moment.
After all the preparations, you can start removing it; to do this, you just need to disconnect the wires from the meter along with the terminal, and unscrew it using a 19mm deep socket. As soon as the meter moves in, you can then unscrew it and remove it by hand.
The old detector can be cleaned and tested in a glass of heated water. However, if you don’t have the necessary equipment or desire, you can simply insert a new meter and check how everything works. If it works, it means the detector was faulty, and there is no point in bothering with its diagnostics.
Since even if his death is accurately established, it still cannot be repaired and you will have to purchase a new device. And if there is no way to cure the patient, then there is no rational point in diagnosing him, except to satisfy his curiosity and the hope that after cleaning he suddenly came to life.
A new detector costs practically nothing, and losses from untimely repairs grow every day like a snowball. Don't neglect your safety and the optimal performance of your vehicle.
Typical breakdowns
- mismatch between temperature and resistance. In this case, there is a strong increase in resistance values when the outer part of the device is heated;
- a break in the electrical circuit of the converter, due to which the electronics simply fail and does not turn on under any circumstances;
- a rapid increase in voltage and resistance even with slight heating of the external part.
How is the replacement made?
- Remove the rear view mirror cover.
- Remove the mirror itself, which is secured with 2 mounting screws.
- Remove the upholstery container, which is also secured with two Phillips screws.
- Disconnect the cable block from the lighting fixture and temperature sensor.
- Remove the sensor by twisting the fasteners.
Fault diagnosis is carried out using a multimeter. It is necessary to measure the resistance, which should not deviate from the standard values. If you notice too much value for this indicator, get ready to buy a new device. Reassembly after replacement is carried out in the reverse order.
As the weather gets colder, the number of malfunctions in VAZ cars increases. Their number is increased by problems associated with the unregulated operation of the heating system. They lead not only to discomfort inside the cabin, but also to frequent frosting of the windows, including the most important one - the windshield.
Functions and main malfunctions of the interior temperature sensor
The heating system in cars of this brand is controlled by a signal method. The impulses come from the electrical control unit. Temperature is a factor affecting every system controlled by the unit. The essence of its work is to compare the indicators on the sensor (16-30°C) with the real heat intensity, which is measured by it.
When a temperature difference is detected, the motor turns on. Its function is to change the flow of warm air using dampers and fan speed.
The cabin air temperature sensor is a thermistor or semiconductor resistor, which has a close relationship between thermal state and resistance.
From the control electrical unit, voltage is supplied to this device through a resistor located inside.
One of the most traditional defects of this device, which operates on the basis of a semiconductor thermistor, is the discrepancy between the temperature of the external part and the resistance.
To correct this discrepancy, you need to know the main features of its work.
Typically, this defect manifests itself in a rapid increase in resistivity with small fluctuations in the degree of heating of the outer part.
In addition, there may be a break in the electrical circuit of the sensitive element of the converter itself, which is why you will have to buy a new interior temperature sensor.
Periodically, a situation arises in which the thermal state of the device shell varies over a certain small range, and the resistance increases disproportionately with voltage.
As a result, the heat calculated by the block turns out to be less than in reality.
In the event that the difference in temperature becomes significant, the command unit evaluates this as the arrival of cold air flow and reduces its amount, while simultaneously adding fuel.
Replacing the interior temperature sensor
The VAZ 2110 interior temperature sensor is installed near the ceiling lamp. If this device malfunctions, it may need to be replaced. To do this, you must have access to the working mechanism. You can replace it yourself, or use the service at a car service center. Although there is no need to rush into a clear solution to this issue.
If a system malfunction is detected, the first thing you need to do is double-check how correctly it is configured. To do this, with the windows and doors closed, you need to set the temperature a couple of degrees higher than the current one. Then place the thermometer directly next to the converter. After a quarter of an hour, you should look at the readings again.
If there is a discrepancy between the thermometer readings and the set temperature, you can adjust the device using the adjustment screw on the controller. Turning clockwise increases its readings and vice versa.
But if you fail to fix the system, you should look for another reason. This could be a failure of the command unit, damper control micrometer, or temperature sensor. Of all the listed devices, the last one, although it is considered unreliable, is still the most accessible for dismantling, checking and possible replacement.
Since it is located close to the lighting shade and is attached to the drapery with four latches, removing it with a screwdriver is not difficult. Then you need to disconnect a couple of connection pads. Only after these manipulations will the device be dismantled. If you have a new device, install it in reverse order.
Although it is not at all difficult to recheck the old meter. Using the simplest multimeter at room temperature, you should measure the resistance between contacts 1 and 2. Then put the sensor in the refrigerator for a couple of minutes and measure again. If the converter is in good condition, the resistance on the ohmmeter should show a significant increase.
If there are no indicators, you can remove the cover and inspect the print board. There is a real chance of restoring the mechanism when checking the contacts.
During operation of this device, minor breakdowns sometimes occur. For example, the interior temperature sensor “buzzes.”
To eliminate this problem, you should know that this device is equipped with a fan, which helps to quickly and reliably determine the temperature level in the car showroom.
A peculiar annoying sound appears if the lubricant dries out on the axis of the ventilated device. To eliminate the defect, it is enough to apply 2-3 drops of oil.
If you turn off the fan while keeping the sensor connected, the climate control will be quite rough. The stove will work even without a temperature meter. The sensor itself controls the air damper through the climate control unit.
In opposite positions of the temperature regulator of the control unit, the fan and sensor are off. Moving to the left gives cold, right - heating mode. In such cases, the damper will be either completely open or closed. The fan will not emit an unpleasant “buzzing” sound.
One of the signs of increased comfort of a car is the presence of climate control. This is no longer just an old-style heater that had a couple of modes. This is a device that has its own control computer model.
It keeps the cabin at exactly the temperature that is most comfortable for the driver, which he sets from the control panel. And it independently reacts to changes. The cabin air temperature sensor (CAT) reports them to the control unit.
Priora is also equipped with such a system.
How it works and what it consists of
As in most sensors of this type, the main element is a thread that changes its resistance as the ambient temperature changes. The climate control system on the Priora is controlled by an electronic unit. That is, essentially a computer. His task is to create the most comfortable temperature for the driver in the Priora’s cabin. And constantly support her. But for this it is necessary to have accurate data on the state of the air at each moment. The Priora diesel engine is used for prompt delivery of this information.
And in order for air to flow directly to the reading element, it is forced by a special miniature motor with a fan. Therefore, the entire device consists of two parts:
- Direct filament sensor.
- Micromotor with fan.