If the mileage of your Lada Granta car is approaching 15,000 km, then it’s time to plan to replace the cabin filter. As a rule, this procedure is performed at every maintenance service. However, it happens that for some, the filter is clogged already by 5,000 km, while for others, even after 30,000 km it still shows signs of life.
Everything depends not only on the operating conditions of the car, but also on the place where it is parked. Yes, this is not a mistake! The place where the car most often stops determines how often you will have to change the cabin filter.
This place could be a parking lot near your work or near your home. If there are a lot of trees and especially poplars around, then get ready for more frequent replacements. The fact is that poplar fluff, leaves and other small debris flying abundantly from trees can partially penetrate through the plastic grille of the JABO and end up on the filter.
If this phenomenon occurs frequently, then you will accumulate more debris in the engine compartment than usual. Now let's finish the lyrical digression and begin the replacement process.
2279-4-16-07 (Copy)
In this case, the arrow on the filter label should point down, and the word “front” should point toward the front of the car.
In this case, the arrow on the filter label should point down, and the word “front” should point toward the front of the car.
In this case, the arrow on the filter label should point down, and the word “front” should point toward the front of the car.
When is it necessary to replace the filter element on Grant
The cabin filter is a small piece of thick paper impregnated with special oil and containing carbon. While a certain amount of air passes through it, dust particles try to pass along with it into the heater air ducts.
They settle on the paper, but reduce its throughput. Ultimately, the effectiveness of the filter element drops and it stops letting air through, and in rare cases, it begins to let in dust itself.
The second point is the fogging of the windows in the cabin during rainy weather. Since air from the street stops flowing into the car interior, the moisture that remains inside the car begins to evaporate and settles on the cold windows.
The third sign is the external condition of the filter. The filter element will require replacement if it looks like this:
If any of the above symptoms are present, the Lada Granta cabin filter must be replaced. Driving with a contaminated element is dangerous to the health of the driver and passengers.
The decisive factor determining the need for replacement is frequency. It is every 10-15 thousand kilometers.
2279-4-16-10 (Copy)
When installing the right windshield trim, the two tabs of the trim must extend beyond the front fender flange.
When installing the right windshield trim, the two tabs of the trim must extend beyond the front fender flange.
When installing the right windshield trim, the two tabs of the trim must extend beyond the front fender flange.
[14 Lada Granta maintenance operations that will help you save]
[How to save money on scheduled maintenance of Lada Granta] [Maintenance of Lada Granta at 2.5 thousand km] [Maintenance of Lada Granta at 15,000 and 105,000 km] [Maintenance of Lada Granta at 30,000 and 60,000 km ] [Maintenance of Lada Granta at 45 thousand km] [Maintenance of Lada Granta at 75 thousand km] [Maintenance of Lada Granta at 90 thousand km] [Carrying out maintenance yourself - general recommendations] [Safety rules for doing it yourself carrying out maintenance] [Tools required for maintenance of Lada Granta] [Lamps used in the Lada Granta car]
Lada Granta: changing the cabin filter and cleaning the drainage hole of the plenum box
Instructions for replacing the cabin filter
For ease of work, install the windshield wiper blades in a vertical position. To do this, turn the ignition key and turn on the wipers. As soon as the windshield wiper blades take a vertical position, immediately turn off the ignition, then they will remain motionless.
The first step is to remove the hood buffer seal, made of soft porous rubber. We are interested in the one located on the right, if you look in the direction of travel of the car. It is indicated by an arrow in the image.
The seal must be removed in order to free access to one of the screws that secures the JABO. You can, of course, not remove it, but simply press it out to get to the screw, but without a seal it will be much more convenient to unscrew and tighten the screw.
And it will be easier to install the frill back without a seal.
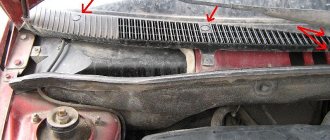
A frill is a decorative plastic lining that prevents large debris and snow from entering the engine compartment. It consists of two halves. We will need to remove the one on the right.
To remove the frill, we need to unscrew 6 screws.
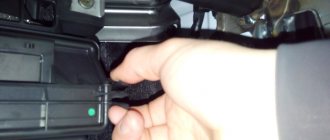
Two screws are located on the frill under the plugs. The plugs can be removed immediately so as not to interfere. They are easily picked up with a small screwdriver.
After the plugs are removed, you can begin to remove the screws. To do this we need a bit or a Torx T-20 head
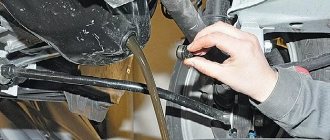
Now you can remove the frill. The washer hose will interfere with the final removal of the frill, so it must be disconnected from the tee.
After you remove the frill, you will see a plastic cover that protects the cabin filter from direct contact with water and debris.
This casing is held in four places. It is held in place by a latch on the left, a screw on the right, and a rubber windshield washer hose is attached to the casing in two places below, which will prevent removal if it is not disconnected. Let's remove the cover...
First of all, let's unhook the washer hose here....
And here…
Then unscrew the screw...
Then we will disconnect the latch...
All casings can be removed. First we take out the part where the latch is located. This is the order that will cause you the least hassle.
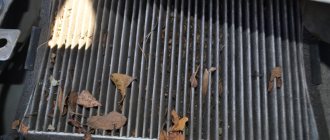
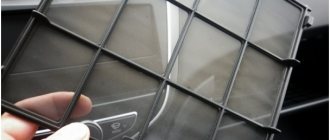
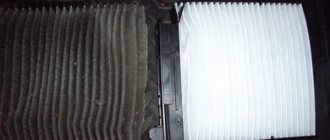
So we got to the cabin filter. As you can see, there is plenty of dirt in it. We will replace it with a new one.
The filter housing is held in place by two latches along the edges - on the left and on the right. It is enough to slightly press them to the sides... and remove the filter.
This is what the outer part of the filter looks like if you take a closer look.
And this is what the inside of the filter looks like.
Not snow-white, of course, but there are no traces of debris or dust. This indicates that the filter copes with its task. Naturally, microparticles of dust still penetrate through it, but it still manages to retain the bulk.
Let's move on. Before installing a new cabin filter, wipe off dust from the part of the stove body where the filter will be installed. And after that you can proceed directly to the installation.
The new filter has a sticker to help you determine its correct position.
FRONT - means that this part of the filter should face forward as the car moves, and the down arrow indicates which part it should be inserted into the heater body.
Pay attention to the foam rubber seal glued to the bottom of the filter housing. Even if there is no sticker with instructions on the filter, the filter will need to be inserted so that the foam seal is at the bottom.
So, insert the new filter and push it all the way down until both latches secure the filter housing. Make sure the filter is securely held in place by the latches on both sides. The latches should be in the position shown in this photo. …..
After the filter is secured, we begin to assemble everything in the reverse order. We begin to insert the plastic casing with the right side.
Next, secure the casing using the latch on the left.
After this, secure the casing with a screw.
We insert the rubber washer hose into place, snapping it back into the brackets on the plastic casing
Before screwing on the frill, do not forget to put the washer hose on the tee.
Next, we fasten the frill with screws, put the plugs in their place and put back the hood buffer-seal.
That's probably all. At this point, replacing the cabin filter can be considered complete.
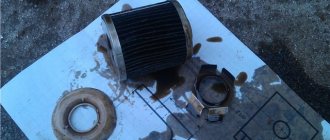
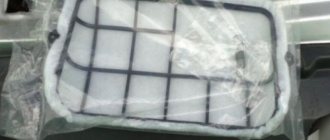
Below is a photo of the packaging of the cabin filter that was used during replacement.
Whether this filter is good or not, time will tell. There were no original filters in the store at the time of purchase, so the one that was in stock was purchased.
Reviews
Sergey (09/14/2018): the other day I carried out a comprehensive diagnostic of the Lada Granta, there are no comments, it works like a watch. The mechanic recommended replacing consumables, oil, filters, including the cabin filter. The choice was made in favor of the original 1118-8122010-08. The quality is good, the price is affordable, my advice to car enthusiasts.
Vasily (09/14/2018): I live in a rural area, there is increased dust and gas pollution, I have to change consumables and filters more often. For example, I change the original Lada Granta saloon 1118-8122010-08 every 10,000 km. I am satisfied with the quality, no comments, my recommendations.