Replacing the intermediate shaft of the VAZ driveshaft
As many motorists know, the VAZ 2110 often has such a defect, especially after long-term use, as steering play. In this case, only replacing the steering cardan on a VAZ 2110 helps to establish normal operation. You have to dismantle the column and carry out repairs. Replacing the VAZ 2110 steering cardan, despite its apparent complexity, is an operation that can be carried out on your own.
When and for what reason do you need to change the universal joint?
The crosspiece is a part in itself that is very strong and durable. Theoretically, it is capable of serving for five hundred thousand kilometers of a car. However, in practice the resource is significantly reduced. It depends on the operating conditions of the car, as well as on the quality of manufacture (or rather, on the quality of materials) of the part itself. Most often, the cardan crosspiece has to be replaced or repaired after traveling several tens of thousands of kilometers.
The most common reason why the driveshaft spider will need to be replaced is play in the joint itself. The fact that it has supposedly occurred will be indicated by various extraneous sounds when the cardan rotates: creaking, knocking or metallic ringing, as well as characteristic vibration in certain speed modes or during starting.
Note that all this can be clearly heard in the cabin, so the driver will quickly understand that something is wrong and it’s time to carry out diagnostics. In this case, diagnosis is a very simple operation. True, to carry it out you need an inspection hole, overpass or lift. Next, you need to put the gear in neutral and go down, that is, under the car. Then, holding the cardan cross with one hand, you should try to rotate the cardan shaft with the other. If there is any play, it will be immediately noticeable.
There are usually two reasons for the occurrence of play: wear of the needle bearing or wear of the cross itself. In turn, wear occurs due to leakage or drying of the lubricant in the bearing, exposure to moisture and dust that got there due to the fact that the oil seal was worn out or even flew out.
It is necessary to pay attention to its condition during the purchase and installation of the cross. It would also be a good idea to pay attention to the element during any routine inspection of the car.
Sometimes there may not be obvious play when the bearing wear is not too great. By the way, this malfunction is characterized by specific creaks and squeaks during rotation. In this case, you may not have to change the entire part at once, but just replace the lubricant. How this is done will be described a little later.
Don’t forget about how many crosses there are in the cardan. There are two of them: front and back. Both need to be examined during diagnosis.
Please note, as practice shows, it is the rear cross that wears out more and more often. The fact is that it experiences heavy loads and is more strongly affected by dirt and water.
There is an exit
Fixing the problem turned out to be quite simple. It’s even strange that the designers didn’t come up with a solution on their own: on a factory scale, the design, of course, would have been more reliable and elegant. In garage conditions, the algorithm of actions is as follows.
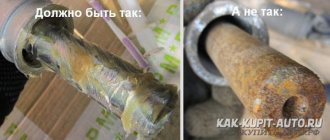
The cardan is dismantled and washed from the outside
The halves are carefully separated; the insides are similarly carefully processed; The slots on the cardan are plastic. You need to clean off the burrs on them (just cut them off with a construction knife) and coat them with silicone grease
This step has already been mentioned. Usually people stop there, which is why they soon have to return to similar manipulations. However, we go further; A piece 15-20 cm long is cut from a rubber hose with a diameter of 18-20 mm. A small piece of rags is also looked for - it is gagged from the bottom of the driveshaft to prevent lubricant from leaking out; The inside of the hose is sprayed with silicone and pulled from below onto the problematic part; Outwardly, it looks like a thick stocking is pulled over the cardan. It is mounted in place, ensuring the correct location of the spline connection.
Changing crosspieces in steering cardan shafts
Steering cardan shafts are structural elements of the vehicle control system, which must be given attention in the event of such troubles as:
- difficulty turning the steering wheel;
- steering wheel play;
- knocks and extraneous noises.
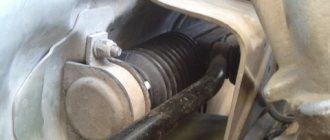
There are two elements in the car under consideration. One cardan is located behind the engine shield under the hood of the car. It is adjacent to the steering rack. The second is located in the vehicle interior, or rather, at the driver’s feet. The external driveshaft is subject to more intense impacts because it operates in a harsh environment. However, the internal analogue periodically fails.
To install the parts in question, you must have keys of 10 and 12. During the process, the steering wheel must be fixed and locked in the central position, since without a cardan, turning it can lead to a break in the cable.
After fixing the steering wheel, loosen the boot clamp. Next, the fastening elements of the lower cardan on the rack are unscrewed, as well as the bolt that ensures the connection of the two structural elements in question.
The next step is to dismantle the lower cardan shaft, for which it must be moved sequentially up and down. The upper analogue is simply dismantled. You just need to unscrew the bolt that secures it.
The feasibility of replacing the structural parts of the steering column universal joint is determined by checking the mobility of the bearings and the play of the crosspiece. If critical defects or malfunctions are detected, you will have to purchase a new cardan, crosspiece or bearings, depending on which part has failed.
In place there is a quiet knocking noise only when turning the steering wheel while driving
If it is not a cardan shaft, a rack, or the consequences of flushing the internal combustion engine with dimexide, feel free to inspect the suspension. Anything can tap:
- Racks.
- Support bearings.
- Ball joints.
- Anti-roll bar.
- Wheel bearings.
Most parts are checked with the vehicle stationary:
- "Supports". Ask an assistant to turn the steering wheel while you put your hand on either the strut rod or the spring. Extraneous crunches and play indicate bearing failure.
- "Ball" Drive the car onto a lift, pit, or overpass and swing the lever on which the support is fixed using a pry bar. There should be no tapping.
Shock absorbers. Place your finger on the strut rod and swing the car up and down by the wing. The knocking sound most often occurs due to a decrease in pressure in the strut due to a worn oil seal or scuffing on the rod. After a while it starts to flow. If you have already removed the shock absorber, make sure the diagnosis is correct - tug on the rod to see if it is loose or not. When installing a new one, make it a rule to bleed it, otherwise clunking will soon occur.
The stabilizer can be moved with a mount. Regarding it, there is one practical piece of advice: if the silent blocks and the rubber part of the stabilizer struts (links) are cracked, change them regardless of the presence of extraneous rattling.
If the steering wheel makes knocking noises when turning a slight turn while driving, inspect the wheel bearing. It usually hums, and the clanging noise is caused by a defect.
Signs of wear on the crosspiece
Often, motorists do not pay attention to insignificant signs that it is time to make repairs, and wait until the problem makes itself known publicly and this is fraught with consequences, especially when it comes to loss of vehicle controllability.
The first signs of wear on the crosspiece appear as:
- the presence of noticeable resistance to the steering wheel when rotating at speeds above 80 km/h;
- delayed wheel turning and loss of sensitivity (delayed response of wheels and steering shaft);
- increased free play angle of the wheels (popularly this symptom is also called “Steering play”);
- uneven rotation of the steering wheel, the steering wheel moves with sharp jerks;
- obvious grinding or knocking noise that occurs when the steering wheel is rotated; the grinding becomes especially noticeable and obvious on an uneven road.
Most often, motorists turn to a car service center to replace the steering shaft crosspiece mechanism only when the last sign of a malfunction appears, but in vain, because in the event of an emergency, the steering control will not be able to adequately respond to the driver’s efforts, and sometimes, the steering control may even fail, this is already fraught with very big troubles.
Repair of the shaft cross is carried out every 50 - 100 thousand, it is better more often, otherwise it will have to be completely replaced with a new one.
To replace, you will need to purchase a crosspiece - on average 150-300 rubles, some car services claim that for the steering to work correctly, you need the entire steering shaft (4 - 7 thousand rubles), but on most cars it is enough to change only the crosspiece.
Lacetti steering wheel sticks
On the intermediate steering shaft there are two crosses with bearings - one in the passenger compartment, and the second in the engine compartment. As a rule, it is the one under the hood that fails due to environmental influences. At least it is covered with a rubber cover, but this does not solve the problem completely. There is even an opinion that this very cover does not help, but, on the contrary, aggravates the situation, preventing the evaporation of moisture from the cross and, accordingly, it begins to rust and jam. Therefore, some people remove the protective cover completely.
But I think this is a wrong decision. It is better to fill the boot with waterproof lubricant. This, it seems to me, is a better solution to extend the service life of the crosspiece bearings.
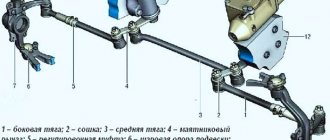
1 - lower universal joint; 2 — boot; 3 - seal; 4 - upper cardan joint.
To make the steering wheel easier to rotate for a while, just spray the crosspiece with a can of WD-40, or even better, with a silicone lubricant spray. For example, the one I used to process rubber seals
How to do this without removing the protective cover? Very simple. The cover has a small slot for drainage of condensation, etc. It is located at the bottom and, with the wheels standing level, it is not visible.
You need to turn the steering wheel either to the right or to the left and it will be on top
It is enough to insert a tube from a spray can into this slot and, without sparing, spray lubricant under the cover
After this, turn the steering wheel left and right and let it stand for a while so that the lubricant penetrates where it is needed. As a rule, after this the steering wheel turns without problems.
Useful tips
Finally, here are some useful tips that will extend the life of the steering rack and other elements included in the control unit:
At least once a quarter, check the condition of the steering at a service station or yourself
Pay attention to the condition of the steering column protective cover. Try to limit driving on uneven surfaces, especially at high speeds
Do not test the strength of the steering rack and the entire mechanism by moving away with the steering wheel turned all the way to the side. If play or other signs of steering rack malfunction are detected, repair or replace it.
Dear Drivers, any mechanism in a car does not last forever, so when driving on an uneven road, at one fine moment a knock
which
feeds into the steering wheel
.
Or standing still, there may be a knock when turning the steering wheel
.
These are the first signs that it is time to repair the steering rack
.
The following signs will help you determine the condition of the steering rack:
1.Grip the steering shaft where it meets the rack and move it up and down. If it knocks, then repair the rack housing (most often the reason is that the needle bearing is running without lubrication). 2. You can check the play of the bushing and the contact of the rack with the steering gear by grasping the joint of the steering rods from under the hood.
It’s good if the reason turns out to be poor tightening of the components, but if there is knocking in the rack, then you can do the following: 1. buy a new steering rack 2. restore the steering rack at a service station 3. repair the steering rack yourself
If the price of a new rack does not bother you, then of course it is better to install a new unit. Restoring it at a service station will also cost a pretty penny. Well, the cheapest way to get rid of knocking is to do everything yourself.
What should you know before starting work?
Repair kits are sold to restore the steering rack. The steering rack repair kit can vary in configuration: 1. The minimum set with a washer, bearing, new nut and fluoroplastic bushings costs 250 rubles. 2. A more complete set with bearings and shafts costs about 500 rubles. 3. A complete rack repair kit, which includes the rack itself, will be cost from 850 to 1100 rubles.
In addition, depending on the year of manufacture of the car, the rack may be old (VAZ 2108) or new (VAZ 2110-12). In the latter case, the difference is that you do not need to disassemble the entire mechanism to replace the bushing. It is enough to tighten the corrugation, then unscrew the nut in the middle and the rack is disassembled into two parts (one part is the entire rack mechanism, the second part is where the bushing is located).
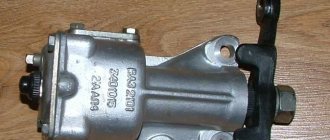
The design of the steering rack is as follows. Removing and installing the steering rack on a VAZ 2110. The instructions are clear, except for one point. In order to pull out the shaft, you need a special 24 octahedron key, and there must be a hole inside the key.
If you don’t have such a key, then you can take a long bolt with a 17mm head. Then grind it out of a hex head - almost triangular (one of the edges is slightly sharpened). We sharpen the sides of the bolt to a 10mm wrench. The special wrench for the steering rack is ready!
Steering rack repair kit:
Steering rack assembly:
1.Remove the support sleeve. It is pryed off with a flat screwdriver.
2. Lubricate the place under the support sleeve, and use a screwdriver to put it in place through the hole. To be honest, it’s not easy to install.
3.Cut off the O-rings.
4. Replace the roller bearing. True, it’s better not to touch it, it’s unrealistically difficult to get the old one, at least for me, I couldn’t think of anything better than to chop it into 2-3 parts with a chisel.
5. Replace the bearing on the drive gear shaft.
We insert the rail into the housing and perform assembly in the reverse order, not forgetting to lubricate the parts.
An alternative way to repair a VAZ steering rack (without disassembly).
Non-standard cases
Suzuki Grand Vitara 2.4 manual, color ZMA Logbook Replacing the steering rack oil seal, without removing the rack.
And not only Part-1 It’s not the suspension or steering parts that can knock. Shocks and body pecks lead to the movement of units. If they “sit” loosely and there is metal-to-metal contact, clinking cannot be avoided.
- Single dull knock when starting off. See rubber-metal engine or gearbox mounts, transmission driveshaft. For example, when starting, the motor may tilt and hit the spar.
- Rattling on small bumps and in turns. Listen to see if there is a knocking sound in the steering wheel when braking; if there is, the brake caliper guides are worn out.
- Intermittent impact sound, more common when turning at low speeds. Malfunction in the differential of a front-wheel drive vehicle.
Tighten the key bolts and nuts more often, refuel only at gas stations with high-quality gasoline, and remember: a worn CV joint does not knock, but crunches, and does this with the wheels turned out.
The steering, along with the car's braking system, are the most important elements that ensure safe driving at any speed and on any road. Therefore, when knocks, clicks and other extraneous noises begin when turning the steering wheel, in any case, you need to sound the alarm and immediately look for the cause of the problem in order to eliminate it. Now we will tell you why a knocking sound may appear when turning the steering wheel while standing still or in motion, and what problems does it indicate?
First of all, you need to clearly localize the place where the knocking is heard, as well as determine the conditions under which it occurs, this will greatly help you in finding the breakdown, the symptom of which is the knocking. In addition, different steering systems may knock in different situations and such a knock will indicate different breakdowns. We list the main causes of knocking when turning the steering wheel:
- wear of the constant velocity joint;
- wear of the ball joint;
- wear of the support bearing of the stabilizer link;
- wear of steering tips;
- the appearance of play in the steering rack and leakage of working fluid from it;
- loose steering wheel nut;
In principle, these are the most common causes of knocking and other noises when turning the steering wheel. But there are also less common breakdowns that cause similar sounds. But we can talk about such special cases only using the example of a specific car model in which such knocks began.
A knocking sound, or rather a crunching sound, when turning the steering wheel, as a rule. This indicates that it is time to change the CV joint or constant velocity joint. Although, it is not always necessary to replace this unit. Often, it is enough to replace the boot on the CV joint and replenish the lubricant. By the way, a special lubricant is needed; ordinary grease is not suitable here. CV joints can be external, which is what usually needs to be changed, as well as internal. The inner CV joint fails in serious traffic accidents, or in the event of a sudden failure of other components, for example, the ball joint of the wheel. The constant velocity joint can knock for quite a long time, but still, it is better to replace it as quickly as possible so as not to worry about every trip.
Replacing steering shaft bearings for VAZ 2110 Lada
- Repair manuals
- Repair manual for VAZ 2110 (Lada) 1996+.
- Replacing steering shaft bearings
| EXECUTION ORDER |
↓ Comments ↓1. General information 1.0 General information 1.1. Vehicle Specifications 2. Engine 2.0 Engine 2.1 Possible engine malfunctions. 2.2 Replacing the coolant 2.3 Replacing the engine oil and oil filter 2.4. Installing the piston of the first cylinder to the TDC position of the compression stroke 2.5 Replacing the camshaft drive belt and tension roller 2.6 Adjusting the camshaft drive belt tension 2.7 Removing, troubleshooting and installing the flywheel 2.8. Replacing engine seal parts 2.9 Cylinder head 2.10 Grinding in valves 2.11 Adjusting clearances in valve drive 2.12 Removing and installing engine 2.13. Engine repair 2.14. Lubrication system 2.15. Cooling system 2.16. Exhaust gas system 2.18. Features of VAZ-2112 engine repair 3. Transmission 3.0 Transmission 3.1. Clutch 3.2. Gearbox 3.3. Front wheel drives 4. Chassis 4.0 Chassis 4.1. Checking the technical condition of suspension parts on the car 4.2. Rear suspension 5. Steering 5.0 Steering 5.1 Inspection and check of the steering on the vehicle 5.2. Steering column 5.4. Steering mechanism 5.5 Possible steering malfunctions. 6. Brake system 6.0 Brake system 6.1. Vacuum booster 6.2. Main brake cylinder 6.3. Pressure regulator 6.4. Brake hoses and tubes 6.5 Bleeding the brake system 6.6 Replacing brake fluid 6.7. Front wheel brakes 6.8. Braking mechanisms of the rear wheels 6.9. Parking brake 6.10 Possible malfunctions of the brake system. 7. Electrical equipment 7.0 Electrical equipment 7.1. Mounting block 7.2. Generator 7.3. Starter 7.4. Ignition switch (lock) 7.5. Checking and replacing spark plugs 7.6. Integrated engine management system (fuel injection system) 7.7. Contactless ignition system 7.8. Lighting, light and sound signaling 7.9. Windshield wiper 7.10 Replacing the electric motor of the radiator fan of the cooling system 7.11. Heater electric motor 7.12. Cigarette lighter 7.13. Instrument cluster 7.14 Checking the carburetor solenoid valve control unit 7.15 Possible malfunctions of the EPHH control unit. 7.16 Electrical diagram of a VAZ-21102 car 7.17 Electrical diagram of a car with a carburetor engine 2110 7.18 Engine control diagram 2111 (pin M1.5.4) 7.19 Engine control diagram 2111 (pin MP7.0) 7.20 Control diagram for engines 2111 and 2112 (pin M1) .5.4N, "January-5.1") 8. Body 8.0 Body 8.1 Possible body malfunctions. 8.2. Replacing the buffers 8.3 Removing and installing the radiator trim 8.4 Removing and installing the locker 8.5 Removing and installing the wing 8.6. Hood 8.7 Removing and installing upholstery, trim and windshield frame lining 8.8. Trunk lid 8.9. Side doors 8.10 Removing and installing the front seat 8.11 Removing and installing the upper and lower lining of the floor tunnel 8.12. Seat belts 8.13. Rear view mirrors 8.14. Instrument panel 8.15. Heater 8.16 Anti-corrosion compounds for body treatment 8.17. Features of body repair of models 2111 and 2112 8.18. Body care 9. Applications 9.0 Appendices 9.1 Fuels, lubricants and operating fluids 9.2 Basic data for adjustments and control 9.3 Filling volumes 9.4 Lamps used in the car |
Device
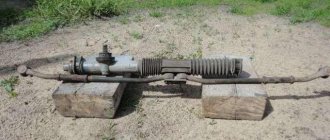
As you know, the cardan or intermediate steering shaft, as it is also called, consists of two parts. These are components that are connected to each other by a special universal joint.
VAZ intermediate shaft design
The steering cardan is connected to the drive gear using a special fastener, indicated by the number 9, but this is from the bottom side. But on the top side the cardan rotates in the bracket pipe on ball bearings (there are two of them). As for the main shaft mounts, they are connected to the welded bracket in four places. The front part of the cardan is attached through two plates with special shear heads. And the rear part of the cardan is connected using welded bolts and nuts that have spring washers or, often, self-locking nuts, but without washers.
Replacing steering cardan shafts on a VAZ 2110 upper and lower
Note
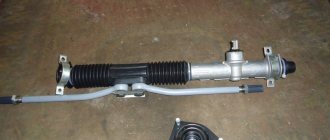
It is important to know that depending on the year of manufacture, the steering rack comes in two types. In one case, it is not necessary to disassemble the entire steering rack, but this is mainly for the VAZ 2108 and similar models
As for the steering wheel on the VAZ 2110, to replace the cardan it will need to be disassembled.
To disassemble the rack you need to do the following:
- the protective corrugation is removed;
- the nut located in the middle is unscrewed;
- the rail is disassembled into two parts.
Steering rack knocking on Kalina: reasons
To tighten the steering rack on the Lada Kalina, it is necessary to dismantle the largest pipe going from the air filter to the injector. That is, getting to this mechanism is not so easy. But, after spending a considerable amount of time, I still managed to get to the problem node. I just couldn't tighten the nuts. WD-40 was used, after about half an hour the wrench finally grabbed and moved the nuts. Imagine my surprise when I realized that the problems were in a completely different place.
It turned out that the connection was loosened at the place of the cardan and splines. After tightening them up, the problem went away on its own. We can say that I was somewhat lucky, because this is the most common and harmless reason why the steering rack on Kalina knocks. In your case the problem may be different. As a result, I will highlight the following possible malfunctions:
- the central tooth on the steering rack is worn out;
- the working couple has exhausted its resource;
- another component of the assembly has worn out, for example, a disc spring;
- resulting corrosion.
How to change the crosspiece of a VAZ 2107 quickly
First you need to unscrew the outboard bearing brackets, then thoroughly clean the connection and before unscrewing the flange fixing bolts, you must mark both forks. Chalk, paint, file, whatever, the main thing is not to upset the balance. Disassembly is carried out simply - using a 14-point head, the crosspiece bearings are seated a little deeper than they should be, after which the retaining rings are removed using round pliers. And so four times. After this, the bearings of the fork that is attached to the gearbox flange are knocked out.
Now you can safely change the bearings and the cross itself, having first cleaned the grooves for fixing the retaining rings and carefully lubricated the new bearings with Litol or 158 grease. Assembly is carried out in the reverse order and, as a rule, does not cause any difficulties. Listen to the crosspieces, do not allow the cardan to become unbalanced and have a good trip everyone!
Steering shaft SS20 for VAZ (intermediate driveshaft)
In the SS20 steering shaft, instead of needle roller bearings, the cardan uses plain bearings using elastic bushings.
Applicability
- VAZ 2113-2115
- VAZ 2110-2112
- VAZ 1117-1119 (LADA Kalina)
- VAZ 2190-2191 (LADA Granta)
- VAZ 2192, 2194 (LADA Kalina 2)
- Datsun mi-DO, Datsun on-DO
- VAZ 2170-2172 (Lada Priora with EUR)
Advantages of using the SS20 steering shaft in VAZ cars
- silent operation - the universal joint with elastic bushings has no play and therefore does not knock;
- easy rotation and absence of jamming is ensured by the presence of high-quality lubrication and high anti-friction properties of the cardan shaft bushings;
- The elastic bushings of the cardan have sufficient strength, do not wrinkle and have minimal wear, which ensures a long service life.
Guarantee
- Description
- Buy
The intermediate steering shaft (steering cardan) is installed between the power steering (on vehicles with electric power steering) and the steering mechanism. On those cars that do not have a power amplifier, it is installed between the steering column shaft and the steering mechanism, and is designed to transmit force from the rotation of the steering wheel to the steering mechanism.
Since the axes of the steering mechanism and steering column are at an angle to each other, the steering shaft includes a cardan mechanism (one or two, depending on the model), and a rubber damper to reduce vibrations and shocks transmitted to the steering wheel. Cardan mechanism The standard steering shaft installed on the conveyor has four needle bearings in the crosspiece, ensuring free rotation and rotation. During vehicle operation, the needle bearing wears out, increasing the clearance and backlash, which is why knocking, jamming and rolling (uneven rotation) appear. Also, during the production of standard steering shafts, there are defects in the bearings being insufficiently lubricated. Often, there is initially an increased gap in the bearing and from the very beginning of the vehicle’s operation, the steering shaft universal joints are knocking.
The SS20 company offers 2 modifications of steering shafts for each car:
- for the LADA Priora, LADA Kalina and LADA Granta models these are two modifications: the first shaft with an all-welded structure and a modification with a connector in the central part - a shaft of a composite structure.
- for the VAZ 2110 and 2113 models, these are modifications with a rubber damper as in the factory design, and the second modification is an all-welded shaft, from the design of which the damper is excluded;
A shaft with a rubber coupling provides elastic shock absorption from the steering mechanism and standard controllability.
The all-welded shaft and the composite shaft provide more precise and precise vehicle control.
The composite design shaft is easily installed on the car and does not require removal of the steering rack. This eliminates the need to use lifts and other specialized equipment. Installation of a composite shaft on a vehicle can be done on level ground using a minimum set of tools.
In the SS20 steering shaft, instead of needle roller bearings, the cardan uses plain bearings using elastic bushings. This solution ensures preload in each of the cardan joint bearings and, accordingly, the absence of play and the complete absence of knocking in such a joint. Ease of rotation ensures the presence of high-quality lubrication and high anti-friction properties of the bushings.
Diagnostics of the steering propeller shaft
On your car, you can check the serviceability of the steering propeller shaft yourself (note: SS20 steering shafts are installed only on cars with a height-adjustable steering column). To do this, on a car without an EUR:
- Place the car on a flat, horizontal surface with a hard surface.
- With one hand, grasp the intermediate steering shaft in the area of the cardan crosspiece, touching the cardan forks with your fingers.
Diagnostics of the steering shaft for cars with electric power steering is carried out in a similar way, both with the engine running and with the engine not running. It should be taken into account that when the engine is not running, while the steering wheel is rocking, a knock can be heard in the electric power steering - do not confuse it with a knock on the steering shaft (the presence of a knock in the electric power steering when the engine is not running is not a defect).
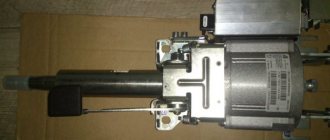
Installation
1. Using a mandrel or head of a suitable diameter with an extension, press the lower steering shaft bearing into the pipe until it stops, with the wide side of the plastic sleeve facing up.
Warning. When pressing, select a mandrel or head of such diameter that it rests on the outer ring of the bearing.
2. Insert the upper steering shaft into the bracket pipe and press the steering shaft into the lower bearing until it stops.
3. Place the upper bearing on the upper end of the steering shaft with the wide side of the plastic sleeve facing down.
4. Having rested the bead against the outer ring of the bearing, we press it into the pipe until it stops.
5. Make sure that the lower end of the steering shaft is opposite the previously applied mark on the bracket
6. Check the operation of the anti-theft device of the ignition switch.
7. If necessary, lightly tap the hammer through the wooden spacer at the ends of the steering shaft (at this time the lock should be open) to move it in the steering column tube, achieving easy blocking and release by the anti-theft device.
8. We carry out further assembly and installation of the steering column on the car in the reverse order of removal.
Replacing the intermediate shaft of the VAZ driveshaft
As many motorists know, the VAZ 2110 often has such a defect, especially after long-term use, as steering play. In this case, only replacing the steering cardan on a VAZ 2110 helps to establish normal operation. You have to dismantle the column and carry out repairs. Replacing the VAZ 2110 steering cardan, despite its apparent complexity, is an operation that can be carried out on your own.
How to replace the steering shaft crosspiece - why change it and the replacement procedure
Hello, dear car enthusiasts! The steering of a car is not only a set of parts and mechanisms that allow you to set the direction of movement required by the driver, but to a greater extent a unit responsible for the safety of everyone in the cabin.
Steering malfunctions very often become the causes of serious accidents, in which other road users may suffer in addition to you (God forbid).
A good driver always reacts to the slightest changes in the operation of the car’s mechanisms, and if the controls fail, the reaction should be immediate.
When expressing your suspicions about a steering failure, you can often hear the phrase from a car service specialist: the steering shaft crosspiece is faulty. Such a malfunction is easy to diagnose and fix yourself.
Purpose and design of the steering shaft crosspiece
Replacing the cross
Everyone who is familiar with the structure of the VAZ “classic” knows that the steering shaft is connected directly to the worm shaft and there are no other joints in this design.
Newer car models have such a design of the chassis and body that the steering shaft must have a downward angle in a certain place. The crosspiece of the steering shaft is precisely designed to transmit torque from a section of the shaft in the cabin to a section of the shaft or gear of the rack and pinion mechanism (worm) in the engine compartment.
The steering shafts of some domestic and imported cars even have two crosses. This was done to allow the steering wheel to be adjusted in height.
In principle, the design of the cross is very simple. The crosspiece itself is made of durable steel with four spikes onto which the needle bearing cages are mounted. The clips themselves are inserted into the bracket (fork), which is connected to the splined ends of the shafts. The bearings have seals made of oil-resistant rubber.
When is it necessary to replace the steering shaft crosspiece?
The following signs may indicate that you need to pay attention to the condition of the steering cross bearings:
- excessive effort must be made to rotate the steering wheel;
- an increase in the free play angle of the steering wheel or delayed response of the wheels when turning the steering wheel;
- uneven rotation of the steering wheel, jerking, “biting”;
- extraneous knocking, grinding, noise when maneuvering and overcoming uneven sections of the road.
The fact is that the universal joint, especially the one located in the engine compartment, is constantly subject to negative influences: vibration, temperature changes, friction, high humidity.
All this over time leads to loss of elasticity and loss of rubber seals. Leaked and dried grease provides a large field of activity for dust and moisture. Bearing needles very quickly become corroded and wear out.
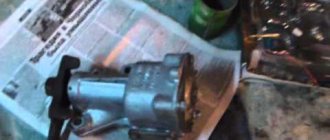
Procedure for replacing the steering shaft crosspiece
Repair of the crosspiece, in essence, is not carried out (!) This is a pointless matter. The repair consists of replacing the old cross with a new one along with all the bearings. Crosspieces are offered for sale in just such a set.
The steering shaft crosspiece can be removed quite simply using the following algorithm:
- the steering shaft is installed in such a way as to provide access to the bolts that compress the upper and lower casing of the crosspiece forks;
- the bolts on the upper and lower forks must be completely unscrewed and removed;
- moving the cross block along the splines, first remove it from one end of the shaft, and then from the other (sometimes you will have to remove the steering column to do this, which is also useful for checking the condition of the bearing).
Bearing races, as a rule, are secured by punching, which can be easily eliminated using a small chisel or drill with a thin drill bit. Then the clips are pressed out one by one in a vice.
Assembly of the unit occurs in the reverse order, but it is important to remember that the bearing races are pressed into the forks only from the outside until completely immersed. Don’t forget to apply a new core to fix the bearings
And, thus, the repair of the steering shaft crosspiece can be considered complete.
Differences between a short-stroke link
The main differences can be seen even in photographs. We see that the short-stroke rocker has smaller dimensions, namely length. To reduce the stroke length at startup, the length of the transmission under the hinge should be increased. Due to this, we can not only get shorter gears, but also maintain the traction axis in its original position.
The photo shows a self-modernized backstage. As an alternative, you can use a part from other VAZ models.
It is worth understanding that after such tuning, you will need to put more effort when changing speeds. After upgrading, switching will resemble joystick control, which is undoubtedly a plus. In addition to the rocker, you can install a backlash-free cardan, which will also have a positive effect on the smooth operation of the gearbox.
The replacement takes place in several stages:
- We lift the car off the ground using a lift or by rolling it into a hole, but you can also get by by lifting the front of the car.
- We set the steering wheel at a right angle and fix it, and also fix the steering wheel; during replacement, movement of the wheels and steering wheel is not desirable.
- To access the steering shaft, remove the left (right) wheel. We go into the salon and unscrew the fastening bolt; after a slight effort, the steering shaft should come off the steering wheel.
- Under the car, carefully remove the upper and lower casings, check the amount of dirt on the crosspiece and steering shaft driveshaft; not all cars have them protected by a boot (purchase and installation of such rubber will cost 100-200 rubles).
- We find and unscrew the bolt on the crosspiece; you may have to use a WD tool. Once the bolt is removed, the steering shaft should easily come off the steering rack.
- Pull the shaft down and pull it out. Often the crosspiece mechanism is rusty and dirty; first of all, you will need to wash it.
- For flaring you will need a sprocket of the appropriate diameter; fix the shaft in a vice.
- Using a head (presumably a 8-pointer), we knock out the cross first in one direction (remove the bearing cup), and in the other direction (also remove the cup).
- Then we take a new crosspiece and insert it in the same order - we start one side first, and then the other, press it in using a vice (but not too tightly, the metal may wrinkle).
- We align both cups and roll them with a chisel and hammer.
The final assembly procedure is no different from disassembly - the main thing is to maintain order. So, we have replaced the steering shaft crosspiece; if everything is done correctly, the handling will respond better to your efforts.