Replacing the stove fan with the previous one
Thanks to it, the heater fan is sent from the environment inside the car, but comes from a cold environment, and, flying into the dashboard, passes through the heater radiator (correctly called a heating radiator), which can be very hot or too cold (depending on how the coolant heats up, if it has reached the desired operating temperature of 95 degrees, the goal, then the radiator also heats up very well, and all the air that it crosses becomes just as hot), that is, in simple words, the fan serves only one purpose, which is to suck air from environment and force it to flow in a certain flow inside the car, where, having already passed through the radiator of the stove, it will heat up and come out hot inside.
Replacing a stove fan will not take much time, but it will not take very little time (it still depends on which road you go), strength and tools, the main ones of which are: Wrenches of all types, starting with wrenches and ending with spanners , in addition to this set of different types of screwdrivers, you will also need, of course, a new fan for the furnace itself!
Where is the heater fan located?
It is located under the right side of the windshield, if you look towards the car, next to it there is also a cabin filter, which is periodically installed every 15,000 thousand kilometers, or better even once every 10,000 thousand kilometers; it is recommended to replace it with a new one, because if it gets clogged filter first (if it is a carbon filter), at a certain moment desorption occurs (this is a process in which all the dirt accumulated on the filter leaves it, and when exiting it flies right inside the machine, and the filter collects everything except pleasant little things, primarily dust and toxic exhaust gases, secondly, we think that this is enough to start changing this filter on the car more often and not delay its replacement), but this article is not about that, and the location of the stove fan, for clarity, by the way, is indicated on The photo below is red, and the blue one is the same interior filter, which is recommended to be replaced periodically on the car.
When should you change your furnace fan?
If the fan is completely out of order, the stove stops working completely (that is, turning the stove control knob does not turn on), if the fan is partially out of order (if the blades are partially out of order, the blades can be connected), the motor itself to the fan is crap, and so on) the stove will continue to work, but during its operation you will hear extraneous noises, such as rustling, humming, whistling, and besides, the stove may still work worse and weaker, these will be the most basic symptoms that will appear when the stove is partially or completely turned off.
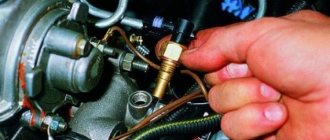
If the stove stops burning, do not rush straight to the workshop to get this fan, you will have to check everything first, and first of all check the fuse going to the stove (fuse F9 with a current of 25 Amps goes to the stove), if it is intact, then most likely this fan is broken , because only the fuse and this fan are responsible for the operation of the stove (in some cases there is still a problem with the wiring, in this case the fan does not turn on) and they wanted to add other things due to the low air flow, this can be not only a fan, but also a very clogged cabin filter, for example!
How to replace the heater fan on a VAZ 2170-VAZ 2172?
When replacing the fan, if the cabin filter has not been replaced for a long time, it can be removed and replaced with a new one; it is inexpensive in car dealerships, but only then so as not to get into the car (However, to change the heater fan, you need to go to the place where choose where the filter is installed), you can immediately change it if it is too dirty and then drive into your car with clean air in the near future!
Replacing the heater motor on a Lada Priora with Panasonic air conditioning
Replacing the heater motor with a priori Lada with Panasonic air conditioning.
Replacing a Priora stove motor with Panasonic air conditioning
This replacement method may be wrong, but it is fast!
1) There are two ways in which you can remove the stove fan, we will tell you both, but before we start describing them, we will briefly talk about them, and which one you will use during operation is up to you, the first method is to remove throttle assembly, when removing the bulkhead liner and removing the cooling expansion tank, the second method does not involve this; If you choose the second method, it will be enough to unscrew the screws and nuts securing the fan and then remove it from the car.
It would seem that the second method is much more convenient and faster, in fact it is, it is done much faster, but it is very inconvenient to do it, because in this case you will have to choose hard-to-reach nuts, as well as hard-to-reach screws, and so on, in this case when performing the second method, there will be no need to crawl in hard-to-reach places, all the nuts and screws will be in front of your eyes, but you will still spend more time because you will remove different parts than in the first method, and you will not have to touch!
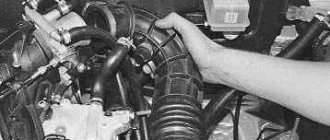
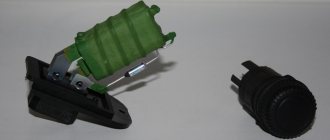
2) After you have decided and made your choice, get to work, at the beginning of the operation, in any case, you will have to remove the windshield trim (How to remove the trim, read the article: “Replacing the cabin filter on a Lada Priora”), after which block Disconnect the wires and connector from each other (they are indicated by a red arrow) and remove the block of wires from the additional resistor (it is connected to it, this block is indicated in both photos with a blue arrow), these are all general operations that must be performed in any case.
3) Read this paragraph only in the case of the second method, if you do not want to remove anything unnecessary and if you are not going to do the work using the second method, then in this case go straight to step 4, and then to the detriment of the second method, with it you first need will remove the throttle assembly (how to do this, read the article: “Replacing the throttle assembly on a car”), but only when removing it, do not disconnect any pipes, but simply unscrew the nuts that secure the group to the casing, and then remove it, and as soon as the group is removed, proceed to removing the protective casing, to do this, loosen the screw that secures the steam line on the expander tank with a screwdriver (this is the tank where you need to fill the coolant, you will immediately find), loosen the screw, disconnect the hose from the tank and pull it out through the hole in the upholstery (see photo 1), then lift the expansion tank and, without disconnecting the other pipes from it, carefully move it, otherwise it will interfere with the removal of the lining, then use a screwdriver to unscrew again, but completely, the lower screw fixing the lining (see photo 2) and the left side of the trim (while the car is moving, watch) remove it from the car, then find the three clips that are attached to the clips, and attach the brake booster hose so that it does not hang, thus overcoming the force of the clips, remove them from the brackets (see photo 3), right after you unscrew the nut that is attached to the top of the strut fairing (see photo 4) with a cap handle or wrench, simply unscrew the nut, pull this metal mesh and remove it from the top, remove the studs and finally the right part (last part) of the cover (see photo 5) from the car and bend the end of the brake pedal bracket (see photo 6).
4) Now we unscrew the three screws and one on the right side of the heating element mounting nut, if you have removed the casing, then it will be very convenient for you, after turning off the heating element, remove the heating element from the place where it is installed outside so that you can remove the stove fan.
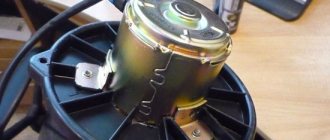
5) Having disassembled the stove at a sufficient distance, unscrew the three screws securing the fan (two of them are indicated by red arrows in the photo and are almost turned off), disconnect the electric motor ventilation pipe from it (indicated by a blue arrow), and then remove the fan (if you need it, pry with a flathead screwdriver from the bottom) as shown in the small photo, but keep in mind just one fact, when you put the new or old (it's not the case) fan in its place, install it in such a way that the motor vent pipe, indicated by the blue arrow, is facing to the nozzle on the stove fan, if you install the fan in reverse, then simply do not connect this pipe to the nozzle, but it must be placed on the nozzle of the stove fan.
If you have not removed the throttle valve and the partition casing, unscrewing the screws and nuts of the heating element will simply not be very convenient, and you will still have to work hard to remove the heating element at a sufficient distance, thanks to which it is possible to replace the fan, but this is possible and some people do replace stove fan for a new one!
Reinstallation is carried out in the reverse order of removal, do not forget about the cabin filter, if it is too dirty, replace it with a new one.
You can see a brief explanation on replacing the stove fan in the video below, for all this in this video there is additional information that you will not find in the article, without watching the video, you can still proceed to replacing the stove fan, but it’s still better to watch, so that all unnecessary doubts and questions disappear.
In general, about a year ago I bought a new stove fan, also known as Auto49, from the BBC store. But it was so crooked and so new that after installing it, the last thing I wanted to do was take everything off and go change it. The flaw was that the blades themselves and the edge of the fan (which are made of plastic) were deformed and, as a result, not centered, so strong vibrations occurred during rotation. At 1 (sometimes I was lucky at 2) speed this did not appear, so we decided not to return.
I didn’t like the situation with the fan, I wanted to change it, but I didn’t get around to it until winter. Then the frosts came, I just didn’t want to get into the car (garage without heating =), I had to suffer and warm up the interior at 1st speed =
Now that it’s getting hotter, I finally succeeded and below I’ll write a short epic about what happened and how))
I couldn’t find any clear instructions on the Internet without analyzing the gender of the muzzle, so I acted “according to the circumstances,” that is. I unscrewed everything that was in the way and tried to get it out)) By the way, there is a lot of leaves clogged in the air intake, the stove does not blow from all the holes, so I also bought a cabin filter and went to change it)
I replaced the stove fan earlier with a minimum of analysis and without downloading anything)). By the way, I have a 2007 car without air conditioning.
I have a lot of leaves accumulated there. I saw on the device that there was a thin mesh attached to the vent, but unfortunately I was unable to find it, so this idea was not implemented.
First, as usual, I unscrewed the filter grille.
I removed everything else, everything is extremely simple and clear there
Important points
There are a couple of nuances, without mentioning which this article would be incomplete:
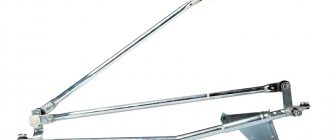
- The old gearbox should be removed very carefully. A long shank sticks out of it. If you remove the gearbox at an angle, you can damage the edge of the hole for the shank. If this happens, installing a new gearbox will not be so easy. Therefore, advice: when removing the gearbox, it should be pulled in a plane parallel to the floor;
- When buying a new gearbox at a car dealership, you should only buy the original VAZ one. Yes, its quality leaves much to be desired. But this is still better than buying a fake gearmotor, which the spare parts market is literally flooded with now. You can spot a fake by price. A normal gearmotor on a Priora costs 700 rubles and more. And a fake rarely costs more than 300 rubles.
So, replacing a heating gear motor is not a very difficult task and even a novice driver can do it. If a person has held a screwdriver in his hands at least once, he can handle it. All you need to do is follow the above recommendations exactly.
Lada Priora Hatchback KosmosS › Logbook › Replacing the heater motor with Panasonic air conditioner
I drove for the last month and suffered with my air conditioning.
The symptoms were bleak; the air conditioner either worked or didn’t.
In other words, the air conditioner worked properly, but the heater motor
He was obviously shirking his own work.
Especially when you drive on smooth Russian roads))
Symptoms: the motor refuses to operate in all positions of the rotation speed control handle.
At first there were floating speeds, later it completely died out, and from time to time it came to life on bumps.
I thought there was a bad contact in the connector. I got to the connector, everything is ok.
If you lightly hit the fan body, it comes to life and continues to work normally, which means the reason is in the motor itself, and not in the control unit or connector contacts
I was completely fed up with this and now I dared to change it...
It turns out this is very difficult to do and spare parts
you need the original. Panasonic ept)))
To be honest, it got me, it’s either the original regulator or the motor (((
Replacing the heater motor on a Lada Priora with Panasonic air conditioning
Replacing the heater motor
on Lada
Priora
with
air conditioning
.
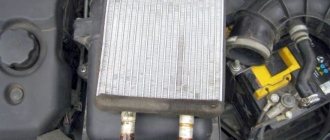
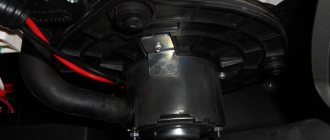
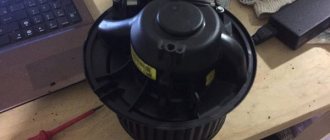
Removing the heater fan on a Priora is difficult, but possible.
Remove the right side of the engine compartment bulkhead trim. The heater fan motor is visible, but it is impossible to reach it: the outer plastic casing of the air conditioner is in the way and can only be removed by disassembling the entire air conditioner assembly (draining the antifreeze, removing the vacuum brake booster, leaving freon from the air conditioning system, etc.).
We make a cut on this casing in the indicated place, which will allow you to remove the right side of the casing and reach the heater fan
The heater motor is in our hands.
Reassembling in reverse order
Replacing the Priora stove motor
Replacing the heater fan on a VAZ first with your own hands.
The operating parameters of this microchip are subject to change. Adjusts settings for ignition timing, cylinder fuel volume, exhaust control and exhaust emissions.
This can be done in two ways:
- Integration of a new chip with your personal firmware (program);
- Refinement and modification of an existing chip. It is turned off and after the procedure the microcircuit is assembled.
The best option is to entrust the car to a reliable service that has been tested by you personally. An experienced professional will perform the procedure accurately and with minimal engine side effects. If you are confident that you can handle it yourself or a professional is working with you, then there is no need for a car service. But a few hints before starting the firmware will help you in the next task.
The DIY modification procedure takes place using built-in equipment in several stages: the ECU is connected to a laptop or PC via a connecting cable with a suitable connector. The computer system contains software with modules and settings for the Lada car.
Replacing the heater motor on a Prior without air conditioning.
That is, to perform chip tuning you must have:
- Working computer with software support;
- Connection cables to the Priora computer;
- Chargers and adapters;
- Software and modules.
With correct and competent tuning, engine performance will be optimized and fuel consumption will be reduced.
How to change the heater radiator on a Lada Priora
After all, every motorist who owns a Russian car discovers a malfunction of the car’s heating unit in winter. After all, only with the onset of severe cold does a person begin to think about how not to freeze while driving a car. Of course, everyone uses a stove for this. But what should those for whom this very device did not work properly? After all, only the heater can influence the normal temperature in the cabin, which allows for comfortable movement. In this article, we will look at only one reason why a heating device stops working, and we will learn the principles of repairing and replacing the heater radiator installed in a Lada Priora car.
If the motorist is sure that the heater core needs to be replaced, then removing the faulty item can take a long time, because most likely, the process will require replacing not only the blown fuse, but also more serious repair work. True, you shouldn’t immediately despair of your ignorance; the summary is carefully written in the material, helping everyone understand how to replace the radiator of a Priora stove with and without air conditioning.
Replacing the radiator of a heating unit in a Priora that is not equipped with air conditioning
Replacing the heater core on a Priora without air conditioning may make sense in this case if hot air does not enter the cabin and the heating itself works. If, in addition to the dilemma described above, water is also flowing from under the Priora stove, the motorist will inevitably have to remove the faulty unit in order to weld the latter. From time to time, repairs are impractical and you have to replace the old device with a new one.
So first you need to start by removing the negative terminal from the battery. The fact is that here the matter is not only about the safety of the master himself, but also about additional insurance, which allows him to avoid several unpleasant surprises that, if the name is careless, can appear not only with wiring, but also with electrical equipment.
If you replace the heater radiator on a Priora without air conditioning, after de-energizing the system, you can begin disassembling the windshield trim. In this case, the wiper arms should also be removed, which can cause additional discomfort during operation. After this, you should clean the unit of all plastic tubes, through which the liquid in the washing machine tank flows directly to the nozzles. Only after completing all of the above steps will it be possible to remove the decorative trim located on the sides of the windshield. Indeed, it is not difficult to carry out such a manipulation - it is enough to get rid of 7 screws.
Replacing the heater radiator on a Priora can only be done after removing the hood seal. Before disassembling, it should be taken into account that in the center of the cover there is a screw that tightens both halves of the structure. Using a screwdriver or at least a knife, you can carefully lift the plugs (this element acts as a “cover” for the screw) and unscrew them.
Then you can begin to remove the soundproofing that is located in the drive bay. In order for everything to be correct, you need to unscrew the screws and remove the pads (there is no clear rule about what to remove first: left or right). Then you should get rid of the pipes going directly to the radiator. A person who wants to understand how to get to the heater radiator on a Priora must loosen the fastening elements of the clamps holding the structure itself.
This way you can get all the wires going directly to the stove from the connectors. You can remove them using 2 keys, namely 1 “for 10”, and the other for “8”. After unscrewing all four nuts, slide the belt held by the holder to the side. The “13” key will help to disassemble the bracket located on the brake pedal. Only after this can you begin to remove the heater core on a Priora, which does not have air conditioning. A regular Phillips screwdriver will help you disassemble the device, allowing you to unscrew 3 screws. The rest of the work consists of installing a new disk and restoring the system in the reverse order of the described steps.
Indeed, there is another method of replacing the system element of interest. Open access to this element will help to disassemble not the heater body, but the vacuum brake booster. It should be noted that this procedure will only be successful if the brake pedal is removed along with it. Such actions help to specifically approach the left side of the stove and the appropriate fixture.
Installation of a new radiator in a Lada Priora with air conditioning
Replacing the heater radiator in a Priora car with air conditioning is a fairly simple process. The latter unit appeared exclusively in newer cars, that is, Priors began to be equipped with HALLA or Panasonic air conditioning. Thanks to the new component, you can replace any part of a non-working heater by only removing the trim, removing the wipers, the heater itself or the vacuum brake booster.
If a motorist wants to figure out how to remove the heater radiator on a Priora with air conditioning, he must start by removing the sound insulation located in the engine panel. Then you need to disassemble the unit’s air filter hose and remove the gasket, which is located near the radiator pipes. Then you should drain the coolant and lift the radiator towards the mechanic.
Conclusion
Practice shows that there is nothing particularly difficult in installing a stove radiator on a Priora. The driver just needs to stock up on patience, time and tools. Any unit, even the most complex, can be disassembled and reassembled by an amateur mechanic, therefore, before starting work, you should figure everything out and immediately begin the long but fundamental process.
The best prices and conditions for purchasing new cars
4.5% credit / Installment plan / Exchange / 95% endorsements / Gifts in the Mas Motors showroom
Changing the cabin filter
There are Lada Priora configurations that include air conditioning. It could be HALLA or Panasonic. Owners of such cars are also concerned about replacing the stove on a Priora with air conditioning. But first, it’s worth understanding the air conditioners themselves, which differ not only in the country of manufacture.
HALLA is made in Korea and Panasonic is made in Taiwan. You can find out which air conditioner is installed in your car by visual inspection.
Attention should be paid to the button, which is located in the center of the air conditioner control panel. Panasonic system has a button to turn on, but HALLA does not have such a button
Car owners should regularly change the filter to ensure that the cabin is free of foreign odors from the street and the air is clean. Before you find out how to change the heater filter on a Priora, you need to know the type of system that is installed in your vehicle. After all, each cooling system model has different filter elements.
The filter changes differently depending on whether the car has air conditioning or not. If the car is not equipped with an air conditioning mechanism, then proceed as follows:
- Open the hood.
- We dismantle the grill installed under the glass on the left. There are screws on it, closed with plugs. They need to be unscrewed. After completing this step, access to the filter will be freed.
- The cleaning component cover is held in place by four bolts that must be removed.
- We remove the cover, which will allow us to get the filter. We clean the vacated area from possible contamination and debris.
- We install a new filter element and assemble the car in the reverse order.
If the car has a cooling mechanism, the actions will be slightly different.
- Open the hood and find the required part.
- We bend the upholstery material.
- If Panasonic is installed, then the latch on the filter element must be unscrewed. With a Hull cooler, you will need to press the latch, which will open the lid.
- We take out a filter that has already served its purpose and in its place we put a new one, which will need to be twisted using the slots in the housing.
- We install the cover and all parts in their place.
Repairing the Priora stove may be associated with a number of problems that initially need to be correctly diagnosed. We will write several more articles on this topic and consider the main problems in detail. In any case, you need to know how to disassemble the stove on a Priora, because this is the basis.
Priora with air conditioning HALLA heater radiator -
Lada Priora with Panasonic air conditioning (Panasonic), the heater is operating at maximum mode, we change the rheostat (resistance) Thanks for watching and for subscribing, everyone is coming
Video on how to remove or replace the heater radiator on a Priora, VAZ 2170, 2171, 2172 with Halla air conditioning. There are extraneous sounds in the torpedo panel, as it turned out
Replacing the heater motor with a priori Lada with Panasonic air conditioning
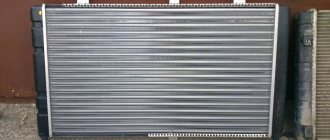
In this video I will talk about how to drain antifreeze or antifreeze from previous VAZ 2170, 2171, 2172 through a cooling radiator. The video is not finished! Sorry about that, it's necessary
Replacing the previous cabin filter with a detailed video of the air conditioner. At the end of the video you will learn the secret of replacing the previous cabin filter with air conditioning