During the operation of the car, sometimes it becomes necessary to adjust the clutch drive. This happens because over time, the pedal stroke changes as a result of natural operational wear of the rubbing parts of the clutch (driven and driven disks, flywheel surface) and (or) pulling of its cable.
In another case, the need to adjust the clutch drive may arise due to previous incorrect adjustment. It is possible to reduce or increase the working stroke of its pedal. As a result, malfunctions occur in the operation of the drive - the clutch begins to “slip” or “drive”, gear shifting becomes difficult, jerks appear when starting from a standstill, fuel consumption increases, etc.
Here we will consider a simple adjustment of the clutch drive (clutch pedal travel) on VAZ 2108, 21081, 21083, 2109, 21091, 21093, 21099.
Tools required for adjusting the clutch of VAZ 2108, 2109, 21099
— tape measure with a clearly readable scale
— two 17 mm open-end wrenches
open-end wrenches for 17 and a tape measure - all you need to adjust the clutch drive on eights, nines and ninety-nines
Preparatory work
— fix the car (put chocks under the wheels)
— remove the battery (you don’t have to remove it, but it’s easier to make adjustments with the battery removed)
— press the clutch pedal several times
Checking the working clutch pedal
Let's measure the travel of the car's clutch pedal. Before doing this, we move the carpet on the floor of the car back so that the measurements are more accurate.
— Using a tape measure, measure the distance from the floor of the car to the bottom edge of the clutch pedal
The image shows how best to do this.
the actual distance from the bottom edge of the clutch pedal to the floor under the driver’s feet, measured using a tape measure
It should be approximately 18-20 cm.
— press the clutch pedal all the way with your hand and measure the distance from the floor to the bottom edge of the pedal.
the distance from the floor under the driver’s feet to the bottom edge of the clutch pedal when it is pressed all the way - the clutch is “disengaged”
It should be 6-7 cm
- subtract from 18-20, 6-7, it turns out 13-14 cm
This is the norm for the full travel of the clutch pedal of VAZ 2108, 2109, 21099 cars and their modifications. Many repair manuals indicate a working stroke size of 12.5-13.5 cm, which is also very close to our measurement.
If the clutch pedal travel differs more or less, it is necessary to adjust the clutch drive.
Adjusting the clutch drive VAZ 2108, 2109, 21099
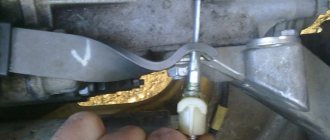
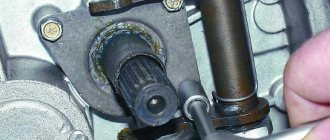
The clutch drive adjusting nut is located in the engine compartment of the car on the drive cable sheath, inserted into a special bracket mounted on the gearbox housing. It is protected from unscrewing by a lock nut located there.
clutch drive adjusting nut and its locknut on the bracket
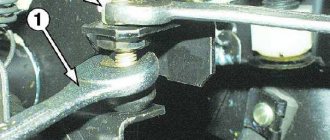
— Holding the adjusting nut with one 17 mm wrench, use another 17 mm wrench to loosen the lock nut a few turns.
loosening the locknut using two open-end wrenches 17
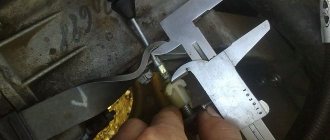
— Rotate the adjusting nut clockwise with one wrench, holding the locknut with the other - this is to increase the clutch pedal travel (the pedal will rise) or counterclockwise to decrease its travel (the pedal will lower to the floor)
rotation of the adjusting nut - adjustment of the clutch drive
How much to reduce or, conversely, increase the pedal stroke is determined based on the results of the check described above.
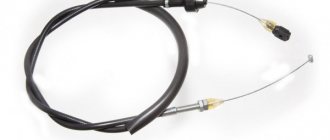
Clutch cable replacement process
- The first thing that needs to be done before dismantling the old cable is to inspect it and take the necessary measurements of the free part of the cable of the lower tip, which is located near the gearbox. We inspect the entire length of the cable from the fastening to the clutch block or gearbox (types of gearbox). Then we find the connection point of the cable and carefully disconnect it from the gearbox or clutch unit, pulling it into the cabin through the engine compartment. If necessary, we remove part of the floor under the pedals for ease of dismantling. At the very end, disconnect it from the clutch pedal. After the cable is disconnected, remove the damper (tip) from the bracket on the gearbox.
- Installing a new clutch cable occurs in the reverse order. We first attach the prepared cable to the clutch pedal. Next, we stretch it back to the gearbox or clutch unit and attach it to the place where it is attached. At the very end, we put the floor under the pedals in place.
After replacing the cable, it is imperative to adjust it. Experts advise adjusting the cable not only when it is replaced, but also every 15-17 thousand kilometers. This is due to the fact that over time, the linings on the clutch disc wear out, which leads to increased looseness of the clutch pedal. Therefore, timely adjustment of the cable is a necessary safety measure when driving a car.
Preparation for repair
Before starting repairs, do the following:
- Disconnect the battery.
- Drain the gearbox completely. Look at its condition and replace if necessary.
- Install wheel chocks under the rear wheels.
- Loosen the front wheels.
- The front part of the car must be placed on supports.
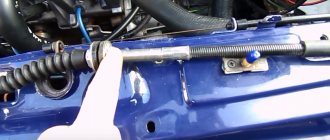
- Using a 17mm wrench, unscrew the bolts securing the bracket on which the clutch drive cable is mounted.
Clutch cable adjustment process
So, the process of adjusting the new cable is carried out as follows.
- Using a ruler, measure the length from the clutch release fork to the end of the cable. This distance should be from 82 to 90 mm. But the length from the cable tip to the gearbox bracket should be 56 - 65 mm. However, the indicated values may not always coincide with real indicators. If the length does not correspond to the specified values, it is necessary to adjust the length of the clutch cable using a wrench, tightening the adjusting nut on the tip, slightly loosening the lock nut.
- We check the accuracy of the cable adjustment by pressing the clutch pedal three times for 2 seconds with each press. After this, we measure the distance again. If the measurements do not correspond to the established indicators, we repeat the step of adjusting the cable again. In this case, the fork travel distance should be 27-33 mm or 31-35 mm. After the cable adjustment is completed, secure the nut with a locknut. Check the smooth engagement of reverse gear.
How to determine the amount of free play?
Determining the amount of free play is carried out using a ruler or caliper, the main thing is that they fit in size:
- A clearly visible object with a sharp end, for example, a match, is attached to the middle of the pedal sole. This is done in order to facilitate the measurement process.
- The ruler is installed in the plane of movement of the pedal support pad so that changes in the location of the latter can be easily monitored using the scale marked on the ruler.
- Lightly press the pedal with your hand, and then carefully move it until a sharp jump in resistance to the force occurs. After this, use a match to mark the distance traveled by the pedal in millimeters.
After receiving the measurement results, it will be possible to determine whether the clutch pedal requires adjustment or whether it can be done without it.
Reference! For different car models, the value of this indicator will be different. For example, for a VAZ-2101 it will be 35-40 mm, and for modern class B cars this parameter should be in the range from 5 to 14 mm.
Thus, the specific amount of pedal travel for a certain type of car must be checked in the operating manual (the so-called “Murzilka”).
Step-by-step procedure for tensioning the clutch cable on a VAZ-2114
In order to change the length of the clutch cable, we only need a wrench.
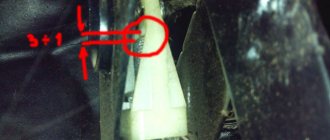
1. First of all, open the hood and look for the nuts on the gearbox housing located at the very end of the adjustment unit. Two 17mm bolts.
The clutch cable is marked with a red marker.
2. Next, loosen the locking nut, and then change the position of the adjusting nut, tightening or unscrewing it to the required length.
The nuts will unscrew easily with any pressure.
3. When the nut is screwed on, the clutch pedal will rise, increasing the length of its distance, and if it is unscrewed, the distance to the floor will decrease, pressing the pedal closer to the floor.
The arrow marks the nut for fixing.
There is no doubt that such work is much easier to carry out in the company of an assistant.
4. Upon completion of all adjustment work, the locking nut is tightened as close to the adjusting nut as possible.
When carrying out such procedures, make sure that the clutch cable itself is intact, that there is no damage or scuffing on its body and shell, and that it moves freely inside the elements supporting it. If something like this is discovered, then it is best to replace the cable with a new one, since the wear of the supported one will only increase, and it is impossible to talk about the reliability of the work performed.
Checking work
After you have completed this work, you need to check the correctness of the work performed.
- First, measure the travel of the clutch pedal.
- With the engine turned off, depress the clutch pedal several times and return it to its place.
- Next, we take a new measurement and clarify the received readings.
- If they have not changed compared to the first measurements, then the work has been completed, correctly, and the first stage of verification can be considered completed.
- And if they differ from the first indicators, it means that the locking nut was not tightened tightly, and the adjustment process must be carried out again.
There is one rule among car enthusiasts! A properly adjusted clutch should begin to engage approximately halfway through the pedal stroke.
The following test can definitively indicate the serviceability and correctly adjusted clutch:
- The car must be placed on a flat surface, the handbrake must be turned on, and the engine must be running.
- Next, we turn on the gear and try to start moving.
- If at this moment, when the clutch pedal is not pressed, the car stalls, this means that the adjustment was made correctly.
- And if this does not happen, the car is running in gear with the clutch pedal not pressed, then this will indicate clutch slipping, which will need adjustment.
Briefly about the design of a friction clutch and its purpose
Any self-respecting motorist will study the design of the unit before adjusting the clutch on a VAZ 2114. This will help you approach the issue wisely and avoid mistakes.
The mechanical drive design is simple and reliable. Compared to hydraulics, the cable requires minimal maintenance, and changing it is not labor-intensive. The mechanical drive consists of the following elements:
- Adjustable sheathed cable.
- Control pedal.
- Clutch release fork lever.
- Bracket for fastening the end of the cable sheath.
- Brake and clutch pedal bracket.
The mechanism serves to transmit force from the pedal to the release fork, which, in turn, removes the friction disc from the flywheel. Using a cable drive avoids major problems such as fluid leaks and periodic bleeding of air from the clutch control system. The weakest link in this chain is the cable, the quality of which at times leaves much to be desired. Therefore, replacing a cable on a Samara is a fairly common occurrence.
Meanwhile, the question of how to adjust the clutch on a VAZ 2114 car remains relevant for the cable mechanism. Setting standard values guarantees optimal tightness of the driven disk to the plane of the flywheel and basket when the clutch is engaged. The design also ensures complete separation (switching off) of the above parts from the passenger compartment through the pedal.
Design
The mechanical drive on the VAZ-2114, despite the fact that it has the least simple design, is in no way inferior in reliability to its hydraulic counterpart. Its system consists of a cable adjustable in length, sealed in a special anti-corrosion sheath, and the clutch pedal itself located in the car's interior, which, through free movement, is designed to transmit the pressing force to the clutch fork.
Despite the fact that such a scheme is simple, in general it is quite reliable.
Clutch diagram
A new product in the form of a clutch cable for VAZ-2114 cars helped to avoid all the problems that all owners of classics encounter. First of all, this refers to the leakage of hydraulic fluid from the system, and as a result, loss of control over the car. It would also require work to remove air from the clutch system after repair.
At the same time, periodic checking and adjustment of the clutch pedal has remained the same.
Why is it necessary to adjust the cable travel?
This procedure is necessary so that when the pedal, and with it the clutch cable, reaches certain values, the most squat pressing of the flywheel with the basket to the driven disk is made, at the moment when its operation is necessary. At the same time, thanks to the precise adjustment of this drive, the clutch is released at the moment the clutch pedal is released.
Note! During operation of this system, when the lever is in the neutral position, or when it is turned on, no extraneous sounds or crackles should come from the gearbox housing.
You can monitor the condition of the clutch, preventing such a situation from occurring, visually by positioning the clutch pedal relative to the floor of the car, using only a ruler.
Values
The optimal values should be from 125 to 140 mm , when measuring readings first with the pedal pressed and then with the pedal released. The maximum value that is allowed when measuring such indicators is 160 mm , and if they exceed these values, then this will mean severe wear of the friction linings, and therefore, after adjusting it, the clutch itself may soon need to be replaced.
We measure the result along the bottom edge of the pedal - in the photo the result is normal.
Let's sum it up
It is not difficult to adjust the free amplitude of the clutch pedal yourself. This requires minimal skills and a set of tools. For more information, we recommend that you refer to the operating instructions. It indicates the optimal parameters for full and free pedal travel. A well-adjusted clutch makes it possible to drive the car safely and comfortably. Gear shifts occur smoothly, without sudden movements or jerks. In addition, the car moves smoothly even at low speeds, which leads to less wear on the clutch.
| Tweet |
The principle of clutch adjustment
If, after a preliminary check, you have determined that the clutch cable needs adjustment (that is, tightening - approx.), then do not be alarmed, since the process of such work is not complicated and will not require any additional effort.
Clutch cable tension is adjusted by tightening it under the hood
Such a process consists of simply changing the length of the cable and its sheath from the adjustment unit, due to which its indicators can change both to the smallest and greatest extent.
As you might have guessed, if the length of the cable is reduced, then the pedal stroke will be less, the same applies to increasing the stroke, all that remains is to achieve those cherished pedal stroke indicators of 12.5 centimeters.