Almost every driver has encountered such a problem as lack of space in the trunk of a car. And this applies not only to connoisseurs of outdoor activities who regularly go outdoors and take bicycles, tents and household items with them. In everyday life, the problem of transporting large items from place to place often arises.
A good option for solving such problems would be additional cargo space on the roof. If the manufacturer does not include this element in the standard configuration of the car, a do-it-yourself car roof rack will be a good alternative. This is a removable design that can be easily mounted on a car and just as easily removed.
Why do you need a roof rack on a car?
A roof rack will definitely come in handy if you:
- started renovations and transport building materials yourself;
- moving, transporting a large number of things;
- are interested in active recreation, be it cycling, snowboarding, skiing, fishing, hunting, hiking, etc.
Trunk rail - a minimalist solution for avid travelers
Manufacturers
The most common manufacturers of such products on the domestic market are:
- NEKON company has been professionally manufacturing various types of products for extreme recreation for several years. The expedition rack from this manufacturer is distinguished by consistently high quality and good performance characteristics. The average cost of a trunk is about 15,000 rubles;
- Eurodetal is another popular manufacturer of luggage racks. It is no less popular due to its very reliable and practical products. The cost of the kit is about 13,000 rubles.
International NIVA Club
26 Feb 2010, 16:30
Suicide: If you find thin-walled pipes, then one of them.. Mona.. if you don’t find it, then don’t.. it will be very heavy.
Universal car trunk
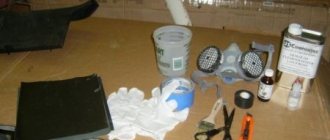
It is better for an inexperienced craftsman to start with making the simplest type of trunk. In fact, there are two crossbars to be made. For this you will need:
- metal profile, for example, with dimensions of 20X30 mm and a wall thickness of 1.5–2.0 mm (ideally aluminum, since it is lighter);
- clamps for muffler - 4 pieces. With their help, the trunk will be attached to the roof (if there are roof rails);
- polyurethane foam;
- grinding machine;
- fiberglass with a density of 300 g/m2. m.;
- dye.
Step-by-step production
To make a trunk in accordance with the parameters of the car and securely attach it to the roof, follow the algorithm below:
- First, we cut the crossbars. The length of the crossbars must correspond to the width of the car body.
- We cover the crossbars with foam both inside and outside. The layer should be quite dense: this will allow the crossbars to be given the required shape at the next stage.
- After the foam has dried, grind it off using a sanding machine. At the first stage, we give the profile the shape of a regular parallelepiped, and then we make design changes in order to improve aerodynamics, in particular, we grind down the corners.
- Since the foam has a loose structure, the crossbars can be additionally covered with car putty - this will make their surface smoother.
- We wrap the crossbars with fiberglass cloth in three layers.
- Paint the crossbars and wait for them to dry.
- At this time we will start making fasteners. In our case, we decided to take the path of least resistance and use muffler clamps. They need to be prepared - file the bottom of the clamp to create an even plate for a tighter fit.
- We drill holes in the cross members. There should be two symmetrically located holes on each side. The distance between them should coincide with the “ears” of the clamp.
- We attach the crossbars to the rails. To avoid damaging the crossbars with clamps, rubber gaskets can be placed at the points of their contact.
Video: features of fastening the structure to the Oka car
How to secure it?
The option for installing the trunk directly depends on the car model and roof design features.
On the roofs of “classics” of domestic manufacturers, as well as on old foreign cars, a longitudinal drain is provided, which is used to secure the trunk.
For this type of installation, metal stops with a clamp are made or purchased. This design feature of the car roof makes it possible to fix luggage racks of different designs and dimensions.
For modern models with longitudinal rails, you can use ready-made clamps to attach the muffler or make a clamp yourself.
To do this, a metal sheet is selected and bent according to size. Holes are drilled in it for screw fastening to the trunk.
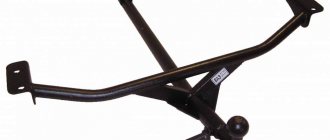
Expeditionary trunk type "basket"
The technology for manufacturing an expeditionary trunk will be much more complicated. In this case, you will need to first draw up a drawing. In addition, you cannot do without a welding machine and the ability to handle metal.
Mesh base - a practical solution for expedition luggage
Construction drawing
Let's take a homemade trunk for a Chevrolet Niva as an example. The length of the trunk will be 163 cm, width - 123 cm. To make an expedition trunk, you will need a metal profile 15X15 (approx. 9 linear meters), 20X20 (approx. 7 linear meters), 25X25 (approx. 7 linear meters) and 30X20 (approx. 6 p.m.).
It’s quite possible to make an expedition rack for Niva using this drawing yourself
Sequence of actions of the wizard:
- We start making the trunk from the base: we cook the perimeter. Longitudinal guides are made from profile 30X20, transverse jumpers are made from profile 20X20.
- We weld load-bearing lintels from a 30X20 profile into the perimeter. For them the platform will be attached to the rails.
- We reduce the distance between the load-bearing jumpers by welding additional transverse ones from the 20X20 profile.
- We make an arc that will be located in front in order to improve aerodynamics: we measure 5 cm from the edges of the profile and cut out a triangular sector, after which we bend the profile. We weld the arc on the outside of the perimeter.
- To increase the strength of the structure, we fasten the jumpers together with sections of 15X15 profile. If desired, non-load-bearing lintels can be replaced with metal mesh or stainless steel sheets.
- We make the sides. We cut the profile into pieces 6–10 cm long and weld it to the base. If desired, they can be mounted on a thread - then the sides and the upper part of the trunk can be removed.
- It was the turn of the top crossbar. It should be the same size as the bottom one, but the side crossbars should be slightly shorter, and the posts connecting them to the base should be angled to improve aerodynamics.
- We fasten the trunk in a manner similar to that described above. An important point: to evenly distribute the weight, the expedition rack should be secured to six points.
If the car does not have roof rails, you will have to make the supports yourself from a piece of sheet metal. You can put it on brackets, but to do this you will have to drill into the body.
The expedition trunk has increased functionality compared to a regular trunk. For example, you can attach fog lights to it - just weld the headlight mounting bracket to the inclined connecting element at the front (see point 7).
In addition, it is convenient to carry a shovel in the expedition trunk. It can be secured using a conventional pipe fastener.
Video: fastening the structure to an SUV
Preliminary calculations
Drawing up a drawing of the trunk with your own hands begins with measuring the width and length of the car roof. If you plan to install a complex structure, then before starting work you need to determine the size and weight of the future trunk.
It is also important not to forget about the basics of aerodynamics and design the front end more streamlined. This will reduce air resistance when driving and increase the sound insulation of the trunk.
The drawing itself should consist of the following elements:
- Height of side sides
- Length and width of the trunk bottom
- Length and thickness of power jumpers
- General dimensions of the structure
It should be remembered that when making a trunk yourself, the car enthusiast must understand and accept all possible risks during its subsequent operation.
Roof rack: pros and cons
We have already started talking above about the benefits that roof racks provide to car owners. Now let's look at them in more detail.
Advantages of the design
There are many advantages of a roof rack:
- The most obvious benefit is, of course, the extra space for things. So, on the roof you can easily place three bicycles or everything you need for outdoor recreation - a tent, inflatable boat, fishing equipment, etc. And the capacity of seemingly quite compact boxes can be up to 300–800 liters;
- it becomes possible to transport non-standard, for example, very long loads (such as ladders, boards, pipes, etc.);
- due to the fact that part of the luggage is moved to the roof, it becomes much freer, more comfortable and safer in the cabin;
- Due to the roof rack, the load is distributed more evenly. So, if all the cargo is in the trunk, the car “sags”. This reduces ground clearance and creates a risk of rollover.
Installation
Before installing the trunk, the structure is cleaned and coated with a special coating. To install the Expedition rack, you need to do the following:
- First you need to drill holes in the roof, insert the key there and turn 90 degrees clockwise until it latch. Drilled holes are where fasteners are installed.
- Then the support cover is removed.
- The cam is tightened until the support is installed.
- Next comes the installation of the support. The cushions should be as close to the center of the car as possible.
- For maximum securement, use an L-shaped wrench.
- We insert the rubber gasket into the recess of the arc, then close the top of the arc with a plastic plug.
The work is done. Installing the expedition rack is very simple; in any case, you can buy it in the store. In any case, this installation will make it easier for you on any long trips with a bunch of different things in your own car.
What to choose
Before moving directly to choosing a VAZ roof rack, it is important to clearly understand two points:
- what do you plan to transport;
- what is the mounting system of your car?
Depending on the purpose of transportation, there are:
- Open trunks are suitable for transporting large, bulky or dirty cargo over short distances. They are a rectangular base with fastening elements. They are budget-friendly, but they reduce the aerodynamics of the car and, accordingly, increase fuel consumption.
- Closed trunks - used for frequent long-distance trips and in cases where it is necessary to protect luggage from adverse conditions, moisture, dust, etc. They have the form of baskets or boxes - closed containers. One of the advantages is increased aerodynamics, and the disadvantage is high cost.
- Specialized racks for transporting sports equipment (bicycles, skis, etc.) - narrow functionality. Most often it belongs to the middle price segment. Aerodynamics are reduced due to the specific shape of the load. The installation is noted to be difficult.
Depending on the mounting method, VAZ luggage racks are:
- standard – installed on recesses on the roof, according to the car manufacturer’s instructions;
- roof rails;
- integrated roof rails;
- attached to the doorway - this is how a roof rack is installed on the roof of a VAZ 2112, 2110;
- with mounting on a T-shaped profile;
- with fastening to the drain;
- on magnets - rare, has a relatively low load capacity;
- through the interior (inflatable trunk).
This does not limit the process of selecting a luggage rack. It is important to pay attention to the material of manufacture. You don't have to settle for soft metal car racks. Preference is given to steel types with galvanized coating or high-quality plastic.
Also, consider the manufacturer's reputation. And the option remains to make a VAZ roof rack yourself.
Eurodetail
One of the largest companies in the country for the production of luggage systems is Eurodetal. It has been on the market since 1998. Production is entirely based on the company’s own developments and uses materials only from Russian partners. The assortment is rich, there are luggage racks for almost any modern car.
On the roofs of many representatives of the “ten” class there is a Eurodetal car rack. For VAZ 2110, 2112 there are two options for open-type luggage systems of different materials: steel and aluminum.
The design consists of two rectangular crossbars, a support made of soft material so as not to scratch the car roof, and a mounting kit. Fastening occurs behind the doorway. Installation does not require special skills or specific tools. The price is affordable.
Ant
The Russian brand “Ant” is considered a budget option among car racks. Luggage systems of this brand are produced by. The target audience of the brand is owners of domestic cars, but there are also interesting options for lovers of foreign cars.
“Ant” is distinguished by high-quality materials and is famous for its versatility in fastening options.
For LADA 110, you can install the roof rack using fasteners behind the doorway. The luggage system for VAZ 2110, 2112 consists of a pair of rectangular arches made of steel and coated with plastic, special supports and fasteners. The ease of installation of Ant brand racks is noted.
Homemade trunk
You should not discount the possibility of independently manufacturing a removable roof rack for a VAZ 2112, 2110 car. It is easier for an inexperienced craftsman to start with the easiest option. For work you will need the following materials:
- metal profile, aluminum is more convenient;
- with already installed roof rails, to create a fastening system you will need clamps for the muffler - 4 pieces (if there are no roof rails yet, install them, more on that below);
- polyurethane foam;
- grinding machine;
- fiberglass;
- dye.
Let's move on to production:
- We saw the crossbars. The length of the profiles must correspond to the width of the car body.
- We cover the crossbars on all sides with a dense layer of foam.
- We wait for the polyurethane foam to dry and grind it down with a grinding machine. Then we give the profile the necessary shape - first a regular parallelepiped, then we change it to improve aerodynamics (grind down the corners).
- We wrap the “arcs” in several layers with fiberglass - from 3 layers.
- Let's paint.
- While we wait for it to dry, we make fasteners. We file the clamps from the bottom so that the plate becomes even.
- We drill holes in the crossbars, two on each side (it is clear that they must be symmetrical). A prerequisite is that the space between the holes coincides with the “ears” of the clamp.
- We attach the crossbars to the roof rails.
Using roof rails
There are many options for using roof rails, but the most popular are:
- fixing cargo baskets. A practical device that is characterized by a completely acceptable appearance, good capacity and ease of fastening;
- fixing bike racks. An excellent solution for car enthusiasts who are also avid cyclists. It is distinguished by its reliability and the ability to simultaneously secure several bicycles, which is very convenient when planning a collective bicycle ride;
- magnetic and mechanical fixation. Most often used for transporting snowboards, skis and other similar things.
Etiology of pathology
The etiology of the formation of dislocations in the elbow joint is due to three versions.
Most often, this is:
- an awkward fall on a joint;
- sudden lifting of heavy objects;
- involuntary jerking of the hand (for example, when parents intuitively try to keep the child from falling).
Formation of dislocation of joint bones due to indirect impact on the articular block. In this case, the force of the impact is taken by the head of the radius or ulna, for example, an unsuccessful landing or a consequence of an accident in an accident.
The manifestation of pathology as a consequence of the presence of congenital anomalies of the osteochondral structure, or as a consequence of joint destruction caused by the presence of inflammatory joint diseases in the patient (arthrosis, arthritis), leading to musculoskeletal deformities.
With the development of these diseases, pathological changes in the joints may well provoke the manifestation of spontaneous (permanent) dislocations, and with partial articular displacement in the elbow joint block.
Bottom line
Assembling the trunk is easy and you can complete the job in two days. A homemade trunk with rails is suitable for transporting things on tourist trips. It is indispensable when delivering goods to the country. You can use the trunk to transport your bicycle to the dacha; in winter, you can transport skis on it. In the summer, summer residents will bring building materials to the site. All things will be safe.
If you have not yet decided whether to make a trunk, weigh the pros and cons, then make a decision. This is a useful design, and quite simple to make.
- Next Do-it-yourself trailer for a passenger car: do it step by step
- Back Wireless rear view camera with monitor: how to choose a useful assistant
- Aug 6, 2019
- Aug 5, 2019
- Hyundai crossovers / News
Aug 5, 2019
- Aug 3, 2019
- Legislation / Taxes and fines
Aug 2, 2019
- Aug 1, 2019
- April 13, 2019
- March 12, 2019
- Feb 17, 2019
- April 11, 2019
- July 27, 2017
How to install
To attach the trunk to a VAZ 2110 car, it is not necessary to visit a car service center. You can install the roof rack yourself. Procedure:
- We install supports for further installation of transverse arches. It is important to check that the support fits onto the seal. Otherwise, there is a risk of damaging the car's paintwork.
- Pull out the control knob. Carefully holding the support, turn the adjuster until the structure fits tightly to the machine. Do not overdo it so as not to deform the beam. We repeat this procedure with another support.
- We check the geometry: it is necessary to secure the supports evenly. We monitor whether they lie tightly.
- We install the cross members and check the geometry again.
- We fix the box, mesh or other structure.
Fastening to gutters
Installing a roof rack on a VAZ 2110 using mounts for gutters is the most common type of fastener, typical mainly for domestic cars. Advantages:
- many options for trunk position;
- the ability to install several pairs of rack racks;
- the presence of a special type of luggage installations - baskets;
- versatility - suitable for almost all cars of the VAZ family.
Fastening to the doorway
Unlike the previous one, this mounting option is typical for foreign cars. But the installation of a trunk on a VAZ 2110 often occurs due to clamps behind the doorway.
The car trunk is secured thanks to profiled side bends. Fasteners are placed there, and the required level of structural stability is achieved due to the tightening device at the base of the trunk itself.
The advantages of this fastening system:
- versatility - suitable for most models;
- safety – high protection against removal.
Installation of roof rails
Most versions of car racks on the roof of a VAZ 2110 or 2112 can be installed without the use of roof rails. This design itself can play the role of a kind of trunk. Therefore, consider installing it. Before you take action, keep two things in mind:
- It makes sense to install roof rails only if they are permanently on the roof of the car;
- It is recommended to entrust the installation work to professionals.
If it is not possible to entrust the installation of roof rails to specialists, you can follow the instructions:
- Preparation: thoroughly clean the roof from dirt, degrease the surface of the body, remove the ceiling trim in the cabin.
- We drill holes in the body. It is important to clearly calculate the mounting locations for the roof rails.
- We prepare the reinforcing plates. Any metal will do, thickness – 2 mm. We bend the plates to the shape of the tens of ceilings and fasten them with glue.
- We install roof rails.
When installing, take into account:
- the first load can be transported on rails within a day from the moment of installation;
- regularly check how tightly the roof rails fit the car body;
- it is important to distribute luggage evenly throughout the installation;
- Do not exceed the load capacity of the roof rails.
The problem of lack of trunk space in the VAZ 2110 is easily solved. The main thing is to be able to choose a universal car rack, taking into account possible factors - from the purpose and frequency of cargo transportation to the type of fasteners.
Installing a trunk on the lid of a VAZ 2112
, 2111, 2110
Of course, there is no need to explain why the car has roof rack This device makes it possible to increase the volume of transported cargo. For example, if you are planning an active holiday, then it is impossible to install skis or sleds in the cabin, in which case roof rack But, if this car trunk is heavily fixed, it can be more than just bad.
In this case, you must always correctly and securely install the roof rack on the VAZ 2112
, 2111, 2110. First you need to purchase the rack you want. When choosing a roof rack, you need to carefully calculate the weight of the cargo that will be transported. It is very important to know what is made of galvanized steel. The plastic covering can be left on. There is no need to buy a trunk that is made of very soft material.
Such racks will soon lose their operational capabilities as they are thrown away. Under no circumstances can you buy these racks during assembly that you need to use some special tools. When luggage is purchased for VAZ 2112 , 2111, 2110, you need to take into account that there are no gaps on the roof for draining water, in which case it will be necessary to install a luggage rack
to the edge of the roof. First, you need to fix the two cross beams. To avoid damage to guests during installation. There is a possibility that the paint will damage the car's paint.
Recommendations for use
For long-term and successful operation of a self-made trunk, the product must be periodically cleaned of road debris, sanded and repainted. Having chosen metal pipes as the material, the decorative protective coating should protect the product from corrosive processes.
Also, in order for the trunk to last a long time, it is important not to overload it, but when filling it, carefully distribute the weight of the luggage over the entire area of the structure.
Post Views: 73
Fastening the crossbars
To attach the crossbars to the rails, holes must be made in them. Measure them symmetrically on both sides, taking into account the holes in the mounting plates. Drill carefully. Place the trunk tightly on the roof rails. If there is no tight fit somewhere, you can use rubber gaskets. Securely secure with bolts and nuts. It is also necessary to remember about safety precautions. The car roof cannot be loaded with more than 70 kg.
Sources used:
- https://svoimirykamiinfo.ru/bagazhnik-svoimi-rukami/
- https://mytopgear.ru/interesting/soachwork/kak-svoimi-rukami-sdelat-bagazhnik-na-kryishu-avtomobilya/