Perhaps one of the simplest procedures is adjusting the clutch on the VAZ 2110 and 2112. Anyone, even a novice driver, can do it. This may be necessary when working on removing the gearbox, as well as when the clutch drive malfunctions. Typically, this means increased wear on the friction disc. It is advisable to familiarize yourself with the features of the clutch drive on this car model before carrying out work. This way you can make diagnostics and settings much easier for yourself. Even for a beginner, the process takes a minimal amount of time, so there is no point in visiting a car service center for this.
Do-it-yourself clutch adjustment on a VAZ 2110
During the operation of the car, a situation may arise in which the owner of a VAZ 2110 will need to adjust the clutch. It must be said that this procedure is not difficult to perform and even a beginner can handle it. Such a need may arise in a situation when the clutch drive begins to malfunction. This can occur when the friction disc is severely worn. Before performing work, you need to have an idea of how the clutch operates on this particular car model. If you study this thoroughly, then it is quite possible to adjust the VAZ 2110 clutch with your own hands. In this case, there is no need to visit a car service center.
Features of changing the clutch pedal travel
So, it is worth noting that when changing the travel of the clutch pedal, a huge threat can loom, which in turn leads to an emergency situation on the road. To adjust the clutch pedal, which will take the driver very little time, you will need only two simple devices, in this case it is worth doing a little jewelry work. This process can be carried out in the same way as on new and old car models. This family of domestic cars includes a huge number of similar parts that could be used in different series of this brand for many years.
The clutch adjustment process is necessary when replacing a disc with friction linings.
The main signal that indicates that adjustment is necessary is an increase in the free play of the clutch pedal; it is this parameter that can push the driver to take certain actions. This problem can be determined very simply, since the pedal will rise slowly.
Do-it-yourself clutch adjustment on a VAZ 2110
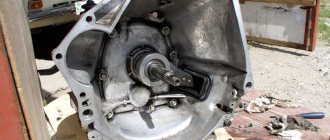
The design of the clutch mechanism of injection or carburetor “dozens” with 16 valves is absolutely identical to the mechanisms installed on 8-valve cars.
At the same time, the operating principle of the unit is based on the use of a mechanical cable, in contrast to classic machines that use hydraulics. The main advantage of the system is the ease of adjustment and repair. To perform the operation, you do not need to drive the car onto stands or an inspection pit - all manipulations are performed at the top of the engine. Precise calibration consists of tightening the drive cable and setting the required pedal position.
Detailed instructions on how to set up the VAZ 2110 clutch are below.
You can also watch how the procedure is performed in the video:
How to adjust the clutch cable
Before repairing, you must prepare the necessary tools. For this you will need:
- ruler;
- WD40 or similar product;
- clean rags;
- head No. 10;
- two open-end wrenches number 13.
The further sequence of actions looks like this.
- Using head No. 10, unscrew the air filter mounts to facilitate access to the required unit.
Remove the air supply housing.
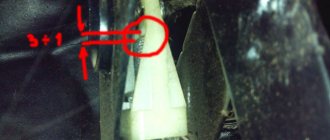
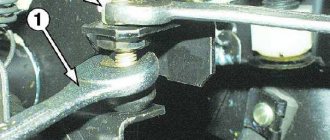
The required part is located directly below the element. Lift up the rubber boot to release the nuts. Using keys No. 13, loosen the locknut securing the cable to the release bearing fork. Next, you need to scroll the thrust element to achieve the required pedal position.
After an approximate adjustment, you need to get into the car and press the pedal all the way 3-4 times. Check the height of the pad from the floor.
If the results are satisfactory, tighten the cable in the reverse order and return the boot to its place. If the factory parameters are violated, the adjustment procedure must be repeated.
In this case, if you tighten the cable, the pedal will rise up, and when loosened, it will go down.
How to properly adjust the clutch pedal
The manufacturer's manual states that the required height of the lever is in the range from 12 to 16 cm. In this case, the most efficient operation of the mechanism is achieved. If there is a violation in the installation height, it is necessary to calibrate the mechanism.
You can set the required gap like this.
- The car is put into neutral and the engine is turned off.
- The driver's mat is removed.
- A ruler or other measuring instrument is applied perpendicular to the lever to the pedal.
- The height of the lining position is measured.
If there is a result on the ruler that goes beyond 12-16 cm, urgent adjustment is required. The required position is established by tightening or loosening the clutch cable. When unscrewing the nuts, the lever rises, and after tightening it lowers. In this case, when adjusting the tension, it is necessary to press the clutch all the way and measure the position of the lever with a ruler.
This procedure indicates the standard setting recommended by the manufacturer. However, experienced motorists know a way to lower the clutch to an acceptable position for each user.
- Start the engine and squeeze out the clutch.
- Without releasing the pedal, engage the rear position of the gearbox.
- Smoothly raise your leg and simultaneously turn on your back leg. At the moment the pressure bearing is activated, the rocker handle will begin to vibrate.
- With “conveyor” tattooing, the moment of operation is 70-95 mm from the floors.
- For convenience, it is recommended to reduce the threshold to 2-3 cm from the mat by tightening the cable.
After performing this procedure, the lever clutch will be much lower than the “stock” position, which has a positive effect on driving comfort.
VAZ 2110 clutch diagnostics: signs of malfunction, parameters
General diagram of a mechanical clutch drive
In the case when we find difficulties with engaging gears, the box itself is extremely rarely the culprit of the problem. As a rule, the first thing to check is the clutch. On old VAZ models, the clutch release drive was hydraulic and there were practically no problems with it. A manual drive on modern budget cars brings unpleasant surprises much more often. However, difficult gear shifting may be associated not only with the drive:
- release bearing wear;
- wear of the friction linings of the driven disk;
- oiling of clutch friction linings;
- mechanical damage to the working surface of the crankshaft flywheel;
- deformation or breakage of the release bearing drive fork;
- incorrect installation of the driven disk;
- destruction of the membrane plates of the clutch basket.
Clutch device VAZ 2110
All this can easily cause difficult gear shifting, slipping, or lead to the clutch starting to “drive.” However, practice shows that it is the cable drive that often leads to problems with gear engagement. This is the easiest way to check, since there is no need to remove the gearbox and all drive elements in plain sight.
How to check the clutch of a VAZ 2110 correctly
At the same time, you need to understand that problems are not always associated with breakdowns. Elementary natural wear of the friction linings will cause the clutch to slip and the gears to not engage clearly. This becomes especially noticeable when starting from a stop or when engaging reverse gear, and also while moving, difficulties will arise when shifting. It is not at all necessary to immediately think about replacing the clutch or driven disc. With a high mileage after repair, 100-120 thousand - yes. The average clutch life of a VAZ 2110, according to owners' reviews, is 50-70 thousand; of course, its mileage depends on driving style. But the clutch cable can die after 10-12 thousand mileage, depending on the quality.
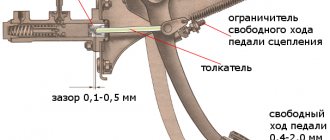
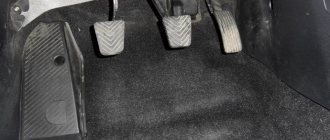
The free play of the clutch pedal A on a VAZ 2110 should not exceed 5 mm
Therefore, self-diagnosis will not hurt every 7-12 thousand km. AvtoVAZ has established standard indicators by which one can judge the condition of the entire unit and, in particular, the drive. The main indicators that you need to take a closer look at are, of course, the behavior of the car when starting from a stop, the smoothness and precision of gear shifting. The factory recommends observing the following values for free play and clutch pedal play:
- The maximum pedal stroke should not exceed 160 mm.
- Normal working full stroke is 120 mm.
- The free play of the clutch pedal, play, should not exceed 5 mm.
Clutch drive VAZ 2110
These parameters are measured simply using a ruler or tape measure, and if they do not correspond to the nominal values, we proceed to adjustment.
Measuring the free and working travel of the pedal
Eventually
In conclusion, it should be noted that there are some “homemade” ones who specifically move the release bearing away from the basket, explaining their actions by the fact that in this way they will be able to extend its service life. However, they will have to be disappointed - the bearing is unlikely to become more durable, but the petals of the diaphragm spring will gradually be milled by the untwisted bearing race. And, please note, we are not discussing the discomfort from increased pedal travel, which can result in much greater expenses than purchasing clutch elements.
Adjustment sequence
First, you need to accurately measure the distance between the pedal and the floor mat (the bottom of the car). To perform this task, a regular ruler will do. The measuring tool must be positioned so that its angle of inclination is 90 degrees. For VAZ-2110 models, the acceptable value is 120-130 mm. As wear occurs, the pedal travel increases by several centimeters. The permissible maximum value is 160 mm; if the distance exceeds this value, adjustment is urgently necessary.
To set the value to 12-13 cm, you need to turn the adjusting nut. This segment works as follows: when screwing the nut onto the tip, the distance of the pedal from the floor increases. If the nut is tightened, the stroke of the control lever decreases. Turn the adjusting nut with a rotating motion until you reach the desired value. Finally, you must tighten the control nut, otherwise the first time you press the pedal, all settings will be lost.
After completing the above operations, you need to check the system. To do this, press the clutch pedal to the floor. Repeat this action several times. Then measure the distance from the floor to the pedal. If the adjustment was performed correctly, the distance should be 12-13 cm.
If the indicators do not meet technical standards, repeat the adjustment operations, and also carefully check the condition of all segments. The problem may be the failure of certain parts or fasteners.
Malfunctions and reasons for their occurrence
But this type of drive is also not eternal and problems with it will only be a matter of time.
Over time, the cable threads corrode and break, which is why at one point when you press the clutch pedal, it remains in the depressed position and does not return to its original position.
For the same reason, it happens that pressing the pedal and returning it is difficult, and a grinding noise can be heard. This is a consequence of the “fluffing” of the cable - rotted metal threads rest against the braid, significantly complicating movement.
All these malfunctions occur for one simple reason - moisture gets inside the braid, which leads to corrosion.
And although manufacturers are trying to combat this problem by applying a polyethylene protective layer over the cable, such measures can only extend the service life.
And here, too, everything is simple - while moving, the cable rubs against the braid and over time the protective layer wears off. Lubricating the cable also provides only temporary protection.
Corrosion is not necessarily the cause of the burst. Very sharp squeezing of the pedal, for example, during a difficult traffic situation when the driver kicks it with all his might, can also lead to destruction of the cable.
In any case, if problems arise with the drive, the cable must be replaced, since it cannot be repaired.
Note that the cause of the failure of the clutch pedal can be not only the cable, therefore, if such a malfunction occurs, first of all you need to make sure that the drive has broken.
The fact is that there are cases when the clutch release bearing control mechanism breaks, which is a much worse problem than the destruction of the cable. After all, in case of such a malfunction, you will have to remove the gearbox from the car in order to repair the mechanism.
But a cable break is a malfunction that can be very easily eliminated if you have a spare element.
And since such a problem on a VAZ can appear at any time, it is recommended to always carry a new cable with you in the trunk.
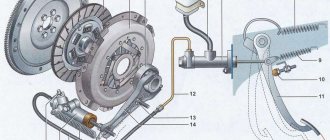
Clutch release bearing: principle of operation, symptoms of malfunction
Nowadays, clutch mechanisms with 2 disks are very popular - the main one, which rigidly engages with the crankshaft, and the secondary one, which transmits torque to the gearbox. To change gears or put the car into idle mode, you need to disconnect the clutch discs, which is done by the release bearing, which pulls the secondary disc away from the main one.
Where is the release bearing located?
This is an important part of the clutch mechanism and another highly vulnerable part. The clutch release bearing is in a quiet state when the car is moving and is activated when changing gears. The malfunction of this small spare part will not allow you to continue using the machine, so you need to change the bearing as soon as there are clear signs of its failure.
The cost of the part is from 300 to 1500 or more rubles. It all depends on the company and brand of the car. Changing a bearing at a station will cost 3-7 thousand rubles, so if you have the desire, opportunity and a good set of tools for the machine, you can do it yourself and economically.
Types of release bearings
Today, two types of release bearings are widespread:
- With rollers or balls - mechanical units that transmit force to the bearing through a rather rigid linkage of rods.
- On hydraulics - here the force is made by hydraulics, so it is much easier to depress the clutch pedal.
Hydraulic release bearing
Roller release bearing
Mechanism of action
The function of the bearing is to connect and disengage the clutch when the pedal is pressed inside the car. The mechanism of operation of the part is very simple:
- The drive disk is brought to the flywheel by the pressure disk, and this is how the clutch occurs.
- The pressure on the pressure disk is provided by the diaphragm spring on the petals inside it and the clutch release bearing acts.
- The bearing moves, the discs move apart, which provides traction with the fork.
Release bearing in a car clutch mechanism
Causes and symptoms of release bearing failure
The reason for the malfunction of this part is unequal loads on it when the clutch is pressed and it is sent back together with the main disk. If there is such a reason, then we strongly advise against holding the clutch pedal a lot when the gear is engaged. In general, this part is reliable and durable, and it often breaks due to inexperienced drivers.
The first sign of a worn bearing is when a slight knocking noise occurs when you depress the clutch pedal. If it sounds in the summer, then this indicates inevitable problems; if it appears in winter, then perhaps the linear dimensions of the bearing cup have simply changed due to a drop in temperature. The release bearing in many cars has a big advantage - high strength, so if there is noise, you can still drive the car and see if it has become stronger.
Method for checking the release bearing
The clutch release bearing is checked by listening, when you press the pedal in working condition (while rotating). It all depends on the stage and nature of the wear (there was little lubrication, or wear and tear began), the sound will be different, either buzzing or noise can be produced, or other sounds can be heard from the box. But do not confuse these sounds with those that occur when the clutch pedal is pressed all the way, as this symptom will indicate the bearing of the first shaft.
Replacing the clutch release bearing
If you still need to change the bearing, you need to do everything in this order:
- dismantle the gearbox;
- disconnect the ends of the spring fixing element from the coupling;
- remove the bearing directions from the bushing;
- disconnect the spring holder;
- Remove the bearing from the coupling and install a new part.
A new bearing should make rotational movements very easily; there should not be even a small amount of interference or play.
Before installing the part on the direction bushing, their sides must be well lubricated with grease.
In the end, it should be added that release bearings can last up to 150 thousand km without malfunctions. driving, but they often need to be changed every 50 thousand km. due to incorrect actions of car owners and bad roads that destroy the car, in particular the clutch.
Rain is a joy for us. Test drive of Viatti Bosco H/T V-238 SUV tires
See all photo news >>
Reasoning about alternative regulation
Before adjusting the clutch on a VAZ 2110 in the traditional way, let’s think about how justified it is, and whether there is any point in using an alternative option. According to reviews from many owners of “ten” cars, and not only them, the clutch control pedal is quite high from the floor. The inconvenience that most drivers get used to is actually quite significant.
The driver gets tired during the trip, he wants to change gears less and less, each time lifting a heavy boot. This affects not only the speed of movement, but also the condition of the transmission. Experienced drivers assure: when the clutch pedal is released, it should be positioned so that it can be depressed without lifting the heel from the floor. It’s not without reason that on UAZs and Gazelles, where adjustment is impossible, experienced drivers place a piece of board under the mat.
The classic adjustment order indicates data that ensures the clutch disengages with a large margin. As a result, by fully depressing the pedal, the driver forces the bearing to bend the diaphragm spring much more than is technically necessary. As a result, it loses its characteristic properties, and at critical moments it simply breaks
And it doesn’t matter that you chose a branded clutch kit to replace - everything is subject to the laws of physics
Method for alternative clutch drive tuning
Experienced car enthusiasts prefer to make adjustments individually for each set of coupling parts. The event does not require an assistant or special equipment:
- Start the engine, depress the clutch and engage reverse gear. On almost all VAZ models it does not have a synchronizer, so the disks are completely disconnected.
- Slowly release the pedal and simultaneously engage and disengage reverse gear.
- The moment the speed is switched on is manifested by vibration on the shift knob. If the setting was made according to the official factory instructions, then the start of activation will correspond to a distance of the pedal from the floor of 75-100 mm.
- Set the cable length so that the “grasping” moment corresponds to 20 mm from the floor to the top edge of the pedal.
After we adjusted the clutch on a VAZ 2110 in this way, the clutch pedal in the initial position is much lower than the brake pedal. This allows you to instantly switch the toe of the boot without raising your foot to the handlebars. Early activation greatly simplifies the process of driving a car; gears are engaged smoothly and without jerking.
In conclusion, it should be noted that there are some “homemade” ones who specifically move the release bearing away from the basket, explaining their actions by the fact that in this way they will be able to extend its service life. However, they will have to be disappointed - the bearing is unlikely to become more durable, but the petals of the diaphragm spring will gradually be milled by the untwisted bearing race. And, please note, we are not discussing the discomfort from increased pedal travel, which can result in much greater expenses than purchasing clutch elements.
Two methods: how to adjust the clutch drive of a Lada 2110 car yourself?
Assessing the advantages and disadvantages of their cars, owners are increasingly talking about the engine and suspension. Much less often in such conversations you can hear about the gear shift mechanism. The reason for this unpopularity is that the lack or reserve power of the power unit reminds itself regularly, and the driver quickly gets used to the controls. However, it is impossible to do without periodic adjustment of the friction clutch control during operation.
When do you need to adjust the clutch drive on the “ten”?
Car enthusiasts who already know how to adjust the clutch on a VAZ 2110 can promptly diagnose the condition of the unit. They are helped in this by having experience and knowledge; they do not need any consultations at a car service center. For example, no one will argue that replacing a clutch cable requires subsequent adjustments. Before you take a ruler to measure pedal travel, you need to pay attention to the behavior of the car:
- Jerks and impacts, as well as noise when turning on the speeds, indicate the need to adjust the drive.
- The start of the vehicle movement immediately after releasing the pedal indicates a lack of free play.
- In the case when the car does not move even with the clutch pedal fully released, the free play exceeds the norm.
How to check pedal travel?
Clear signs of trouble require a performance check of the clutch control pedal. The procedure is simple, does not require special skills and is described in detail in the instruction manual. So, before adjusting the clutch on a VAZ 2110, we perform the following steps:
- Place a ruler perpendicular to the outer edge of the pedal, resting it on the floor.
- Determine the distance from the floor to the outside of the pedal.
- The acceptable distance is considered to be 120-160 mm ; if the readings are outside the norms, adjustment of the drive is required.
Clutch adjustment on VAZ 2110 and 2112. In principle, nothing complicated
Clutch adjustment on VAZ 2110 and 2112
. done without much effort. This is due to the characteristics of the drive. Here it is cable-based, which helps to avoid additional work on bleeding the clutch and checking various additional indicators. The cable is located in a protective casing and is attached at one end to the pedal, and at the other end to the clutch fork using a swivel joint. If the discs are worn out, the pedal travel increases. Wear of the cable (pulling) leads to a decrease in stroke, or incomplete engagement/disengagement of the clutch.
For this procedure you will need the following tools:
- 2 keys for 13;
- Ruler.
Just in case, you need to stock up on rust converter. To carry out this work you do not need an inspection hole; all actions are carried out from the engine compartment. This makes the job much easier.
The clutch cable is located under the corresponding pedal and goes to the fork located on the gearbox. Finding it is not a problem, even for an inexperienced car enthusiast. The need for adjustment is determined by the pedal travel. Ideally, it should be within 12-13 cm, it can be increased to 16 cm. That is, the pedal stroke can vary from 12 to 16 centimeters; for any deviations, adjustments must be made. This is done as follows:
- If the pedal is raised by more than 16 centimeters, it is necessary to make an adjustment;
- To do this, open the hood and find the clutch cable. We are interested in the nuts located on it. It is advisable to treat them with WD-40 and let them stand for 5-10 minutes, this will avoid problems with unscrewing them;
- We are setting up. To do this, unscrew the lock nut with one of the keys, and use the other to make adjustments. By screwing the adjusting nut towards the tip, the pedal stroke increases; by unscrewing it in the opposite direction, the indicator is reduced. At the same time, do not forget to measure the progress in the cabin;
- When you move the pedal 13 centimeters, you should sharply press it 3-5 times. After which, the measurement is repeated. If the move goes wrong, you need to repeat the setup procedure;
- The last step is to move the rubber bushing until it stops.
When taking measurements, you can make an allowance of a couple of millimeters. If its stroke is more than 17 centimeters, then you need to think about repairing the basket, or rather, replacing the clutch disc.
Often during adjustment it turns out that the problem is a worn cable. In this case, you will have to replace it. Traveling with a faulty cable can lead to clutch failure while traveling, which can lead to an emergency. Replacement is carried out in the following order:
- Using open-end wrenches 19, slightly loosen the nut securing the cable to the bracket;
- The cable is carefully removed from the bracket;
- Disconnect it from the clutch fork; to do this, you just need to pull the cable through the hole;
- To disconnect the cable from the pedal, you must remove the windshield trim. It is also better to remove the engine compartment trim;
- Using a Phillips screwdriver, remove the cover protecting the clutch pedal;
- Use a slotted screwdriver to remove the lock washer and remove the pedal;
- The cable is disconnected from it; simply move it to the side;
- In the cabin, unscrew the 8 nut securing the upper part of the cable casing. The cable is removed into the cabin through a hole;
- Assembly is carried out in reverse order. It is advisable to lubricate all screwing parts, as well as the cable lead, for example, with lithol.
After installation, the clutch must be adjusted. This work is carried out exactly as described above.
Conclusion
. The clutch is one of the most frequently used systems in a car. Therefore, the wear of its parts is quite logical. To compensate for this, the clutch on the VAZ 2110 and 2112 must be adjusted periodically. In general, this work is simple and does not require any special skills. In some cases this does not help, and the drive cable has to be replaced.
- Clutch adjustment on VAZ 2106 and 2107. Doing everything right
- Replacing the clutch master cylinder for Ford Focus 2. We service the American
- All about adjusting the clutch on the VAZ 2114. Repair and operation
- Has the clutch pedal failed on a VAZ 2110? Easily solved
8 valve engine
As you can see from the picture, the 8-valve engine has only one camshaft, which controls both the intake and exhaust systems.
In more detail, there are 2 valves for each cylinder, one opens when the air-fuel mixture is supplied to the cylinder, and the second when it is necessary to get rid of exhaust gases after combustion of the mixture.
The camshaft has tapered projections called cams. When the engine is running, the camshaft rotates and presses on the valves with cams in a certain order. Thus, in each cylinder it opens either an intake valve or an exhaust valve.
Since the engines mostly have 4 cylinders, we get a 4 x 2 = 8 valve engine. Of course, there are cars with 6 and 8 cylinders, but also with 2 valves per cylinder, but such engines are extremely rare.
pros
Simplicity.
8-valve engines are much simpler in design than 16-valve engines. This simplicity (roughly speaking) lies in the fact that in such an engine there are 2 times fewer parts, and, accordingly, repairs and spare parts. parts (such as camshafts, valves, and everything connected with it) will be 2 times cheaper.
- There are no hydraulic compensators.
Another simplifying feature of the “octlop”. Accordingly, the mechanism and adjustment of valve movement will be just as simpler and cheaper than the 16-valve analogue. - “Stickless” pistons.
Most 8-valve engines have “stickless” pistons. This means that if your timing belt breaks, you will not get into trouble and nothing will be bent. You just install a new belt, set the marks, and you can safely drive on. - Unpretentiousness.
8-valve engines are less demanding on the quality of oil and fuel. Yes, you can fill in semi-synthetic and 92 gasoline, but as they say, this is not for everyone, or if your conscience allows
- Dimensions.
Since there is only one camshaft, there is more free space under the hood.
Minuses
- Power.
The octagon has 2 valves per cylinder, so the engine has to work harder to carry out the intake and exhaust processes. - Fuel consumption.
Everything is the same, due to the smaller number of valves compared to the “gear” one, it is more difficult for the engine to push exhaust gases. After all, it is more difficult to push them out through one valve than through two. - Noisy.
If you put the “gear” and “octagon” side by side, then you will hardly hear the “gear” against the background of the 8-valve engine. This is due to the fact that due to mechanical pushers and the absence of hydraulic compensators, the valves and clearances need to be regularly adjusted, since wear occurs on the pushers.
Method No. 1
This method takes a little longer. However, dismantling elements such as the windshield wiper and frill (this is a decorative panel located under the “arms” of the wipers) will significantly facilitate the process of replacing the cable. So, where do we start? First, you need to remove the windshield wiper with wrenches, and then the plastic trim underneath it.
This way we will release the clutch cable of the 2110 VAZ from the fork. Slide the cover off the cable end and unscrew the nut that secures the end to the bracket on the transmission. Use the second wrench (“19”) to keep the tip from turning. We remove the part from the fasteners. The tip bracket is removed from the studs. Next, unscrew the screw of the protective cover holder. The latter bends slightly to the side. This way we can get to the tip of the clutch cable. Using a screwdriver, remove the locking bracket. Remove the tip. Next we go to the salon.
Here we need to unscrew the bolt with which the cable is attached to the pedal. We dismantle the bushing and inspect its technical condition. If necessary, we make a replacement. Don't forget about lubrication. On a VAZ-2110 car, replacing the clutch cable cannot be done without first treating it with Litol. Assembly is carried out in reverse order.
Replacing the cable
Even if there is no break yet, but there is deformation or a violation of the integrity of the cable, there is definitely no point in postponing the dismantling process.
The whole process can be divided into three main stages:
Preparation
During preparation, we recommend that you not only get ready for work, but also study the operating manual and watch several visual videos. This will give you additional knowledge and understanding of what needs to be done with the clutch system.
Also stock up on the necessary tools:
- 8 wrench;
- Two 17mm wrenches;
- Phillips screwdriver;
- New high-quality clutch cable;
- Lubricants.
Dismantling
Next, you need to remove the old cable, which will allow you to install a new element of the clutch system. The sequence of work will be as follows:
- Remove the windshield wiper from your "ten".
- Loosen the locknut and adjusting nut slightly.
- Remove the rim of the damaged cable from the clutch release fork.
- Slightly move the cover of the lower end of the cable casing using a 17 wrench.
- At the same time, you need to loosen the nut securing the tip to the bracket. The tip must be held with a second key of 17, which will prevent turning.
- Remove the required tip from the bracket.
- The windshield wiper mechanism bracket is held on by 2 nuts that need to be unscrewed. Plus, dismantle the bracket itself directly.
- Do not forget that during reassembly, the bracket must be installed with the inclined part towards the front of the car.
- Now you tighten the screw that secures the protective cover and remove its holder.
- Bend the cover a little, which will allow you to reach the fastening of the cable tip to the pedal responsible for the clutch.
- Using a flathead screwdriver, pry and remove the support bracket from the “finger”, and then remove the cable end from it.
- The next step is to remove the bolt securing the cable holder to the pedal bracket. This way you will finally be able to pull the damaged cable through the interior.
- But that's not all. Remove the bushing from the pedal pin.
- If the bushing is broken or worn out, be sure to replace it with a new one. But keep in mind that the design stipulates that the sleeve is cut. Therefore, this is not a defect that arose during operation, but the manufacturer’s idea.
Installation
The hardest part is probably behind us. But the work cannot be considered complete. Installing a new cable does not involve complex processes, but then you will need to reassemble the entire structure, adjust the clutch and check its operation.
Adjusting the VAZ 2110 clutch with your own hands, the easy way
- When is customization needed?
- Pedal travel
- Adjustment
In this material we will talk about adjusting the clutch on a VAZ 2110 car, define the main situations for carrying out such work, and also tell you about the sequence of performing the work.
When adjustment is needed
You need to send the car to the garage and start adjusting the clutch system of your VAZ 2110 as soon as you notice signs of deviation from the normal operation of the unit.
The clutch greatly affects the performance of the entire car. What can we say, without it you will not be able to engage a single gear. Therefore, you will not be able to go anywhere.
The pedal may be too tight or fall apart at the slightest pressure. Both situations indicate that the clutch needs to be adjusted.
In general, the work is carried out in two stages:
- Clutch travel is checked;
- The setup itself is carried out directly.
But the first thing you should start with is studying the most important tool for repairing all components, assemblies and mechanisms of the VAZ 2110. Of course, we are talking about the instruction manual. Open it at the clutch section, study the main nuances, understand the essence of the unit, its design, operating principle, and then become familiar with the adjustment process.
Now we will talk about two main setup steps.
Pedal travel
This is where the whole process begins. The factory manual states that normal travel is about 13 centimeters.
But over time, the parameter increases as the driven disc lining wears out. This leads to the fact that the pedal rises slightly. Measuring the indicator is not difficult.
- Open the door leading to the driver's seat in the cabin.
- Squat down so you are close to the pedals.
- Place a regular ruler on the mat under the pedal, positioning it perpendicular to the clutch pedal.
- Measure the distance from the mat to the extreme point of the pedal, that is, the maximum distance.
- If the indicator is 16 centimeters or more, this indicates an urgent need for adjustment.
Adjustment
If the situation demands it, we will do it. You don’t have to disassemble anything, because this process can be performed even by a beginner who does not have much experience in car repairs.
The setup process is as follows:
- Arm yourself first with a pair of simple keys for 13.
- Open the hood and locate the clutch cable lug in the engine compartment.
- There is a lock nut on it.
- Using the first wrench, slightly loosen the locknut, and with the second, turn the adjusting nut.
- If you turn it closer to the tip, the total pedal travel will increase, and if you move it in the opposite direction, the pedal travel will decrease.
- Tighten the nut and check how the manipulations affect the clutch pedal inside the cabin.
- Having reached the desired mark of 13 centimeters, sharply press the clutch pedal about 5 times and release. If the distance is less or more than required, repeat the operation.
- Having completed the adjustment, tighten the lock nut back, and therefore slide the rubber stopper sleeve as far as it will go.
With these simple steps you can do the work on your car yourself. But keep in mind that if the cable or other components of the clutch drive show signs of deformation or wear, it is better not to risk it, but to immediately replace them when making adjustments. This will protect you from many problems in the future.
The adjustment cannot be called complicated, so there is no point in going to a service station. Well, unless you have a lot of other things to do and you don’t have time to work on your car.
Malfunctions
Any driver experiences an unpleasant feeling when the clutch pedal sinks to the floor. This can happen if the clutch cable breaks; it is also possible that the release fork breaks (this case is discussed in another article). The cable breaks more often on older cars that are used in extreme conditions or all year round.
The cable may become frayed, which affects the smoothness of the pedal and the operation of the clutch. This cable also requires replacement.
If the clutch cable is broken, you can drive your car to the repair site. You need to start the car in first gear and shift while driving. The following situation is possible: the cable broke while the gear was engaged, and the car stalled.
There is a possibility that it will be difficult to engage the neutral position. Then your car won’t even be able to roll off the roadway. The transmission is disengaged by rocking the car forward and backward and disengaging the transmission at the same time. You can jack up one of the wheels and spin it by hand, this will also help.
Even if the cable is not replaced, gear shifting is possible. It is possible to get to the service station, but such driving has a negative impact on the service life of the gearbox.
The cost of the spare part is low, about 300 rubles. The cost of replacing a cable in a car service is 400 rubles.
Step-by-step instructions for adjusting the VAZ-2110 clutch with your own hands
First, you should measure the distance between the clutch pedal and the mat, placing a ruler against the latter. The normal figure is 12-13 cm, but if it is within 16 cm, adjusting the VAZ-2110 clutch is not yet necessary.
If this indicator is higher, repairs are performed. How to adjust the clutch on a VAZ-2110:
- The car is placed on a level surface with the hand brake applied.
- We are looking for a mount that combines the pedal and the mechanical cable under the hood. At the end of the latter there should be two lock nuts.
- The lock nut located on the lower tip is loosened, after which the second one is tightened until the desired pedal stroke is achieved. Loosening the second locknut increases the stroke, while tightening it, on the contrary, decreases it.
- The clutch pedal is pressed all the way 3-4 times.
- The pedal stroke is re-measured.
- When the desired indicators are achieved, the first locknut is tightened back.
- The rubber bushing moves until it rests against the fork.
You can take a detailed look at a simple clutch adjustment option in this video:
There is nothing complicated in the instructions, since you can adjust the clutch pedal on a VAZ-2110 with your own hands in a garage in no more than 20 minutes. In this case, it is enough to know only the basic principles of the car’s structure in order to carry out all the procedures quickly and correctly.