Replacing the brake pressure regulator
The replacement of the sorcerer on VAZ-2110 cars and other vehicles equipped with an RTD is carried out on an overpass. You need a 13 mm spanner, a powerful screwdriver and a special 10 mm wrench designed for unscrewing brake pipes. Before starting work, the assembly must be cleaned of dirt and rust, doused with WD-40 or another penetrating compound, and then wait half an hour.
Related article: Main signs of a malfunctioning throttle sensor
Work begins by unscrewing the bolt securing the bracket to the spring. Afterwards, the brake pipes are dismantled, the position of which is recommended to be pre-marked.
Be sure to read
Do-it-yourself tube flaring
You can also unscrew the tube fittings with a regular wrench. However, using a special tool makes the job easier and reduces the likelihood of “licking” the edges. After the fittings, unscrew the two bolts securing the sorcerer to the body and remove the part.
It is necessary to install the new VAZ-2110 sorcerer in strict reverse order. After installing it and before adjusting the RTD, you should bleed the rear brake circuits. Next, the above-described procedure for setting up the sorcerer is performed.
Sorcerer repair
In order to repair the brake force regulator, you need to perform a number of actions:
Thanks for subscribing!
- Dismantling. We remove the entire assembly, using wrenches 10 and 13. The brake pipes are unscrewed, the brake fluid is drained and plugs are installed in the pipes. Next, the “sorcerer” body is removed, which is attached to the bottom with two nuts.
- Diagnostics and replacement of “sorcerer” parts. Carefully examine the surface of the “Sorcerer”. If necessary, replace faulty parts (sealing rubber bands) using a repair kit. A soured piston cannot be repaired and requires a complete replacement of the unit.
- Installation of the sorcerer. Reassemble and adjust the part in reverse order and bleed the brake system. Add brake fluid.
Device Description
The design and principle of operation of this element are quite simple. At the moment when the rear part of the car body rises and the distance between the axle and the body increases, a special lever is activated, which is connected in a “sorcerer”. This lever lowers the piston, which closes the brake fluid channel, and accordingly the pressure on the rear pads decreases. The wheels do not stop rotating and, accordingly, do not skid.
The idea itself is quite clever, but, as often happens, in practice it raises doubts. After all, if when braking the brake pedal is pressed with great force, then the front wheels go into skid and the car still begins to skid. Quite often, when observing a traffic accident, you will notice that the cars with the “sorcerer” are turned backwards. Is this related to this miracle detail, which in its essence should prevent this skidding?
Why do you need a brake force regulator?
The function of the regulator is to temporarily reduce the braking force during heavy braking. The fact is that force evenly distributed on the rear and front axles can lead to a skid of the car. If the rear brakes start working a little later and weaker than the front ones, this does not happen.
Based on the above, we can conclude that the sorcerer is an element of the car’s safety system, partly preserving its stability on the road when the brake pedal is pressed in an emergency. On modern models, this function is performed by ABS. That is why there is no need today to use a technically outdated device in production.
How to tighten the handbrake on a Prior? The auto industry breaks down as always - Fix the Car!
If the handbrake on a VAZ-2112 becomes difficult to hold, then you should not change it immediately, since the cable can be adjusted. If the mileage on the car is high, the rear pads on the car may wear out. This may reduce the effectiveness of the handbrake and the entire braking system. In this case, the handbrake cable will need to be tightened.
Handbrake diagram for VAZ-2112
For clarity, here is a diagram of a hand brake
1 - button that fixes the handbrake lever; 2 — hand brake lever; 3 — protective cover; 4 — handbrake rod; 5 — cable equalizer; 6 — adjusting nut; 7 - lock nut; 8 - cable; 9 — protective sheath of the cable.
In this scheme we need element number 6. It is he, and only him!
What is required for adjustment?
In order to adjust the handbrake you need a platform or lift. If there are no such devices, then you can simply hang the rear wheels on the “goats”. They can be installed under the car using a jack. It’s also worth taking two “13” keys and pliers.
Start:
- The car is installed on an overpass or “goats”. Hanging out your butt
- The lever position is set to the lowest possible position. We put the handbrake at the very bottom. Do not pay attention to the scuffs of the console; we conducted an experiment with non-standard armrests. The iron fastenings of the armrest are visible. The photo shows the editorial car
- Use a wrench to loosen the locknut. Adjusting nut
- The second wrench holds the adjusting nut.
- The adjusting nut should be tightened until the cable is tensioned. It must be remembered that the rod should be held with pliers when tensioning the cable. Tighten the adjusting nut
- After this, you should make sure that the full stroke of the handbrake lever is no more than 4 and no less than 2 clicks.
- When the stroke check is completed, the locknut is tightened. The adjustment is held with another key.
- If necessary, change the mechanism to a new one. Everything is rusty, we changed the adjustment mechanism
- After releasing the adjusted lever down, you should spin the rear wheels. When the lever is in its lowest position, the wheels should spin freely.
THIS IS INTERESTING: How to set the ignition of a VAZ 21099
If you cannot tighten the cable, then it should be replaced with a new one.
Adjusting the handbrake after tensioning
After adjusting the brakes, you need to check them again. To do this, the car should be placed on a road with a slope of at least 23%. The car should be in neutral gear in this area and with the handbrake pulled up. If the handbrake brakes hold the car in this area, then the handbrake is adjusted correctly.
What to do when adjustment does not work
There are also cases when the above actions are not enough to adjust the handbrake. This can happen, for example, when the handbrake cable is broken. This happens on the VAZ-2112, although rarely. In such situations, the cable must be replaced. The cable also needs to be replaced when:
- The tips are loose.
- The cable itself begins to stretch, which will lead to its breakage during operation. HAIKU! The old cable is very worn out! For comparison, old and new handbrake cables
- Physical wear (scuffs and cracks) of the handbrake cables. Heavy wear on the handbrake cable
- It is quite difficult for the cable to move in the casing even after lubrication.
This replacement procedure does not require contacting a service station. Although this will require some time and skills from the driver, such work can be done independently.
It should also be remembered that when replacing the cable, certain conditions must be observed. To do this, the driver will need an assistant who will pull the cable.
Why do you tighten the handbrake?
The cable acts here as a drive. If the driver pulls the handbrake lever, then at the same time he uses the cable, which spreads the pads in the rear wheel.
If the handbrake is faulty, you just need to tighten the cable or replace it with a new one. On a VAZ-2112 it’s quite easy to do this with your own hands.
Need for adjustment
You can determine that the parking brake needs adjustment when checking. It is recommended to do it every 30,000 kilometers. This procedure should be done even if the handbrake seems to be working well.
The device must also be checked in cases where it does not work. For example, a car moves when the brake lever is applied.
Replacing the sorcerer with a tee
It is no secret that the reliability of the brake force regulator leaves much to be desired, causes many complaints from car owners, and many dream of getting rid of it. The most risky and confident drivers install a tee. You see him in the picture. This device is simpler than the sorcerer, less likely to leak. However, the distribution of braking forces does not occur, and the braking of the rear and front wheels occurs simultaneously.
Pros and cons of installing a tee
| Pros of installing a tee | Disadvantages of installing a tee |
| The brakes become more rigid and at the same time obedient | In winter conditions, the risk of skidding increases if the rear wheels are locked with brake pads before the front ones. |
| Service life increases | Braking becomes dangerous, especially in winter |
| The cost of a tee is less, the prices of a sorcerer | If the front hose ruptures, which happens quite often when a tee is installed, the brakes completely fail. Even the parking brake is a poor help in this case. |
You, of course, can use this scheme and “upgrade” the brake system in your car, but it will be much safer to monitor the condition of this system and, in particular, the sorcerer, and carry out preventive cleaning of this device more often. Then it will last longer.
There is an opinion that the tee is installed not instead of the sorcerer, but after it, and then this device will protect the force regulator.
Setting up the brake force regulator: “The Sorcerer” carries the hero
Many people have heard that there is a “sorcerer” in the braking systems of VAZ cars, but not everyone knows about the importance of this device. We evaluate its impact on braking efficiency
“The sorcerer”, or, according to the catalogue, the pressure regulator in the brake drive, it was not for nothing that people received such an apt nickname: no one really knows how it works, but, they say, being faulty, it can present an unpleasant surprise - make the car dance in an emergency. braking.
This is where the insidiousness of the “sorcerer” lies: during normal operation, without braking to the floor, its work or inaction is practically not felt, but when its help is especially needed, it may not come.
The pistons have soured, the rod or drive lever has broken off, or you installed a new one instead of a faulty regulator, but for the time being you don’t know that the unit is defective or out of adjustment... How dangerous is this?
Let’s check in our experiment how “witchcraft” affects the effectiveness of the brakes at partial and full load of the Chevrolet Niva and Kalina and what the owner should be wary of if he does not monitor the condition of the regulator. We can simulate a malfunction, from excessive activity to complete inaction, with adjustments.
Let us remind you that the regulator’s task is to reduce the braking force on the rear axle, reducing the likelihood of skidding when braking to skid.
The regulator, mounted on the body and connected by an elastic lever to the axle beam, limits the pressure in the rear brake mechanisms depending on the position of the rear of the body relative to the road, that is, on the vehicle load.
“Sorcerer” is the predecessor of ABS, which helps to some extent prevent the rear wheels from locking when braking and thereby reduce the likelihood of skidding.
“Sorcerer” is the predecessor of ABS, which helps to some extent prevent the rear wheels from locking when braking and thereby reduce the likelihood of skidding.
By the way, before testing tires on cars without ABS, each time we slightly adjust the regulator taking into account the road condition (snow, ice, asphalt), ensuring that the rear wheels lock a little later than the front ones. Let's not break tradition. Our Shniva found the gap between the cheeks of the regulator to be 16 mm, which was adjusted using a stop screw.
Several brakings, and the braking distance from 80 km/h for a car with a partial load is determined: 34.4 m. With a full load... 33.6! Almost a meter shorter! At the same time, the driver noted a heavier pedal and rapid heating of the brakes, which required cooling before each measurement. Let’s remember these parameters and make adjustments to the “sorcerer” adjustment. First, let's reduce the gap to 8 mm. Now the regulator significantly limits the pressure in the rear brakes, transferring almost all the hard work to the front ones.
Adjusting the sorcerer
After the regulator has been replaced, all that remains is to figure out how to adjust the sorcerer on the VAZ 2114.
This should be done as follows:
- Rock the car from side to side several times.
- Use a screwdriver to press the sorcerer pin with such force that the gap between it and the spring is 2 mm (you can check this using a feeler gauge or, more conveniently, the shank of a drill of the appropriate diameter).
- Tighten the first adjusting bolt.
- Check the size of the gap again.
- If it remains unchanged, then tighten the second adjusting bolt.
At this point, the configuration of the sorcerer can also be considered complete.
As you can see, replacing and adjusting the sorcerer will not be difficult for a motorist even with little experience. The only thing worth remembering once again when finishing this article is that you should check the condition of the brake pressure regulator periodically, and if obvious signs of malfunction appear, replace it immediately.
checking and adjusting brakes on VAZ 2110 VAZ 2111 VAZ 2112 cars
Checking pipelines and connections To prevent sudden failure of the brake system of the VAZ 2110, VAZ 2111, VAZ 2112, carefully check the condition of all pipelines and connections, paying attention to the following: metal pipelines should not have nicks, scratches, burrs, active foci of corrosion and should be located away from from sharp edges that can damage them; brake hoses must not have any cracks on the outer shell or signs of chafing visible to the naked eye; they should not be exposed to mineral oils and lubricants that dissolve rubber; by pressing the brake pedal firmly, check to see if any swelling appears on the hoses, indicating their destruction; all pipeline fastening brackets must be intact and well secured; loosening or destruction of brackets leads to vibration of pipelines, causing their breakdowns; Do not allow fluid to leak from the connections of the master cylinder with the tank and pipelines; if necessary, replace the tank bushings and tighten the nuts without subjecting the pipelines to deformation. When tightening the pipeline nuts, use the wrench 67.7812.9525. Eliminate any detected faults by replacing damaged parts with new ones.
Flexible hoses, regardless of their condition, should be replaced with new ones after 125 thousand kilometers or after five years of operation of a VAZ 2110, VAZ 2111, VAZ 2112 to prevent sudden ruptures due to aging.
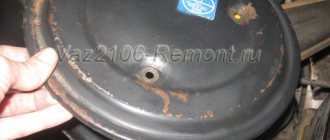
Checking the functionality of the vacuum booster VAZ 2110, VAZ 2111, VAZ 2112
Press the brake pedal 5-6 times with the engine off to create equal pressure close to atmospheric in cavities A and B (see Fig. 6-2). At the same time, by the force applied to the pedal, make sure that the valve body is not jammed. Keep the brake pedal depressed and start the engine. If the vacuum booster of the VAZ 2110, VAZ 2111, VAZ 2112 is in good working order, the brake pedal should “move forward” after starting the engine. If the brake pedal does not “go forward”, check the fastening of the hose tip, the condition and fastening of the tip flange in the booster, the hose to the tip and the fitting of the engine intake pipe, since loosening the fastening or their damage sharply reduces the vacuum in cavity A and the efficiency of the booster.
rice.
6-2. Vacuum booster: 1 - vacuum booster housing; 2 — amplifier housing cup; 3 - rod; 4 — adjusting bolt; 5 — rod seal; 6 — sealing ring of the main cylinder flange 7 — diaphragm return spring; 8 — amplifier pin; 9 — tip mounting flange; 10 - valve; 11 — hose tip; 12 - diaphragm; 13 — amplifier housing cover; 14 — sealing cover; 15 - piston; 16 — protective cover of the valve body; 17 — air filter; 18 — pusher; 19 — pusher return spring; 20 — valve spring; 21 - valve; 22 — valve body bushing; 23 — rod buffer; 24 - valve body; A - vacuum chamber; B - atmospheric chamber; C, D - channels Adjusting the brake drive of VAZ 2110, VAZ 2111, VAZ 2112
The free play of the brake pedal when the engine is not running should be 3-5 mm. The adjustment is carried out by moving the brake light switch 7 (Fig. 6-11) with nut 6 released. Install the switch so that its buffer rests against the pedal stop, and the free play of the pedal is 3-5 mm. In this position of the switch, tighten nut 6.
rice. 6-11. Brake drive: 1 — master cylinder; 2 - tank; 3 - vacuum booster; 4 — brake pedal bracket; 5 — brake light switch buffer; 6 — brake light mounting nut; 7 — brake light switch; 8 - brake pedal WARNING Adjust the free play of the brake pedal when the engine of the VAZ 2110, VAZ 2111, VAZ 2112 is not running. If the brake light switch is too close to the pedal, it does not return to its original position. In this case, valve 21 (see Fig. 6-2), pressing against body 24, separates cavities A and B, which opens air access to chamber B, and the wheels are incompletely released when the pedal is released.
If moving the brake light switch cannot eliminate the incomplete release of the brake mechanisms, then disconnect the brake master cylinder from the vacuum booster and check the protrusion of the adjusting bolt 4 relative to the mounting plane of the master cylinder flange (size 1.25-0.2 mm). This size can be set by holding the end of the rod with a special wrench, and with another wrench, tightening or unscrewing bolt 4.
How does a sorcerer work?
The regulator itself consists of a cylinder, valve, spring and rod. The latter is connected to the rear beam, which ensures the operation of the VAZ-2109 sorcerer. Also, brake fluid circuits pass through the rear brake pressure regulator. For mounting them on the device, Renault provides 4 threaded entries. » alt=»» How does the sorcerer regulator work on a VAZ? During emergency braking, the front of the car is pressed to the ground, and the rear is raised. This causes the regulator rod to move, which blocks the flow of fluid to the rear cylinders. A spring located under the valve prevents it from closing completely. Therefore, the rear mechanisms still work, but later and weaker than the front ones.
On my 2113, I completely removed the handbrake, unscrewed and threw out the lever in the cabin, removed the always soured and rotten cables due to cracks in the external insulation, removed the spacer strips, spacer levers, fingers under the drums... I left only the brake cylinders, pads with springs, drums, holes for the cables I plugged it with short bolts, washers and nuts so that no dirt would fly into the drum... I also threw out the rusty and soured sorcerer regulator and connected the rear brake pipes directly to the GTZ using brake pipe connectors... The rear brakes became super and there are never any hemorrhoids with them... The only thing I had to replace was the three-turn pad pressure springs with two-turn pad springs from the classics so that the pad pressure would be stronger and they wouldn’t rattle when driving... Before that, as it turned out, judging by the unworn pads, I drove for 5 years practically without rear brakes, the damn regulator is a sorcerer
rusted and soured, and because of it the rear practically did not slow down, now everything is super... I always park the car on the uphill in 1st gear, on the downhill in reverse gear, in 8 years the car has never rocked...
Guys, help me after replacing the handbrake cable, the working cylinder, the pads. The rear brakes are not pumping... At first the brake fluid seemed to run a little, then it stopped on both sides.
Guys. Why are the brakes weak on Prior? Do you need to press very hard and it stops too weakly?
the grant skids when braking. without ABS. why? when braking, the right rear one is activated first
Should the gap be adjusted while the sorcerer is removed or after installing it? If after installation, what position should the rear axle be in? Hanging out or loaded? That is, when adjusting, the car should be on a lift or on a pit?
GOOD DAY TO YOU. PLEASE TELL ME, AND IF I PUMP BY ANOTHER SCHEME ZP ZL PP LP THEN THE RESULT WILL BE BOTH? I'VE ALWAYS BEEN TOLD THIS SCHEME.
GOOD DAY TO YOU. PLEASE TELL ME WHAT CAN THE BRAKE PEDAL FAIL? THE SYSTEM IS BLEEDED, THE REAR CYLINDERS AND PIPES ARE NEW, THE FLUID IS FILLED TO THE MAXIMUM, BUT THE FLOW IS STILL SLOWLY FALLING DOWN. IT FEEL LIKE THERE IS AIR IN THE SYSTEM, ALTHOUGH THE SYSTEM IS BLEEDED.
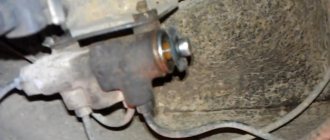
Removing the brake force regulator (sorcerer) VAZ 2113
Do you need to adjust the sorcerer on suspended rear wheels? or under load?
If you seat the rear (cut off the spring), will the gap increase or decrease?
I did as you wrote. everything worked out. All the same, I had to insert a screwdriver and press the valve a little, in short, everything was fine. Thank you!
I'm probably already tired of my questions? Here’s the problem, the rear right circuit won’t bleed, I release the valve, the pedal stays stuck and won’t release. They suggested (the tubes were clogged), I checked everything was fine. maybe it's the sorcerer?
- To begin, use a metal brush to clean the threaded connections and fittings of the brake pipes that are screwed to the sorcerer. After cleaning, use WD and let the fittings dry out.
- Remove the retaining bracket and remove the sorcerer drive lever from the rear beam (5).
Next we must rip off the fittings using a brake pipe wrench (7).
Mark the brake lines for proper installation on the new sorcerer.
Unscrew the fittings and plug them with rubber plugs (8).
Unscrew the nuts securing the brake pressure regulator bracket (9).
Unscrew the regulator from the bracket (10).
Connect the tubes to it and tighten the tube fittings.
Attach the rear brake pressure regulator drive lever to the rear beam, check that the retaining bracket presses the lever (11 and 12).
Possible malfunctions of the sorcerer
The most common problem with the sorcerer is leakage of brake fluid from under the cuff, or at the junction with the brake pipes. It is impossible to eliminate leaks; you can only replace the entire assembly. The sorcerer is generally a reliable part and there are few malfunctions in it. Piston souring and valve jamming are two interrelated problems. They occur because the piston becomes clogged with dirt, which can be mixed with oils and other technical fluids. All this leads to undesirable consequences. In order for the sorcerer to last longer, it is necessary to periodically, at least once a season, drive the car into a pit and carry out general cleaning under the body, including cleaning the brake pressure regulator from dirt.
Brake force regulator - description and replacement
What is the "Sorcerer" for? This is a rather mysterious detail and no one has found a clear answer to this question. Perhaps this is why he was colloquially called a “sorcerer”, because he works magically. At its core, this part performs a similar function to the anti-lock braking system, preventing the wheels of the rear axle from locking during emergency braking. Its operation directly depends on the position of the rear axle relative to the car body: when braking sharply, the car nose-dives, and the rear part of the body rises, after which the “witchcraft” begins - the brake force regulator partially blocks the flow of fluid, and the rear wheels do not lock.
Of course, in ideal conditions (dry asphalt, straight road, working brake system and chassis), the brake force regulator does its job perfectly. But such conditions do not always occur.
Device Description
The design and principle of operation of this element are quite simple. At the moment when the rear part of the car body rises and the distance between the axle and the body increases, a special lever is activated, which is connected in a “sorcerer”. This lever lowers the piston, which closes the brake fluid channel, and accordingly the pressure on the rear pads decreases. The wheels do not stop rotating and, accordingly, do not skid.
The idea itself is quite clever, but, as often happens, in practice it raises doubts. After all, if when braking the brake pedal is pressed with great force, then the front wheels go into skid and the car still begins to skid. Quite often, when observing a traffic accident, you will notice that the cars with the “sorcerer” are turned backwards. Is this related to this miracle detail, which in its essence should prevent this skidding?
Signs of a malfunctioning brake force regulator
“Sorcerer”, as an element of the braking system, has a number of signs of malfunction that manifest themselves during emergency braking. Let's look at the first symptoms that call for checking the regulator:
- When braking hard, the car pulls to the side.
- Reduced braking efficiency (feels).
- “Bouncing” and jerking of the car when braking.
In such cases, it is necessary to check not only the “sorcerer”, but also other components of the brake system and chassis. But, since we are talking about the brake force regulator on a VAZ, we will consider this particular mechanism
After placing the car on a lift, pay attention to the regulator. The most common sign of its malfunction is the presence of brake fluid leaks.
In case of any malfunction, the best solution is to replace the sorcerer. But, if you still decide to repair the brake force regulator, then below we have prepared brief instructions for this action.
Sorcerer repair
In order to repair the brake force regulator, you need to perform a number of actions:
- Dismantling. We remove the entire assembly, using wrenches 10 and 13. The brake pipes are unscrewed, the brake fluid is drained and plugs are installed in the pipes. Next, the “sorcerer” body is removed, which is attached to the bottom with two nuts.
- Diagnostics and replacement of “sorcerer” parts. Carefully examine the surface of the “Sorcerer”. If necessary, replace faulty parts (sealing rubber bands) using a repair kit. A soured piston cannot be repaired and requires a complete replacement of the unit.
- Installation of the sorcerer. Reassemble and adjust the part in reverse order and bleed the brake system. Add brake fluid.
Repairing this unit is a rather dubious decision. Therefore, we strongly recommend that in case of any malfunction, you perform such an action as replacing the brake force regulator.
Adjusting the braking forces of Lada Vesta
The operating principle of the system that regulates and distributes brake fluid pressure on Lada Vesta cars is fundamentally different from previous models, and there is no “witchcraft” in it. The Lada Vesta brake pressure regulator is directly connected to the ABS system and is electronically regulated depending on the speed of each wheel.
The ABS control unit transmits signals from speed sensors and analyzes the situation. The system “understands” any skidding and allows you to distribute the braking force with maximum efficiency. The pressure is controlled by the valves in the ABS hydraulic block, and there is no need for any magic. In addition, the electronics itself detects all malfunctions and reports them to the driver using a special lamp on the dashboard.
olade.ru
What is the sorcerer on the VAZ 2114 and where is it located?
This strange name “sorcerer” was given to car owners by the brake force regulator. This device first appeared in 1970. This is probably not accidental, because the behavior of a vehicle on the road depends on this mechanism: the length of the braking distance, whether the car will skid when turning and by how much. During braking, the load on the front and rear axles is distributed unevenly, therefore, in order to equalize the force between the axles for effective braking, dynamic correction of the braking process is required. This correction is performed by the brake force regulator. This small detail prevents the rear wheels from locking before the front wheels, and thereby prevents the car from skidding during braking. If the sorcerer is faulty or incorrectly adjusted, the machine may even overturn. The figure below shows the design of the brake regulator.
And below is its schematic image:
The brake torque regulator on the VAZ 2114 is located under the body at the rear, on the side of the left rear wheel, near the rear suspension beam. The VAZ-2107 and other “classic” models also have this mechanism, but it is located on the right side. New vehicles equipped with anti-lock braking devices and EBD electronic brake force distribution do not use the sorcerer. Understanding how the sorcerer works will help the car owner configure it correctly and operate it in the future. The sorcerer distributes the braking forces as follows: during sharp braking, the front is pressed to the bottom, and the rear is raised. In this case, the rod moves and thereby closes the flow of brake fluid to the rear brake cylinders. The spring holds the valve, preventing it from closing completely, so the rear wheel locking is activated, but a little later than the front ones. Ideally, the rear wheels should brake half a second after the front wheels.
Checking and adjusting the free play of the brake pedal on VAZ 2108, 2109, 21099
The free play of the brake pedal of VAZ 2108, 21081, 21083, 2109, 21091, 21093, 21099 cars is 3-5 mm. In the braking system of VAZ 2108, 2109, 21099 cars, the free play of the brake pedal is the travel of the pedal from its top position until the brake mechanisms begin to operate. The upper position of the pedal is limited by the brake light switch (the pedal rests against its moving contact with its stop).
Checking the free play of the brake pedal of VAZ 2108, 2109, 21099 cars
We check the free play of the brake pedal with the engine turned off.
— We measure the distance from the floor to the released brake pedal
To do this, place a tape measure or ruler against the floor of the car and measure the distance to the upper surface of the platform with the pedal fully released.
— We measure the distance from the floor to the pressed brake pedal
Without removing the tape measure or ruler, lightly press the brake pedal with your hand and lower it down until you feel resistance to movement. Using a ruler or tape measure, we determine how many millimeters the pedal platform has dropped. This will be the free play of the brake pedal.
If it does not fit within the required limit of 3-5 mm (more or less than this value), we adjust the free play of the brake pedal.
Adjusting the free play of the brake pedal of VAZ 2108, 2109, 21099 cars
To adjust the free play of the brake pedal, you must move the rear brake light switch, which serves as a stop for the brake pedal. See photo at the beginning of the article.
— Loosen the locknut of the brake light switch
We use an open-end wrench at “19”.
— Move the brake light switch
To move, rotate the nut securing the brake light switch. We use the same key on “19”. To reduce the free play of the brake pedal, screw it (clockwise) onto the switch. To enlarge, on the contrary, turn it away (counterclockwise).
— Fix the brake light switch
Fix the switch in the required position by tightening the locknut.
— Check the free play of the pedal and the operation of the brake lights
After adjusting the brake pedal free play, check its value again. If it again does not correspond to the norm, we carry out the adjustment again.
In addition, we check that the brake lamps in the rear lights turn on in a timely manner. The switch must be in such a position in relation to the brake pedal that the brake lights turn on in a timely manner when it is pressed and do not burn with a constant light when it is released.
Notes and additions
— Why is free play of the brake pedal necessary on VAZ 2108, 2109, 21099 cars? It prevents spontaneous braking of the wheel brake mechanisms when the brake pedal is released.
What is a sorcerer for? Is it worth cleaning it up!?
Since ancient times, a brake pressure regulator has been installed on Soviet cars; in colloquial language it is called a sorcerer. This small invention serves to distribute the braking force of the wheels, although it is not for nothing that it was nicknamed the sorcerer because of its unpredictability. If the sorcerer is not working properly, when braking, the car may skid to the side or the brakes may not be effective. Incorrect braking can also be caused by incorrect settings of the sorcerer. The front wheels always start braking, and then the rear ones, but the transition delay time depends on the sorcerer.
To properly configure the sorcerer, load the rear of the car halfway, that is, as much as you usually carry, including passengers, divide in half. We climb into the inspection hole and, using any object two millimeters thick, create a gap between the plate and the sorcerer.
The sorcerer may be faulty due to souring of the rod or internal blockage; it is better not to delay repairs, because faulty brakes are dangerous!!!
When replacing the sorcerer, only the rear brake cylinders need to be bled. To bleed the brakes, unscrew the nipple (not completely) from the inside of the wheel, ask an assistant to press the brake pedal, and bleed air from the system. We press the brake pedal with three long presses and on the fourth press we press the pedal, at this time we loosen the nipple and then tighten it again.
You can remove the sorcerer at your own risk, but at the same time you will have an even distribution of braking force on all four wheels, which will need to be taken into account when braking. The sorcerer can be replaced with a tee (2101-3506091), or bypassed using two brake hoses from a VAZ 2108.
Pinout of the sorcerer tubes:
1. Highway
2. Right wheel
3. Left wheel
4. Highway
When hooking up brake hoses from a VAZ 2108, you just need to connect 1 and 2, 3 and 4. Using a tee, we combine 4 and 1 and hook up 2.3 into the tee.
Personally, I do not recommend removing the sorcerer, and if it is not working properly, then it is better to simply replace it with a new one.
"LADA KALINA"
We set the regulator so that the rear is slightly late in locking the wheels. With this setting and partial load, the car needed only 27 m to stop. Fully loaded - 29.5 m. There are slight difficulties in preventing the front wheels from skidding. We reduce the gap in the regulator to zero - the half-empty Kalina stops after 31.8 m. The braking distance increases by 4.8 m, accompanied by a sharp blocking of the front wheels. The loaded one slows down after 35.2 m, the deterioration is even greater - 5.7 m! The pedal effort is increased and the brakes become noticeably hot.
Now we move the adjuster so that the rear brakes work as efficiently as possible. At partial load, the rear wheels suddenly lock and the car drifts off course—you have to release the pedal. On the verge of blocking it is very difficult to brake. The result is 30 m, which is 3 m worse than the “norm”. Full load gave a result of 26.9 m, which is 2.6 m better than the base (29.5 m). There are no comments regarding deceleration control. At the basic position of the regulator, the braking distance increases with increasing load. At partial load the spread of results is 4.8 m, so the base position is most effective. When you deviate from it in any direction, the braking distance increases.
- On a fully loaded vehicle, depending on the position of the regulator, the spread of the braking distance is 8.3 m.
- The best results, as on the Niva, come with increasing pressure in the rear brakes.
- However, on a slippery road, even in smooth turns, early locking of the rear wheels is possible, leading to a skid.
- And at partial load, with the regulator position different from the base one, the braking distance only increases.
Brake system "Lada Kalina": diagram, mechanism and system design
One of the disadvantages of the ABS of this car, like many others, is the possible failure of the electrical part of the control unit. Bad roads and shaking may destroy the soldering (or the soldering from the factory was initially of poor quality), and the ABS will fail. If liquid gets into the block, a short circuit occurs, oxidation and subsequent rotting of the components. The main thing is not to hesitate and immediately take it to a service center or manually clean the board and solder the questionable elements. ABS repairs are carried out by automotive electricians.
Lada Kalina, Granta and Priora became cars of a new generation, replacing the Sputniks and Samaras. Let's figure out whether the Kalina's braking system is different from these old cars, and how it works.
How does the Kalina brake system work?
The Kalina's braking system is designed similarly to many budget cars. In case of brake failure, engineers placed two independent circuits located diagonally. Each will be able to brake if the other one fails. The front contour includes the right front and left rear wheels, and the second contour includes the rear right and left front. The system is designed in the same way for cars with manual and automatic transmission.
Luxury and sports versions have an anti-lock wheel system (ABS), which greatly reduces the braking distance of an unprepared driver. These same modifications boast rear disc brakes. In the poor and regular trim levels, there are ventilated discs in sizes 13 and 14 at the front, and conventional drum brakes at the rear. On the dashboard there is a series of indicators indicating what is happening in the system.
Overview of individual elements
Diagram of the Kalina brake system:
Brake system diagram
| 1, 5, 13, 16 | Brake mechanism of the Kalina front wheel, including pads, caliper, disc, cylinder |
| 13, 16 | Brake mechanism of the Kalina rear wheel - pads, drum, cylinder |
| 2, 6, 12, 17 | Hoses going to the cylinders |
| 3, 7, 11, 18 | Tubes |
| 4 | Brake Master Cylinder (Brake Master Cylinder) |
| 8 | GTZ tank |
| 9 | Vacuum brake booster (VUT) |
| 10 | Brake pedal |
| 14 | Fluid pressure regulator in the TC of the rear wheels |
| 15 | Regulator knob |
GTZ and brake pedal
The main brake cylinder has not undergone any changes compared to previous Lada models like the VAZ-2110. It is attached to the vacuum brake booster and the force from the brake pedal is transmitted through the VUT.
On top there is a tank with two sections and with measuring notches to control the liquid level. A sensor located in the reservoir lights up an indicator on the dashboard when the brake fluid level drops.
Tubes extend from the GTZ to both circuits. It is due to the main cylinder that the fault tolerance of the entire structure increases. When the vacuum booster rod enters the cylinder and pushes the first piston, the primary circuit pressure increases and the brakes are applied. Due to the pressure, the second circuit also operates synchronously, providing uniform force on both axes.
Master brake cylinder
Since the car is front-wheel drive, the circuits are located diagonally, evenly distributing the force in case of failure of one of the circuits. For rear-wheel drive vehicles, the contours are divided into axles:
- first circuit – front axle;
- the second is the back.
The brake pedal is standard. The exact same one is installed on many Lada cars, there are no differences. It is attached directly to the vacuum booster.
The brake pedal article number is 1118-3504010. Price around 300 rubles;
GTZ article number – 1118-350501082. Costs about 1500-2000 rubles.
The vacuum brake booster, like power steering, is designed to reduce the amount of force applied. The driver of a car without VUT would have to press the brake pedal hard, reducing safety and driving comfort.
The vacuum unit works due to the difference in air pressure that creates force. It consists of two chambers - atmospheric, into which ambient air enters, and vacuum, connected to the exhaust pipe of the engine.
Vacuum brake booster
Structurally, the VUT consists of the following components:
- chambers – atmospheric and vacuum;
- pedal pusher;
- check and follow-up valves;
- return spring;
- hydraulic cylinder rod;
- separation membrane;
- mechanism body.
The design of the VUT has not changed since the VAZ-2108, so any one will do, starting with this car.
Article number VUT – 11180-3510010-11. You can buy it for about 2500 rubles.
Lines and hoses
The tubes are interchangeable with Granta. There are 4 of them in total. The first two stretch from the main brake cylinder and go to the front wheel mechanisms. The second go from the GTZ to the pressure regulator next to the rear axle. They cost a little - 100-300 rubles.
There are four brake hoses on the Kalina, and they stretch from the cylinders to the pipes going to the GTZ and VUT. The prices are similar - about 200 rubles.
Pressure regulator
The unit was borrowed from a VAZ-2108 car. The essence of the work is to adjust the fluid pressure in the brakes on the rear axle. Correction is made depending on the load on the rear axle.
Article – 21080-3512010-00. It costs around 1500 rubles.
Brake cylinders for front and rear wheels
The brake cylinder is the final element of the system that runs from the pedal pressed by the driver to the disc itself. When the pressure in the line increases due to the incompressible fluid, the cylinder piston presses the pads against the disc, performing braking. The piston is located in the caliper, and to remove it, the caliper must be removed.
The main disadvantage of brake cylinders is the possible ingress of fluid and oxidation. A soured piston will not move; you will have to remove the wheel and caliper to change the cylinder. There is no point in cleaning it. If the boot lets liquid through, a similar phenomenon will happen again.
The TC deteriorates if the pads are not changed for a long time. The piston will extend to a maximum depth not intended by the manufacturer and may become misaligned.
Brake cylinder (rear)
The rear and front RTCs are completely different. In the brake mechanism of the Kalina front wheel, the RTCs press the pads against the disc. The front ones, like many elements, come from the VAZ-2108, but the rear ones were installed from the VAZ-2105. The front ones also differ on the sides (right or left). In the Kalina rear wheel brake system, the working cylinder presses the pads against the drum.
The article number of the front right RTC is 21080-3501044-82. Price approximately 600 rubles;
The article number of the front left RTC is 21080-3501045-82. Costs about 600 rubles;
The rear RTC article number is 21050-3502040-00. The price is approximately 400 rubles.
ABS – anti-lock braking system. The Kalina braking system with ABS prevents wheel locking, maintaining controllability and reducing the braking distance. This system also controls the braking of each of the 4 wheels, maintaining stability by changing the fluid pressure in the RTC. When cornering, the braking force on each side is also controlled and different to avoid the vehicle skidding.
The ABS system itself on Kalina consists of:
- speed sensors and rotors on both axes;
- hydraulic unit;
- electronic part;
- hydromodulator;
- solenoid valves;
- return pump.
ABS system on Kalina
The speed sensor is similar to an electric motor. When the wheel rotates, an electrical signal is generated to the control unit, by the frequency of which the unit understands the speed of this very wheel. Then the microcontroller calculates how much the braking force on the wheel needs to be reduced or increased and sends a signal to the hydraulic modulator. It regulates the fluid pressure in the cylinders. If the pressure is too low, excess brake fluid goes back into the turbocharger.
One of the disadvantages of the ABS of this car, like many others, is the possible failure of the electrical part of the control unit. Bad roads and shaking may destroy the soldering (or the soldering from the factory was initially of poor quality), and the ABS will fail. If liquid gets into the block, a short circuit occurs, oxidation and subsequent rotting of the components. The main thing is not to hesitate and immediately take it to a service center or manually clean the board and solder the questionable elements. ABS repairs are carried out by automotive electricians.
Dashboard indicators
Sensors related to the brake system:
- ABS system status indicator. Lights up when there is a system malfunction.
- Brake system indicator. Lights up when the fluid level is low or there is another malfunction of its components. Located next to the ABS lamp.
- ESC indicator. Since the information is based on ABS sensors, it can also be classified as a brake system. Flashes when the system is activated or lights up when there is a malfunction. The inscription ESC OFF indicates that the system is disabled.
- Handbrake indicator. Lights up when the car is on the handbrake.
Basic faults
Frequent malfunctions of the Kalina brake system include:
- increase in braking distance;
- increasing the brake pedal travel;
- extraneous sounds from the brakes;
- increased effort when pressing the pedal;
- skidding or drift when braking;
- incomplete release of the brakes on one or all wheels.
Such malfunctions can occur for many reasons and require comprehensive diagnostics at a car service center.
Diagnostics
If you are an experienced motorist, you can search for a faulty unit in your garage. Most often they are logical and easy to find. If you don’t have such experience, it’s better to contact a good car service center. The brake system is not particularly expensive to repair.
Service
Maintenance consists of inspecting all components and replacing them in case of wear. All service looks like this:
- checking the brake pedal travel;
- checking and possible adjustment of the parking brake (Kalina has a handbrake from “nine”, so it must be tightened often);
- inspection of all tubes and hoses;
- inspection of the condition of brake discs, drums and pads;
- checking the brake fluid level and replacing it approximately every 40 thousand kilometers.
Repair
For repairs, you need a garage, the ability to hang the car, a set of tools, knowledge and skills in troubleshooting typical faults in the brake system of Kalina and other cars. If you have all this, you can repair it yourself, but if not, it’s better to contact a car service center, where they will do a high-quality restoration for little money. If the car is under warranty, it is especially not worth repairing it yourself.