There was a slight vibration at speed. I started digging into this matter. I got to the diff and it turned out that it had play((The time has come to replace the bearings. I naturally grabbed my head, imagining HOW MUCH the spare parts would cost(I come home, get into the existential situation and fall into a stupor. Differential bearings, ORIGINAL, 2 pieces cost 1400 rubles O_o. Plus non-original filter RUB 500. Nice)) I ordered everything, and then I went to remove the box)
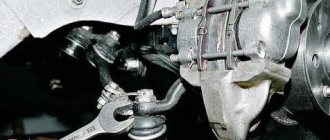
We unhook everything we can from the box. We drain the ATP. We hang the engine. Unscrew the box from it and remove it)
Having unscrewed a shitty cloud of bolts in a circle, we cut the box in half. Do this VERY carefully! There are no gaskets there! Everything is sealed! It is very easy to damage the mating surface! After unscrewing the bolts, the box should lie on its side with the bolts facing up! Having removed one half, we see another 2-3 liters of ATP inside.
I didn’t know about this((I definitely spilled a liter(
Well, I finally had some time to post a report on replacing the diff bearings; I carried out the replacement during the New Year holidays, but I didn’t have time to show you to my friends.
So a little theory. If a noise appears from the front while the car is moving, it increases when accelerating and decreases when stopping, no matter what gear or neutral. These are either wheel bearings or differential bearings. The first thing you need to do is check the wheel bearings with this phonendoscope. We hang up the front wheels one by one, secure the car with the handbrake and rollbacks, with the help of an assistant we accelerate to those speeds at which the hum appears, and listen to each bearing from the pit. Attention: when one of the drive wheels is raised, the differential will not allow the car to start moving, but will only rotate the wheel that is lifted off the ground. You just need to secure the car well so that it doesn’t jump off the jack.
.
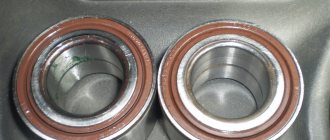
If none of the wheel bearings are humming, then only the diff bearings remain; they can also be listened to in the manner described above. Well, in my case the differential bearings were damaged. Spare parts were ordered in advance. What is needed to replace bearings Lanos A15SMS gearbox F16: 1. Bearings 2 pcs code 96335754
2. Drive oil seals 2 pcs
code 25187787
3. O-rings (left and right, different)
code 96243158 (left), 96243159 (right)
4. Gearbox pan gasket
code 96179241
5. Thread lock 6. New gearbox oil is desirable As Murzilka writes, the bearings are adjusted on a disassembled box, with the secondary shaft gear (main pair) removed, with a preload of 2 kg. That is, you need to disassemble the box and tighten the bearings with the differential rotating freely. Well, since on our boxes the diff bearings can be replaced only by removing the pan, a problem arises with adjusting these bearings. I scoured a bunch of forums, including Drive2, no one had done this, the answer was found only on one (Vektrovsky in my opinion) and it was superficial, I’ll write which one below, I decided to take a risk. There was also a thought that the drives were hanging too much, but it was decided to postpone this problem, because... This is a problem with our differentials and should be eliminated by tightening the seats for the drive. Well, since the seals do not leak, and the drives do not dangle relatively much, the problem is put aside. I also looked for the dimensions of the bearings to replace with an analogue in size, asked on various forums and again to no avail. That's why I'm telling you their sizes.
Thickness 17mm Outer diameter 63mm Inner diameter 38mm Tapered bearing.
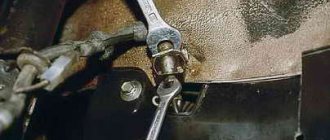
Well, perhaps it's time to get started. Attention, this procedure requires some skills and tools, if you are not confident in yourself, leave this undertaking for servicemen
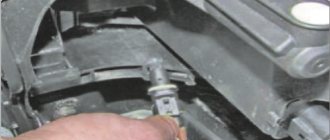
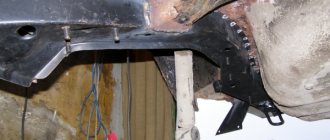
We hang it in front of the car
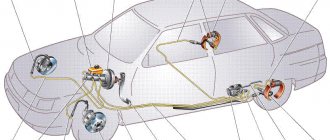
Differential bearing arrangement
A tapered bearing is a type of rolling bearing and is a structure consisting of two rings in the shape of a truncated cone with running grooves. Between them there is a separator with rollers. They are cylindrical, conical, barrel-shaped, needle-shaped and twisted in shape. Conical by their design are divided into single-row and double-row.
As an element of the mechanism, the differential bearing is capable of operating under conditions of high loads and rotation speeds. Therefore, tapered bearings are included in both axlebox assemblies for railway transport and wheel hub elements of automobiles.
Preload selection
Creating preload during installation is usually accompanied by measuring force (in some cases, displacement) or friction torque.
General information about preload
Depending on the type of bearing, the preload can be radial or axial. For example, precision cylindrical roller bearings, by design, can only have radial preload, while angular contact ball bearings or tapered roller bearings can only have axial preload.
Preload with springs
The preload force remains virtually constant even when the bearing moves axially due to thermal expansion.
F = kd
Where
| F | = | preload force |
| k | = | coefficient, described below |
| d | = | bearing bore diameter |
For small-sized electric motors, the value of the coefficient k is taken to be from 0.005 to 0.01. If the preload is used primarily to protect the bearing from vibration when stationary, the preload value should be greater - k = 0.02.
The spring loading method is also widely used to create preload for angular contact bearings on spindle units of high-speed grinding machines. This method is not suitable for cases where a high degree of joint rigidity is required, the direction of the load changes, or random peak loads may occur.
Why might you need to replace a differential bearing?
Types of defects are divided into the following groups:
1. Initial defects:
- depreciation;
- furrows;
- bullies;
- destruction of the surface layer;
- rust;
- the result of the passage of electric current.
2. Secondary defects:
- fatigue shells;
- gap
If any defect is present, intervention will be required. The bearing cannot be repaired; only replacement is possible.
Types of differential locks
There are several types of blocking:
- Full . Directly connect the housing to the axle shaft, which receives the main load, and secure it firmly. Those. transfer the torque as it is to the wheels.
- Partial . Limit the rotation of the satellites in the planetary mechanism. In this case, it will be possible to partially lock the differential, which means that the torque will also be partially redistributed, but most of it will be redirected to the wheel with the clutch.
According to the method of inclusion there are:
- manual locking;
- automatic (self-locking).
The manual locking drive can be:
- mechanical;
- electric;
- hydraulic;
- pneumatic.
As a rule, manual locking occurs due to a cam mechanism. It actuates the positive differential lock using a switch on the dashboard or a lever mechanism. Those. the driver must manually activate the unit. No sensors or reminders. The mechanism is universal for use. The driver, including a special clutch, connects the axle shaft to the differential housing, and the moment is transmitted directly without the participation of satellites.
If you bought a car with the “all-wheel drive” badge, this does not mean that it has a differential lock installed. Unfortunately, not all 4x4 fans know about this. Therefore, an SUV hanging diagonally in a dirt road rut is not at all uncommon. In this situation, the wheels that are in the air spin vigorously, and those that are pressed tightly to the ground stand without participation. Why is this happening?
For city cars, a standard differential is quite enough. If there is an icy section on a snowy track, they will transfer most of the torque to the wheel remaining on the hard surface. But for traveling on difficult off-road or washed-out dirt roads, this is not enough.
Therefore, they invented mechanisms that, depending on the situation, or at the driver’s request, can lock, in all-wheel drive monsters, even a choice of rear or front differential and lock the center differential.
How are repairs carried out?
To carry out restoration activities you will need:
- Ball bearings in the amount of 2 pcs.
- Gaskets (oil seals) of drives in the amount of 2 pcs.
- O-rings for sealing. There should be different: right and left.
- Transmission pan lining.
- Thread locker.
- New gearbox oil.
To adjust the differential bearing, the transmission must be removed. They are adjusted on a dismantled unit with the secondary shaft gear (key pair) freed. After the box has been removed, the differential is removed from it.
The following is done:
- The axle gears are released from the differential and rotated 900.
- Using the necessary tool, remove the retaining ring, which is located in the gear axis.
- After removing the stopper, the axle and, together with it, the gears themselves can be easily removed.
- Take a head of the required size, an extension, then unscrew the bolts that secure the driven gear to the differential frame.
- Then the driven gear is released from the housing (you can use a hammer).
Now you need to look at the working surfaces of the parts that were removed for any defects. If small irregularities are identified, they should be eliminated using sandpaper. If there is more serious damage to the parts, it is necessary to replace them. Also, if during inspection chips, cavities or other defects are revealed on the driven gear, then it must be replaced.
How is the GP structured?
What does the main gear consist of:
- bevel gear;
- bevel wheel.
The gear is the driving part (the thrust from the gearbox and the engine is attached to it), and the wheel is the driven element (it receives the thrust from the gear and transmits it at an angle of 90°).
Gears are made with teeth in the form of a spiral, because of this their hardness and number increase. At the same time, they are meshed, and the gears operate smoothly and without noise.
In addition to a bevel gear transmission with axes that intersect each other, the machine uses a hypoid transmission. Here the teeth have a certain design and the axis of a small bevel gear. It is shifted downward relative to the center of the largest gear by a certain distance.
This allows you to place the driveshaft lower and reduce the height of the convex upper part of the tunnel for positioning the shaft on the underbody, thereby increasing the area of the car interior.
It becomes possible to slightly reduce the center of gravity of the machine and increase its stability. Hypoid transmission has significant smoothness, high tooth strength and wear resistance.
Replacement process
The next step is to carefully look at the location of the bearings. If there is a hole in these places, the housing should be replaced; if cavities are found on the tracks and rolling elements, an indentation mark or a defect in the separators, then the bearings are changed. The differential bearings are then sealed using a tool. The outer rings from the gearbox housing are crimped. This is done using a special device. If there is no puller, then the axle flaps are first crimped, then replaced with fresh ones.
The outer rings are removed using a bit. There is an adjustment ring underneath them. Before compressing them, it is necessary to prepare new copies of the parts. If necessary, change the gear responsible for the speedometer. The differential is reassembled after changing the bearing.
Repair of differential cup
Defects of the differential cup are:
- wear of bearing seats;
- wear of the holes for the journals of the satellite crosspiece;
- wear of the holes for the journals of the axle gears.
Worn seating areas of the differential cup bearings are restored by chrome plating, followed by grinding to the required size, as well as metal surfacing by welding. Surfacing should be carried out with heating to avoid warping of the cup. If the differential cup is made of steel, then cold expansion of the bearing seats can also be used.
To do this, a conical mandrel, generously lubricated with oil, is driven through the hole in the cup under a press. After distribution, the necks are turned on a lathe. When the holes intended for the spider journals wear out, these holes are deployed to accommodate the increased size of the journals, which are pre-chromed to obtain a tight fit when the differential cup is assembled. Worn holes for the journals of the axle gears are bored on a machine, and to obtain a normal fit of the journals of the axle gears, the surface of the journals is chrome-plated. The holes can also be restored by boring the holes, followed by pressing in bushings made of a material corresponding to the material of the cup. After pressing, the bushings are processed to the size of the journals of the semi-axial gears with the calculation of obtaining the required clearance.
Adjustment of VAZ differential bearings
The differential is a unit that allows you to split the torque when each of the axle shafts acquires its own newtonometers. It also adjusts the rotation speed of the wheels. When turning, the outer wheel travels in a huge arc and begins to slip. To prevent this, a differential is used.
Because of this, the wheels have different torsion angles at speed. To adjust this element to the condition of the track, it is necessary to adjust the differential.
The elements consist of two parts: outer rings, which are clamped into the bridge stockings; and internal ones, the compaction of which goes to the differential. You can do the replacement and adjustment of these units yourself.
To adjust the differential bearings, you need to:
- Loosen the bearing caps so that the adjustment nuts can turn.
- These nuts need to be used to tighten the bearing with a little force.
- Tighten the bearings with nuts, turn the gear first in one direction, then in the opposite direction. When doing this, the rollers, which are located in the bearings, occupy the desired position.
- To measure the lateral gap in the clutch of the final drive gears on the rear axle housing, you need to strengthen the pointer and move its probe to the top of the tooth along the outer edge of the gear. The gap should be 0.15-0.2 mm. Measurements must be taken on at least six teeth in the reverse zones of the crown.
- In order to reduce the distance, using a screwdriver or a thin metal rod, the nut for adjusting along the edge of the reverse gear is unscrewed, and the other one is tightened.
Unscrewing and tightening the nuts must be done by the same amount, orienting them along the grooves. Each unwinding must end with a puff. This action ensures stable contact of the outer ring of the bearing with the nut, which, in turn, guarantees fixation during operation. To increase the distance, you need to perform the same steps, but in the opposite order.
Differential repair 2110
Differential. What is it, its repair
A differential is a mechanical device that transmits rotation from one source to two others in such a way that the angular velocities of rotation of the source and consumers can be independent.
In order to understand how a differential works and what its role is in a car, let's look at an example. The car moves in a straight line, both wheels - left and right - rotate at the same speed. But when we start a turn, the inner wheel travels less distance than the outer wheel, and therefore, if there was no differential, the inner wheel would slip. All this would lead to increased wear on the tires of the drive wheels, and would also lead to poor vehicle control when cornering, and the higher the speed, the stronger this factor affects. Only the differential comes to the rescue, which provides the drive wheels with different rotation speeds. It, like the main gear, reduces the speed that is supplied from the gearbox to the drive wheels. The differential is located on the drive axle of the VAZ 2110.
Adjustment stages
- After the distance has been adjusted, it is necessary to check the play on the axle. To do this, attach the pointer to a tripod, and rest the probe against the end of the driven gear. The backlash is measured, and the part is rocked in the direction of the axis.
- The adjustment nut, which is located on the opposite side from the driven gear, sets the play on the axis from 0.055 to 0.035 mm.
- Then the nut is tightened and the preload is set: 0.1 mm, if the bearing mileage is no more than 10 thousand km; 0.05 mm – if more than 10 thousand km. Turning the nut one notch is equal to “compressing” the bearing by 0.03 mm.
- After making the adjustment, you need to tighten the bolts on the bearing cap and install the locking plates. The lateral distance is checked again.
Gearbox maintenance and troubleshooting
Below are links to articles that can help you find the information you need.
- What kind of oil to pour into the gearbox? Types of oils, viscosity, oil service life.
- How to remove/replace the gearbox? Step-by-step instructions for removing the gearbox.
- The gearshift lever is rattling, what should I do? We get rid of the rattling of the gearbox handle at 2.5-4 rpm.
- How to replace a malso in a gearbox? Step-by-step instructions for changing the oil in the box.
- How to check the oil level? About where the dipstick is on the box and how to check the level.
- How to replace the reverse sensor (RDS)? The reversing lights do not light up - most likely the sensor has failed. Detailed instructions for replacing the sensor.
- Reverse gear does not engage. What to do? The reasons for this problem and what can be done about it.
- Second gear crunches. The reasons for this problem and what can be done about it.
We hope you found answers to your questions.
Adjustment of UAZ differential bearings
This procedure must be performed by adjusting the thickness of a set of adjustment shims, which are placed between the sides of the closed rings of both bearings and the gear box. When changing main gear parts and differential bearings, make adjustments in this order:
- Press the closed bearing rings onto the nut so that there is a distance of 3-3.5 mm between the sides of the gear box and the sides of the closed bearing rings.
- Dismantle the axle shafts and place the differential assembled with the driven gear into the crankcase, install the linings and cap, do not fully tighten the bolts that hold the covers, and, turning the driven gear with an assembly blade through the throat of the crankcase, roll in the bearings so that the rollers fit into the right place. Then use the bolts to align the cap with the crankcase evenly and completely.
- Unscrew the bolts. Very carefully remove the cap, remove the differential from the axle housing and use a feeler gauge to measure the distances A and A1 between the sides of the gear box and the closed bearing rings.
- Select a set of pads with a thickness equal to the sum of A+A1. To protect the preload in the automatic transmission differential bearings, add a 0.1 mm thick gasket to this set. As a result, the total thickness should be A+A1+0.1 mm.
- Remove the sealed differential bearing rings. Divide the assembled set of pads into two parts. Place them on the necks of the gear box and compact the closed bearing rings to the limit. Then adjust the distance on the sides by moving the driven gear.
Only after changing the differential bearings should you take measurements and compare the height of the new and old assemblies. If the new bearing is larger or smaller than the outdated one by a certain amount, then reduce the thickness of the existing set of pads in the first option and increase it in the second.
Signs of a faulty differential
The main symptoms of a faulty differential are:
- increased noise level while driving
- knocks or impacts that are not only audible, but can also be felt by the driver and passengers while driving
- lubricant leak
The most common and quite serious breakdown is considered to be bridge jamming. But such a problem does not arise immediately, as a consequence of some problems that were ignored by the driver. By the way, all 3 of the above “symptoms” usually precede a bridge jamming.
That's why you can't turn a blind eye to all this. Oil leakage may indicate the need to replace seals and gaskets. You will need to change the oil immediately. If it is heavily contaminated or insufficient, the parts wear out faster, which, accordingly, will lead to some new malfunction or serious breakdown with the replacement of spare parts.
Of course, you can try to figure out the problem yourself, find and eliminate the cause. But not everyone succeeds in this. Therefore, it is better, without delay, to sign up for a service center and show the car to a specialist. This will allow you to find the exact cause and fix the problem.
We are not always talking about some expensive repairs with replacement of parts. But, if you delay for a long time and ignore the problems, sooner or later the differential will refuse to perform its functions normally. And then, much more time, effort, nerves and money will have to be spent on solving the problem that has arisen. It’s better not to let things get to that point!
Some tips for use
Unlike a manual transmission, the machine is less demanding in terms of operating conditions. It is almost impossible to burn the box on your own if it wears out quickly at high speeds. The automatic algorithm will automatically increase and decrease gears. This system is especially suitable for novice and inexperienced drivers.
The first and basic rule of using an automatic transmission is to warm up the car before driving. This is especially true for our country, given the long periods of low temperatures. In cold weather, the car needs to be warmed up for at least 10-15 minutes. Therefore, if you are in a hurry, think: maybe rushing will cause you more problems than delay.
Don't use regular switches too often. This often affects motorists who have switched from an automatic transmission to a manual transmission. When stopping at intersections and traffic lights, do not shift into neutral or P. Also, do not perform limited maneuvers with the transmission. It is better to use a minimum of machine.
A similar tip is to use reverse only after the car has come to a complete stop. Otherwise, the gears and mechanisms inside the box will move.
All prevention and care of the car comes down to timely checking and changing the oil. This must be done according to the mileage indicated in the operating instructions. As a rule, this is 7.5 - 15 thousand kilometers. In severe operating conditions - 5000 km.
Use high-quality oils, have your car repaired on time, and don’t tire out your workhorse. So your car will serve you for a long time and faithfully.
Related posts:
- Priora oil separator 16 valves
- Cylinder head tightening torque 6g72
- Is it necessary to communicate the news?
- Largus dashboard designations
| No reverse. There are only 1st and 2nd speeds, no 3rd and 4th speeds. | |
| The car does not move forward or backward. When shifting to P or N, or any gear, there is a strong jolt, a change in speed, but still no movement. | |
| Drive only in 3rd gear | |
| Ignition of an unheated box (until cold) is carried out by pushing. | Dirty plate or solenoids. Diagnostics and cleaning of the valve body is required. Consumables may need to be replaced. |
| There is no reverse. | |
| The car does not move forward or backward. Shifting from “P” or “N” at any speed occurs without a noticeable push to change gear. | |
| Increasing hum of the automatic transmission, vibrations when driving, and other strange sounds. Increases depending on engine speed. | |
| The car moves with the selector in the “N” position. | |
| Gears shift at high speeds | |
| The car moves smoothly, but during prolonged acceleration to the last speed, the car skids and passes at low speed. | |
| Pressing the accelerator pedal firmly does not result in a kickdown). | |
| When the car starts moving, slipping occurs, but after acceleration it continues to move correctly, the automatic transmission switches to other speeds. | |
| Slipping when changing gears. | |
| No forward or backward movement | |
| Strong shocks occur when changing automatic transmission | |
| The car slips when driving and shakes when changing gears | |
| The vehicle drives normally until the oil warms up. Then he starts to slide, eventually the car remains motionless. | |
| The noise is similar to the knocking of a metal object at least | 1. Frickz disks of one of the drums are badly worn |
| The automatic transmission does not switch to a lower gear when “sneaking on the ground”; it does not develop speed in order to increase the speed of the car. There is no kickdown. | 1. The problem is related to the operation of the engine. |
| You have found iron particles in the pan of your car. Pointed shape, quite large, more than 1 mm | Possibly end of planetary gear life. |
| Water got into the automatic transmission (automatic transmission | |
| Oil pressure in the line is low | |
| After turning on the speed, the car trots and stops. If you increase the speed and turn off the movement there is. | |
| Aluminum particles at the bottom of the pan. |
Signs of problems with the machine
Of course, in order to accurately diagnose automatic transmission problems, you will need to contact a professional service. However, there are visible signs of automatic transmission failure or structural failure. Let's look at some obvious disadvantages:
- The automatic transmission does not change gears. This is definitely an obvious problem with the box. In this case, the speed may not be activated at all and remain neutral. But most often the car engages first gear in position D. In most cases, this is accompanied by characteristic sounds and triple sounds of the car;
- automatic transmission slipping. If the gearbox slips, it is immediately noticeable: the car picks up more speed as the number of revolutions increases, and makes a characteristic sound when the gear is restored. If you notice this, contact service;
- if the valve body malfunctions, the car begins to move with characteristic sharp jolts;
- overheating of the transmission, a small amount of special fluid in the box, low pressure of internal lubrication are direct signs of failure. However, they are available on machines with appropriate sensors or tools.
It is worth saying that in general, any unpleasant and unusual sounds are a reason to contact a specialist. This also applies to all types of machine malfunctions. Fortunately, an initial superficial inspection of a car today is not that expensive.
Even if you see no obvious reason to visit a repair shop, have your vehicle serviced and inspected regularly. It is not recommended to extend or neglect maintenance intervals. Yes, you will save money at first, but later problems, especially with the box, will cost you a lot of money.
CV joint play in differential
Hi all. When accelerating or braking the gearbox, extraneous sounds appeared (something like a sewing machine). Upon inspection, I noticed an oil leak from under the right, inner grenade at the gearbox. A detailed inspection will also reveal vertical play in both drives in the gearbox. If you hang the wheels and start + turn on the speed, the diff crunches at the beginning, then when you increase the gas, the gearbox jumps.
The gearbox works flawlessly, everything turns on and doesn’t even howl. True, the synchronizers from 1 to 2 are already tired.
I'm wondering if the differential bearings are dead, how justified is a gearbox overhaul with a mileage of 200t.km. I think I will at least have to change the synchronizers there. P.S. How many more checkpoints do you think can go like this? The play is not very large, but noticeable. _________________ https://bond123.narod.ru/mvi_0026-new.gif
Return to top -Viewer-
| Siers. wrote: |
| If you hang the wheels and start + turn on the speed, the diff crunches at the beginning, then when you increase the gas, the gearbox jumps. |
If there really is a crunch in the diff, then after a while your satellite axis will break and come out. This means replacing the gearbox assembly or replacing the housing + broken pieces of hardware, which is almost equivalent to replacing the entire assembly.
| Siers. wrote: |
| How justified is a gearbox overhaul with a mileage of 200t.km? |
What do you think?
Return to top Siers.
-Viewer- It’s hard to say what exactly is crunching there, but the sounds are in the differential area. The crunch is only on the suspended wheels, nothing crunches on the road. Only the sound of the sewing machine was added, but everything was as usual. And the gearbox only jumps when the car is raised, as if there weren’t enough teeth in the diff.
Eh. The car is now cheaper than a new gearbox + drives)))
P.S. Even the clutch is still factory, almost 200t.km.))) _________________ https://bond123.narod.ru/mvi_0026-new.gif
Return to top -Viewer-
Return to top Siers.
-Viewer- BU is not an option, I don’t like it. So all that’s left to do is buy a new one, there’s only one car, dismantle the gearbox, and then there’s no time to take a taxi to the shops..
I’m looking at some gearboxes from Prior and a new model for sale for a starter with 3 studs. Rewiring the speed sensor connector is not a problem, but the starter will start at 2x. 3 bolts. The 3rd bolt seems to be off to the side, it shouldn’t interfere, can you tell me. _________________ https://bond123.narod.ru/mvi_0026-new.gif
Return to top -Viewer-
| Siers. wrote: |
| there is no time to spread out the checkpoint and then take a taxi to the shops |
Then immediately buy: 1) 2 bearings 6305N 2) 2nd gear gear 2110 with a locking ring 3) 4 Phillips screws M8 for the pressure plate of the rear bearings 4) 2 nuts for the tails of the shafts (they seem to be M16x1.5, but I don’t remember exactly, the store will probably give you the ones you need) 5) The satellite axis (
200 rubles, but possible raw material) or differential assembly (
1500 rubles, but I haven’t come across a ketai) 6) Speed sensor 2170 assembly (ring + sensor) and connector for it. 7) 2 differential bearings 30207JR Set of gearbox seals (BRT). 9) Silicone sealant. And you can safely take it apart. Of course, there is no 146% guarantee against trips to the store, but on the other hand, there is no guarantee when purchasing another box.
| Siers. wrote: |
| The starter will start at 2. 3 bolts? |
No, he won't get up.
Return to top Siers.
-Viewer- Thanks for the list, I’ll think about it, maybe I’ll actually do it myself.
But I’m looking at the new checkpoints and I’m a little lost in them. Gearbox 2110 of the old model, new with 3 studs with number 21120-1700012-11. Priora box with 2 and 3 studs, 3 studs of the new type. I also read that gearboxes from priors howl less. And just change the speed sensor and starter to 3 studs.
Source: www.autolada.ru