Welcome to the kuzov.info blog!
In this article we will look at how to pull out the spar. Let's look at the rules of pulling and what tool is used to eliminate the deformation of the spar.
Spars are the load-bearing structural elements of a car body (see the article “Structure of a load-bearing car body”). They are located in the front and rear parts of the body. Structural load-bearing structures should be straightened first when body deformation is eliminated.
The initial inspection of the damage is carried out on the external body panels. By the unevenness of the gaps and the changed position of the body panels, the displacement of structural elements can be determined.
A more detailed inspection may require disassembling the damaged part of the car.
The content of the article:
- Replace or pull out a damaged spar?
- Securing the car body before pulling out the side member
- Measuring distances between body control points
- Pulling out the spar
- Spar constriction
- Rail saver repair tool
Required materials and tools
I would like to warn you right away that the further possibility of using the car depends on a high-quality hood, so this problem should be taken seriously.
We will need the following tools to pull out the car body:
- powerful electric grinder (impeller);
- welding machine;
- gas stove);
- grinding machine with a full set of discs;
- a stationary stand with the necessary template and chain grips (they are easier to work with);
- metal spatula and automotive primer;
- sealant tape;
- straightening hammer for metal;
- You will also have to find a table for the make of your car with data about the factory body geometry.
When the entire list has been collected, you can begin to work.
Spar extension
What will you need for work?
Let us immediately make a reservation that stretching the spar is a rather painstaking process and requires special knowledge and skills. You can’t do this procedure so simply, “on your knees”. We will need a number of specific tools: an angle grinder, welding, a gas torch, a grinder, a stand equipped with grips and templates. And also - a hammer for straightening, sealant tape, primer and spatula, a special table for body repair.
If you are already scared, or many of the names are unfamiliar, then you don’t have to continue. For all the other brave souls: let's continue the process.
Get free access:
Of course, our repaired part must be freely available. Therefore, it is extremely necessary to remove all “interfering” body and chassis parts from the path. But first of all, you should turn off the power supply and hide the wiring from the repair site. Next, we remove the body parts and remove the wheel arch. As a result, the spar is freed. You can proceed to the next stage of work.
{banner_content}
Product search
The drawing is supplied with each car. So, let's get down to action.
Repair of rails on the Chevrolet Niva
The first step is to dismantle the door using an impact screwdriver, and then remove the floor mats and sound insulation in the cabin. Now you need to remove the wing and secure the front of the car to prevent it from falling.
The front axle beam also needs to be fixed. In most cases, it is better to replace the wing with a new one in order to carry out high-quality reinforcement of the spars.
Old parts are often corroded. Then loosen the springs and remove the three bolts from the upper support. After this, you should remove the upper arm. Sometimes it happens that the mounting bolts become jammed and cannot be removed. In such a situation, you need to cut them off with a grinder.
Then you need to remove the brace that attaches the beam and spar. After this, you should cut off the engine mudguard with a grinder.
The next step is to divide the part into two parts and separate it from the body.
If the spar has shifted, but remains intact, then in any case it must be pulled out in order to return the correct geometry to the seat of this element. It is worth remembering that it is better to entrust such repairs to specialists. In a car service, the spar is pulled out on a special slipway. The car is fixed motionless on the slipway and pulled out using clamps, chains and hydraulic equipment. The car body is the most expensive part of vehicles to maintain. Consequently, its repair at a car service center can cost a pretty penny.
This is a responsible procedure, but you can still try to carry out the repairs yourself and literally in the yard. The first and easiest way is to use cable and wood. Instead of a tree, any pole can do. The cable needs to be secured to the pole at one end, and the other to the car, or rather to the extended spar. Next, you should start the engine, turn on reverse gear and, with short, sharp movements back, slowly “pull out” the spar. In between “twitches” you need to tap it with a hammer. In this method, the main thing is not to overdo it - do not knock over a tree or pole, or “tear” the car into 2 parts. This method will not always work. For example, if the engine has moved due to damage or the drive wheels have jammed, this method will not work.
The next way to repair a spar is to use a jack. It is best to use hydraulic models, since with a small applied force you can achieve a larger load. This method can be divided into 2 more methods.
- The car needs to be securely fastened (you can tie it to something stationary), then take a chain or cable, hook one end of it to the pull-out element, and the other to the jack. The jack, in turn, should be secured to something fixed. Then everything is simple - you need to pump up the jack and tap the spar with a hammer.
- For example, a VAZ “classic” with a front spar that has moved into the cabin is suitable. In this situation, it is necessary to disassemble the interior. Next, you need to take the boards and place them parallel to the rear seat, resting them against the ledge of the bottom in this place. There are enough boards needed so that the jack with the rod down rests between them and the spar protruding into the cabin. Next is the familiar procedure - pumping and tapping. On slipways, in fact, hydraulic jacks are used, only slightly modified. The load range of hydraulic jacks is quite wide, so you can choose the one you need based on the nature of the damage.
Geometry restoration
The process consists of stretching a certain point of the body in three-dimensional space, for which it is necessary to “calculate” the desired point geometrically, and then predict the behavior of the body when stretched, and this requires some experience.
Therefore, you need to consider a simpler, often necessary type of repair.
First you need to replace parts of the body kit, which will be cheaper and easier to replace entirely than to restore. For example, doors, fenders, hood, trunk, etc.
Then, the consequences of the resulting corrosion are eliminated. Pieces with through holes are cut out entirely to solid metal, then the patch material is welded.
If corrosion has not yet reached such a scale, then we simply clean the rusty surface down to the metal.
Small defects (for example, shallow dents that appear on smooth surfaces) are the easiest to correct. They are called “poppers”, because of the popping noise during restoration - it will be enough to heat or apply mechanical force on the other hand, the dents will return with a pop to their original state.
Repairing serious damage will require removing the paintwork. To do this, it is convenient to use a grinding machine with an attachment. The main thing when grinding is not to overheat the metal (so that the surface does not turn blue), otherwise its properties will change and it will continue to deteriorate, even under a layer of putty and paint.
That’s when, along the perimeter of some of the dents, the metal stretched out quite strongly (it turned out to be a deep dent). Then it is necessary to “bring it back” so that the metal returns to its original form. It is necessary to act along the perimeter, smoothly stretching the surface to its original form. You will need a small anvil and a rubber (or wooden) hammer. The use of an iron hammer is undesirable, since it itself leads to deformation of the tin.
You apply the anvil to the outer edge of the resulting dent, and use the hammer from the inside, returning the metal to its place.
If the metal is stretched too much, then straightening it using the previous method is very difficult. However, the paintwork will also need to be removed. In addition, this type of repair requires a construction hair dryer and even a spot welding machine using graphite electrodes.
The process is actually similar to the previous one - you need to straighten the dent from the edges to the center. Only first, spot heating of the bent metal is used, and then mechanical action is applied. After heating, the metal becomes more ductile and pliable. You select the heating level experimentally.
When using an industrial hair dryer, there will be no difficulties. However, the use of spot welding requires attention, otherwise it is possible to burn through the iron. The shape of the electrode is selected according to the shape of the dent; it is more convenient to correct a round dent with a round electrode, and a long one with a wide one.
To restore the shape, it is necessary to reach the other side of the part, however, this can be impossible or difficult. In this case, you should try to fix the dent from the outside.
For this purpose, the electrode is welded (grabbed) to the place on the surface that needs to be pulled out. Then, using a special tool or a reverse hammer, the metal is pulled out. Then the electrode is broken off and the surface is ground. Here is a fairly simple and most effective method for restoring the shape when pulling out a car body with your own hands, since the only expensive equipment needed is a welding machine. And you can easily make a reverse hammer yourself.
Front and rear side members of a car - what are they?
The car must be safe and reliable. Therefore, it is necessary to monitor its technical condition and carefully check potentially dangerous components. This is also something to consider when purchasing a used car. The main load-bearing element is the spar. It is responsible for body rigidity and resistance to deformation. This is necessary in order to withstand heavy loads. This article talks about what it is - a car spar, why it is needed and how to check it.
What is a spar in a car?
The front side members are two metal profile pipes.
The spar is supported by the main elements of the car - the engine, wheels, seats, body parts.
The spar consists of two metal profile pipes that are located at the bottom of the car and hold the main elements - the engine, wheels, seats, body parts. In most SUVs, the frame serves as the supporting structure. For passenger cars, a more universal solution is to use side members. They are much lighter, which reduces the weight of the car.
Why check the spar
When buying a car second hand, you must check the side members. If the spar moves, this can lead to deformation of the entire body, resulting in incorrect camber and increased tire wear, and an increase in the gap between body parts. Additionally, if a side member has rotted or burst, the vehicle is considered unsafe and cannot be driven. At high speeds, insufficient body rigidity can lead to loss of controllability. In the event of an accident, the spar provides passive safety, preventing the car body from being crushed and injuring the driver and passengers.
How to check the side members
Rotten front spar
It is possible to detect slight curvature of the side members and changes in body geometry only on a stand. However, serious problems with spars can be identified independently. To do this, you need to check for the following symptoms:
You can find out where the side members are located according to the instructions for a specific car.
- Camber and toe. If there are problems with the side members, there will be incorrect camber and toe-in of the car's wheels. Even with adjustment, it will quickly go astray and the tires will wear unevenly.
- Gaps between body parts. If there are problems with the side members, the gaps between the parts will be uneven; this should be visible by eye. In addition, the doors, trunk and hood will be difficult to close and open.
- External defects. Problems with side members can also be determined visually. Externally, this manifests itself in a violation of the geometry of the body. You can also check them from the inside, from the inspection hole. There should be no welds, cracks or other defects on the side members. You can find out where the side members are located according to the instructions for a specific car. Typically, the front spar supports the engine. The rear spar runs under the trunk and the tow bar and rear bumper are attached to it.
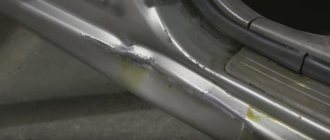
The most common problem is the deformation of the spar during an accident. In this case, it simply wrinkles and loses its original shape. As a rule, if the deformation was not severe, such a spar can be straightened without replacement. For this purpose, special equipment is used - a slipway. Extracting the spar without a slipway is also possible, but it is almost impossible to carry out repairs of sufficient quality.
The car is completely disassembled and installed on a stand. Then the spars are pulled out by the slipway with great effort. At the same time, the geometry of the body is constantly checked and monitored. If the spar goes inside, then it is squeezed out into its place. You can also pull out the spar yourself, although this is not recommended.
As a rule, this option is resorted to in cases where the car is inexpensive or there is no money for quality repairs. The side members may be pulled out with a jerk when the cable is tied to another vehicle. You can also use a jack and various lever mechanisms. Before pulling out the spar at home, it is better to study its design in detail.
If you pull the spar too far in the opposite direction, it will no longer be possible to correct it. On average, pulling out a spar costs about 5,000 rubles, including disassembling and assembling the car and checking the geometry on a stand.
Causes of damage
As we have already found out, the spar absorbs the bulk of the shock absorption when driving; manufacturers specially develop special designs for this part so that it absorbs all the kinetic energy and takes on the entire impact force in an accident. But even if the car has never been in an accident, the spar may crack over time from driving on our roads.
If you notice that the car is starting to pull sideways, or the doors are not closing well, the rubber is rubbing against the body - these are the first signs that the spar is cracked or misaligned. But don’t panic, how to pull out the spar is described in this article, and you can solve this problem yourself or turn to the services of a car repair shop. In today's article we will look at the method of drawing out a spar with our own hands using the example of a VAZ car.
To damage or bend the spar, it is not necessary to make a head-on collision at “crazy speed”; this can also happen in a light collision, as a result of which the entire car body changes its geometry.
How to pull out a spar at home
by almin · June 3, 2014 During accidents, vehicle side members are often damaged and their geometric dimensions change. To straighten simple models of spars, you can use the pulling method. For complex structures installed on foreign cars, in the form of an energy-absorbing cassette, replacement is carried out as an assembly. The pulling process has been worked out thoroughly.
First, you need to remove all parts from the body to provide free access to the spar. You must be sure to remove wiring and electrical parts located near the repair area.
Begin pre-stretching and straightening the damaged spar until you obtain a shape that is close to the original one. First, secure the vehicle to the stand using special clamps. After finishing pre-stretching, if necessary, cut off the parts of the spar to be replaced. If you change damaged elements of the spar without first pulling it out, you can complicate its subsequent repair. When you finish pre-pulling, be sure to check the doors and hinges.
In welding areas, the sealing tape and primer coating must be removed. To do this, you need to preheat the tape with a gas burner or an industrial hair dryer. Once heated, they should come off easily using a steel spatula.
You must check the spar geometry against the check points and the repair chart. To make it more convenient to work, control points can be marked on the spar itself and other elements. Next, you need to pull it out completely, achieving a coincidence of the control points on the spar with the points of the stand, and a coincidence of the dimensions with the body repair table. Use a disc sander to smooth out and sand any uneven surfaces on the side member. Check how parallel the side members and wheel arches are.
Straighten adjacent damaged parts and the wheel arch using a straightening hammer and mandrel. You should also align the welding edges of parts that have been damaged. Using a straightening hammer and mandrel, level the edges of the side members and arches to ensure they fit snugly.
At the places where the interior panels are connected, on the lower part of the side member and the inner surfaces of the wheel arches, it is necessary to reapply the sealing tape and apply a layer of a new primer coating. Then you need to paint the body. Before starting to work with paint and varnish coatings, it is necessary to ensure ventilation of the repair room.
After completing the painting work, take care to apply an anti-corrosion coating. Reinstall all previously removed parts. All damaged parts must be replaced with new ones. Moving parts must be lubricated with grease. Next, you need to fill in the coolant and charge the air conditioner with refrigerant. Upon completion of work, be sure to check the gaps between the body panels and the operation of the lock installed on the hood.
The main part of the body of each car can be called side members; this is a rectangular pipe, or, as they say in another way, a longitudinal beam of the body. The spar passes through the entire body, and the entire load, shock absorption and impact in an accident falls on it. The standard car design has left and right side members, and they themselves are divided into front, rear and middle. As a rule, the front side members are slightly higher than the rear ones; this design is made in order to place the car's engine in front. A variety of materials are used for them, it can be:
- titanium alloy;
- Aluminium alloy;
- composite layers.
Spar Before considering the question of how to extend the spar on Niva 212, let's look at the most common part failures:
- Cracks may appear on the spar over time.
- A structural element of the car becomes rusty.
- In the event of a car collision (accident), a complete rupture of the element is possible.
Minor damage can be repaired using a welding machine. If the part bursts, a partial or complete replacement will be needed.
If you are not a specialist or are not confident in your abilities, you need to contact a service station who can restore the structure using special tools.
Many drivers prefer to restore the element themselves. At the same time, they save money and receive moral satisfaction from the work process.
Sequencing
Before starting work with a VAZ car, you need to remove all the parts that stand in the way of the spar. It is also necessary to disconnect wires and electrical devices in vehicles. After all these manipulations, you will see the spar itself and can now easily reach it. Next, let’s begin the extraction process itself, fix the car and cut off the heavily damaged parts of the part with a grinder - this must be done carefully using a protective mask and gloves. We attach the chains to the spar and make a smooth tension, at the same time giving it its original appearance. After you have cut off the “unnecessary” parts and made a hood, check whether the car door can be closed correctly. If the door closes as it should, then you are on the right track, otherwise you will have to manipulate the tension several more times. Further in the work, using the table of technical characteristics of the VAZ car, we restore the geometry of the points of the body spar. To make it easier to set dots in such conditions, you can use colored tape to mark those same dots. It is necessary to pull out the spar so that the adhesive tape marks coincide with the marks indicated in the technical specifications. Don't forget to check if the side members and wheel arches are parallel.
Types
As already mentioned, side members occupy different positions in the car. Here, a lot depends on the characteristics of the body (truck, passenger car or truck).
The location is as follows:
- Parallel and horizontal to each other;
- Vertical, with a slight bend;
- Horizontal and minimum angle;
- Horizontal and slight bend.
The type of design that is mentioned first has found application in freight transport.
Mercedes-Benz truck frame with parallel-horizontal side members.
As for the other options, they are popular and used in passenger cars.
Rear left floor member of VAZ 21099.
What are they for?
The parts are made of very hard metal and can withstand heavy weight. They absorb shock loads and vibrations received by the car when moving on various roads. Spars are needed to strengthen the elements of the bottom and floor of the trunk (passenger cars) or to completely take on all the loads (trucks, frame SUVs).
Another function of the side members is shock absorption. By taking on vibrations, the part distributes the load across all parts of the machine. Pipes effectively absorb deformation distortions. Therefore, they are made as rigid as possible, but not everywhere. In fact, a modern spar is a structurally very flexible unit with programmable deformation zones. Otherwise, it would not soften the shocks, absorbing them, but transmit them to the cabin.
Prevention of spars
In order for the car to serve for a long time, it is advisable to monitor the condition of the side members and carry out preventive maintenance. Correcting the spar is very expensive, so it is better to monitor it and carry out routine preventive maintenance. Since the inside of the spars is hollow, dirt and moisture can accumulate in them, which leads to metal corrosion. Therefore, it is advisable to apply anti-corrosion mixtures at least once a year before winter. You can find out what the spar looks like from the instructions for the car, which shows the load-bearing elements. This also usually shows drainage holes through which a protective anti-corrosion agent should be applied. In addition, it is advisable to avoid excessive loads on the car body. Under severe overload and operation in difficult conditions, the side members may burst or bend. If it is necessary to use the machine in difficult conditions, a spar amplifier can be installed. This part allows you to reduce the load and extend the service life of the spar. It is necessary to monitor the condition of the car, especially the supporting elements. If it is operated in difficult conditions or driven at high speed on bad roads, it is advisable to regularly check the condition of the side members. Many used cars are sold after cosmetic repairs. In this case, the side members may be rotten or burst, although the car body looks like new.
Metal memory: how to combat it using a slipway
On average, pulling out the body will cost 10–15 thousand.
Even in minor accidents, the geometry of the power structure of the car body is sometimes disrupted, which greatly complicates the process of high-quality restoration. Without qualified editing, it is unlikely that you will be able to set even gaps between the outer panels and correct wheel alignment angles. And if the angles are not set, the car will begin to pull away on the road, the tires will wear out faster and more unevenly.
Complex treatment
The slipway is a platform or racks on which the body is rigidly mounted. And at least one “goose” that clings to the damaged part of the car’s skeleton and creates a pulling force (usually up to 10 tons). In fact, the process is the opposite than during a collision.
Working with a slipway requires extensive experience and high professionalism. For example, you need to clearly dose the load and its direction and place the “goose” at the right angle, otherwise you can easily tear the metal and even welds. Sometimes a combined approach is necessary. That is, the master has to load a certain element of the body with a “goose” and at the same time adjust it with a hammer.
Working with a slipway requires extensive experience and high professionalism. For example, you need to clearly dose the load and its direction and place the “goose” at the right angle, otherwise you can easily tear the metal and even welds. Sometimes a combined approach is necessary. That is, the master has to load a certain element of the body with a “goose” and at the same time adjust it with a hammer.
Replacing the rear right side member 2109
The condition of the rear spar is determined by external inspection; if the body element has traces of severe corrosion and is thoroughly rotten, it must be replaced; in many cases its repair is impractical. Even before performing work, it is necessary to inspect the car body itself; often the iron on the 2109 rots to such an extent that there is practically nothing to weld to.
To carry out repair work you will need:
- welding machine;
- electric drill with drills;
- screwdrivers;
- a set of keys;
- hammer;
- core;
- chisel;
- cleaning wheels.
You must first buy the floor spar itself (LP), the average retail price of the body element in auto stores is from 1800 to 2500 rubles, catalog number is 2108-5101372. This spare part is suitable for model 2108-09-13-14, with minimal modifications it can be installed on VAZ cars 21099 and 2115. Since when replacing a spar you basically have to work under the car, you need to think about how to make it easy to get to below. There are several options here:
- use a car lift;
- carry out work in the inspection pit, hanging the rear part of the body on “goats” or other stands;
- turn the car over on its side, using a reliable support.
Before you start drilling out the old spar, you need to partially disassemble the car and remove:
- rear seats;
- gas tank;
- rear floor trim;
- rugs;
- rear beam (you will have to disconnect the handbrake cables and brake hoses).
After disassembly, you can begin to directly remove the rear LP; to do this, you need to find the attachment points, drill them at the spot welding points using a drill clamped into the drill chuck. After dismantling the body part, it is necessary to thoroughly clean the metal under the spar and prime it, remove the shipping primer from the new part (it can be removed very effectively and quickly using sandblasting). In order for the right side member to fit exactly in place, you should use measurements (there are control points for attaching units), there must be a certain distance between the elements of the front and rear suspension (between the fastening of the rear beam and the front wishbone).
This is interesting: How to replace Nissan Teana spark plugs
After determining the control points, the spar is tacked by welding in several places, the correct installation is checked, then the part is finally welded to the seat. The final stage of repair consists of the following steps:
- cleaning welding scale with a grinding wheel;
- degreasing the metal surface;
- application of primer and anti-corrosion coating.
Very important conditions when performing welding are an intermittent seam, a maximum length of 4-5 mm. A continuous weld is unacceptable; with such welding, the body loses its elasticity and becomes very rigid. The left rear lip on the “Eight” or “Nine” changes in exactly the same way as the body element on the right side, the procedure for performing the work and the installation principle are the same.
Competent replacement of the basics
Both the front and rear side members are the main load-bearing structures of any vehicle. Even the smallest mistake, seemingly insignificant at first glance, will lead to complete deformation of the body. We need to remember this. If the side members are installed incorrectly, engine detonation will occur, the front or rear suspension will be deformed, or even the cooling radiator will not be installed correctly.
Some experts compare the side members of a car with the foundation of a building, and this could not be more accurate. Everyone knows that if the foundation of any house turns out to be not level or strong enough, no matter what types of modern materials are subsequently used for construction and no matter what innovative technologies are applied, such a house will still not last long. Such a building will suffer from curvature of window frames or doors, incorrect staircases or other elements of the house.
The same goes for the spars. A car where this part was installed incorrectly turns into one huge problem.
I would also like to note this point when replacing side members. If this part is too deformed, then simply replacing it will not do anything. Surprised? But this is true. First, you will need to pull out this very deformed spar on the slipway, and replace it only after that.
When replacing the front spar, it will be necessary to remove all radiators, raise the engine, disassemble the suspension (front) and disconnect the subframe on which the engine and the entire chassis of the car were supported. The listed types of work are not a complete list of preparatory operations.
The part must then be replaced, and then coated with a product that protects the metal from corrosion and painted. All disassembled parts, including the engine, suspension, etc., must be carefully put back in place.
And here we come to the most important thing - the control point
What does this mean? Here's what. Even highly qualified specialists who replace the spar must at the end determine whether they did everything well or not. A beginner who is changing this part for the first time will especially need to check everything carefully. There is a special method called “wheel alignment”, which allows you to check the work performed for compliance with the standards. If the spar meets all factory standards, then everything is in order. Otherwise, you made a mistake and will have to do it all over again.
Remodeling is always very difficult. Not only an auto designer or mechanic knows this, but also an employee in any field of activity. Therefore, you need to try not to make mistakes in the process and do everything according to the instructions. We remind you again that the slightest displacement will be enough for the engine to detonate or the radiators and hoses to be installed under tension. All this can lead not only to rework (that's just the beginning). If you do not notice errors (failure to perform a wheel alignment), you can quickly overheat the engine and expose your car to expensive repairs.
We will end this article with this important warning. As you can see, replacing the front or rear side members does not present any difficulties, except that you need to do everything in accordance with the instructions
Problems related to spars
Under the influence of loads, the side members still deform over time, especially the front one (the load from the engine and its systems) suffers. Just like the front ones, the rear ones can crack and get tired. The word “get tired” implies the initiation of a crack, which over time grows throughout the entire part. Of course, an accident can also leave a significant mark.
What does operating a car with damaged side members entail? Some parameters of the car are violated: slightly, but the position of the doors, connectors of body parts, and the position of the power plant changes. The suspension geometry also suffers. Due to all these shortcomings, the car's handling is reduced. Therefore, if the body is damaged, you need to take the car for diagnostics - this decision will be correct.
If the spar completely bursts, then the entire body structure will be completely destroyed. It is because of this that after an accident, experts look at the degree of deformation of these elements. The position in which the side members are in the car also plays an important role.
Statistics: Approximately 90% of all work associated with this part occurs on the front spar. Such damage can be resolved quickly only with a frame spar - there it is simply replaced. As for the supporting body, sometimes the spars simply cannot be replaced. Let's say it was slightly dented in an accident: such damage can be corrected using a special carolin stand. For example, on the stand there are front left and rear side members - using a convenient location, mechanics measure all the parameters necessary to correct the problem.
It happens that the side members of a car are in such a state that the only option left is replacement. Changing parts entails a significant change in the properties of the entire body. After all, the shape, material and weight are calculated by the manufacturing company - in automotive centers you have to improvise. When the main parts of the spar are in good condition, a partial replacement is performed using arc gas welding.
When making repairs, you must insist that the new spar is no larger in size and weight than the old one. Some people prefer to harden a new one, but one must remember that such a decision may lead to a loss of shock-absorbing properties upon impact. Constant blows will lead to more serious consequences. Do not forget that in the event of an accident, the side members are checked first, and then everything else.
- Absolutely legal (Article 12.2);
- Hides from photo and video recording;
- Suitable for all cars;
- Works through the cigarette lighter connector;
- Does not cause interference to radios and cell phones.
Bench hood
We fix the car on the stand. This must be done in the places where the manufacturer’s welds are made. Next, we carefully pull out the damaged spar to parameters resembling the original ones. When the preliminary stretching is done, we use a grinder to cut off the parts of the spar that are most damaged and the need to replace them is an urgent problem.
Not recommended
stretch the spar more than necessary. And after carrying out this procedure, you must try to open/close the doors to check the compatibility of the gaps and the condition of the hinges (if necessary, adjust and bend them to the normal position).
Design features and types
Heavy-duty vehicles and SUVs use a frame-based load-bearing system. This is due to the increased load. In such structures, the spars are located parallel to each other along the entire length. Solid elements are connected to each other by special jumpers. Due to the unique shape of the frame, drivers often call this design a “ladder”.
Spars in a car frame
In modern passenger cars, the load-bearing part is the body itself. Therefore, the side members are already integrated into the body structure and are part of it. They can be either solid or separate and must be installed in the front and rear, although there are designs without rear load-bearing elements. The rear side members do not carry as much load as the front ones.
Solid side members can also be used in a monocoque body. This has its advantages. The structure becomes more rigid and reliable, but has a complex shape. This affects manufacturing technology.
Thus, spars can be divided into two types:
- composite;
- whole.
If the advantage of solid ones is rigidity, then composite ones are more practical. In a collision, the side members are most often damaged. They bend and break. It will be easier to replace the components with new ones.
Spars
In turn, much depends on the geometry of the elements. Additional bends increase the strength of the structure during a side or front impact. Curves also improve vehicle maneuverability and wheel steering angle.
Partial replacement
The spar can also be partially replaced. In other words, give it more shock-absorbing properties and thus modernize it. But this must be done in places where the maximum load would not be placed on the structure and this area would not be designed to absorb shock and subsequent crushing.
It is customary to give shock-absorbing properties to spars as follows:
- in the process of stamping parts, peculiar folds are made in order to crush the spar into an accordion in the event of an accident;
- manufacturing an S-shaped element;
- use of stamped profiles;
- punching holes and through slots in the spar;
- use of variable cross-section in the design.
Partial replacement of an element has many advantages. Thus, there will be no need to use a coupling and it will be enough to use gas-shielded arc welding. As for the process of installing the spar, it happens as follows: the part is cut half a millimeter in front of the apron and mounted after the fitting is completed.
It is recommended to carry out the test on a control and measuring stand, where a movable prism is used as a rigidity element. Using arc welding, the new spar is butt welded. Then, using spot welding, using extended electrode grips, the part is connected to the wheel mudguard.
Recommendations for replacing the rear side members of the VAZ-2108-09
When replacing a LP, many craftsmen cut off the old body element with a gas cutter, but it is better to drill out the part. When installing a new spar, it is very important to find the control points correctly and not to disturb the geometry of the body, otherwise the work will have to be redone and problems will arise. It is recommended to grab the spar at three or four points; before thoroughly welding the part, it is recommended to try on the rear beam - the fasteners must match the studs. Before installing the body element, the seat must be thoroughly cleaned of rust and well primed; if the metal is rusty, new plates must be welded. You cannot weld with a continuous seam, this will weaken the metal of the body.
Replacing rear side members is not an easy job, if you are not confident in your abilities, you should not take on it, it is better to use the services of professionals.
We take out the battery and dismantle the front bumper. We also remove mats, sound insulation, doors and turn the car over.
A visual inspection of the bottom and side members is carried out. Places of maximum corrosion are identified, as well as places that can still be restored by straightening, priming and painting.
We cut off the rusted spars using a grinder.
Now, using a grinder and a brush, you need to clean everything down to the metal.
Then we treat it with orthophosphoric acid to completely remove the rust.
We clean the dust after the “anti-rust” to the metal.
Degrease the entire surface under the spar.
Prime with reactive primer.
Prime with regular primer.
We clean the welding points down to metal.
Primed spar with holes made for welding points. The connector between the spar and the bottom has already been welded, all welding spots on the spar have been cleaned to bare metal. Sealant applied.
The spar is adjusted to the connection points as accurately as possible. The spar is finally secured with clamps.
After this, the spar, without loosening the clamps, should be welded to the bottom of the body.
First the back of the part.
Then we weld the front part of the spar.
The spar is welded, let's move on to welding the bottom reinforcement elements.
The problem of failure of the VAZ 2108/2109 side member is not a pleasant situation, but this does not mean that it cannot be corrected. There are two ways to fix the problem: replacement or welding, DIY repair or in a workshop. You will learn further how to make the right choice.
The decision to straighten or replace a side member on a damaged car depends largely on the length of the deformed zone, the degree of deformation, and also on the qualifications of the repairman. If there is slight deformation of the spar over a long length, even if there is a small fold, the spar does not need to be replaced. Using a jack or square, you can restore the original shape and position of the spar while maintaining its characteristics. On the other hand, if there is significant deformation, the spar must be replaced, since straightening will cause a change in the metal structure and strength, which will lead to a change in the characteristics of the body itself.
If the metal is rotten, then the side members (front and rear) cannot be repaired or restored. Even if you weld, the rot will continue around it. In addition, welding on soft metal can disrupt wheel alignment, tires will begin to wear out faster, transmission parts will begin to break, and body deformation may occur. Such repairs will be enough for a couple of weeks.
If possible, it is always better to purchase a new part, which costs more than temporary repair work. But, even with a limited budget, in some cases you cannot save. Therefore, replacement is much cheaper, but if the crack is the result of an impact or collision with a VAZ, welding will be sufficient.
When repairing a spar, you should never lose sight of the fact that it is a reinforcing element of the body and largely determines its rigidity. At the same time, it is not recommended to strengthen the spar during partial replacement, mainly in the front and rear parts of the body, since this increases the strength of the area intended for crushing, i.e. for depreciation. If the depreciation of this zone turns out to be insufficient, then in the event of an impact, the deformation of the body will pass further, to the car cabin, which should not be deformed.
Remember, you can only repair a VAZ yourself if you understand body work and know how to work with a welding machine. When you encounter it for the first time, you are unlikely to be able to perform high-quality repairs. And all of the above problems may follow.
How it works
Leveling the body shape using jacks should occur in several stages:
Dismantling all parts that in any way interfere with repairs and access to places of damage. Installing the car body on special supports. Installing a hydraulic jack and determining the impact angle. Starting the hood
During the pulling process, it is always very important to take measurements with a special body ruler and compare the indicators according to the control points of the primary body drawing. While pulling, the mechanics also “tap” with a hammer on all the distortions and bends of the metal, which helps give the body its original shape. In cases where the first time it was not possible to pull the parts into their previous position, repeated pulling with squeezing is performed, and everything is left in this position for a day for the metal to “get used to.” If the damage is very extensive, then two or three jacks can pull out the dent at once.
This method may involve the use of a vacuum in cases where the concave part has retained the integrity of the paint layer; it will avoid the need to do “cosmetics”. It may cost more, but considering how much it costs to paint a car, such a hood is still cheaper.
Locations for installing body pulling equipment
It is also possible to use a reverse hammer, but painting cannot be avoided here. The method works like this:
- A hook made of thick wire is welded to the bent section.
- A reverse hammer is attached to the hook, which with blows will pull the metal to its original position.
- When the process is successfully completed, the snags are cut off and the body is sanded and painted.
Sometimes, to install a reverse hammer, a hole for a hook may be drilled into which a nut and washer are threaded. Once completed, the hole is treated with putty or welded.
Please note that the hood must be completed in a timely manner. This means that you must complete all work at the same time as the surface has completely cooled, otherwise it may return to the wrong position.
Car straightening stand
The most popular among devices for eliminating deformations of the car body is a special stand:
- The body is installed on it and secured with clamps at four points for reliable fixation - at the points where the car floor connects with the thresholds.
- Suitable grips are selected based on the location of the damage. They are then attached to the vehicle and the correct pull angle is set.
- Hydraulic jacks are launched, which perform preliminary stretching of the body. After this, control measurements are taken, and if necessary, the process is repeated.
- Next, the body is straightened.
If the entire body is being repaired, then it is necessary to prevent the doors from sagging by placing special trestles under the front and center pillars in the amount required for reliable support.
For each type of deformation, various drawing and straightening methods can be used, all of which are aimed at reducing the extent of interference with the integrity of the body. Therefore, the preferred method of stretching is working with the car body on a stand or using jacks. Small dents can sometimes be eliminated with your own hands using a household hairdryer using heat.
Rail saver repair tool
Tim Gerhards, an American auto body repair specialist who has been working in this field since 1986, has come up with a tool that helps remove dents and bends in side members by attacking the imperfections from the inside. This is a fairly new invention. The tool is called Rail saver (literally translated as spar saver). It is a metal body, to one end of which a hydraulic cylinder connected to a pump is screwed. There is a metal pipe inside the housing.
p, blockquote 23,0,0,0,0 –>
p, blockquote 24,0,0,0,0 –>
A hydraulic cylinder acts on one end of this pipe, and at the other end there is a wedge, which gradually lifts the part of the body where the wedge is also located. It turns out something like a long jack, which is inserted inside the spar to the place where the bend is located and the bend or dent is applied from inside the spar. Anvils of different shapes, which are included in the kit, can be screwed to the place in the tool that rises. Thus, this tool can work on dents and folds caused by the displacement of the side member from the inside.
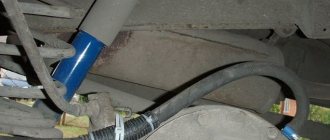
p, blockquote 25,0,0,0,0 –> A tool for straightening the side members from inside the Rail saver is placed inside the side member. The arrow shows the place where the fold is located, which the tool will straighten.
If necessary, the unevenness is tapped from the outside with a hammer, and the tool for straightening the side members acts as support. Since a hydraulic cylinder with a pump is used to operate the tool, it is possible to remove deformation on the metal of a spar of any thickness without much effort. The most important thing is to correctly position the tool in the right place. To do this, you need to measure the location of the deformation and position the tool inside the spar to the desired length. There is a measuring scale on the body of the instrument.
p, blockquote 26,0,0,0,0 –>
Depending on the size of the spar, you can place wooden blocks in its cavity to position the tool as best as possible.
p, blockquote 27,0,0,0,0 –>
The Rail saver tool has been tested and approved by General Motors for repair of salvage vehicles at authorized service centers. The advantage of this tool is that it eliminates the need to cut segments in the spar to access the reverse side of the damage. There is no need to heat the metal, especially since modern high-strength steel is sensitive to heat and is significantly weakened and loses its properties.
p, blockquote 28,0,0,0,0 –>
The design of the Rail saver tool is quite simple and if it is thoroughly understood, you can make such a tool yourself.
p, blockquote 29,0,0,0,0 –>
On the left, at the top of the tool body, you can see a wedge on which another wedge acts, lifting it. The pipe with the wedge inside the housing is pushed by a hydraulic extension. The place with the wedge, which rises when exposed to hydraulics, must be installed opposite the fold, inside the spar. Special anvils/supports can be screwed to this part of the tool. p, blockquote 30,0,0,0,1 –>
Measuring distances between body control points
Measuring the distances between control points must be done before, during and after pulling. Measuring the geometric parameters of the body helps determine the direction of pulling. Measuring while drawing helps to check that the drawing is correct. Measurements after pulling show the correctness of the final result. Measurements can be taken with a tape measure or a special ruler to check the geometry of the body. You need to take diagonal measurements and length measurements between points. You can read more about measurements in the article “Checking body geometry”. It is advisable to have data on the distances between test points, which can be found in repair manuals.
An example of a diagram with the location of control points and the distances between them.
The test points must be returned to the original factory position. An error of several millimeters is allowed.