The filter is an important component of the fuel system of a vehicle - the life and service life of the power unit and adjacent vehicle systems directly depends on the quality of purification of the incoming fuel.
That is why it is necessary to change the fuel filter in a timely manner, adhering to the conditions of scheduled maintenance and the car manufacturer’s regulations.
As is correct, when replacing an old filter, drivers choose foreign-made options - the original filter on the Niva has a short lifespan and quickly becomes clogged.
The most popular fuel filter models for Niva are presented in the table below. All parts comply with the stated standards of the official manufacturer.
| Manufacturer | Country of Origin | Part number | Approximate cost, rub. |
| Romania | ASAM | 30524 | 260 |
| Romania | ASAM | 30543 | 275 |
| Italy | STARLINE | SF PF7012 | 350 |
| Italy | STARLINE | SF PF7043 | 370 |
| France | PURFLUX | EP163 | 370 |
According to the automaker's regulations, the fuel filter on the Niva must be changed every 30,000 km. However, the need to replace the part may arise much earlier - if low-quality fuel is poured into the car or the car is driven on dusty or dirt roads, then the filter needs to be changed every 15,000 km.
Remember, the service life of the engine depends on the timely replacement of this element; a clogged filter significantly speeds up the production of engine components.
Note! It is strictly not recommended to install a fine filter on a car, especially when refueling the vehicle with low-octane fuel. The fine filter does not provide adequate filtration quality, as a result of which small abrasive elements and chips can get into the internal combustion chambers of the engine, which will reduce the service life of the engine. This type of tuning is not compatible with the domestic auto industry!
Replacing the fuel filter VAZ 21214 injector Niva
HomeVAZ 2110Replacing the fuel filter VAZ 21214 injector Niva
How often should you change the fuel filter? - According to the regulations, replacement must be carried out every 30 thousand km. mileage However, if the car is operated in dusty conditions or low-quality fuel is used, then replacement must be done more often.
Where is the fuel filter located? - If the filter meets Euro-2 toxicity standards, then it is installed in the engine compartment on the left front mudguard under the spare wheel. If the filter meets Euro-3 toxicity standards, then it is installed under the bottom of the car, in a recess, above the additional muffler.
| We carry out the work on a cold engine. |
You mean that the fuel in the power system (with the ignition on, as well as for some time after) is under pressure. Therefore, before replacing the fuel filter, the pressure must be relieved. If the car’s ignition has not been turned on for more than 3 hours, then there is usually no pressure in the fuel system. You can check the pressure by unscrewing the cap of the fuel rail fitting and pressing the spool rod. (see here)
You also need to keep in mind that the filter is located below the level of the fuel tank and when it is removed, fuel can flow out of the tank through a tube disconnected from the filter. Therefore, you need to have a container to collect fuel.
To relieve pressure in the system, remove the lining of the left front side panel (see here) ...
We disconnect the connectors connecting the wiring harness of the engine management system and the rear wiring harness. Start the engine and let it idle until the fuel runs out. Then turn on the starter for 2-3 seconds. After this, the pressure in the power system will be released.
Disconnect the negative cable from the battery.
To remove the filter under the bottom (Euro-3)
To remove the filter under the hood (Euro-2)
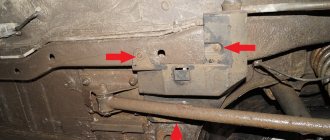
Remove the spare wheel support bracket.
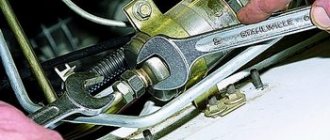
| Holding the filter with a 19mm wrench, use a 17mm wrench to unscrew the fuel pipe fitting, gradually bleeding the gasoline into the substituted container. |
We remove the fuel pipe from the filter. Similarly, disconnect the fitting of the second tube.
| Each tube has a rubber O-ring, which we replace with a new one if damaged. |
| Use a 10mm wrench to loosen the clamp bolt... |
| ...and remove the fuel filter. |
Install the filter in reverse order.
The arrow on the new fuel filter should point toward the rear of the vehicle (in the direction of fuel flow).
Having installed the new filter, we connect the connection block between the wiring harness of the engine management system and the rear wiring harness. We check the tightness of the connections with the engine running.
lada-niva.ru
Where is it located and how to replace the fuel filter on a Niva Chevrolet
The Chevrolet Niva fuel system requires systematic maintenance. If this is not done, the driver will be in for unpleasant surprises: the engine starts to run jerkily, some noise is heard in it after starting, and fuel consumption increases significantly. These are all signs of a clogged fuel filter that needs to be replaced. We will tell you how to replace it with your own hands in this article.
Where is it located and why is a fuel filter needed?
Before restyling it was located under the hood, after 2009 - next to the rear wheel
The purpose of this element is clear from its name: it must purify the fuel that is supplied to the engine from the tank through the fuel line. Any fuel, even the highest quality, contains foreign particles, water and other substances. All this remains in the fine filter, which on the Chevrolet Niva produced before 2009 was located under the hood, and on new cars that have undergone restyling, this filter is located under the bottom, at the right rear wheel, under a protective cover. This article will discuss replacing the filter on new machines.
The arrow shows a plastic casing on the bottom of the machine, behind which there is a fine fuel filter.
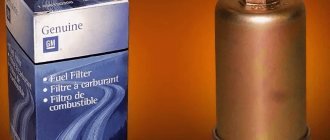
Which consumable to choose
You can install an original fine filter. (its GM OEM number is 21231117010). However, many car owners prefer to install imported filters, for example, Bosch 0450905273 or Hummel WK512. Such filters are more expensive than the original ones, but they will also last longer.
- New fine fuel filter.
- Set of open-end wrenches.
- Set of socket heads with a wrench.
- Phillips screwdriver (medium size).
- The car is installed on the inspection hole.
- The interior opens and the right rear seat rises to an upright position.
Underneath there is a layer of soundproofing material. He leans to the side. The rear seat is raised, the sound insulation is removed, there is access to the cover - This gives access to the square fuel pump cover, which is secured to the floor with four self-tapping screws.
These screws are unscrewed using a Phillips screwdriver. The cover is attached to 4 self-tapping screws, which can be unscrewed with a Phillips screwdriver. - A block with wires is attached to the pump, which is held in place by a metal retainer.
The latch rises, the block is disconnected. The block with wires is disconnected manually, just lift the latch - After this, the car starts and idles until the engine stalls on its own. After this, the starter turns 3-4 more times, as a result of which the fuel pressure in the system is relieved.
- At the right rear wheel, under the bottom of the car, unscrew 2 nuts and 1 bolt, which hold the plastic casing.
This is done using a 10mm socket head. The casing is removed, allowing access to the fine filter. This can be done conveniently with a 10mm socket socket. - There are 2 plastic fittings at the ends of the filter.
They are squeezed with your fingers and removed from the tubes. These fittings are easy enough to squeeze with your fingers. - Using a 10mm wrench, loosen the bolt on the mounting bracket holding the filter, and it is carefully removed from its original location.
To remove it, loosen the bolt by 10 on the mounting bracket - A new filter is installed in its place, after which all components are reassembled.
Important points
- Any work on the fuel system should be carried out either outdoors or in a well-ventilated area, away from sources of fire.
- You need to carefully remove the old filter, since there is almost always gasoline left in it, which can get into the eyes of a person in the inspection hole.
- A new filter must be installed in the direction of fuel flow. To do this, each filter has an arrow showing the direction of movement of gasoline.
- When squeezing the plastic fittings when removing them from the filter, do not apply much force. Despite their apparent strength, they are very fragile.
- The car's operating instructions recommend changing the filter every 30 thousand km. But taking into account the quality of domestic roads and gasoline, car service employees recommend changing the filter every 15 thousand km.
Replacing a fine filter is a task that is entirely within the capabilities of anyone who has at least once held a screwdriver and a socket wrench in their hands. The most important thing is not to forget to relieve the pressure in the fuel system, otherwise troubles cannot be avoided. And of course, we must not forget about safety precautions. All work must be carried out away from sources of fire, and work should only be done with gloves and safety glasses.
Replacing the fuel filter on other car models:
Copywriter with five years of experience.
Rate this article:
motorltd.ru
Design of the injection power system Niva 2121, Niva 2131
vazclub.com
Fuel system (injection) Niva VAZ 21213, 21214, 2131 lada 4×4
(Carburetor engine power supply system)
Diagram of the engine power supply system with distributed fuel injection
The fuel supply is located in the tank located under the rear seat (it is bolted to the body and covered with a plastic cover). The tank is stamped from leaded steel sheet, its upper and lower halves are welded together. The filler neck is connected to the tank by two rubber hoses; The lower (thick) hose is used to fill the fuel, the upper (thin) hose is used to remove displaced air when filling the tank with fuel. The hoses are secured with clamps. The tank plug is sealed. Two fittings in the upper part of the tank (left and right) serve to ventilate the tank; they are equipped with plastic tubes connected to the separator.
The separator is secured with self-tapping screws in the niche of the right rear part of the body. It is connected by hoses and pipelines to the adsorber in the engine compartment. In the sections of the hose near the separator, gravity and two-way valves are installed, as well as a tee connected to the fuel vapor release hose. The latter comes out outside the body near the filler neck, and a safety valve is installed in its section. Fuel vapor from the tank partially condenses in the separator, and the condensate is drained back into the tank.
The remaining vapors pass through gravity and two-way valves and enter the adsorber. The gravity valve prevents fuel from leaking out of the tank when the vehicle rolls over, and the two-way valve prevents excessive increase or decrease in pressure in the fuel tank.
In the adsorber, fuel vapors are absorbed by activated carbon. The second fitting of the adsorber is connected by a hose to the throttle assembly, and the third to the atmosphere. When the engine is turned off, the latter is closed by the solenoid valve, and in this case the adsorber does not communicate with the atmosphere.
When the engine starts, the injection system controller begins to send control pulses to the valve with a frequency of 16 Hz. The valve communicates the adsorber cavity with the atmosphere and the sorbent is purged: gasoline vapors are sucked through the hose and throttle assembly into the receiver and then into the engine cylinders. The greater the engine air consumption, the longer the duration of the control pulses, the more intense the purging.
The fuel pump is electric, submersible, rotary, structurally combined with sensors for the fuel level and its reserve balance in the tank. It is mounted on studs on the top of the fuel tank. The pump is turned on by a command from the injection system controller (with the ignition on) through a relay.
From the pump, through hoses and pipelines located under the bottom, fuel under pressure is supplied to the fine filter in the engine compartment and then to the fuel rail.
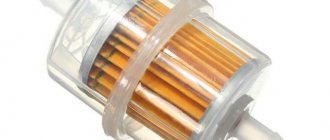
The fine fuel filter is non-separable, in a steel housing, with a paper filter element, located on the left side of the engine compartment. There is an arrow on the filter housing that must coincide with the direction of fuel movement.
The fuel rail serves to supply fuel to the injectors and is mounted on the intake manifold.
Fuel rail assembly: 1 — fuel pressure regulator; 2 — nozzles; 3 - fuel rail
It contains a fitting for monitoring fuel pressure (on the side facing the engine shield) and a pressure regulator. The latter changes the pressure in the fuel rail in the range from 2.8 to 3.2 bar (2.8–3.2 atm) depending on the vacuum in the receiver, maintaining a constant pressure difference between them. This is necessary for accurate dosing of fuel by injectors.
The fuel pressure regulator is a fuel valve connected to a spring-loaded diaphragm. The valve is closed under the action of the spring. The diaphragm divides the regulator cavity into two isolated chambers - “fuel” and “air”. The “air” is connected by a vacuum hose to the receiver, and the “fuel” is connected directly to the ramp cavity. When the engine is running, the vacuum, overcoming the resistance of the spring, tends to retract the diaphragm, opening the valve. On the other hand, fuel presses on the diaphragm, also compressing the spring. As a result, the valve opens and part of the fuel is released through the drain pipe back into the tank. When you press the gas pedal, the vacuum behind the throttle valve decreases, the diaphragm closes the valve under the action of a spring, and the fuel pressure increases. If the throttle valve is closed, the vacuum behind it is maximum, the diaphragm pulls the valve harder - the fuel pressure decreases. The pressure difference is set by the spring stiffness and the size of the valve opening and cannot be adjusted. The pressure regulator is non-separable; if it fails, it is replaced.
The injectors are electromagnetic valves that allow fuel to pass through when power is applied and are closed by the action of a return spring when power is de-energized. At the injector outlet there is a nozzle through which fuel is injected into the intake pipe. The injectors are sealed in the ramp with rubber rings; it is recommended to replace them each time the injector is dismantled.
The injection system controller controls the injectors. If there is a break or short circuit in the winding, the injector should be replaced. If the injectors become clogged, they can be washed at a special service station without dismantling them.
The plastic air filter housing is installed in the rear right side of the engine compartment on three rubber holders. The filter element is paper.
Elements of air supply to the throttle assembly: 1 - air filter; 2 — mass air flow sensor housing; 3 — corrugated rubber sleeve; 4 — air intake
After the filter, the air passes through the mass air flow sensor and enters the intake hose leading to the throttle body.
The throttle assembly is fixed to the receiver. By pressing the gas pedal, the driver slightly opens the throttle valve, changing the amount of air entering the engine, and therefore the combustible mixture - after all, the fuel supply is calculated by the controller depending on the air flow. When the engine is idling and the throttle valve is closed, air flows through the idle air control valve - a metering valve controlled by the controller. The latter, by changing the amount of supplied air, maintains the specified idle speed. The regulator is non-separable; if it fails, it is replaced.
lada-niva.ru
What kind of carburetor is originally installed on the Niva?
The Niva car is equipped with carburetors from the classic “Ozone”, which is not the best two-chamber unit with an idle economizer. The economizer is an autonomous system with a solenoid valve that automatically comes into operation when the ignition is turned on. When the speed increases above 1000, it is turned off, and the engine is maintained using an air damper.
The updated model received the French Solex design. The 1.7-liter engine required an increase in the amount of air-fuel mixture, and therefore Ozone was no longer used.
Replacing the fuel filter on a VAZ Niva car (injector)
In accordance with the maintenance regulations, we replace the fuel filter every 30 thousand km.
If the car is operated in dusty conditions or with low fuel quality, the filter must be replaced more often than specified in the regulations.
We carry out the work on an inspection ditch or overpass.
The fuel filter is installed at the bottom of the car in the recess of the bottom above the additional muffler.
The fuel in the power system (with the ignition on and for some time after it is turned off) is under pressure. Therefore, if we replace the filter immediately after a trip or after turning on the ignition, it is necessary to relieve the fuel pressure in the power system.
If the ignition has not been turned on for a day or more, there is usually no fuel pressure in the system. This can be checked by unscrewing the cap of the fuel rail fitting and pressing the spool rod (see “Power system”, page 123).
When replacing the filter, you need to take into account that it is located below the fuel tank and when the filter is removed, fuel can flow out of the tank by gravity through the disconnected tube. Therefore, we place a container under the filter to collect fuel.
By pressing the two latches, we disconnect the connection block between the engine management system harness and the rear wiring harness.
We start the engine and let it idle until it stops due to fuel exhaustion. Then turn on the starter for 2-3 seconds. After this, the pressure in the power system will be released.
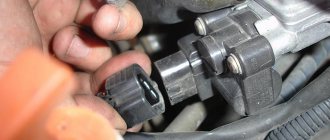
Using a 10mm wrench, loosen the tightening of the fuel filter clamp bolt.
Holding the fuel filter housing by the hexagon with a 19mm wrench, use a 17mm wrench to unscrew the fitting of the fuel supply tube to the filter.
We remove the tip of the tube from the filter to avoid fuel leakage from the tank and place it on the tip of the cap of the brake bleeder fitting.
Similarly, we unscrew the fitting of the tip of the fuel supply tube to the ramp...
... and remove the tube tip from the filter.
We move the filter forward and remove it from the clamp.
Drain the remaining fuel in the filter into a container. We install the new filter in the reverse order.
The arrow on the filter housing should be oriented in the direction of fuel flow (towards the front of the car).
Before connecting the fuel pipes to the filter, we check the condition...
... sealing rubber rings located on the tips of the tubes.
If the ring is damaged (tears, cracks, jams) or loses its elastic properties, replace the ring.
After installing the filter, connect the connection block between the engine management system wiring harness and the rear wiring harness. Turn on the ignition and check the tightness of the connections.
Order a book on repair and operation
How to reduce pressure in the engine power supply system?
Method No. 1
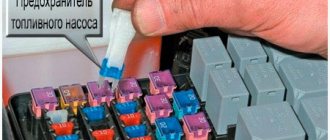
- Unscrew the nut securing the cover of the engine control unit - it is located inside the passenger compartment.
- Remove the cover.
- Remove the fuse for the electric gasoline pump.
- Turn on the engine, it should run until all the fuel in the fuel line is exhausted. When this happens, the engine will stall on its own.
- Reinstall the fuse.
Method number 2
You can reduce the pressure using the control valve, which is located behind the fuel rail; it is closed with a cap (usually made of plastic). The design of the valve is similar to a wheel spool. Unscrew the cap and drain excess fuel by simply pressing the spool.
Disconnection of the fuel wires is possible only after this procedure. Be extremely careful! Gasoline will come out under pressure.
Replacing the fuel filter VAZ-21214
Replacing the fuel filter
EXECUTION ORDER
We carry out the work on a cold engine.
Disconnect the negative cable from the battery. Remove the spare wheel support bracket.
Holding the filter with a 19mm wrench, use a 17mm wrench to unscrew the fuel pipe fitting, gradually bleeding the gasoline into the substituted container.
We remove the fuel pipe from the filter. Similarly, disconnect the fitting of the second tube.
Each tube has a rubber O-ring, which we replace with a new one if damaged.
Use a 10mm wrench to loosen the clamp bolt...
...and remove the fuel filter.
Install the filter in reverse order. The arrow on the new fuel filter should point toward the rear of the vehicle.
Having installed the new filter, we check the tightness of the connections while the engine is running.
Replacing the filter located in the engine compartment
To replace the filter located in the engine compartment, you must follow the algorithm below.
- Relieve pressure in the fuel line.
- Disconnect the tubes from the nozzles.
- Loosen the clamp.
- Remove the old filter.
- Install a new filter and check for gasoline leaks.
What increases gasoline consumption on Niva series cars
Fuel consumption for the Niva 2131 is 16.5 liters in urban conditions, 12.1 liters for the mixed version and 9.7 liters for the highway. This figure can hardly be significantly reduced, and it easily increases due to improper operation of any vehicle, including:
Fuel consumption can be increased if the engine, for example, on 21214, operates outside the operating temperature. This could be a problem with the cooling system, including the thermostat, fan, cooling sensors, or coolant. It will be relatively cheap for “nivovods” to replace the thermostat, which costs about 350 rubles. The operation is performed independently, since all you need is a Phillips screwdriver.
To replace the part, you need to drain the antifreeze, then unscrew all the bolts on the pipes from the thermostat clamps, remove the pipes and remove the element from under the hood. Using a ratchet handle and a socket on “13”, you can easily change the VAZ 2121 radiator fan by unscrewing just three mounting bolts. Thus, it is possible to adjust the ventilation system without extra costs so that operating temperatures in the engine do not exceed the required 98-102 degrees Celsius.
Work and consumables can be much more expensive if the problem of increased fuel consumption is associated with poor operation of the SBU, which is based on incorrect sensor readings. In this case, problems may arise with the lambda probe, mass air flow sensor, throttle position sensors, and temperature sensors. In this case, it is better to go to the stand at the service station.
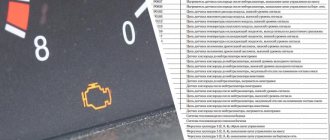
Niva 2121 fuses: where are they located, replacement - AutoExpert
14.01.2020
The main fuse box is located in the passenger compartment under the dashboard, to the left of the steering wheel.
| Relay no. | Decoding |
| 1 | Engine control system fuse box |
| 2 | Windshield wiper relay |
| 3 | Fuse blocks |
| 4 | Engine control relay block |
- In order to get to the main and additional fuse blocks in the Niva, you need to pull the latch, which is located on top of the blocks and remove the cover:
- Explanation:
| Fuse designation (rated current, A) | Protected Circuits |
| F1 (16) | Heater Blower Motor Switch, Tailgate Defroster Switch, Tailgate Wiper Motor, Tailgate Wiper/Washer Switch (Windshield Washer Pump) |
| F2(8) | Steering column switch, windshield wiper motor, hazard warning switch, breaker relay (in turn signal mode), reverse light switch, instrument cluster (coolant temperature gauge, fuel level gauge, tachometer, indicator lamps: turn indicators, differential locks, parking brake, emergency condition of the service brake system, insufficient oil pressure, fuel reserve, battery charge) |
| F3(8) | Left headlight (high beam), high beam indicator lamp |
| F4(8) | Right headlight (high beam) |
| F5(8) | Left headlight (low beam) |
| F6(8) | Right headlight (low beam) |
| F7(8) | Side light lamps in the left front and left rear lights, license plate lights, side light indicator lamp |
| F8(8) | Side light lamps in the right front and right rear lamps, backlight lamps for the instrument cluster, cigarette lighter, switches, heating and ventilation control unit |
| F9 (16) | Hazard switch, breaker relay (in hazard mode), heated tailgate glass relay contacts |
| F10(16) | Sound signal, interior lamps, brake lamps in the rear lights |
| F11 (8) | Reserve |
| F12(8) | Reserve |
| F13(8) | Fog light relay contacts in rear lights |
| F14(16) | Cigarette lighter fuse |
| F15(16) | Reserve |
| F16(8) | Reserve |
- Engine control system fuse box.
- On the left side of the body, under the dashboard, there is a diagnostic connector and a block with four fuses for the engine control system. To gain access, you need to unscrew two self-tapping screws and remove the casing:
- Fuse location diagram in the Niva 21214 block.
- Explanation: