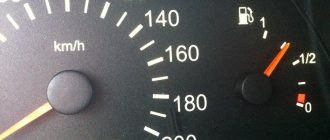
Car : VAZ-2112. Asks : Petrov Viktor. The essence of the question : It incorrectly shows the fuel level in the gas tank or does not show anything at all, it sits at zero.
Hello! I have a problem that the arrow does not correctly show the level of fuel that is in the gas tank. It happens that the arrow either increases or decreases the actual availability of gasoline, and recently it even started pointing to an empty tank, although I know for sure that there is still more than half there. What to do?
Replacing the fuel level sensor and checking it on a VAZ 2110, VAZ 2111, VAZ 2112
Welcome! Fuel level sensor - thanks to it, you can find out at any time how much fuel you have left in the gas tank; if you didn’t have it or if it had become unusable, then checking the fuel in the tank becomes much more difficult and inconvenient; you would have to live without it you would have to unscrew the cap of the gas tank and poke some kind of stick into it to find out how much gasoline is left in it, but on modern cars the gas tank generally goes to the very bottom (all front-wheel drive cars do this) and gasoline is poured into it through a tube that comes from the top and connects to the tank.
Note! In order to replace the fuel level sensor, you will need tools, namely: Wrenches to unscrew the nuts securing the fuel pipes, you will also need a screwdriver, and we also recommend stocking up with a rag to wipe off gasoline that gets on you and we do not recommend that you smoke while working or use fire (a lighter, for example)!
Summary:
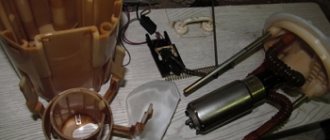
Where is the fuel level sensor located? It is located in the gas tank itself, or rather, it is one piece with the gas pumps and therefore you won’t be able to see it so easily, let’s start first with the fact that, as we said earlier, the gas tank is located at the bottom, it is located on front-wheel drive cars immediately under the rear airbag seats, so in order for you to be able to see the fuel pump inside of which the sensor itself is located, you will have to first fold back the rear seat cushion and only after that unscrew the two screws that secure the cover (This cover will be discussed in another article to which a link will be given as you read) you will see the location of the fuel pump (It is circled in red), and you will need to remove it.
When do you need to change the fuel level sensor? It must be replaced when the fuel level readings become incorrect, that is, if the fuel level arrow does not show (Although there is gasoline in the tank), and also if the arrow shows completely incorrect readings (Although this can be corrected, in this case the sensor is most likely bent the lever that holds the sensor float is in the wrong direction) and even if ringing the wiring does not give you anything (we will tell you how to test the sensor wiring in the same article, so stock up on ohmmeters in advance) then the sensor also needs to be replaced.
How does the device work?
To understand the problem yourself, you need to understand how the fuel level is measured and information is transmitted to the device indicator. The circuit implemented in most vehicles includes the following main elements:
- a float made of lightweight polymer is immersed in the gas tank and is often combined with the pump block;
- gasoline sensor – lever-type potentiometer (otherwise known as rheostat);
- pointer arrow with scale;
- connecting wires.
In many modern cars, an electronic control unit is connected to the system.
The classic rheostat is an open coil of high resistance wire. A lever equipped with a contact and attached to the float rises or falls with the level of fuel in the tank, and the contact moves along the turns of the winding. The classic scheme works simply:
- The rheostat and the pointer device are connected in series in the circuit, both are powered from the vehicle's on-board network.
- When moving the float with the lever, the resistance of the potentiometer changes.
- A change in resistance causes an increase or decrease in the current in the circuit, to which the indicator arrow reacts. The scale is graduated according to the resistance values corresponding to the filling of the gas tank.
How to replace the fuel level sensor and how to check it on a VAZ 2110-VAZ 2112?
Note! When replacing an old sensor with a new one, try to buy the same type that was installed, the thing is that the sensors all look similar to each other, but they are different, and if you buy with the wrong marking, then there is a chance that it will work for you it won’t, or it won’t be as it should be!
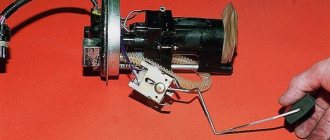
Removal: 1) Essentially, this sensor is changing and is not so difficult, but the first thing you need to do is remove the fuel pump from the car, you can read more about how to do this in the article entitled: “Replacing the fuel pump with "VAZ".
2) When you have removed the fuel pump, proceed to disassembling it and removing the sensor. To do this, use a screwdriver (Thin screwdriver) to move the retaining ring (Indicated by the red arrow) from the upper groove to the lower one, which is indicated by the blue arrow, thereby giving yourself the opportunity lift the cover of the fuel pump, and after it is lifted, disconnect the wiring from the fuel pressure regulator terminal as shown in photo 2.
Disassembly of the unit, its reassembly
To check the functionality of the VAZ 2108, VAZ 2109 sensor, it is necessary to disassemble the unit. You will need the following set of tools:
The following actions are performed sequentially:
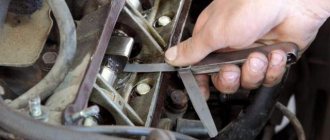
- We recline the back seat and see the lid. Use a Phillips screwdriver to unscrew the fasteners and remove the compartment cover.
- There are a bunch of wires in the compartment, all of them must be carefully disconnected one by one so as not to damage them. This is where the 7 head comes in handy.
- Next, use a 10mm head to unscrew the fuel sensor itself, and then remove it from the gas tank. This should be done carefully, without jerking.
Source
VAZ 2112: how to replace the fuel level sensor
Fuel (gasoline) level sensor (controller) in the VAZ 2112 tank, also known as FLS
Have you started to notice that the fuel sensor is giving incorrect readings: when you start the engine, it shows an empty tank, but as soon as you start driving and gasoline begins to splash in the tank, the sensor readings change? You may need to replace the VAZ 2112 fuel sensor. However, let’s not rush and first figure out why the fuel level controller (FLS) does not work, and whether this problem can be solved by replacing it. Our instructions will help you understand the reasons for the malfunction, eliminate them and replace the controller if necessary. The price of the issue (the sensor itself) is within 100 hryvnia (400 rubles).
Note: The gasoline level sensor (controller) in the tank is designed to inform the driver, through an indicator on the dashboard, about the amount of fuel in the car’s tank. Its readings determine whether you will be able to reach your destination without refueling, or whether you will be stuck in a field, running out of gas and unable to refuel. Therefore, we advise you to pay attention to the behavior of the indicator on the dashboard more often in order to avoid troubles.
Adjusting the readings
If the arrow periodically increases and decreases the values, then adjustment will help in this case.
Adjusting the fuel sensor (FLS) - removing the fuel pump
- Raise the rear sofa.
- We remove the fuel pump and clean everything from dirt. (More information about removing the fuel pump here).
Preparing to remove the fuel pump
- Next, we connect the control wires to the fuel pump and begin to move the float from side to side. While watching the arrow on the instrument panel. During rotation, its readings should also change from full to empty tank.
If in any position the arrow indicates incorrect values, then it is necessary to bend the adjusting tongues on this side so that the float rod can move to the right or left freely, depending on its location.
Adjusting the control arrow on the instrument panel
If the problem is the arrow on the instrument panel, then you need to remove the instrument panel and adjust it manually.
Possible malfunctions and ways to eliminate them
Sensor readings jump
Tip: The most common malfunction of the gasoline level controller is associated with operational wear of the contact parts of its rheostat. You can verify this by measuring its resistance with an ohmmeter, smoothly moving the lever with the float on it from the left extreme position to the right (or vice versa). A faulty controller must be replaced
The cause of this problem lies in the erased tracks on the sensor rheostat board. They wear out under the influence of the runner. Sometimes bending the runner helps for a while; it becomes slightly higher than the worn parts of the tracks. If the abrasions are too great, then replacement is recommended.
Common problems
The fuel volume control system in the gas tank is susceptible to the following malfunctions:
- the pointer indicator lies at zero regardless of the amount of fuel remaining in the tank;
- the device does not display the fuel level correctly - it is lying up or down;
- the needle “jumps” or changes readings in a short period of time;
- The yellow minimum fuel indicator indicator does not light up.
Reference. In some domestic car models, the fuel sensor is lying from the factory. An example is the Chevrolet Niva SUV of the first releases, where the device greatly underestimates the actual level of gasoline. The driver, guided by the sign, pulled into a gas station, only to discover that the tank was full to the top.
There are several reasons why the needle drops to zero:
- Sticking or jamming of the lever.
- The float lost its seal and sank to the bottom.
- An electrical circuit is broken due to oxidized contacts or a wiring problem.
- Failure of the indicator itself or the lever sensor - potentiometer.
Selecting a new sensor
Replacing a fuel level sensor on a VAZ 2112 is not such a difficult process, however, it is more difficult to choose the right controller to replace the old one. So:
- If you have no idea which gasoline level sensor to choose, then select it according to the following parameters.
- We create a resistance instead of the sensor itself, and then measure it with a tester and find out the value of the resistance.
- To do this, we need a special variable resistor rated at 1 kOhm; we connect it instead of the FLS.
- With a full tank, the resistance is approximately 6-7 ohms.
- We adjust the pointer to the “empty tank” position, then measure the resistance.
- Based on the data received, we are looking for a new sensor with the appropriate resistance. The main thing when searching is that the nominal resistance of the new controller corresponds to the indicator readings.
- In addition, you can use the instructions in the service manual.
- Before buying a fuel sensor for a VAZ2112, you need to determine its markings.
- There are many varieties of such sensors (controllers) (more than 8), and they practically do not differ in appearance.
- The difference between them is the resistance, which is different for each type.
- We strongly recommend purchasing a sensor with similar markings, otherwise you risk receiving false readings from the fuel controller, even if the system is fully operational.
- For your information, the older your sensor, the more difficult it is to find it on sale (the oldest models are DUT-1).
Common problems
The fuel volume control system in the gas tank is susceptible to the following malfunctions:
- the pointer indicator lies at zero regardless of the amount of fuel remaining in the tank;
- the device does not display the fuel level correctly - it is lying up or down;
- the needle “jumps” or changes readings in a short period of time;
- The yellow minimum fuel indicator indicator does not light up.
Reference. In some domestic car models, the fuel sensor is lying from the factory. An example is the Chevrolet Niva SUV of the first releases, where the device greatly underestimates the actual level of gasoline. The driver, guided by the sign, pulled into a gas station, only to discover that the tank was full to the top.
There are several reasons why the needle drops to zero:
- Sticking or jamming of the lever.
- The float lost its seal and sank to the bottom.
- An electrical circuit is broken due to oxidized contacts or a wiring problem.
- Failure of the indicator itself or the lever sensor - potentiometer.
Typically, incorrect readings and “jumps” of the needle are a consequence of contamination of the rheostat and slider. On a car with high mileage, these parts can wear out - the thin layer on the plates wears away, causing contact to disappear between them and the runner.
The fuel level sensor in the tank sends conflicting signals that are reflected on the dashboard.
One of the reasons for the minimum level indicator not working is a burnt-out light bulb on the instrument panel. Less common are problems with the end contact located inside the tank, or a break in the electrical wiring. In the newest systems, the lamp even lights up at the command of the controller when the resistance of the lever potentiometer reaches a certain value.
Diagnostics using additional tools
To diagnose cars, including the VAZ 2110, various equipment is used, which is connected to a special connector. Thanks to this equipment, which is not particularly complicated or expensive, you can get a complete picture of the condition of the car.
The service station uses a personal computer to which data from phase sensors is transmitted via a special cable.
Bluetooth devices have appeared on the market that allow diagnostics using a smartphone, tablet or laptop.
They work according to the scheme. The device is connected to the connector, the ignition is turned on and the diagnostic process begins. The data comes from phase sensors to the ECU. From it to a mobile device on which specialized software must first be installed.
This makes it possible not only to obtain more data, but also to present it in a more visual form. This method allows a driver, even with little experience in operating a car (in our case, a VAZ 2110), to obtain all the data about his car.
But most drivers prefer to carry out diagnostics at a service station. So that you are aware of the data that the on-board computer produces through RAM from the phase sensors, we will present the transcripts of common errors.
Diagnostics
There are two ways to diagnose the condition of car systems. Let's start with the first one, which does not involve the use of additional equipment.
To start the self-diagnosis function, you need to press a button that resets the mileage for the day. Turn on the ignition. You will see how the arrows on the instruments begin to move from one position to another. This means that the diagnostics of the VAZ 2110 has been launched and information has begun to flow from the phase sensors to the ECU. After the process is completed, the RAM will transmit numbers to the display that will show the state of the car’s systems.
Decoding combinations
When the self-diagnosis is completed and the number 0 is displayed, this means that everything is in order with the vehicle and all systems are working as expected:
- if 1 is displayed, this indicates that there are problems with the microprocessor or the RAM is failing;
- 4 — high voltage in the network, more than 16 V;
- if 8, then low.
If there is not one fault, but several, then a figure equal to the sum of faults will be displayed. If 6 lights up, then this will mean the sum of the numbers 2 and 4. If 14, then most likely there are three malfunctions at once, namely 2, 4 and 8.
The simplest diagnostics that is available to the driver without the use of additional equipment. It will, of course, help identify some faults, as well as show the condition of the components and systems of the VAZ 2110 as a whole. But to specifically identify all faults and decipher information coming from phase sensors, additional tools are needed. For example, the on-board computer STATE, which provides more data.
Broken ground contacts
This problem manifests itself on the panel by displaying incorrect information; the tachometer needle may drop below the current level. The needles of other instruments may also freeze, either permanently or for a short period of time. The panel backlight may also disappear, but the arrows will show the correct data.
Bolt for fixing ground wires from all devices
Through trial and error, it was found that these glitches can occur due to the fact that the ground contact is broken. Under the dashboard, near the driver’s right foot (near the gas pedal), there is a special mount to which ground wires from all instruments are fixed.
To solve such a malfunction in the operation of the VDO dashboard, you simply need to improve the contact. Unscrew the bolt at “8”, disconnect and clean all contacts suitable for it. To be safe, it is advisable to treat them with “electronic contact cleaner”. After this, all that remains is to connect the wires and screw the bolt back.
Bottom line of the route display
If you have stopped switching the parameters that are displayed in the bottom line of the route display (under the total or daily mileage), then the problem lies in the steering column switch.
It is responsible for switching between the following options:
- current time;
- outside air temperature;
The buttons on the switch work every once in a while
- travel time (valid from the last reset);
- average fuel consumption;
- instantaneous fuel consumption (changes as the vehicle moves);
- average speed since reset;
- residual power reserve with the remaining fuel in the tank;
- amount of gasoline consumed since reset.
Checking the steering column switch
Checking the contacts in the steering column switch housing
In those cases, switching between the BC readings on the panel should be done with a switch on the steering wheel, but this cannot be done - you should make sure that it is working. This steering column switch is used on the panels: “VDO” 1118-3801010, “Schetmash” 2170-3801010-01 and “Avtopribor” 1118-3801010-02. To check whether the steering column switch is working properly, it must be removed and disassembled.
Disassembling the switch consists only of removing the cover, which is held in place by a small metal latch in the form of a bracket. There are 4 contacts under the cover, which are connected to the Reset button and to the switches. There are yellow and black wires coming from the “Reset” button. There are green and red wires coming from the top switch button. All these contacts must be checked with a multimeter for resistance.
If it is, then everything is fine with the switch and you need to disassemble the dashboard to inspect the contacts and tracks. On VDO panels with one window produced in 2006-2007, there is a factory defect - poor contact of one of the resistors, which, during driving, cracks and interrupts the connection between the steering column switch and the panel board.