It's no secret that over time, all the upholstery of a car's interior begins to rapidly lose its appearance. This is reflected most strongly on the ceiling: it darkens, fades, spots and cracks appear on it. This is especially noticeable if you smoked a lot in the car. In this case, the cheapest way to correct the situation is to reupholster the car ceiling with your own hands.
The process, of course, is quite labor-intensive, but it allows you to save a considerable amount on the services of specialists. In addition, before work you can watch a video on this topic, then many questions will disappear by themselves.
Ceiling material
The first thing to do is to choose the material for reupholstering the car ceiling. Today, the choice is simply huge; the ceiling can be upholstered with flock, carpet, Alcantara, natural or artificial leather, or fabric can be used. They all have their own merits, and making a final decision can be difficult. On average, it takes at least 5 square meters to reupholster the ceiling and racks. m of material, be it leather or fabric.
[custom_ads_shortcode1]
Removing the headliner
To properly repair a car's ceiling trim, it must be dismantled. To do this, you need to remove all the plastic trim parts that are adjacent to the ceiling trim and interfere with its removal. It is also necessary to remove the interior lighting lamps (in the front part), sun shields, plastic handles and all the clips that hold the trim. The lampshade, which is located in the middle part, should be removed last, as it will keep the casing from falling down while you unscrew and dismantle all other parts. Each car has its own characteristics of removing various elements, so if difficulty arises, it is better not to apply excessive force, but to find instructions on the Internet. Sometimes it is enough to know in which place you need to insert a flat-head screwdriver to make the part give way.
To remove the removed trim from the interior, it may be necessary to remove the front passenger seat.
So, when all the edges of the ceiling trim are free from fastenings, you need to unscrew the interior lamp and pull the trim out of the cabin to the workplace where it will be repaired. On cars with a fifth door this will be easier to do, but on sedans you will have to contrive to stick the headliner through the door. To remove the removed trim from the interior, you may need to bend (or twist) it a little. Here you need to be careful not to bend it too much.
It may be necessary to dismantle and remove the front passenger seat from the passenger compartment so that it does not interfere with the removal of the headliner from the passenger compartment.
Automotive leather
Perhaps the best material that you can choose for upholstering a car ceiling with your own hands is automotive leather. The list of its advantages is impressive:
- it is strong, durable and abrasion resistant;
- not afraid of open fire;
- it cannot be damaged by chemical compounds used to clean the interior;
- not afraid of water;
- does not deteriorate from temperature changes and high humidity.
Perhaps the only drawback this material has is its high price, so not everyone can afford it.
[custom_ads_shortcode2]
GAZ 31 WagonTeam › Logbook › Hard ceiling!
In the near future, the ceiling of the car will be noisy and the car will be given to the guys to make a hard ceiling from fiberglass (with Alcantara covering). The question is that this ceiling costs me almost 5 thousand without Alcantara (the price is determined by a single copy), there is an opportunity to pay a couple of thousand extra and I will have a matrix at my disposal to make the ceilings there will be about 1800-2500 (without pasting, without delivery, from my margin 300-500r.). Are there people interested in purchasing hard ceilings for our station wagons?
I’ll say right away that you need at least 5 people willing (for me this is the payback of the matrix)
Ecological leather
As an alternative to natural leather, you can use artificial leather to reupholster the ceiling. This material also has very high performance characteristics, but is much cheaper. Here are its advantages:
- it is easy to care for, you just need to wipe it periodically with a slightly damp cloth; you can use ethyl or ammonia to remove greasy stains;
- does not crack at low temperatures;
- does not get wet;
- does not wear out;
- the surface is smooth and soft;
- rich color range;
- long service life;
- low cost.
Externally, eco-leather differs little from natural leather, so it can be used to give the car interior an equally impressive look. In terms of performance and quality characteristics, it ranks second among materials used for car interior finishing.
[custom_ads_shortcode3]
Car ceiling painting
If the ceiling in your car has acquired an unpleasant color over time or after cleaning, do not rush to re-tighten it. Perhaps painting will help you.
For a high-quality result, it is best to remove the ceiling. If you don’t have the time or desire to remove it, you can simply paste over and cover the parts that cannot be painted.
You can choose aerosol paint for suede or fabric, or water-based paint, which is applied with a sponge, roller or brush. Plain enamel cannot be used for cars, as it is not intended for painting.
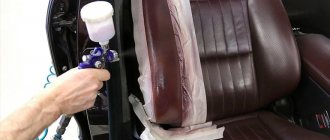
It is best to paint in dry weather; be sure to use personal protective equipment when carrying out work. To make it convenient to paint from bottom to top, it is better to use a spray gun; a spray can may not cope with this task.
The surface must be clean and dry before painting. the paint is applied alternately, in several layers. The quality of painting depends on the skills of the artist.
A well-painted surface looks no worse than a repainted one, and the cost of paint is much less. Therefore, in some cases it is more profitable to try painting the upholstery than reupholstering.
Painting the ceiling with a spray gun will allow you to achieve an impeccable result.
Alcantara
Alcantara, or faux suede, is a synthetic fabric made from ultra-fine fibers. Outwardly, it really resembles suede. This fabric is quite often used in auto tuning, for the manufacture of various inserts in the interior of the cabin and seats.
Alcantara has deservedly earned the title of “breathable” material - air passes through it unhindered. The advantages that Alcantara has allow us to classify it as one of the best options for do-it-yourself interior reupholstery:
- has a pleasant appearance and is pleasant to the touch;
- long service life without loss of quality (does not wear out, does not fade, does not stretch);
- not afraid of temperature changes and high humidity;
- wide choice of colors.
[custom_ads_shortcode1]
Choosing glue for work
Having chosen a material suitable for the type and budget for covering the ceiling, you can move on to the next important stage of work - choosing an adhesive. It is important to choose one that is non-toxic, can firmly connect the elements to each other, and does not leave streaks.
The following types of glue exist:
- Based on polychloroprene. It has a strong hold, is durable and resistant to temperature changes.
You might be interested in Features of embroidered French tulle mesh and types of fabrics used
Rice. 11 Polychloroprene based adhesive
- On polyurethane. Versatile, durable, also widely used by craftsmen. However, it takes a long time to harden, which makes the gluing process too long.
- In aerosol form. They are also used for covering the ceiling, but they have shown themselves best when covering torpedoes, etc.
In an aerosol
Flock
This material is not used for reupholstering car interiors with your own hands as often as the previous ones. However, it has a number of advantages that make it recommended for use:
- attractive appearance, variety of colors and textures;
- high wear resistance;
- noise-absorbing properties;
- ease of care.
Re-upholstering the ceiling with flock will require, in addition to glue, the use of a flocking agent and a degreasing agent, i.e. is associated with additional costs.
[custom_ads_shortcode2]
Ceiling re-upholstery technology
The process of re-upholstering the ceiling comes down to gluing the material onto a matrix. This work can be compared to wallpapering - here it is also important to secure the fabric, making sure that there are no folds. For this reason, it is also important to work with an assistant here. The sheathing is glued from the center, moving towards the edges.
Re-upholstery process
The work algorithm looks like this:
- A thin strip of glue is applied to the center of the matrix with a length of no more than 100 mm.
- The central part of the selected ceiling fabric is placed in place with glue and smoothed well with a roller.
- The same strips should be applied every 100-150 mm.
- The material itself must be carefully stretched and smoothed each time (but not overly zealous). This is where you need an assistant, with whom the work will go faster and better.
- After gluing all the fabric, you should go over it with a roller again. Then you can dry it with a hairdryer at a not very high temperature.
- Now you should tuck the edges and glue them on the inside. All excess material is then trimmed off.
If the work is done correctly, the result will be no worse than factory quality. Some types of fabrics are sold with a self-adhesive backing, so there is no need for glue.
Car ceiling reupholstery
After the material and glue have been selected and purchased, it is necessary to dismantle the ceiling and remove it from the car interior. In a hatchback this is somewhat easier to do due to the presence of a fifth (or third) door, whereas in a sedan you may need to remove the front passenger seat.
First of all, all additional elements are removed, such as visors, handles, lampshades, and plugs. After the ceiling is removed from the car's interior, you need to carefully remove the old material from the base, as well as any remaining glue and foam rubber, if it was there.
Then the new material is carefully glued to the base. It is better to glue together. You need to start from the center to the edges.
The glue (you can use “Moment”) is applied evenly, the assistant must stretch the fabric (or skin), and the adhesive carefully smoothes it out. It is better to do this with gloves (cellophane or rubber), otherwise hand marks may remain.
Particular attention should be paid to bends and recesses; the fabric in these places should be glued as securely as possible. The edges of the material need to be wrapped and glued to the back of the ceiling. After this, you need to cut out holes for bolts and additional elements, if possible in such a way that the edges of the material are also wrapped and glued to the back.
After the glue has dried, you can begin installing the car ceiling in the reverse order. Despite the apparent complexity, reupholstering the ceiling in a car with your own hands is quite within the capabilities of even an amateur, especially if you watch the instructional video. The main thing is a little patience and diligence.
Alcantara ceiling reupholstery is becoming a very popular service among car owners who want to improve the interior of their car. Factory car ceilings, as well as ceiling pillars and sun visors, are most often light gray; this, of course, is done by manufacturers for visual volume in the car’s interior, but when reupholstering the seats in a different color, car owners also want to create a unified style and design of the interior, that’s why contact the SealAuto car shop for this service. We, in turn, can offer our clients the service of reupholstering the ceiling not only with original Alcantara (which is produced in Italy at the only plant in the world), but also with original ceiling fabric of various colors and shades. Our craftsmen reupholster the car ceiling within 4-5 working days, this includes careful dismantling of the ceiling, ceiling pillars and other interior parts, then gluing and drying these elements, painting plastic ceiling fittings and, of course, installing these parts back into the car interior. If you decide to come to us for a car ceiling reupholstery service, we will always be happy to help you in choosing colors and other issues related to this work and we hope that the result of our work will exceed your expectations!
In the vast majority of cases, reupholstering the car ceiling is necessary for the simple reason that the owner becomes uncomfortable in his car. There are always details in the cabin that really catch the eye, be it the seat covers or floor mats... even the air freshener. Upholstery burned by someone, old traces of food.
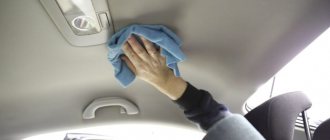
But there are also less noticeable elements that can tell a lot about their owner. One of these elements is the cabin ceiling. Contamination of fabric upholstery with dust getting into it, fading of color under the influence of sunlight, and if the car is old, then sagging of the ceiling.
Gradually a decision comes: the ceiling needs to be re-drawn! By the way, reupholstering the ceiling is often popular with women for the simple reason that they just like to change something. You can easily do this yourself.
Reupholstering is a great way to update your car's interior ceiling.
[custom_ads_shortcode1]
Execution Rules
To reupholster the sheathing, in addition to new material, you will need:
- adhesive composition;
- degreaser (alcohol, acetone, gasoline);
- screwdrivers;
- fine grain sandpaper;
- hard sponge;
- roller for leveling the surface;
- masking tape.
It is also recommended to purchase a hair dryer, which will speed up the drying of the glue, and plugs. The latter are torn off during retightening and cannot be restored.
Replacement of the coating is carried out in several stages. If the ceiling is tightened, then first remove:
- pens;
- visors;
- lampshades and other decorative elements.
Then the old covering and foam rubber are dismantled. The surface is then treated with a soap solution and a hard sponge. Next, the ceiling needs to be degreased with appropriate means. This must be done, since traces of old glue remain on the surface, due to which the new canvas will not be fixed firmly enough. Finally, the ceiling must be sanded.
After preparation, a thin layer of glue 10 centimeters long must be applied to the surface in the center (if necessary, the sheathing is also treated with the composition). Then the selected material is glued to the ceiling. Next, the next layer of adhesive is applied in increments of 10 centimeters, and the sheathing is attached.
When performing the described procedure, you need to carefully handle the niches and bends. In these places, the finishing material often sags, which is why it will be necessary to re-upholster it in the future. During gluing, the skin must be immediately leveled using a roller or hands. To avoid sagging, the material must be tensioned.
If, after completion of the work, sagging is detected, this area must be heated with a construction hairdryer. Otherwise, a new banner will be required. It should also be taken into account that roof leaks are possible in older cars. Therefore, before starting work, it is necessary to check the tightness of the body and eliminate any identified defects.
Advantages
Nowadays, in stores you can buy absolutely everything you might need to reupholster the ceiling with your own hands, so there shouldn’t be any difficulties here. Moreover, doing this simple work yourself will allow you to save quite a significant amount, since such services are expensive. There is no need to wait in line at the service station, pay much more and worry about whether the result will be of high quality. How nice it will be to see the creation of your own hands every day!
[custom_ads_shortcode2]
Lada 4×4 3D Midnight in Monte Carlo › Logbook › DIY ceiling
I’ll tell you about the ceiling, I made it a long time ago, but I didn’t post it because I never finished it... and I don’t know how yet, maybe we’ll think about it together?
I’ll first make a report as I did. Without the sizes of the guys, whoever needs it, I can measure it, I just did it locally...
I tried on a sheet of 6mm plywood, sawed off the edges as needed, measured the arc radius of the windshield, and also cut out
Next are the walls for the center console on the ceiling made of a 21mm plywood sheet (what was there is not important)
Then I decided to blacken it in the middle just to make it look better when you shoot something more or less, because... I wanted to make an opening shelf there, but I haven’t done it yet...
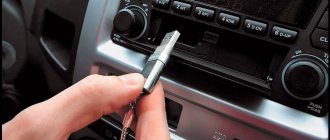
Next is the center console itself, which comes after the first one, but the first one has no photos ((there is a sheet of metal drilled for toggle switches, cut for a fuse block, and painted... and the second one is for a gazelle lamp (the cheapest one is more or less decent in appearance)
As a result, the whole thing is covered with leatherette, fastened to the jumpers on the ceiling with self-tapping screws (not long, otherwise you can drill through the roof)))... everything is held quite decently and tightly...
As you can see now, all the buttons are on the ceiling, there are shelves, and after this console there is a plywood with a lampshade...
The question now is how to cover the curves of the roof on the sides - it’s not clear! ((at the back the second half of the ceiling will also be made of plywood and there will be something else on it, then you’ll see) I’m waiting for advice on improving this work of idiocy of the Russian soul and student idleness... comments like POST HARD CEILING AND DON’T WORRY You don’t have to write it, I’m already thinking about it myself, but the point here is to finish what I wanted! And I’ll always have time to install a hard one
Source
Reasons for getting a reupholstery
Some reasons when you need to replace your car's headliner:
- Dirty or worn areas (head marks, soot from cigarette smoke, stains of road dust or dirt).
- Mechanical damage to the casing (scratches, impact marks, tears or cuts).
- The desire to change the design, make a new color scheme. Owners seeking to improve the appearance of their car are trying to radically change its interior lining.
- Natural wear and tear from prolonged use. For example, with frequent washing, the fabric wears out from detergents.
In every car, the ceiling is subject to wear and tear.
[custom_ads_shortcode3]
Materials
To reupholster the ceiling with your own hands, you can use special fabrics with a set of certain characteristics: carpet and Alcantara, leather and leatherette, vinyl artificial leather and auto velor.
Carpet is a non-woven fabric with a decorative layer covered with pile. Used for ceiling coverings and audio systems. Soundproofing acoustic fabric, which has a texture of various shades. Good stretchability, there are types of coating that are water-resistant.
Alcantara is a very durable coating, has a soft surface that has dirt-repellent properties. It is easy to care for and is very comfortable for long-term use.
Vinyl leather and leatherette are a fairly inexpensive material with good stretch, but it has its own smell and absorbs others, and is not particularly resistant to mechanical damage.
Auto velor is a traditional material for replacing the ceiling with your own hands. Velor fabric is not particularly resistant to mechanical stress, but it is easy to clean and does not wear out for a long time.
Leather is one of the most beautiful and expensive materials. It is characterized by naturalness and special strength, leather is wear-resistant and durable.
[custom_ads_shortcode1]
A selection of photographs of garage ceilings
Properly selected cladding simplifies maintenance, provides a comfortable microclimate and lasts a long time without requiring additional costs. It is not always expensive. You can hem the ceiling in your garage with budget but attractive materials.
Preparing for work
Re-upholstering the ceiling with your own hands should be done in a place where it is warm and there are no drafts. To replace the upholstery you will need material, scissors, a knife, screwdrivers, glue, rags. Since in any garage most of the specified equipment is available, reupholstering the ceiling can be done with minimal financial losses.
You need to unscrew all the plugs and handles, visors and clips, as well as various additional devices. Then you need to carefully remove the old casing. The surface must be carefully cleaned of glue residues using a suitable solvent and a sponge, then walk along the surface of the ceiling with zero-grade sandpaper in order to remove any unevenness, and the glue will adhere better to a rough surface.
The removed old upholstery will be used as a pattern. You need to remove dust and dirt from it, carefully spread it on a flat surface, and secure the edges with masking tape. After the new upholstery material is evenly positioned on the template, it is necessary to cut out the holes that are provided for in the ceiling design. This is done with a knife and scissors.
In general, reupholstering a ceiling with your own hands is about gluing it: the main task is not so much to remove it as to correctly glue the new fabric without folds or unevenness. First you need to apply glue in the center of the ceiling with a thin strip (10 cm), and press the central part of the material. After this, you can glue from the center of the ceiling to each side, applying glue in strips of 10 cm. If you have an assistant, his task is to pull the material away from the center and smooth the fabric, moving from the center to the edges. In this way, you need to glue each side and watch all the bends and indentations, pay more attention to them - in such places the upholstery fabric should be glued very well. The edges of the fabric are folded and glued, the remains are cut off. All the necessary holes are very carefully cut out for the fasteners.
[custom_ads_shortcode2]
Reupholstering the interior at home - step-by-step photo report
1. First of all, you need to remove the ceiling from the interior. In some cars, you even have to remove the windshield to do this. This option is definitely not suitable for me, so I didn’t even think about it and tried to get it that way. I took it out through the back door, having first removed the passenger seat, and after a little torment I managed to get it out.
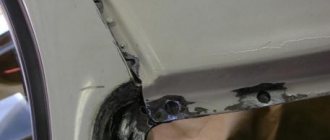
2. The frame of the ceiling of my car is a matrix onto which glass mat was sprayed, after which epoxy was applied. I tear off the remnants of velor and foam rubber and prepare the surface for gluing a new one.
3. Using a metal brush, a knife, a dishwashing knife and other sharp cutting tools, we remove the remnants of the old glue. Finally, the surface must be “sanded” with sandpaper of the smallest possible grit. This will make the surface smoother and improve the adhesion of the glue and material.
To glue the fabric, I used glue “88”; you can use another glue with similar characteristics.
4. The fabric for the ceiling is also up to you personally; there is a large selection of different options in stores. Personally, I chose black fabric with large grain and expressive structure. It looks beautiful and is pleasant to the touch, and besides, there will be no stains or other marks that remain on white velor.
5. In fact, the ceiling reupholstery can be safely called gluing, because the fabric is glued and not stretched using rivets and staples. It’s better to call an assistant for gluing, so the quality of the work will be higher and the work itself will end much faster and more fun.
6. Sticking. Apply a thin line of glue about 10 centimeters in the center of the ceiling frame, then apply the center of the fabric to it.
7. Next, slowly, gradually glue each side, starting from the center of the ceiling. Everything is about the same, 10-15 cm each. An assistant should pull the fabric from the glued center, while you should gradually smooth the fabric with your hands (wear mittens or cellophane gloves) from the center to the edges. If your fabric is light-colored, your hands may leave marks, so gloves are a must.
8. Carefully watch the edges, corners and bends, do not be lazy to properly tuck the fabric in the corners and press it in the recesses, you should not have sagging or un-glued places, the future service of your ceiling depends on this. The edges of the fabric must be folded and glued, and the excess can be carefully trimmed if necessary.
9. We make holes for fastenings, after which you can begin installing the finished laminated ceiling at the place of further service.
The result is visible in the photo. It seems to me that it turned out pretty well. When I first decided to reupholster the ceiling with my own hands, I didn’t even imagine that it would turn out so well. Over time, I even began to catch myself thinking that I was even glad that the old ceiling had become unusable, since I liked the new one much better.
Current:
- Self-upholstery of the steering wheel with leather or a leather steering wheel with your own hands
- What is carbon film? DIY carbon fiber pasting
When to contact specialists
You should not reupholster the car ceiling if the overhead airbags have deployed. This will require certain knowledge and good skills. In this case, simply re-tightening is not enough.
This will require restoration of the original shape and, additionally, strengthening with epoxy resin and fiberglass. After this, you can start reupholstering the ceiling, but first it’s better to install new pillows.
The headliner reupholstery procedure described here is suitable for most vehicles. As you can see, this is quite doable, you can do everything yourself. At a low cost, you won’t regret the time spent - the new ceiling will look much fresher and better.
- DIY ceiling reupholstery
Do you want to replace your car's old headliner material, change the color, or restore your car's headliner after an airbag deployment? At the same time, you do not plan to seek help from specialists. Be prepared for the fact that reupholstering the ceiling with your own hands will take quite a lot of time and sometimes require an investment comparable to reupholstering the ceiling in a car workshop.So, how do you reupholster the ceiling yourself? In this article we will look at the following nuances of re-upholstering the ceiling: - how exactly the ceiling is re-upholstered;
- what material is better to reupholster the ceiling; - what glue to use;
- how to repair the ceiling with your own hands; What you will need to reupholster the ceiling with your own hands:
None - glue;
— brushes or a compressor with a spray gun; — if repairs are necessary: automotive putty, sandpaper (80), scraper, fiberglass, epoxy resin;
- super glue and anti-super glue; — iron and natural fabric (cotton, linen).
[custom_ads_shortcode1]
Work procedure and valuable tips
The ceiling frame has already been cleared of the remnants of old fabric and foam rubber. You can sand it with 80-120 sandpaper for better adhesion. Before gluing, you need to remove any remaining dust and grease from your hands - we use degreasers, but it is not recommended to apply a lot - if the composition saturates the top layer of the frame, it can cause delamination of the material. Therefore, we are testing this method in a hidden area.
Pasting the frame with material
The ceiling has been laid on the table, fabric has been purchased, and a jar of glue has been opened. Let's get started!
Safety precautions require the use of safety glasses, a respirator and rubber gloves. It should be noted that glue that gets on the front surface of the ceiling will spoil the appearance and will not be cleaned off, so we apply the glue with rubber gloves and smooth the fabric without them.
Using a brush, apply a thin layer of glue to the frame area. We wait for a while according to the instructions, lay the fabric and press it in order, paying more attention to bends and indentations. A small roller, a plastic spatula, fingers and a cloth will help you press the fabric. It is important that the layer of glue is small and uniform; it is not advisable to rub the same place with your fingers - it can leave a stain.
You should not cover the entire frame with glue - there is a risk of not having time to press the fabric. Therefore, we apply in strips of 30–40 centimeters, this slowness will allow us to avoid mistakes.
The fabric at the edges can be cut along the edge with a sharp knife, or it can be folded onto the back side of the frame by 1-2 centimeters, cutting it with “teeth”. In this case, the fabric will hold up better. However, it is worth considering that installing the ceiling will be more difficult - it will become wider by the thickness of the fabric.
Video: plywood ceiling of a car in a workshop
What mistakes can a novice master make:
The ceiling is glued - we give it a soak, the time of which depends on the instructions for using the glue. After this, we proceed to installing the ceiling.
Ceiling installation
To mount the ceiling, you must first carefully place it inside the car. Practice shows that it is easier to remove the ceiling from a car than to install it in place. Therefore, you should use the services of an assistant and wear clean gloves. We put the ceiling in place and fasten it. An assistant must support the sagging parts of the ceiling, preventing the frame from breaking or bending. If this is not done, wrinkles or folds will appear that will spoil the appearance of the finish.
It is better to select the fasteners in advance to match the color of the trim so that it does not stand out. It is also better to replace clips that are broken during disassembly. When tightening the screws, you should be extremely careful; a broken screwdriver will scratch the plastic or fabric.
Evaluation of work and rewarding of the master
The critical stage is acceptance of the completed work. A new ceiling in a car always looks nice, but don’t relax - we must look at all the shortcomings, loose spots, and dirty spots. We correct them if possible.
If you did the work yourself, be sure to reward yourself with a good emotion; if the work was done by a professional, in addition to money, you can leave a good review of his work, tell your friends about the talented master.
Installation of a car ceiling needs to be done only by two people: then the work will be done carefully