- home
- Steering
- Malfunctions of the electric power steering and how to understand that the power steering is broken
18.02.2021
Electric power steering is designed to make driving life easier. It helps to turn the steering wheel in a parking lot without putting much effort; in modern cars it prevents accidents and makes driving easier. It is more reliable and better than the hydraulic booster, but it still breaks down, although less often. Let's look at the main malfunctions in the operation of the electric amplifier and how they manifest themselves in order to be prepared for repair costs.
Advertising:
Battery problems
Based on this, we can draw the first conclusions about the cause of the breakdown. A common cause of malfunction is low voltage in the on-board network. The fact is that for the amplifier to function, a supply voltage of 13.5V is required.
First of all, we test the battery, if everything is fine with it, then we’ll look into it further. The problem may have occurred when you removed the battery for charging. To make the electric booster work again, turn the wheels to the extreme position and back 5-6 times, very often this is enough to resume operation.
Electrical faults of the electric booster
When troubleshooting electrical problems, be sure to remove the terminal from the battery. This procedure must be performed during any electrical work in the car.
Operation failure
It happens that when you turn the key in the ignition switch, the icon indicating a malfunction in the EUR turns on again. A possible malfunction is a breakdown of the amplifier drive motor. It is possible to fix such a malfunction yourself if you have electrical knowledge. If you are unable to repair the electric motor, it is recommended to replace it with another one.
Operation failure may also occur in the following cases:
- The fuse has blown. However, it is recommended to replace the fuse only after eliminating the cause of its blown. The fuse is designed to protect the electrical circuit from short circuits. When the wires are shorted, they heat up and the fuse link melts, breaking the electrical circuit. There is probably an overlap of wires in the circuit and their further short circuit. Eliminate the cause and only then change the fuse.
- Poor contact at the connections, resulting in a lack of power in the amplifier circuit. Correct the contacts or clean the wire connections.
Speed sensor
One of the most vulnerable elements of the system is the speed sensor. This is an electrical device that is designed to control the electric drive of the amplifier at various speeds.
The fact is that using ESD at high speed can cause an accident, since the slightest rotation of the steering wheel will lead to the car being driven off the road. This sensor reads the speedometer and, as speed increases, weakens the power steering effect. Thus, it turns out that at high speed the power steering operates in the same way as when using a mechanical amplifier.
The main malfunction of the sensor is its failure. If the sensor fails, the amplifier circuit does not receive speedometer readings and the amplifier is turned off. After this, a special icon on the instrument panel lights up (steering wheel with an exclamation mark). In this mode, the amplifier operates without an electric drive and does not interfere with the steering. In this case, you just need to remove fuse F31 in the block to the left of the steering wheel to completely disconnect the circuit before replacing the speed sensor.
Ultimately, to fix this problem, you just need to change the speed sensor.
Mechanical problems
Mechanical failures of the power steering include various damage to the amplifier structure, jamming, deformation and fracture. In cases with mechanical faults, the electric amplifier must only be replaced.
Wiring fault
In the case when the battery is in order, we look at the wiring; weather conditions, frost, rain or heat may be associated factors. If the electric power steering on a Priora turns off when weather conditions change, then this is a clear sign of a wiring fault. Check the soldering and insulation of the winding; a short circuit may occur.
The Priora's electric power steering does not work all the time. The maximum load on the electric motor occurs at low or no speed, and the minimum at high speed. So, in the Priora, at a speed of 110 km/h, the electric booster is completely turned off. At the same time, feedback to the steering wheel becomes maximum. The Kalina electric power steering switches off already at 60 km/h.
➤ Electric booster Grant Liftback - step-by-step installation
Cars of the Lada Grant family are equipped with power steering as standard. Electromechanical power steering (hereinafter referred to as EPS) is installed individually by the owners.
Electromechanical power steering
ESD is a relatively new development of modular control, which, like power steering, has advantages and disadvantages.
Is it worth installing electric power steering on a Lada Granta car?
The cost of the EUR for Granta Liftback is 15-20% more expensive than its hydraulic counterpart. Not every owner can afford installation.
Chip errors
When a situation is observed that the wheels turn on their own, the reason is the electronic filling of the Priora electric power steering control unit. As mentioned above, quality was sacrificed for the sake of economy. Now the situation with this seems to have improved and everything has been finalized, but if suddenly you feel that the steering wheel is starting to move by itself, go for repairs.
If, along with the electric power steering, the speedometer also fails, then you need to look at the speed sensor. It was either simply dirty or broken. The same applies to the torque sensor installed on the amplifier. Clean them well and check their functionality.
Don’t forget to reset errors on the on-board computer; this can be done in several ways.
- Remove the terminal from the battery, wait a few seconds and put it back, the error should go away.
- Using a computer, the corresponding software can be found on the Internet.
How to check the EUR yourself
To understand what is broken in the amplifier, you need to diagnose it. Not every car owner has a diagnostic scanner; some people like to repair the car themselves. In this case, you can determine the malfunction of the electric amplifier yourself using a paper clip. This option is suitable for Kalina and Priora cars.
"Paperclip" method
We disassemble the protective cover of the steering column and get to the amplifier control unit. We find a black block with six wires. It is necessary to close contacts 7 and 6 between each other - “ground” and “K-line”. If you look at the block from the side of the wires, then the countdown goes from right to left, from top to bottom. You need a brown wire - contact number 7 and an empty socket, not used - number 6 in a row.
Turn off the ignition, insert a paper clip into the contacts, make sure that it does not short-circuit the other wires. Turn on the ignition and count the number of flashes of the warning light on the dashboard. One long signal, and then several short ones, these are the ones that need to be counted. Let's look at the decoding of fault codes for Kalina's electric booster :
- One short one – the system is working;
- Two - No signals from the engine speed sensor;
- Three – The torque sensor is faulty;
- Four – Electric motor failure;
- Five – There is no signal from the steering shaft position sensor;
- Six – The rotor position sensor is faulty;
- Seven – Low voltage on-board network;
- Eight – EUR control unit;
- Nine – Vehicle speed sensor.
In practice, this method may not always show real breakdowns. In this method, the control unit checks itself, and it needs to be checked under load. There were cases when it generated false errors, and the fault was hidden in the electric power steering ECU.
To Contents...
Fuse box location
If you suspect that a fuse has blown and you want to check it, then the question arises: where is the Priora electric power steering fuse located? The control mounting block is located to the left of the steering wheel. Its opening scheme is simple. All you need to do is turn the three latches 90˚ and remove the cover, as shown in the photo, and you get to the brain stuffing of the car.
Here you can check and replace the failed fuse, then close the lid by pressing it tightly and snapping the three latches back 90˚ in the opposite direction.
You can carry out diagnostics and minor repairs to the Priora's electric power steering with your own hands. To do this, it is enough to determine what caused the failure and fix the problem, following our advice. It is better to entrust a complete replacement of the electric amplifier to professionals.
Electric power steering is a component used to provide more comfortable driving. Not so long ago, domestically produced cars began to be equipped with EUR, in particular, in this article we will talk about Lada Kalinas. What malfunctions can occur with the Kalina EUR and what troubleshooting methods are there? Find answers to these and other questions below.
Causes of EUR failure
Dismantling and disassembling the electric amplifier
How to tighten the electric power steering rack?
Photo gallery “Adjusting the steering rack”
How can I lubricate and adjust the EUR?
Electric power steering connection diagram with icons
Video “Guide to repairing an electric booster in a garage”
Comments and Reviews
How to make repairs
Repair of the electric power steering is carried out depending on what exactly has failed. If the amplifier itself breaks down, this is not such a serious problem, since the vehicle can be driven without it. But, for example, if the control unit of this mechanism “flies”, then this problem is already quite serious. To carry out repairs, you need to remove it from the car. To do this, you need to remove the steering wheel to gain access to the control unit.
After this, you need to remove the decorative plastic trim. By removing the plate you can see our block. Before disconnecting it from the system, it is advisable to disconnect the battery. Next, unscrew all the mounting bolts and disconnect the device.
Now you can check how worn it is, whether it can be fixed or whether it can only be saved by replacing it with a new one. As a rule, to determine the breakdown, you need to remove the steering wheel and EUR. This way we have a better chance of finding faults.
To extend the life of your car's electric power steering, it is recommended to operate it correctly.
- Try to avoid any mechanical or physical impact on the amplifier or its relay. If it so happens that this mechanism falls out of your hands (at the time of installation), it must be checked for damage, and if any are present on any parts, they must be replaced.
- It is not recommended to expose the system's electronic devices to moisture or high temperatures.
- Do not touch the contacts on the connectors, as this may cause them to become deformed.
- After the control unit has been replaced with a new one, it is necessary to carry out adjustment (calibration). This is necessary in order to set the zero point of the sensor indicating the speed of the car.
- It is also recommended to avoid any mechanical or physical interference with the steering column assembly.
Compliance with all the rules will allow you to maintain the functionality of your electric power steering and the entire steering system, which means that steering will be as easy and comfortable for you as before.
Causes of EUR failure
Why does the electric power steering on the Lada Kalina not work, turns off and refuses to work, what are the signs of a steering wheel with power steering knocking, jamming, biting or squeaking? To repair the system yourself, you need to know how diagnostics are carried out and what causes precede the breakdown. Most often, the failure of the amplifier is caused by a breakdown of the unit itself and the amplifier fails. Problems of this type are resolved by thoroughly checking the system to identify the exact problem.
As practice shows, often the inoperability of the electric amplifier (failure) is associated with a breakdown of the speed controller.
- the steering wheel is jammed,
- jams
- becomes tight
- and others
Because the speed controller sensor ensures activation and deactivation of the electric power steering under different driving modes. The amplifier on Kalina works if the car is moving at low speed. When the speed begins to increase, the booster automatically turns off, allowing for safer machine control when driving at high speeds.
So, briefly about the reasons for the inoperability of the EUR:
- The speed controller has failed or the control unit does not receive or disappears a signal from it. In this case, the reason may lie in either a breakdown of the sensor, damaged wiring, or poor contact of the controller with the on-board network.
- The voltage in the vehicle's electrical network has decreased. The reasons can be different, ranging from a dead battery and an inoperative generator to the use of inappropriate electrical equipment in the car.
- The permissible crankshaft speed has been exceeded.
- Incorrect operation or failure of the control module. Depending on the cause, the control unit may need to be repaired; more detailed diagnostics need to be done.
About qualified electric amplifier replacement
If there is a need to replace the mechanism when the ESD does not work, we recommend contacting experienced technicians. When the car is under warranty, the most rational measure would be to contact the dealer network to resolve the problem.
There are situations that do not allow you to resort to these two methods of eliminating an amplifier malfunction. Then the only solution will be to manually replace the mechanism that has become unusable.
Let us immediately make a reservation that the replacement process if the EUR does not work is characterized by sufficient complexity. To carry it out successfully, you will need experience and the possession of special tools. Unqualified replacement actions can aggravate the scale of the breakdown, which will entail a significant waste of money on more expensive repairs in service conditions.
Before the actual replacement procedure, we recommend that you carefully study the entire list of features and actions if the ESD does not work. Here you will need to delve into the connection diagram of the unit, which will avoid damage to the electrical components of the mechanism.
To remove the amplifier, partial disassembly of the front panel of the Lada Kalina is necessary. After this, the device itself must be disconnected from the entire list of supply wires. Sometimes owners repair the electric power steering, avoiding the need to replace it with a new unit. As a rule, after a complex of restoration work, standard devices work no worse than their new counterparts.
A common malfunction is the occurrence of a knock that clearly comes to the driver from under the panel or the amplifier turns off. This phenomenon may be accompanied by a characteristic squeak that occurs during rotational actions with the LADA Kalina steering wheel. This situation is usually solved by using a special lubricant. If such an action does not bring the expected result, then a more detailed diagnosis of the amplification mechanism will be required.
To install the electric power steering in the seat of the Lada Kalina, you will need to be attentive and patient. All cable connectors must be tightly seated, and the device itself must be firmly secured. Only after this can you proceed to the reassembly of the previously dismantled front panel components.
Diagnostics
To check the amplifier in a car, you need to remove the plastic trim on the steering column; to do this, unscrew the bolts securing it from the bottom.
Then you will need to get to the 8-pin plug, its pinout is as follows:
- The blue contact is connected to the ignition switch, this is 12 volt power;
- the red-brown contact is the connection cable to the tachometer;
- the gray contact goes to the car speed controller;
- white and pink wire - amplifier control indicator;
- black-yellow contact is a diagnostic line;
- the next contact is empty, the wire is not connected to it;
- brown contact is ground;
- empty.
Dismantling and disassembling the electric amplifier
Before removing the amplifier, you need to remove all the steering column switches. Remove the steering rack cover and dismantle the devices, remembering to disconnect the connectors from the power supply.
How to remove the EUR with your own hands:
- After removing the switches, you will need to dismantle the lower cross member of the dashboard. To do this, you need to press the fasteners that secure the connector with wires, and then disconnect the wiring from the control module. Once these steps are completed, you can disconnect the connector from the switches.
- The system bracket is secured with nuts; you will need to unscrew them with a wrench.
- After this, the steering rack will need to be carefully lowered down. To do this, you will need to find the bolt that secures the driveshaft to the booster shaft. This bolt must be unscrewed, but when unscrewing, you will need to fix the nut, this will prevent it from turning. When the bolt is removed, the fastening will need to be loosened, after which the intermediate shaft will be carefully removed. At this stage, we recommend marking the position of the shaft and gears; you can use a marker for this. This step is very important because doing it will prevent possible installation problems in the future. If the marks on the shafts do not match, this may cause problems with the amplifier. When dismantling, be careful not to damage the wiring, as this will also lead to the inoperability of the ESD.
- When the unit is dismantled, it will need to be disassembled and the failed elements replaced. Further editing is done in reverse order (the author of the video is Murzik Bely).
Grant electric power steering repair
We remove the steering column assembly if the steering shaft bearings or electric power steering fail.
Set the front wheels to the straight-line position of the vehicle. Disconnect the wire terminal from the negative terminal of the battery. We remove the spiral cable drum device (see “Removing the steering column switches and the connector of the switches with the spiral cable drum device”). We disconnect the ignition switch wire blocks and, if necessary, remove the switch from the steering column (see “Removing the ignition switch, replacing the contact group and immobilizer coil”). Remove the cover of the fuse and relay mounting block from the instrument panel (see “Replacing fuses and relays”). Using a 13mm socket, unscrew the nut of the bolt securing the intermediate shaft to the steering gear shaft. If the bolt turns, hold it with a 13mm wrench.
Using a powerful slotted screwdriver, we open the terminal connection of the universal joint of the intermediate shaft.
Using a high 13mm socket, unscrew the two rear mounting nuts...
...and two nuts for the front steering column mounting...
...and lower the steering column to the floor.
By pressing the block latch, disconnect the black wiring harness block from the electric power steering block.
Similarly, disconnect the gray wiring harness block.
We take out the steering column with the intermediate shaft from under the instrument panel. The electric power steering control unit can be removed without removing the steering column. For clarity, we show the removal of the control unit on the dismantled steering column.
Pressing the block latches, disconnect the three wire blocks from the control unit connector.
Using a Phillips screwdriver, unscrew the two screws...
...and turn the bracket with the control unit.
Using a Phillips screwdriver, unscrew the three screws...
...and remove the control unit. Install the electric power steering control unit in the reverse order. To remove the intermediate cardan shaft, turn the bracket with the control unit. We use a marker to mark the relative position of the upper joint of the propeller shaft relative to the steering shaft.
Using a 13mm spanner, unscrew the nut of the hinge coupling bolt. If the bolt turns, hold it with a 13mm wrench.
Remove the hinge bolt. Use a screwdriver to loosen the terminal connection of the hinge.
Remove the intermediate shaft. Install the intermediate driveshaft in reverse order. When connecting the upper joint of the intermediate propeller shaft to the steering shaft, it is necessary to align the previously made marks. Install the steering column in the reverse order. In this case, we mount the lower hinge of the intermediate shaft on the gear shaft of the steering mechanism so that the coupling bolt of the hinge is located vertically on the right side. It is more convenient to install the steering column with an assistant.
How to tighten the electric power steering rack?
The appearance of a knocking sound in the operation of the electric power steering is associated with the need to tighten the steering rack.
How to do it right:
- First you need to disconnect the battery; to do this, disconnect the terminals from it. Unscrew the battery mount; to do this, you need to unscrew two more nuts located at the edges. After this, the battery is removed and put aside.
- Then you need to lift the plastic stand, there are four more screws under it, they can also be unscrewed.
- Having done this, it is necessary to move this stand forward until the platform is disconnected from the air filter housing retainer pad. After this, the trim can be moved back, this will provide freer access to the rail itself.
- At the next stage, you will need to crawl your hand under the rail. Directly below it, as shown in the photo, there is a rubberized cap; it will need to be removed, this will allow the key to access the adjusting nut.
- To perform adjustment work, you will need a special wrench to tighten the rack; without it, the adjustment procedure will not be possible. Using this wrench, you need to crawl under the car rail to install the tool in the required hole.
- When adjusting, be careful not to overtighten the rack. If its tightening is very strong, then when cornering the rack will bite, and this, in turn, may affect the safety of movement. The angle of adjustment is always different, it depends on how much the nut is loose, but usually when performing such work the nut is tightened by approximately 30 degrees. This should be enough to get everything right. After the adjustment is completed, it will be necessary to check that this task was performed correctly. That is, you will need to make sure that the steering wheel turns normally to any position all the way and there is no knocking. If the knock remains, then the adjustment continues.
Operating principle of the EUR
Every time you turn the steering wheel, the torsion shaft twists. Information about this process is transmitted from the torque sensor to the control unit online.
Based on the information received, the electronic control unit (hereinafter referred to as the ECU) accumulates information and reads readings from other sensors. The ECU transmits a signal to the electric motor, which increases the torque of the steering rack shaft by activating the electric motor.
Information is processed so quickly that tenths of seconds pass from the moment of transmission to the moment of reading.
How can I lubricate and adjust the EUR?
How and with what to lubricate the amplifier?
Litol can be used as a lubricant; the procedure is performed as follows:
- First you need to remove the plastic casing; to do this, unscrew the bolts that secure it. To unscrew, use a Phillips head screwdriver. It is also advisable to remove the lower cross member of the instrument panel, located under the steering wheel.
- Next, unscrew the two bolts that secure the amplifier itself; for this you will need a 13mm wrench. After this, the column can be released down.
- Unscrew another bolt, after which you can do the actual lubrication.
- First, the steering wheel is turned to the left until it stops. The lubricant is poured into a 10 cc syringe, which needs to be sprayed into the hole formed. You need to throw out all 10 cubes.
- Then the steering wheel is turned to the right until it stops - the syringe is again directed into the hole, all the lubricant is sprayed out.
- After this, the steering wheel should be turned to the middle position and again sprinkled with lubricant into the hole.
- Next, the steering wheel must be turned in different directions until it stops several times. The lubrication operation is repeated again.
- Then all the components are assembled in reverse order.
EUR malfunctions and their diagnosis
Despite the simplicity of the design of the unit we are considering, if the need for repair arises, it is difficult to carry out; there are different malfunctions and the methods of elimination are often complex. An important “aggravating” circumstance is the poor location of the mechanism. The manufacturer placed this module directly under the radiator of the LADA Kalina interior heating circuit.
Operation in cold weather has a temperature effect on the electric power steering. Over time, this factor causes malfunctions in the amplifier. This phenomenon is very common for Lada Kalina. If a unit fails, the driver immediately feels it becomes more difficult to control the car at low speeds. The most common factors leading to electrical amplifier malfunctions can be grouped into the following areas:
- the speed sensor “does not respond” and does not send signals to the ECU;
- the on-board network “suffers” from low voltage;
- the maximum speed has exceeded the permissible limit;
- The control module has become unusable.
The identified malfunctions and solutions will be discussed below. When the ignition is turned on, the ECU independently diagnoses the amplifier system for possible failures and malfunctions. If there is no signal from any of the sensors, the on-board controller automatically identifies this sensor as faulty, and the corresponding lamp on the display on the front panel of the cabin immediately lights up. This indicator looks like a steering wheel with an exclamation mark and is highlighted in orange.
The instructions supplied by the factory to the LADA Kalina car require immediate repairs if a malfunction is detected in the electric power steering mechanism, especially when the power is turned off. In such a situation, the driver should drive to the service center at low speed. Practice shows that this development of events does not always take place. An orange symbol on the dashboard may not indicate the need for repair procedures. It indicates the presence of a problem in one of the structural components of the system. Sometimes failures can occur in the supply circuit or one of the sensors has failed. These situations do not in any way affect the functionality of the node, and control control remains active.
If the steering wheel, after the indicated symbol is illuminated, has lost sensitivity, then a malfunction of this kind is considered quite dangerous, since it interferes with the normal functioning of the mechanism as a whole; it is also bad when the amplifier is turned off. Such problems arise quite often and really require urgent intervention. Ignoring this state of affairs may be associated with dire consequences for the LADA Kalina car. In order to quickly respond to a problem that has arisen, we quickly remove the fuse located in the panel block on the left side of the steering wheel. This measure prevents further damage to the electrical amplification system, since it completely deactivates it. You can go to the repair site, but you will need to apply more force to the steering wheel, because the amplifier is no longer functioning.
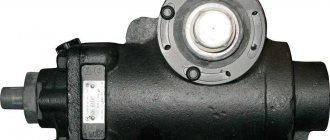
vendor code
Standard Electric power steering VAZ 1118 (Kalina), Granta, Datsun On-Do (Mi-Do), Priora 11186-3450008-02, 1117-3450008-02
Manufacturer: Autoelectronics, Kaluga, Russia
Price 20,500 rubles