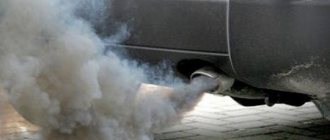
Most often, at the sight of an oily stain on the asphalt, the motorist’s brain, at the speed of a supercomputer, calculates possible breakdowns that could cause a leak and immediately gives an approximate amount of how much it will cost to eliminate them. And at the same time he is trying to figure out which car service center would be best to turn to for help. In fact, there’s no point in panicking and preparing for big expenses right away.
Yes, a puddle of oil under the engine can mean problems with the cylinder head - for example, loss of tightness of its gasket. Or something worse. But first, it’s worth remembering that this takes place in winter. And if it turns out that the puddle formed after parking in frost below −20ºС, it is likely that there is no point in grieving too much about the future investments in the engine capital.
After all, extreme cold can trigger a leak. The fact is that in the cold, any “rubber bands” and flexible plastic of various seals sometimes greatly lose their elasticity, turning into hard plastic. At the same time, the metal, as it should be during serious cooling, contracts. Including metal in threaded connections. Because of this, the reliability of the latter may decrease.
Given this, you shouldn’t be too surprised when technicians at a car service center discover that the puddle under the car was caused by a leak, for example, through a loose engine crankcase drain plug. Or the oil has escaped through the hardened rubber seal under the oil filter. To eliminate such “problems”, expensive repairs are not needed - as a rule, it is enough to simply tighten the threads further.
A “winter” puddle under a car is caused not only by oil, but also by antifreeze from the cooling system. It has its own “rubber bands”, which, due to severe frost, can harden and lose their tightness. But in this case the matter does not end there. The radiator of the cooling system is made of aluminum and is constantly under fire from stones flying from the road. In case of particularly “successful” hits, microcracks form in its “honeycombs”.
They do not manifest themselves in any way with more or less standard readings of a street thermometer, when the metal is not compressed much. But at seriously negative temperatures, such a hole opens and antifreeze begins to leak onto the asphalt. In this case, you won’t be able to solve the problem by “tightening the cap” - you’ll have to go to a car service center and replace the radiator with a new one. But this is for the better: anyway, the “damaged” part would have shown itself to leak a little later. But already, for example, on the highway - with the accompanying boiling of the engine, the threat of overheating, jamming and other “adult” troubles.
Why is antifreeze leaking?
An antifreeze leak on a Priora occurs due to a leak in the system. For example, when cracks appear in the pipes, destruction of gaskets between the water pump and thermostat, as well as due to the formation of cracks in radiators.
All breakdowns associated with antifreeze leaks are a wide-ranging problem that can take from 15 minutes to a whole day to fix.
The antifreeze is gone, what can I add?
Quite often, a problem with antifreeze leakage occurs on the road and takes the driver by surprise. Since you can’t drive a car without coolant, you need to top it up to the level, but where can you get it if this happens suddenly?
It is recommended to always have at least one liter of coolant in your car. If there is no coolant in the car, you can add regular water and drive to the nearest station. Subsequently, after adding water to the system, when the breakdown is eliminated, it must be washed and filled with new coolant.
Where does antifreeze come from on Priora: Locations
There are many places where coolant can leak on a Priora car, but we will look at the most common places for antifreeze leaks and how to deal with them.
Pipes
Most often, antifreeze leaks in Priora occur from under the pipes, which become harder over time and begin to leak liquid. This problem can be solved by replacing the pipes with new ones or using a sealant.
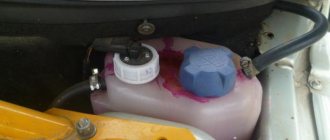
Expansion tank
Sometimes it happens that over time the expansion tank cracks or chafes, which leads to coolant leakage. This problem can be solved quite simply, which does not even require draining the cooling liquid.
Gaskets
Quite often, a leak forms between the joints of the pump and the cylinder head, as well as the thermostat and the cylinder head. It occurs due to the destruction of the gasket that is installed between these parts to seal the connection.
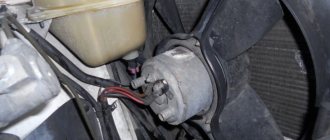
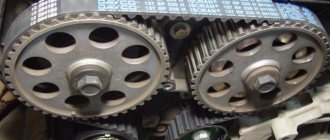
Pump leaking
Often the seal on the pump ages and loses its elasticity, which leads to coolant leakage. This problem is dangerous because coolant getting on the timing belt can cause it to break, and on a Priora, a timing belt break leads to bending of the valves and expensive repairs. If the pump begins to leak, it cannot be repaired, but only needs to be replaced with a new one.
Radiator leaks
The Priora has two cooling radiators and stoves, both of which are prone to leakage, which undoubtedly leads to antifreeze leakage. If any of the radiators are leaking, they must be replaced with a new one.
Blown cylinder head gasket
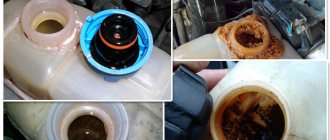
One of the most problematic antifreeze leaks. With such a breakdown, antifreeze begins to flow either outward or inward into the cylinder, thereby getting into the engine oil, which can adversely affect the operation of the engine. This problem is quite difficult to fix, but it is possible. To solve this problem, it is necessary to remove the cylinder head and, in some cases, even grind it on a milling machine.
Cracks in the cylinder head
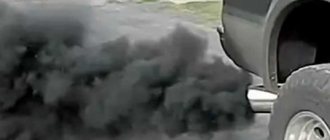
Very often, cracks form in the cylinder head due to overheating. Cracks are very difficult to detect. As a rule, they are hidden. Cracks can form between the cavity of the cooling system and the inlet channels and exhaust channels. Cracks also often form between the cylinder head valves.
If antifreeze enters the intake passage, it is drawn into the combustion chamber. The exhaust channel releases the antifreeze into the exhaust pipe. A crack between the valves allows antifreeze into the combustion chamber.
Externally, the presence of cracks can be determined by the appearance of white plaque in the channels. When antifreeze evaporates, it leaves traces of a white coating on the internal cavities of the channels. But it is possible to finally confirm that there are cracks in the cylinder head only after crimping the cylinder head using special equipment.
Moreover, the cylinder head must be heated during pressure testing. Because cracks begin to open only when heated.
Why does antifreeze go away?
One of the common problems that arise with the engine cooling system is a fluid leak. Due to low levels of antifreeze, problems may occur with both the engine itself and parts of the cooling system. Therefore, the fluid level in the expansion tank must be regularly monitored and not allowed to drop below MIN. You can determine that antifreeze is running out by the following signs:
- The coolant level is constantly decreasing;
- the heater stops working;
- The engine temperature becomes higher than normal.
A minimal increase or decrease in the coolant level in the expansion tank is considered normal. However, if antifreeze needs to be topped up periodically, then you need to deal with the problem that has arisen.
A change in coolant level from minimum to maximum is normal.
Engine radiator leaking
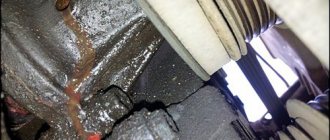
The most common reason why coolant leaves the system is damage to the main radiator of the cooling system. The malfunction can be diagnosed by smudges on the unit body or a puddle under the car after parking. Damage to the heat exchanger can be caused by the following factors:
- exposure to corrosion as a result of long-term use;
- hit by a stone flying out from under the wheels.
A leak in the radiator is possible both through the honeycombs and through the tanks.
The radiator, by its design, consists of many honeycombs through which coolant circulates. Even the slightest damage to one of them will lead to leakage. To diagnose a breakdown, you will need to remove the heat exchanger from the car, assess the nature of the damage and try to restore the seal by soldering or argon welding. If you do not take any action to eliminate the leak, the engine will overheat, which sooner or later will lead to serious consequences and expensive repairs.
You can try to restore the cooling radiator by soldering or welding
Malfunction of the radiator or heater tap
Sometimes there is a leak in the interior heater core. The problem manifests itself as a puddle of coolant under the front passenger's carpet, as well as a foggy windshield. In this case, the radiator will have to be removed from the car to identify the damaged area and carry out similar measures as with the main radiator.
The main causes of malfunctions in the engine cooling system and methods for eliminating them
| Cause | Way |
| Motor overheating | |
| Low coolant level in the radiator | Add coolant |
| Thermostat valve stuck in closed position | Make a replacement |
| Coolant does not circulate well | Replace the pump or pump |
| There is a lot of debris in the radiator | Clean the radiator |
| Scale and deposits on radiator tubes, hoses and cooling jacket | After flushing the cooling system, the fluid must be replaced |
| The fan does not work due to a malfunction of the temperature sensor or other components | Check the electrical circuit. If necessary, replace fuses, resistors, relays or fans |
| Crack in the coolant tank plug | Replace the plug |
| The engine overheats and cold air comes out of the heater. | |
| Low coolant level, leaking or worn cylinder head gasket | Add coolant, replace gasket |
| The engine cannot warm up for a long time, the temperature is not stable | |
| Thermostat stuck closed | Replace thermostat |
| The coolant level is constantly decreasing | |
| Radiator depressurized | Repair or replace |
| Heater radiator is depressurized | Repair or replace |
| The coolant tank is depressurized | Replace the coolant |
| Coolant leakage through pipe connections | Replace hoses, pipes and tighten clamps |
| Worn water pump seals | Replace the pump |
| When parked, coolant leaks from the joint between the cylinder head and the cylinder block. | Tighten the bolts. |
Signs of a coolant leak
The main and most obvious sign of a malfunction in the cooling system is a puddle of antifreeze under the engine compartment where the car is parked. This can be either a full-fledged puddle, consisting of all the antifreeze that was in the cooling system, or a few drops, which also does not bode well for the car enthusiast.
In the first case, the cause is most likely a ruptured pipe or radiator. It's quite easy to notice, just open the hood and look closely.
In the second case, the reason lies in a cracked pipe, a microcrack in the radiator, a poor connection of pipes, or a faulty gasket. Then it is much more difficult to diagnose where the antifreeze is leaking, and often only professional auto mechanics can do this quickly.
In addition, another sign of a coolant leak is a persistent smell of antifreeze in the cabin: it indicates a malfunction with the heater. Often the smell is accompanied by wet rugs, in which case it is necessary to begin troubleshooting immediately. Antifreeze vapors are toxic to the body and can cause severe poisoning if inhaled.
An elevated engine temperature may indicate either an ineffective cooling system or a low level of antifreeze resulting from a leak. It is worth knowing that most modern cars have a coolant level sensor, and when the antifreeze level is critical, a special indicator lights up on the dashboard.
Consequences of a coolant leak
Engine operation with low antifreeze levels causes a number of problems that affect both the comfort and reliability of the vehicle:
- Insufficient coolant makes the interior heater ineffective. Often, heat only appears from the air ducts when the engine speed increases.
- Due to ineffective cooling, the engine begins to operate at elevated temperatures, which can lead to engine failure.
- As a result, the remaining coolant will boil, which is often accompanied by rupture of pipes and radiators.
In any case, the cost of repairs is tens of times higher than the price of a 10-liter canister of antifreeze, and even if the car owner does not have time to send the car to a car service center, monitoring the coolant level and adding it is simply necessary.
Reference
Antifreeze is the international name for car coolant. It is used to reduce t0 of the power unit and prevent its premature failure. Previously, distilled water and antifreeze were used for these purposes. Antifreeze needs to be changed at least once every two years. During vehicle operation, its level is monitored by special sensors in real time. When its quantity decreases, the car’s computer system notifies the driver of the problem: a warning is displayed on the instrument panel.
How to find an antifreeze leak
Since coolant can leak from different places in the system, you need to know where and how to look for the problem area.
Visual inspection of pipes and clamps
By visual inspection, you can identify areas of coolant leaks. The more it leaks, the easier it is to find the leak. The procedure should begin with the pipes, since on many cars they have free access. During the inspection, you need to carefully check each hose of the cooling system, especially if the elements have been changed a long time ago.
The pipes are checked by visual inspection
In hard-to-reach places, you can use a mirror to check. Damaged hoses must be replaced. If no leaks are found on them, they are still worth inspecting for preventive purposes. Additionally, the clamps are subjected to visual inspection. Sometimes it happens that a coolant leak is caused by a loose fastener. In this case, tightening the clamps more tightly allows you to get rid of the problem in question.
Troubleshooting
The extent of repair work will depend on the nature of the problem. As a rule, if you notice a problem in the early stages, you can deal with the breakdown yourself.
But otherwise, when the problem was discovered a long time ago and nothing was done to fix it, you need to contact a service station or a car repairman.
During the cold season. Such breakdowns in the winter are a very common occurrence, especially for older cars. The reason for this is a decrease in the volume of antifreeze under the influence of low temperatures. Subsequently, it becomes necessary to constantly add it to the expansion tank. This situation indicates that everything is in order with the cooling system. This only confirms the usual reaction of antifreeze in cold weather.
Sometimes drivers dilute antifreeze with water. But such actions are not always justified. This can lead to serious consequences, such as engine failure. Today, there are two types of antifreeze in car stores - ready-to-use and concentrated. Only concentrated substances can be diluted with water.
By adding distilled water to a ready-made liquid, you can significantly disrupt its beneficial properties, which will lead directly to failure. Therefore, before diluting antifreeze with water, you need to study the instructions from the manufacturer.
Violation of the tightness of the expansion tank
If antifreeze leaks, there may be different reasons. Depressurization of the tank is one of them. If the structure of the tank is damaged, then the corresponding antifreeze stains will not be visible on it. This happens due to the evaporation of working fluid from the tank due to its depressurization.
Therefore, if a leak of coolant in large volumes is detected, it is necessary to conduct a visual inspection of the expansion tank for mechanical damage. It is quite difficult to restore the tank yourself, so it is better to replace it immediately.
Expansion tank
If the expansion tank body and/or the caps with the gasket on it are old, then there is a high probability that they have microcracks. Another option is to skip the safety valve on said lid. The simplest thing in this case is to replace the cover and install a new gasket. More difficult is to replace the entire tank (including the lid).
Damage to conductors
In this case, coolant stains will be visible. Finding an antifreeze leak when the conductors are damaged is not difficult. Working fluid can leak not only when the car is running, but also when the engine is turned off.
If characteristic stains from antifreeze are observed the next morning, it is necessary to inspect all connections and components. But before starting work, you need to turn off the engine and wait until the temperature in the system normalizes.
During repair work, it is necessary to check all connections for mechanical damage. They can occur in any part of the system or hose. If certain parts are not visible due to poor access, a mirror can be used. When a certain hose is already very old and completely cracked, the leak can only be removed by completely replacing it. Diagnosis is best done in good lighting.
The cause of the leak may be poorly clamped clamps, as well as dried out rubber seals. In this case, antifreeze leaks from the pipes can be eliminated by replacing the seals and clamps. Timely repairs and diagnostics will help avoid big problems if antifreeze is leaking.
And finally, some useful tips
Serious damage can be prevented by regularly monitoring the condition of the engine and all its components. Look under the hood frequently to check the levels of all fluids and make sure there are no leaks.
That’s all I have, thanks for your attention, write in the comments what other leak options you know and whether the article helped you understand where the antifreeze goes. Bye everyone, take care of yourselves!
Today there is a serious question that many car enthusiasts are tormented with - it often happens that antifreeze leaves the expansion tank, but no one knows where, there are no leaks or drops under the car! But the level in the expansion tank treacherously drops every day! Just some kind of miracles, what to do and why this happens. Let's find out...
THE CONTENT OF THE ARTICLE
I want to warn you right away - if antifreeze leaves the tank and does not leak anywhere, that is, the system seems to be in perfect order - this is a bad sign and it entails serious damage. You can't drive a car like that! Every kilometer leads you to a major overhaul of the engine, and even worse, it may simply jam.
So if you can’t determine it yourself, we urgently go to the service station and let the professionals look at it.
To begin with, I would like to think about what could be leaking, that is, obvious problems that can be eliminated.
If you can't find the leak
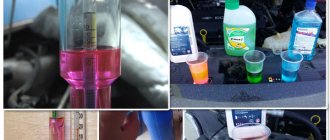
Not finding a leak doesn't mean you don't have one. Once the engine has cooled completely, check your vehicle's coolant level. Take note of how much fluid is in your car's coolant tank. The coolant level indicator is located on the side of the transparent plastic tank. Most tanks have clear minimum and maximum markings. The coolant level should be between o and “max”. After this, drive the car for several days and see if the fluid is leaking somewhere or not. If the liquid does not go anywhere, congratulations, everything is fine. Otherwise, sign up at the nearest service station.
Preparatory stage
Before you start, you should do the following:
- choose and buy a suitable cooler;
- stock up on a new cover mount in case the old one is damaged;
- take the wrench;
- find a container where you will send the waste liquid;
- buy rags.
Algorithm of actions
To replace antifreeze in Priora, follow the instructions:
- Send the car to a garage with plenty of free space to work on. Cool down the engine. All actions must be performed on a cold engine system.
- Get rid of high blood pressure. Open the cap of the reservoir containing the antifreeze. If the engine is hot, fluid may splash out. Use a cloth and gloves for protection.
- Remove the protection that is installed on the propulsion system. Unscrew the bolts on the mount. The latches do not need to be removed. They will not interfere with the process.
- If a transmission with cables is installed, it must be removed. To do this, disconnect power from the battery. Remove the protective coating with a wrench.
- Now you need to drain the entire volume of liquid. To do this, unscrew the fixing cap. Place a container below where the waste material will be drained. Wait until all the refrigerant has left the tank. Assess the condition of the latch. If signs of wear are noticeable, replacement is recommended.
- If there are any cloudy traces in the coolant, it is recommended to flush all the channels in the car. To do this, add purified water. Add citric acid or vinegar to remove any remaining dirt. Flush the system until the water runs clear. Only after this can you fill the coolant into the tank.
- Assess the condition of the hoses. If they are worn out, replace them.
- Using a hose, pour new fluid into the container. Avoid high internal pressure.
- Refrigerant is added until the tank is filled to the optimum level.
- All disassembled parts are reassembled in reverse order.
- Start the engine and take it for a test drive. After this, check if all systems are normal.