04.03.2022 12 304 VAZ 2101
Author: Ivan Baranov
The timing chain plays an important role in the operation of the gas distribution mechanism. Over time, it stretches and requires tension, since the quality of the engine depends on it. Therefore, you need to know when to check the tension and how to tension the chain on a VAZ 2101. This topic is covered in an article and a video that demonstrates the process of checking and tensioning the chain drive.
[Hide]
Signs of a poorly adjusted chain
When they talk about a poorly adjusted chain, they usually mean a loose and sagging chain. Because a highly tensioned chain does not show any signs of breakage. She's just bursting. Here are the main signs that the timing chain has become loose:
- after starting the engine, a loud grinding and knocking noise is heard from under the hood, the frequency of which increases as the crankshaft speed increases. This occurs due to the fact that the slack chain continuously hits the damper and the tension shoe;
- the car reacts poorly to pressing the gas pedal: the engine begins to increase speed only one or two seconds after pressing. This is due to the fact that due to a sagging chain, the synchronism of rotation of the timing shaft and the crankshaft is disrupted;
- There are power failures in engine operation. Moreover, they can occur both when accelerating and when the engine is idling. Due to the desynchronization of the shafts, which was mentioned above, the operation of the cylinders in the engine is also disrupted. In this case, one cylinder either does not work at all, or works, but not at full strength;
- increase in fuel consumption. If the cylinder block is not working properly, this cannot but affect fuel consumption. It can increase by a third, and in especially severe cases - double.
If the driver notices one or more of the above signs, this only means one thing: it’s time to remove the timing chain and check for wear. If it turns out to be very worn, it will have to be replaced. If the wear is minor, the chain can simply be tightened slightly.
Gas distribution diagrams
The timing belt of a passenger car consists of the following elements:
- crankshaft gears (sprockets);
- camshaft gears (sprockets);
- drive belt or chain;
- camshaft;
- block head valves;
- tensioners and dampers, tension rollers (these parts may vary depending on the timing device).
The drive belt or chain is put on the crankshaft and camshaft gears, and transmits movement from the crankshaft (CV) to the r/shaft. The cams PB open and close the valves, thereby ensuring that the cylinders are filled with the working mixture. At the moment of compression, the mixture ignites and a working cycle occurs in the internal combustion engine cylinders.
Many modern cylinder heads have 4 valves per cylinder. To drive a large number of valves, you need quite a lot of cams, so often two valves are installed in the gas distribution mechanism.
How to Stretch a Chain on a VAZ 2101 Video
Tension of the tension circuit on a VAZ 2101 car in artisanal conditions
The timing chain is important in the timing mechanism. Over time, it stretches and requires tension because it affects the quality of the engine. Therefore, it is necessary to know when to check the voltage and how to tighten the chain on a VAZ 2101. This topic is discussed in the article and video, which show the process of checking and tensioning the chain drive.
When is stretching needed?
Chain tension is required in the following cases:
- after engine repair;
- after replacing the product;
- when stretched after long-term use.
Timing of VAZ 2101
In the first 2 cases, it is clear that a voltage check is required, since the circuit
Taken in different ways. Replacement. Additionally, it should also be checked to ensure that the alignment markings are the same. These marks are located on the crankshaft and camshaft. Find the need for stretching usually to the sounds of a running motor. If the tension is weak, then during its operation you can hear extraneous noise where the chain drive is located. With all these parts, time wears out faster
Therefore, when checking the tension, it is necessary to pay attention to the condition of the damper and trunk
Timing belt
How to tighten a chain on a VAZ 2101 video.
If the link tension is weak, sliding vibrations between several teeth are possible, and then the valve synchronization will be disrupted. The car can stop here, but not start, the speed will fluctuate. Use a flathead screwdriver to check. It must be locked and pressed against the chain using a lever. It should not bend and stretch like an arrow. Do not apply excessive force to the drive, although the part is made of iron, it is subject to deformation.
At the bottom of the video, the VAZ car is considered 2101, where you hear an accident with the engine running. Detailed information is provided on how to check the condition of the damper, boot and how to tension.
pull a chain correctly
cars with VAZ
Traditional series. groups.
Step by step guide
Before proceeding with defect repair, ensure that the customer remains free of any mechanical defects from the temporary components. To do this, it is necessary to remove the protective cover of the drive and conduct a visual inspection of the parts: sprockets, damper, tensioner and trunk. If deficiencies are identified, they should be replaced.
from these devices.
tools
Before you begin, you need to prepare the necessary tools:
- keys for "13" and "38";
- flat screwdriver;
- pliers.
To operate, the car must be installed on a convenient platform, and supports are placed under the wheels to prevent it from rolling. The gear shift lever must be set to neutral.
VAZ Engine Division 2101
Stages
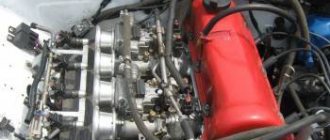
- First you need to find the tensioner, it is located under the injectors next to the pump. The key “13” should release the tensioner. As the chain loosens, the trunk should break.
- Then take a 38" wrench and screw it onto the crankshaft pulley nut. Then turn the crankshaft several turns clockwise.
- Rotate the shaft until the marks on the camshaft sprocket on the camshaft bearing housing line up. In this case, the spring located inside the tensioner and acting on the barrel will automatically perform the necessary stretching.
- It is better to check the tension using a screwdriver. If our client remains normal, we go back to the tensioner and tighten his head with a wrench.
Checking tension with a screwdriver
Pull the chain drive, start the engine and check its operation. It should work without noise from outside. If interference remains after the tension, you prefer the cause to be a tranquilizer. Then you need to check its serviceability if you want to replace it
. This may not work to raise the chain drive the first time, so this procedure will have to be repeated several times. During the procedure, the marks must match to ensure that the gas distribution phase is not disrupted.
This operation must be performed every time after any repair work. In addition, after marking it is necessary to carry out a preventive check. 10 thousand kilometers. If you learn to check and strain yourself, this will allow you to extend its service life and save on car service costs.
This video demonstrates how to pull a chain in a classic VAZ.
VAZ 2105 - replacing the camshaft drive chain
We replace the camshaft drive chain on a VAZ 2105 and other models from the “classic” series if it is not possible to restore the required degree of tension using the usual method using a tensioner. The verdict is clear - the chain has stretched beyond the permissible limits and needs to be replaced. The dismantling work on all types of classic engines is identical, so let’s look at the replacement process using the example of the most popular engine of the VAZ 2103 family. On an injection engine, the sequence of work is also identical with the only difference being that you will have to disconnect the block with wires from the crankshaft position sensor.
To carry out repair work, we prepare a standard set of tools, namely wrenches of different calibers from ten to seventeen, screwdrivers, pliers, etc. There is no need to drive the car into a pit for repairs. If you have everything you need, we begin the process, the sequence of actions of which is as follows:
- We remove the valve cover and, turning the crankshaft as it rotates, align the marks on the camshaft sprocket with the mark on the camshaft bearing cover housing.
- Next, using a flat-head screwdriver and a hammer, bend the tabs of the lock washer on the camshaft sprocket mounting bolt.
- Now we need to loosen the bolt. To do this, stop the car with the parking brake and engage any gear. We just loosen the bolt without completely unscrewing it.
- We remove the VAZ 2105 chain guide and the tensioner shoe. To remove all this equipment, we need to remove the front cover of the camshaft chain, unscrewing all the bolts securing it around the perimeter. A sealing gasket is installed between the cover and the block, which, regardless of its condition, must be replaced with a new one during subsequent assembly.
- Loosen and completely unscrew the chain stop pin.
- Next, we need to straighten the petals of the auxiliary sprocket lock washer. We use a flathead screwdriver with a long shaft and a hammer.
Unscrew the bolt securing the auxiliary device sprocket
To prevent the sprocket from turning, carefully fix it with a flat screwdriver by inserting the rod between the teeth and resting the screwdriver against the cylinder block. After the bolt is unscrewed, use a small mounting blade to pull the sprocket off the shaft.
- We completely unscrew the bolt securing the camshaft sprocket and, carefully lifting the chain, remove the sprocket from the shaft.
- We lower the chain down and remove it from the crankshaft sprocket, and install the camshaft sprocket itself in place, aligning the marks as they were.
After removing the old chain, you can begin installing the new one. The new chain is put on the auxiliary sprocket, after which the sprocket itself is installed in its place and secured with a fastening bolt (do not forget to install a new lock washer).
Prepare a long metal hook, use it to pick up the chain from above and pull it towards the camshaft sprocket. Place the chain on the sprocket. Secure the sprocket and bend the tabs of the lock washer.
All. At this point, the process of replacing the old camshaft drive chain of the VAZ 2105 can be considered complete. At the final stage, install the tensioner, tensioner shoe and chain guide and stop pin in the reverse order of removal. Check the tightness of all bolts securing system elements. Turn off the speed and parking brake and turn the crankshaft a few revolutions and check the alignment of the marks on the sprocket and the camshaft bearing cap. If the marks do not match, then it is necessary to throw the chain onto the link either forward or backward. If the installation was successful and the marks match, tighten the tensioner cap nut. Check and adjust the ignition if necessary. This completes the repair work.
Adjustment or how to set timing marks on a VAZ 2106 yourself
Decoding notes
Without pre-basing the pistons and valves, installing the timing chain on the VAZ 2106 according to the marks is impossible. Therefore, the significance of the marks is not at all conditionally decorative. The signs give an understanding of the position of parts inside the motor:
- The mark on the KV pulley, which coincides with the long line on the front cover, means that the pistons of cylinders 1 and 4 have reached TDC.
- The mark on the RV sprocket, combined with the tide on the bed, informs about the closed valves in cylinder 4 - this is where the compression stroke occurs.
When the marks coincide, the ignition distributor slider is turned towards cylinder 4, and the valves of the latter are closed. By analogy with setting the clutch on a “classic”, the unambiguity of the relative position of the crankshaft and camshaft serves as the basis for adjusting the clearances in the valve mechanism and the ignition setting procedure.
How to restore tag matches
When the chain is pulled out, the marks will go away. The main difficulty is to return them to a position of mutual coincidence. This work is combined with dismantling the old chain. However, there is no need to rush to remove it - misalignment of all factory markers is fraught with danger.
The base is the position of the crankshaft at which the pulley mark coincides with the long line on the front cover. In this case, the drilling hole for the camshaft star should be closer to the high tide. This must be achieved first. It is worth remembering that the transmission is made with a 2:1 ratio - two revolutions of the crankshaft correspond to one revolution of the camshaft.
- Remove the camshaft sprocket, remove all other gears and the chain stopper.
- Take out the chain.
- Put the camshaft sprocket back (without the chain), tighten the bolt, tighten it, securing the part by the teeth with a screwdriver.
- Rotate the camshaft until the marks on the sprocket and bed coincide.
- After fixing the sprocket with a screwdriver, unscrew the bolt and remove it.
- Install a new chain, sprockets, tensioner shoe and damper plate.
Unnecessary fears when dismantling the RV sprocket are not appropriate. The shaft design includes a pin. In addition to transmitting torque, it serves as a fixator of a certain position.
How to put on a chain
Installation of a new chain begins with its attachment to a new crankshaft sprocket. Next, the damper, tensioner shoe, and limiter are mounted. The chain is passed through the drive shaft gear and secured along the way. Afterwards it is mounted on the camshaft sprocket, and its position is adjusted according to the cycle:
- Put it on the shaft.
- Look at the relative position of the drill bit and boss.
- Take off.
- Move one tooth in the desired direction.
The final procedure is to tighten the chain, during which the tensioner is twisted all the way with good force. After rotating the HF key, the final check of the coincidence of the signs is carried out.
Do-it-yourself: Replaced sprockets and timing chain after 220 thousand km
Hi all! As you know, the car has already covered 200 thousand km, so I decided to do a mini-overhaul, almost completely replacing the timing mechanism myself. I decided not to touch the rocker with the camshaft for now and work on the chain with sprockets that have been there since the factory. Various sources write that the life of the chain is somewhere around 100-150 thousand, although even at 220 thousand it was tensioned well by the tensioner, and I didn’t notice much noise, perhaps due to timely maintenance and good oil. However, during diagnostics at the service center, the technician said that the valve timing angles had already dropped a little, so it was better to replace it. I decided to play it safe and replace it along with the stars, as is done wisely.
I bought a set of sprockets, a chain, a new stabilizer and shoe, a front cover gasket, a front crankshaft oil seal, nuts, sealant, etc. from a trusted store.
First, let's provide access to the front cover - remove the cooling fan, radiator, drain the antifreeze from it, and decorative grille.
Then the engine protection and mudguard to provide access to the three cover mounting bolts from below. We will be replacing the mudguard, as it was rotten through and through and the generator was flooding in the puddles.
Now we unscrew the crankshaft pulley nut (ratchet), we need a 36 wrench, or better yet a head, but we couldn’t find one, and the standard stamped wrench was bent and did not want to unscrew the nut.
I also had to weld pipes from it for a 40 key, long enough to rest against the right side member.
It was not possible to unscrew it manually; I had to tear it off with the starter, resting it on the spar.
Next, remove the PCV sensor, alternator belt, valve cover and set the timing marks on the crankshaft pulley and camshaft sprocket at TDC of the 4th cylinder. Oddly enough, they completely coincided.
Then we remove the crankshaft pulley and the front cover, dismantle the shoe, damper, limiter and gears with the chain. We make sure that the marks do not go astray.
When comparing the old and new parts on the stars, I didn’t see any special workmanship, except for polishing on the sides.
The chain is also intact on the outside. The shoe and damper have minimal wear, as they have already been replaced relatively recently.
However, the old chain turned out to be 4-5 mm longer than the new one, which, according to the same data from the Internet, is already above the tolerance of 4 mm and requires its replacement.
Before installing new parts on the new camshaft sprocket and crankshaft pulley, I used a center punch to make additional marks at 90 and 180 degrees for convenience during subsequent valve adjustments.
We put them in reverse order according to the marks and keys: first the shoe with the damper, then the upper sprocket with the chain, then the small sprocket and the middle one, check the marks again and tighten the chain.
We carefully double-check everything and lock the retaining rings.
During assembly, due to inattention, I placed the small crankshaft gear with the “skirt” outward instead of inward, which is why the crankshaft was blocked when tightening the ratchet nut - I had to remove the cover again and rearrange it.
The marks coincided exactly again, as if nothing had changed, hmm..
Seal the front cover seal and gasket with sealant.
Also, instead of the usual nuts with engravers, I tightened the front cover with nuts with a nylon ring, which means they have the ability to unscrew and leak oil).
Well, at the end I installed a new engine splash guard.
- Set of stars – 680 rub.
- Chain – 630r
- Calmizer – 70 rub.
- Shoe – 90 rub.
- Oil seal – 110 rub.
- Nuts, washers, gasket – 200 RUR
- Engine splash guard – 400 RUR
- Ratchet key – 150 RUR
It took a couple of days to do everything, although it could have been done in one. After replacing, I did not notice any major changes in the operation of the motor. After a couple of thousand, after grinding in the parts, you will need to tighten the chain again. But then you can sleep peacefully with another couple of hundred thousand mileage).
About chain tension on the VAZ-2107
One of the most important components of every car is the gas distribution mechanism. The proper operation of this unit affects the operation of the entire motor. The drive mechanism of the timing system on the VAZ 2107 is a chain. If it sags too much, it can jump onto one of the sprockets. If it is displaced by at least one tooth, failures in the operation of the motor occur, as well as destabilization of the speed. To avoid sagging of the chain, it is necessary to periodically tension it, and if certain signs occur, replace it.
How often does tension need to be applied?
During operation, the chain is subjected to heavy loads, so its service life is 60-80 thousand km. Adjustment should be carried out every 15 thousand km, but if the driver discovers earlier that something has begun to rattle when the engine is running, then it should be diagnosed. Before tensioning, you need to check its serviceability.
It is also necessary to check the tension in the case when the timing belt repair on the VAZ 2107 was carried out or in the case when, after tensioning, knocking of the product is still observed. The knock, or more precisely, the rustling of the chain, will not be difficult to distinguish even for an inexperienced driver. This rustling noise can be clearly heard if you lift the hood and listen to the engine at idle speed. If you add gas, the rustling disappears, which actually means that it’s time to tighten the timing chain. For this, a timing chain tensioner is used, which come in different types: automatic and mechanical.
Step-by-step instructions for stretching
Now let’s pay attention to the question of how to properly tension the timing chain on a VAZ 2107. Initially, it is worth noting that the timing mechanism on VAZ 2107 cars with an injector and carburetor fuel supply system are absolutely identical. The tension on the VAZ 2107 is performed in the following sequence:
The tension on the VAZ 2107 is performed in the following sequence:
- The car is placed on a flat surface, the “neutral” is turned on, and the wheels are fixed.
- The tensioner cap is loosened (using a 13 key), which is located near the pump.
- The crankshaft is turned 2 turns clockwise, for which a special key is used (pictured).
- After this, the tensioner is tightened to failure.
- Next, we start the engine and listen to see if the clanging remains.
- If it disappears, then the chain is tight. If there is any left, we recommend repeating the procedure from point No. 2.
If the actions taken are not successful and the noise remains, you will have to resort to a visual inspection of the timing mechanism, and for this you will have to disassemble the engine.
Tension check
The VAZ 2107 chain is located in the front part of the engine. It is not visible, since it is covered by the cylinder head cover and the block itself. Before you start disassembling the VAZ 2107 engine, you need to understand the features of visual inspection and checking its tension. It is rational to check the chain tension only in cases where regular tensioning does not help solve the problem.
How to tension the camshaft drive chain of a VAZ-2101-2107.
To visually check the tension of the VAZ-2107 timing chain, you must first remove the air filter housing, then the cylinder head cover. To do this, you will need a “10” wrench, with which you need to unscrew 8 fastening nuts.
After removing the valve covers, access to the upper part of the product becomes available. Here you need to inspect the tensioner shoe and damper for integrity, and then check the chain mechanism with your hands, and if that doesn’t work, you can use a pry bar or a large screwdriver.
The mount must be installed so that it stands between the chain mechanism and the block body. As a result, we get a lever that is used to check the chain tension on a VAZ 2107 car. If it bends easily, then its tension needs to be adjusted or replaced. The ideal tension is one at which the product does not bend and is taut like a string.
https://youtube.com/watch?v=L27fdFKEj-U
Repair of VAZ 2107 tensioners is not carried out, so the product will have to be replaced with a new one. Replacement is rarely required, but the ANC “Pilot” automatic tensioner is best suited for this. After installing it, you will forget about the noise and clanging of the engine for a long time. But if you already have an automatic tensioner installed, and the engine is knocking or the chain is making noise, then there is no point in making adjustments. You will have to immediately disassemble and replace the timing mechanism parts.
Keep it up!
Keep it up!
Along with the advent of overhead engines, a simple and reliable timing chain drive was introduced. But there are some drawbacks - the chain and sprockets gradually wear out, the drive makes more and more noise, notifying the owner of the need for intervention. There are known engine designs where the tension of the timing chain is not adjusted at all - when certain wear occurs, the chain is simply replaced. This can hardly be considered a gift - replacement is expensive! Most developers prefer a different approach: for good engine operation throughout the entire run, it is desirable to keep the chain tension as stable as possible. Moreover, we are talking here not only about the averaged indicator, but also about circuit oscillations that need to be smoothed out. As a result of design searches, two necessary devices were born - a chain tensioner and a chain vibration damper.
There are two main types of tensioners - hydraulic and mechanical. The first ones on domestic cars have not proven to be reliable, but the dangers of weakening the chain are known. Engine operation is accompanied by various vibrations - in particular, a sagging chain whips against the sprockets and breaks the damper. Once free, she can jump over the teeth; and the impacts of the pistons on the valves complete the picture of the accident. It’s not for nothing that many people abandon hydraulics in favor of simple mechanics.
One of such devices is the VAZ-2101 chain tensioner. Structurally, it is quite complex, although it is not automatic. The chain must be tightened periodically. In addition, he is not without “sores”. It happens that when struck by a chain, the rod is recessed, slips in the collet clamp, and there is little spring force for reverse movement. If the length of a worn chain is already at its limit, then this tensioner (even a working one!) does not help - there is not enough rod travel. After all, the maximum distance from its end to the flange is only 68 mm. And then the pacifier breaks. Therefore, some craftsmen, without waiting for trouble, put an extension cord on the rod.
Modern tensioners are automatic. I installed one like this, the chain tightened - and you can forget about it for a long time.
Some of the RODOS tensioners we showed are intended to replace outdated devices on any Zhiguli cars. Thanks to the solid overhang of the rod, they are also suitable for the VAZ-21213 engine; A tensioner was also created for the Niva VAZ-21214 engine instead of the standard hydraulic tensioner, about which there are complaints. In addition, RODOS supplies a set of two original tensioners of hydromechanical action (oil pressure to help the spring) for the ZMZ-405 and 406 engines - again, instead of the standard hydraulic ones.
From the point of view of a repairman, the tensioners of this company have one drawback: it is often necessary to loosen the chain tension, and with RODOS this is not easy. It is almost impossible to recess the rod and secure it with a pin without removing the tensioner. Yes, and it won’t work right away on film. It's also a little confusing. the grace of the notch on the rail. The small step is designed to make the tensioner operation almost stepless, but the requirements for the quality of the material must be very strict - after all, the unit restrains strong vibrations! What happens if there is a small glitch in technology? How will the openwork design of the rod behave in the event of a breakage of the stop on the tensioner shoe, which is commonplace for VAZ engines, and an “oblique” load on the heel of the rod? This is especially true for the 21214 motor: the extended rod increases the leverage of the force.
We hope that time will dispel these fears. In the meantime, the RHODS product attracts many with its good performance and, taking into account the large circulation, its low price (about 350 rubles).
ISAI tensioners are quite rare on the market, which is explained by the lower production capacity of the manufacturer. Price - about 400 rubles. We were attracted to them by the simplicity and high rigidity of the design without “openwork” parts, stepless regulation and ease of operation during repairs. Tensioners are intended for engines of “classic” VAZ, “Niva” VAZ-21213 and 21214 and for some ZMZ. As for the latter, the ISAI developer took into account the difficult operating conditions of timing chains, especially the upper ones, due to lack of lubrication. For these motors, tensioners have been created that are installed instead of hydraulic ones, and they provide additional oil supply (for this purpose a groove is made on the body) directly to the chains. The service life of the drives is significantly increased.
Main Causes of Circuit Failure
As the engine speeds up, the chain begins to rattle. In this case, the metallic ringing goes away as the speed decreases. A stretched timing chain contributes to a gradual shift in the valve timing, which leads to engine malfunctions.
All owners of cars of this brand should know how to tighten a chain on a VAZ 2107. This work is performed using a “13” wrench and a hammer. The chain is adjusted as follows.
- The tensioner is discharged. When performing this procedure, the shoe should snap off. If this does not happen, it means that the timing chain tensioner plunger is stuck. The problem is eliminated by tapping the unit body with a hammer.
- Using a key set to “13”, the cap nut is unscrewed.
- Using a special crankshaft wrench, the pulley is turned a couple of turns.
- The crankshaft stops at the moment of maximum rotational resistance. In this position, tension is applied.
- While holding the crankshaft from turning in the opposite direction, tighten the cap nut.
- The cylinder head cover is being installed.
In some cases, such tension is ineffective. Experienced auto mechanics know how to tighten the VAZ 2107 injector chain. To do this, you will need the following tools: 8 and 10 sockets, pliers and a ratchet with a handle. The valve cover is unscrewed and dismantled, thus providing access to the camshaft sprocket. The chain tension is checked manually.
The next step is to turn the crankshaft of the VAZ 2107 injector several turns. This work is carried out by turning on the starter for a few seconds or using a wrench that is placed on the ratchet.
A timing belt or chain is installed as a timing drive on different types of engines. They transmit torque from the crankshaft to the camshaft, which controls the operation of the vehicle's valve system. The VAZ 2107 engines use a chain drive, which provides greater reliability compared to a belt drive. There are frequent cases of broken timing belts, which leads to damage to the valves of the gas distribution system and requires expensive, labor-intensive engine repairs. Unlike a belt, a timing chain guarantees the absence of breaks and the consequences associated with it.
During operation, the chain gradually wears out and stretches, beginning to make an unpleasant knocking noise. If the malfunction is not corrected in time, a chain that is too loose can jump one or two teeth, which will lead to a shift in valve timing, loss of power and engine performance. If the chain slips by a larger number of teeth, the timing valves may “meet” the pistons, as happens on some engines when the timing belt breaks. To prevent this from happening, it is necessary to periodically monitor the tension and, if necessary, tighten the VAZ 2107 chain.
Replacing Opel camshafts
On Opel cars, in contrast to VAZ models, there are a lot of different types of power units - there are both small-displacement and fairly high-volume internal combustion engines. The line of power units includes 3, 4 and 6 cylinder engines; they can be equipped with one or two camshafts. On single-shaft Opel engines, the cams often wear out; the shafts of twin-shaft engines are much more reliable, they rarely fail.
Let's look at how you can replace the camshaft on an Opel car with a 1.6-liter 8-valve internal combustion engine (C16NZ engine):
- remove the valve cover (8 bolts);
- dismantle the upper plastic timing case;
- install timing marks;
- remove the module or distributor (depending on the modification), which is located at the rear;
- drain the antifreeze, since you will have to unscrew the bolts that secure both the camshaft bed and the cylinder head at the same time;
- loosen the tension belt, unscrew the camshaft;
- we twist the cylinder head bolts (10 pcs.), they also secure the camshaft housing (bed);
- remove the shaft assembly;
- if the shaft has a fairly long mileage, it is better to replace it together with the housing;
- Having secured the new shaft in place, we put everything in place - we tighten the cylinder head bolts from the middle with a force of 11-12 kg in several stages.
When making repairs, it is important not to touch the cylinder head itself; if it is moved from its place, you will have to change the cylinder head gasket. But this design feature is typical only for 8-valve engines; on 16-valve Opel internal combustion engines, the cylinder head is not affected in any way.
About malfunctions of the tensioning mechanism
The timing chain tensioning mechanism on the VAZ 2106 is a system consisting of three important elements:
- tension shoe fitting;
- tension shoe;
- timing chain damper.
The timing chain tensioning mechanism on the VAZ 2106 is a complex system consisting of several elements.
All tensioning mechanism malfunctions are in one way or another related to wear or breakage of one of the above elements:
- Breakage of the tension fitting. It can occur either due to mechanical wear of this part or due to its corrosion. Whatever the reason, the result is the same: the tension shoe stops extending and putting pressure on the timing chain. As a result, the chain loses stability, begins to dangle and hit the guide, and in especially severe cases it flies off the guide sprockets or breaks. There is only one solution: replace the tension fitting. This part cannot be repaired, since its body cannot be disassembled (and even if the body were dismountable, it is not possible to find spare parts for the tension fitting on sale);
- Timing chain guide failure. The damper breaks either due to fatigue failure of the metal, or due to a weakened timing chain, the impacts of which led to the loosening of the mounting bolts with subsequent breakage of the damper. The second case is the most dangerous, since broken bolts and damper parts can lead to a broken timing chain. And this, in turn, will lead to damage to the valves, cylinders and complete jamming of the engine. It is not always possible to eliminate such a breakdown even with the help of expensive major repairs. Solution: replacing the damper. The reason is simple: the damper is a very important part, and no one will restore it by welding, for example. There is only one condition: the new damper should not be Chinese, but real VAZ;
- tension shoe wear. A thick layer of a special polymer material that is resistant to abrasion is applied to the working surface of the tension shoe. But even this material cracks and thins over time, which leads to vibration when the timing chain operates. Vibration is accompanied by characteristic shocks, the frequency of which increases with increasing engine speed. Since it is not possible to restore the damaged polymer layer without special industrial equipment, there is only one way out: replace the worn tension shoe with a new one;
- The timing chain is not tensioned. This occurs if the chain is already stretched to the limit, and the crankshaft simply cannot be turned with an open-end wrench. The second option is also possible: the car owner, who decided to tighten the chain, did not sufficiently loosen the cap nut holding the tensioner, or the tensioner fitting was not discharged due to a breakdown. The solution is obvious: check the condition of the cap nut and fitting, and fix the problems as indicated above.
So, tensioning a slack timing chain does not require any special skills or knowledge. This task is quite within the capabilities of even a novice car enthusiast who has held a wrench in his hands at least once. All you need to do is follow the recommendations given above exactly.
How to understand that the chain is poorly adjusted
If we are talking about a poorly adjusted chain, most likely the chain is stretched. When a chain is overtightened, it is extremely difficult to understand from the outside, but immediately after the movement begins, such a chain breaks. If the timing chain is loose, you will know about it by the following signs:
- After starting the engine, you heard a grinding and knocking noise under the hood. As the speed increases, impacts occur more often because the chain sags and scratches the guide and tension shoe.
- You feel failures in engine operation, especially at high speeds.
- Your car responds to the pressed gas pedal with a significant slowdown. The engine speed increases only a few seconds after holding down the gas pedal.
- Unjustified increase in gasoline consumption. Most often, a car consumes one third more fuel, and if there is a special case, then twice as much.
When you notice any of the signs mentioned above, then you can say with confidence that the chain should be dismantled and the degree of its wear determined. If the chain is not very worn, it must be tightened, and in case of severe wear, it must be replaced with a new chain.
Typical chain tensioner defects
Such malfunctions include:
- A collet-type clamp is not able to fix the product rod, which interferes with adjustment work on the correct tension of the chain drive.
- Wear of the main spring element (looks like this: the spring element is deformed in one plane, which becomes noticeable after dismantling the chain tensioner, which shines on one side).
- Damper spring failure.
- Limit wear of the product rod at the point where the collet-type clamp is attached.
- Defects in threaded connections on the installation fasteners (studs) of the product.
Adjusting chain tension on a VAZ 2107
In the article we will tell you why you need to adjust the tension of the timing chain, what can happen if this is not done, and how to tension the chain on a VAZ 2107.
When is chain tension adjusted?
- if the chain is stretched. This is indicated by the appearance of a high-pitched ringing sound with a metallic tint from the front side of the engine, in the end part, or a knock from under the valve covers. This can be heard clearly when the engine revs up.
- if the chain has been removed or the engine has been repaired.
- before valve clearances must be adjusted;
- after changing the damper or tensioner.
- A tightening is needed after long-term use, after a mileage of 10-20 thousand km.
What are the dangers of untimely lifting?
The valve timing gradually shifts, the engine begins to operate intermittently, and increased heating and wear of the cylinder-piston group parts occurs.
What tool is needed for tensioning?
- simple open-end wrench 13;
- open-end wrench for cranking the crankshaft by 38;
- tubular wrench size 10 for removing the cylinder head cover.
Sequence of necessary operations:
1. Remove the air filter housing from the carburetor. Then disconnect the throttle link from the roller
2. Then you need to remove the lever with rods.
3. And finally, disconnect the fuel hose from the bracket that goes from the fuel pump to the carburetor.
4. Using a 10 mm tubular wrench, remove the cylinder head cover. This must be done so that you can check the chain tension by hand.
5. Loosen the tensioner. In the engine housing, near the pump, on the right side in front along the direction of the car, unscrew the cap nut with a 13 mm wrench.
6. The chain tensioner discharges, the shoe “clicks” with a specific sound. If there is no click and the tensioner is “stuck,” then you can gently tap the nut with a hammer and release the tensioner plunger.
7. With the cover open, you can easily determine whether the chain is slack by pressing on the side. It is worth remembering what degree of “weakness” it has.
8. Using an open-end wrench 38, turn the crankshaft clockwise by an average of one and a half to two turns. When the greatest resistance to movement arises, then the chain will be stretched to its maximum. The main thing is to ensure that the crankshaft does not turn back due to compression and that the chain tension does not weaken. If you don’t have a key for 38, you can turn on the ignition and turn the crankshaft with the starter. In order not to “overshoot” the torque and tighten the chain, skill is required, because you need to turn on the starter for a split second. You can even turn the crankshaft without a key and without a battery. You will have to hang the rear axle and engage the “easiest” 5th gear to rotate. Then, turning the wheel clockwise, rotate the chain to the desired position.
9. Tighten the nut back, holding the crankshaft from “shock absorption” back. Then we check the tension result by pressing the chain with our hand again.
There should be no deflection. Now we install the block head cover in place.
10. The adjustment is complete. Now we start the engine and check the operation by ear. If you managed to tighten the timing chain correctly, the metallic ringing will disappear.
This method of tension can be recommended to everyone. Experienced car enthusiasts do not need to remove the cylinder head cover, provided that by touch and by resistance they can unmistakably find exactly the position of the crankshaft at which the chain will be as tight as possible.
Source
Replacing the cylinder head gasket VAZ 2110 (2112)
On VAZ 2110 and 2112 cars, a 16-valve four-cylinder engine is often installed; it has almost the same cylinder block, but the cylinder head is different - it is two-shaft. It is somewhat more difficult to remove such a cylinder head; the timing marks are also installed differently.
We replace the PGBC as follows:
- We prepare everything for dismantling the cylinder head (remove the battery terminals, drain the antifreeze);
- completely disconnect the air filter housing with pipes;
- remove the oil filler cap, dismantle the decorative cover of the cylinder head (4 fasteners);
- disconnect the high-voltage wires, remove the ignition module;
- dismantle the upper timing belt casing, the most difficult thing to get to is the lower bolts;
- unscrew the tension roller, remove the timing belt;
- dismantle both camshafts, unscrew the bolts of the iron timing case to the cylinder head. You should immediately remove the dowels carefully, otherwise you may lose them. Before removing the gears, it is recommended to rotate the crankshaft and immediately set the timing belt to the marks;
- remove the intake manifold; after unscrewing the nuts, you need to pull it out of place;
- dismantle the valve cover by unscrewing all its fastening bolts;
- We disconnect all the existing wires and cylinder head fastenings, as well as the fuel rail, gasoline hoses (we unscrew the fittings with two horns and wrenches). When unscrewing the fittings, it should be taken into account that there is pressure in the fuel system, so it is better to bleed it off first;
- remove the protective cover of the exhaust manifold, disconnect the exhaust pipe of the muffler. It is inconvenient to get there; it is better to unscrew the nuts from below;
- unscrew the thermostat bolts (3 pcs., 5mm hexagon);
- twist the cylinder head mounting bolts (10 pcs.);
- Having disconnected everything that can hold the cylinder head under the hood, remove the cylinder head.
We clean the surfaces, install a new gasket, and mount the cylinder head in place. Before installing the cylinder head, it is necessary to set the piston of the 1st cylinder to TDC, and on the head itself you should check the installation of the camshafts by placing the gears on them - the marks should face up. Having replaced the cylinder head gasket of the VAZ 2110, we start the engine and, as the engine warms up, add antifreeze to the cooling system.
labavto.com
Chain drive design
The main purpose of the device is to synchronize the operation of two shafts: the crankshaft and the camshaft. Thanks to their rotation, the pistons move in the cylinders, and the intake and exhaust valves open and close. If timing is lost, the valves collide with the pistons, causing damage to the parts. The quality of the functions assigned to the mechanism depends on the condition of each element that is included in the design of the timing drive.
The design of the chain drive mechanism consists of:
Double-row chain. They are made of metal links interconnected. A chain with 114 links is installed on the “penny”. A chain is more reliable and durable than a belt drive.
Tensioner. Its task is to maintain the chain at the required tension while the engine is running. It can be automatic, hydraulic and mechanical. The first type does not require constant tension, since this is performed automatically. The disadvantage of the devices is their high cost and short service life. The operation of hydraulic mechanisms is based on the supply of lubricant under pressure from the lubrication system. If there is a lack of lubricating fluid, the mechanism may jam. Classic VAZ models are equipped with mechanical tensioners that require constant adjustment. The disadvantage of the devices is that they become clogged with wear residues, which causes the plunger to jam; the device does not perform its tensioning functions.
A sedative. Serves to dampen chain vibrations, preventing it from jumping off the timing gears. If the device fails, the drive may break. This is possible at high engine speeds. The damper is a metal plate with holes for mounting bolts.
Tensioner shoe. It is located opposite the damper and also serves to tension and calm the chain. A special polymer is used for its manufacture, thanks to which the product has high strength and wear resistance.
Symptoms of problems in the chain mechanism
To check the technical condition of the timing drive parts, you will have to partially disassemble the engine, since the mechanism is located inside. Problems that have appeared with device parts can be identified by characteristic signs.
You can hear noise from the chain in the form of knocking, metallic grinding, and extraneous sounds when the engine is running. It is necessary to find out the cause of these noises and eliminate them. If you do not pay attention to this, the wear of components increases, which will lead to expensive repairs or broken circuits.
The cause of chain noise is often the tensioner. It does not tension the chain properly, and when the power unit operates, sounds reminiscent of a running diesel engine appear. Such sounds appear mainly when idling.
The wear of drive parts is influenced by the following factors:
- poorly performed repairs;
- insufficient engine oil pressure;
- violation of maintenance regulations;
- use of low quality parts.
During vehicle operation, the gas distribution chain wears out and stretches.
A stretched chain can jump over several teeth on the sprockets of one of the shafts. If this happens, the ignition is disrupted and the power plant begins to operate unstably. It is necessary to check the parts and replace damaged ones.
Types of chain drive
The VAZ “Seven”, like other “classics”, is equipped with a double-row timing chain. However, there is a single-row chain that, if desired, can be installed on a Zhiguli.
Single row chain
A chain drive with one row has less noise when the engine is running compared to two rows. This factor is one of the main factors in favor of choosing single-row chains. Therefore, some VAZ 2107 owners decide to replace the timing drive. The lower noise level is due to the fact that fewer links are driven. Plus, it is easier for the entire engine to rotate such a chain, which has a positive effect on the increase in power. However, due to the low noise level when such a chain is stretched, it is not always clear that the part needs tension.
Single row timing chain has lower noise levels
Double row chain
Despite the advantages of a single-row chain, a chain drive with two rows is the most common, since it is characterized by high reliability and if a link breaks, the entire chain does not break. In addition, the load on the timing drive parts is distributed evenly, as a result of which the chain and gears wear out more slowly. The life of the part in question exceeds 100 thousand km. Although recently, in order to reduce the weight of power units, automakers have been installing chains with one row.
The double-row chain, despite its higher noise level, has a long service life
Replacing a double-row chain with a single-row one
If you are thinking about replacing a double-row chain drive with a single-row one, you will need to purchase the following parts:
- crankshaft, camshaft and oil pump gears for single row chain;
- sedative;
- shoe;
- single-row chain;
- automatic tensioner.
To install a single row chain, you will need to replace the gears, chain, guide and timing chain tensioner
All of the listed parts are taken, as a rule, from the VAZ 21214. Replacing the chain should not cause difficulties. The only thing that is required is to replace the sprockets, for which you unscrew the corresponding fasteners. Otherwise, the steps are similar to the procedure for replacing a conventional double-row chain.
Video: installing a single-row chain on a VAZ
Despite the fact that replacing the timing chain drive on a VAZ 2107 is not an easy process, every owner of a Zhiguli can do it if you follow the step-by-step instructions. The main thing is to correctly set the marks upon completion of the work, which will ensure synchronous operation of the crankshaft and camshaft.