V-belt (profile A) Used on “Classic”, Samara, Niva 710 mm cars - VAZ 2108-21099 with a carburetor engine and generator drive. Of the most common 715 BRT cat. number 2108-3701720-01RU,
820 mm - VAZ 111, 1113 (OKA) - generator drive The most common are BRT 1111-3701720-01RU (geared), BRT 1111-3701720RU (simple).
840 mm - used on LADA 4×4 in a variant to drive the power steering pump (vehicles of new years of production)
940 mm - the generator drive of the VAZ Classic 2101-2107 of their modifications, the VAZ 2121 NIVA, the generator drive and the steering hydraulic pump drive of the VAZ 21213 (costs 2 belts) in a variant version a poly V-belt is installed, we will consider it below. AvtoVAZ 21010-1308020-82 (geared), BRT 2101-1308020RU (can be either simple or geared).
Poly V-belts (ribbed) are used to drive the generator and auxiliary mechanisms.
6PK698 - drive of the VAZ 21093 generator with an injection engine, 2113-2115 with an 8-valve injection engine. The belt tension is produced by a generator, without additional rollers or mechanisms. BRT 21082-3701720RU
6PK742 - drive of the VAZ 2110-2112 generator without power steering, found on the first production LADA Priora. BRT 2110-3701720RU
6PK823 Lada Granta - generator drive. Engine 2116, 8 valves. There is no belt tensioning mechanism. Elastic belt used 6PK823SF
6PK882 - drive of the LADA Kalina (1118) generator with an 8-valve engine, the belt tension is carried out by a mechanism.
4RK913 - drive of the generator and air conditioner Lada Largus, engine 1.4 BRT 4RK913RU
5K990 — alternator belt Lada Largus BRT 5K990R
6PK1005 - Lada Kalina (1118-1119) generator and power steering drive.
6PK1015 - drive generator and power steering VAZ 2110-2112 with a 16-valve engine, LADA Priora, Priora2 with a 16-valve engine, LADA Kalina, Kalina2, Kalina-cross with a 16-valve engine, LADA Granta with a 16-valve engine. Motor VAZ 21126, VAZ 21127
6PK1025 drive of the generator and air conditioning compressor of VAZ 2110-2112 with a 16-valve engine, LADA Priora, Priora2 with a 16-valve engine, LADA Kalina, Kalina2, Kalina-cross with a 16-valve engine, LADA Granta with a 16-valve engine. Motor VAZ 21126, VAZ 21127
5РК1110 — generator drive LADA Largus engine 1.4. BRT 5RK1110RU
5PK1747 - generator drive, power steering, air conditioning LADA Largus 8 valve engine. BRT 8200833541RU
6PK1822 - drive of generator, power steering, air conditioner LADA Largus 16 valve engine BRT 8200598964RU
5PK1885 drive of generator and auxiliary mechanisms LADA 4x4 21214, 21230, Chevy Niva 2123
—> Auto-moto-bicycle equipment —> Posted: 12/16/2015
Possible faults
If the Gazelle generator malfunctions, the operation of all electrical devices is disrupted, and the battery
is not recharged. A special indicator on the dashboard informs the driver about the breakdown of this part. With such a malfunction, starting the engine and moving the car is still possible, but until the battery is completely discharged. It is impossible to drive such a car in the usual way.
The main malfunctions of the generator include the following: violation of the integrity of the charging circuit wires, failure of bearings, damage to the diode bridge, short circuit of the stator winding, breakdown of the voltage regulator, wear of slip rings, excess wear of brushes.
Generator
“Gazelles”, like any car mechanism, can have both mechanical and electronic damage. Therefore, both the method of repairing the breakdown and the types of operations are different.
Mechanical damage includes wear and damage to rolling bearings, springs, damage to the integrity of the housing, pulley and drive belt.
Faults that are called electrical include breakage of the stator winding, cracks and wear of brushes, breakdown of the relay regulator, melting of the insulating coating of the turns, and interturn short circuits.
In case of any of these types of breakdowns, the generator
The car does not fully perform its functions or completely fails, which affects the operation of all electronic devices and the engine as a whole.
The importance of tension level and checking it
How to tension the alternator belt
Let's consider what unpleasant consequences an incorrect level of tension will lead to. If it is weakened, then there is a high probability of slippage. That is, the generator drive will not operate at rated speed, which in turn will lead to the level of voltage generated by it being below normal. The result is an insufficient level of battery charging, insufficient electricity to power the vehicle systems, and operation of the electrical system under increased load. In addition, when slipping, the temperature of the belt itself increases significantly, that is, it overheats, which is why it loses its service life and may fail prematurely.
If the belt is too tight, this can also cause excessive wear on the belt itself. And in the worst case, even to its breakage. Also, excessive tension has a detrimental effect on the bearings of the crankshaft and generator shaft, because they have to work under conditions of increased mechanical load. This leads to excessive wear and speeds up their failure.
VAZ 2109 alternator belt size
Information on replacing license plate units
Price: 2688 RUR
Generator drive belts VAZ 2108, 2109, 21099, 2113, 2114, 2115. With carburetor engine, size 715 belt profile 0. VAZ generator belt, generator drive, crankshaft pulley 2110, 2107, 2112, 2114, 2109, etc. Buy generator belt VAZ in the tuning store. Chest of linen dunya. Applicability of VAZ 2108, 2109, 21099 (Lada Samara), VAZ 2115 (Lada Samara 2) with a carburetor engine. The timing belt of the VAZ 21214 power steering drive, measuring 838 mm, can be safely replaced with a belt from the Oka generator, the length of which is 820. Only high-quality production and a low price for the generator belt.
K-700, combine harvesters yask-170, 200, yamz-238nd, yamz-236 (238nd) zil-mmz 555, laz-6955, 695e, 697, ural-375, kavz-608(v), moaz-6507, 7405 , LiAZ 677(n), ZIL-130, -131, -157, -158 engine ZMZ-4061
- summer sundresses dolce gabbana 2014
- DIY Tilda Horse dolls with patterns for beginners
- lace crochet blouses vests bolero
- short lilac dress
- how to knit a blanket from motifs with knitting needles
Doubtful savings on rollers can lead to potentially very expensive repairs. In my opinion, it’s better to change both at once and forget about it until the next replacement after 50-60 thousand kilometers.
Photo of VAZ 2109 alternator belt size
The fact is that belts are subject to enormous mechanical, chemical and thermal loads
By the way, pay attention to the tension roller bracket; it turns on two plastic bushings, and if at least one is missing, the roller warps (this happened on my car). Tell me the exact dimensions or catalog number of the alternator belt for Daewoo Sens S
They say that you can install an alternator belt from a VAZ-2108. VAZ-2109, VAZ-2115, VAZ-2110, VAZ-1117 Kalina, VAZ-2170 Priora 46. VAZ-2108-099 timing belt gates (roller belt) kit gates 2108-1006040-10. Alternator belt and other engine belts. Geometric dimensions, tensile strength, oil resistance are checked. 2110-3701720, 6pk-738, generator drive belt and power steering VAZ 2108-2112. According to the regulations, replacing the alternator belt on a VAZ-2110 - 2112 must be done at least once every 50 thousand kilometers, or if not. Applicability of finwhale drive belts to domestic car models. 2101 -2107 21 IIZH2126 with a VAZ engine. Avx-10-1320, Kamaz, Ural, ZIL, generator, water pump
Please tell me the exact dimensions or catalog number of the alternator belt for the Daewoo Sens S. They say that you can install an alternator belt from a VAZ-2108. VAZ-2109, VAZ-2115, VAZ-2110, VAZ-1117 Kalina, VAZ-2170 Priora 46. VAZ-2108-099 timing belt gates (roller belt) kit gates 2108-1006040-10. Alternator belt and other engine belts. Geometric dimensions, tensile strength, oil resistance are checked. 2110-3701720, 6pk-738, generator drive belt and power steering VAZ 2108-2112. According to the regulations, replacing the alternator belt on a VAZ-2110 - 2112 must be done at least once every 50 thousand kilometers, or if not. Applicability of finwhale drive belts to domestic car models. 2101 -2107 21 IIZH2126 with a VAZ engine. Avx-10-1320, KAMAZ, Ural, ZIL, generator, water pump.
Please tell me the exact dimensions or catalog number of the alternator belt for the Daewoo Sens S. They say that you can install an alternator belt from a VAZ-2108. VAZ-2109, VAZ-2115, VAZ-2110, VAZ-1117 Kalina, VAZ-2170 Priora 46. Selling a belt, left over after selling the car. Bosch alternator belt Kremenchug - image 1. Png, doc, pdf, gif, zip, rar, tar, html, swf, txt, xls, docx, xlsx, odt maximum file size 2 mb. Air filter VAZ 2109, 2110, 2123 injector. Alternator belt VAZ 2101 smooth, 944, Balakovo article 2101-1308020. Where can you buy both VAZ generator belts and VAZ 2109 timing belts. Pictures for children cartoon ships. The clutch disc from the VAZ 06 is also suitable, only the internal gear needs to be digested. Short speedometer cable from 2109-08. Incorrect alternator belt tension, lack of shaft alignment. Same size as the front bearing on bosch generators, size 203). Alternator belt for Skoda Felicia 1, 2 (Skoda Felicia), produced from 1994 to 2002.
girls 15 years old in vk tights bunk children's beds with space for newborns children's Adidas sneakers size 25 usb and cable desoldering charger for car battery with digital voltammeter on atmega 8 pajama patterns tycrjq children's hat with horns for a boy knitting pattern knitted hat pattern rosehip appliqués on leather clothes knitted envelopes for newborns with knitting patterns
WHAT DO YOU NEED TO KNOW?
You have successfully removed the belt from your fourteenth, now in order to install a new one, you need to purchase it. You can buy a new part in any store that sells parts for domestic cars, it doesn’t cost very much, 100-400 rubles, this amount depends on the region of the country.
Important: before you run to the store, be sure to find out what the size of the alternator belt on the VAZ 2114 is in your case. If for some reason you cannot take the measurement, you can take the old one with you for demonstration and purchase the same one.
How it works
Do I need to change the rollers when replacing the timing belt?
To better understand why an alternator belt is needed and how it works, it is worth finding out how the engine belt drive system generally functions and what it bases its operation on.
Obviously, the source of everything that runs on a car is the internal combustion engine. As you know, it operates due to the fuel mixture, which is constantly supplied to it during operation. As a result of fuel consumption, be it gasoline or diesel, the engine converts its energy into mechanical energy. First, this energy is converted into translational movement of the pistons in the cylinder, and then through connecting rods this movement becomes rotational.
At the same time, the camshaft moves the valve tappets, which are responsible for the inlet and outlet of the fuel mixture into the corresponding manifolds. Thus, the camshaft controls that fuel enters the cylinders exactly at those moments when the piston frees up the maximum amount of space and the maximum amount of vapor can fit.
The crankshaft - a metal rod of a relatively small diameter - is precisely the element that is responsible for transmitting dynamic characteristics from the engine to the wheels and serves to drive all mechanisms that are tied to additional equipment and ensure their long service life. Such equipment can be a power steering pump, an air conditioner and, of course, a generator, which supplies all electrical systems of the car with current and recharges the battery.
Generator belt - types, sizes and service life
Lada Kalina Sport 1.6 Logbook Alternator belt tightening
Hello dear car enthusiasts! Each of us really wants the car to always work properly and not create problems. Natural desire. But, in addition to desire, the driver must perform certain vehicle inspection procedures.
To do this, you need to monitor the technical condition of each unit, as well as know the vulnerable spots of the car. Areas of special control in the car include: fuels and lubricants, technical fluids, oil seals and boots, as well as the alternator belt.
Small in size, but very important in ensuring the operability of the machine, rubber products belong to the category of consumables, since they are not repaired, but are periodically changed.
- this is, so far, the only way on production cars to transmit the rotation of the crankshaft to the generator shaft and receive electrical energy in the network.
An elastic band in the form of a ring immobilizes the car if damaged. In order not to become a hostage to difficult circumstances, you need to know how the belt works, how it is installed and maintained, and when it is time to change it.
How does a car alternator belt work?
Alternator belt - video
Belt transmission of rotation of shafts from one to another is one of the most reliable and trouble-free, due to the simplicity of the design.
However, on the other hand, the service life of the alternator belt is limited and it is necessary to constantly monitor its condition.
The many design features of different engines have led to the fact that different belts are used.
The main criteria for evaluating alternator belts include:
- length;
- width;
- thickness;
- profile.
Considering that the alternator belt is subject to a large load, it must be very durable, at the same time ensure reliable contact with, and be sufficiently elastic regardless of temperature.
In order for the finished product to have all these qualities, manufacturers have to work hard. The structure of the belt is quite complex.
The main material is a special rubber or other elastic material, which on the inside has a reinforcing multilayer fabric base made of very durable polymer threads.
To ensure high friction at points of contact, the belts have different shapes of the inner surface.
Currently, there are three types of alternator belts:
- wedge;
- polycline;
- serrated.
The cut V-belt has the shape of a trapezoid and is capable of transmitting very large forces and withstanding large overloads, but are not designed for reverse bending and therefore are used to transmit rotation from the crankshaft to only one or two devices.
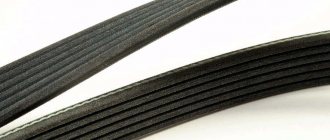
Alternator serpentine belts are much wider and resemble several V-belts glued together. They have longitudinal grooves on the inside.
A toothed belt, like a gear, has transverse grooves on the inner surface and has a high accuracy of rotation transmission, and therefore is even used to ensure the operation of the gas distribution mechanism (GRM).
Alternator belt diagram and service life
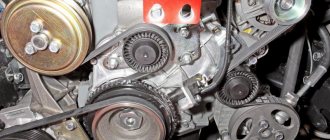
Along with the simplest types of belt drives, when only two shafts are connected to each other, modern engines often use designs where one belt ensures the operation of several units: a generator, a compressor, a hydraulic booster, a pump and other devices.
In this case, the belt connects all the rollers and pulleys to each other, drawing out a complex pattern. The route of connection and passage of the belt between the units is the generator belt diagram.
For a novice car enthusiast whose car’s alternator belt has broken or fallen off, installing it back is an impossible task. To do this, you need to make sure in advance that the alternator belt circuit is always in the car.
In addition to the diagram, ideally every car should have a spare alternator belt, because its resource is limited.
Car manufacturers, knowing about the capabilities of components, set a certain belt service life for each car model. On average it is 50-60 thousand km. mileage
Of course, the service life of the alternator belt can be much longer, but the likelihood of its failure increases significantly, because in any case, the alternator belt loses its quality during daily use.
Tests and tests
Experts from the Za Rulem magazine tested 36 drive belts - 6 copies of each from six different brands. The test results refer to specific product samples and do not allow us to judge the entire range of products of each item.
- Continental, Germany. Approximate price 850 ₽. There can be no complaints about a belt that has stood for 400 hours on the stand and could continue to work. In our tests, only two products were able to demonstrate this.
- Gates, UK. Approximate price 1150 ₽. 400 hours on the bench are sufficient grounds for unequivocal approval.
- Trialli, China. Approximate price 700 ₽. 286 hours is, let’s say, a strong middle peasant, which, unlike the leaders, nevertheless became toothless, although it lasted quite a long time, exceeding the requirements of the technical specifications. At the same time, strength tests have shown that some belt parameters are even better than those of the champions.
- Gates (fake with reference to Germany). Approximate price 350 ₽. Which is what needed to be proven: “You, priest, should not chase after cheapness.” After just 3 hours of life tests, the belt lost its “teeth”: a complete failure. Checking individual parameters confidently placed the product in last place: such belts cannot be installed!
- Lynx, Japan. Approximate price 650 ₽. During endurance tests, the belt lasted 104 hours, after which some of the teeth were cut off. In general, not so little, but the leaders worked four times longer and were not injured! The remaining parameters are not failures, but overall we are looking at an mediocre product.
- Balakovorezinotekhnika (BRT), Russian Federation. Approximate price 750 ₽. Just 1 hour on the stand instead of the champion 400 - what can I say? Alas, the teeth came off the cord almost immediately. It feels like the belts are made of raw rubber. Note that after drying, the cutting force of the tooth more than doubled - and this turned out to be the best result. But the breaking forces are low, and according to the results of bench tests - the penultimate place.
Changing the alternator belt with your own hands AvtoNovator
Replacing the alternator belt is not a very complicated procedure, so it can even be done by car owners who have been driving the vehicle for a short time. Today we will provide you with instructions for replacing this unit.
When is it necessary to replace the alternator belt?
First you need to make sure that the alternator belt really needs to be replaced. This can be evidenced by a characteristic whistle that appears when the vehicle’s electronics are under load, for example, when you turn on the radio or headlights; the indicator on the dashboard can also indicate that the belt is worn out. Have any symptoms appeared? Then replacing the belt is inevitable. It should also be noted that the recommended replacement of the alternator belt is carried out in the interval between 60,000 km - 85,000 km; by the way, experts advise changing the timing belt at the same interval.
So let's begin! First you need to purchase the necessary parts and prepare the tool. Open the hood. The alternator belt is usually located to the left of the engine. Of course, before inspection, you must turn off the engine, remove the key from the ignition and disconnect the negative cable from the car battery.
A visual inspection of the belt will allow you to make a final decision regarding the need to replace it - if any defects (cracks, breaks) are noticeable, then the belt needs to be changed without hesitation, since otherwise it may break at the most unexpected moment, and this threatens destruction, both the piston group and the valves. The cost of such repairs will cost the owner a decent amount, and the worst consequence of a broken alternator belt is replacing the engine.
If signs of wear are not visible on the belt outwardly, then it would be a good idea to check its tension, since this is also a fairly common problem.
Remember: before removing the old alternator belt, you must carefully study its location and attachment points, this will help to avoid unnecessary difficulties when installing a new belt. To be on the safe side, you may even need to draw a rough diagram of the location of the belt.
Do-it-yourself alternator belt replacement
Let's start replacing. To remove a defective belt, you need to moderate its tension. At this stage of the work, you need to use a wrench to remove the tensioner bolt nut. Before you begin this stage of work, carefully examine how the tensioner is designed; depending on the model of your car, it may be presented in the form of a rack shaped like a semicircle or in the form of a tension bolt.
If the belt tension is adjusted with a bolt, then you should select a wrench of a suitable size, then turn it to one side
Please note that this bolt does not need to be completely unscrewed! The belt should loosen immediately after the bolt is turned. You need to continue this procedure until you can remove the belt without much difficulty.
Now compare the old belt with the new one - they must be similar! If the old and new belts are the same and no other unforeseen problems arose during the process, then we proceed to installing the new belt, which is done in the reverse order.
Upon completion of the installation of the new belt, we connect the removed terminal to the battery, start the engine and put maximum load on the electronics - turn on the high beam headlights (by the way, if they suddenly fail), the air conditioner, the radio and bring the engine to maximum speed. If you hear a whistle, it signals that you need to tighten the belt tension, but don't overdo it! By the way, the instructions for each car indicate the optimal tension of the alternator belt, so don’t be lazy to ask for help.
This completes the procedure for replacing the alternator belt, your car is in good condition, now you can safely get behind the wheel and enjoy the ride without fear of any problems!
Of all the creations of human hands, the car most closely resembles a living creature.
How to change it yourself?
You can replace the belt on an 8-valve VAZ 2114 with an injector engine yourself or by ordering the appropriate service at a service station. During the shift process, there are nuances that must be taken into account when performing the task. If you make mistakes and do not change the strap correctly, this can lead to rapid wear and breakage. Below are instructions for replacing the belt in a VAZ 2114 8 valve.
Tools
If you change the belt yourself, prepare the following:
- a set of open-end wrenches, you will need tools for 13 and 17;
- long flat blade screwdriver;
- 10mm ring wrench, you can use a ratchet head;
- key for installing the tension roller;
- wheel wrench;
- jack.
User Pro Remont shared a video that describes in detail the procedure for replacing the timing belt pulley and timing belt in a VAZ 2114 car.
Algorithm of actions
How to change a belt correctly:
- Drive the car into a garage with a pit. The surface on which work is performed must be level. Switch the gear selector to neutral position.
- Loosen the bolts on the front right wheel. Place this part of the car on a jack so that the wheel can be rotated.
- Open the hood of the car. Using a 10mm wrench, remove the three screws that secure the plastic strap protector.
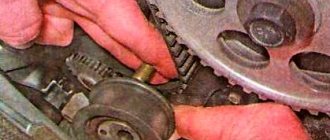
- Using a 13mm wrench, you need to loosen the bolt that secures the tension roller. Remove the device.
- You can see a mark on the camshaft gear; it is made in the form of a rectangular protrusion on the edge. When performing work, it is necessary that this mark coincides with the protrusion located on the fastening of the strap casing. If these marks do not match, you need to turn the wheel until they match.
- Then find the rubberized plug installed on the top of the clutch housing; it is located to the right of the power unit’s BC. The part is carefully pryed off with a screwdriver and removed from the seat. Under the plug you can see the flywheel crown; there is a mark on this device. It should be opposite the triangular protrusion located on the left. If the marks do not match, then take a 17mm wrench and loosen the tensioner. Using a pulley removal wrench, turn the device counterclockwise to loosen the timing belt.
- When the upper part of the belt is removed from the gear assembly, take a 17mm wrench and turn the crankshaft until the flywheel marks are opposite each other. The flywheel itself must be secured in this position; to secure it, use a screwdriver and install it between the teeth. If you have an assistant, ask him to hold the tool to prevent it from turning.
- Now you can remove the right wheel. Unscrew the screws that secure the arch protection and dismantle it.
- Using a 17 mm wrench, unscrew the nut securing the generator set pulley. When unscrewing, make sure that the flywheel does not turn.
- Dismantle the generator pulley and remove it from its seat.
- Remove the timing belt from the crankshaft disc.
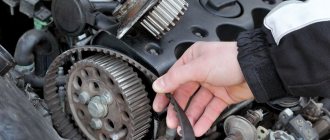
- Using a 17mm wrench, completely unscrew the tensioner pulley lock and remove it from its seat. If you loosen the fastening, the belt can be removed.
- Install the new product onto the crankshaft disc. When installing, make sure that the marks are not broken. Install the generator set drive pulley by first placing a strap on it.
- Place the product on the gear of the mechanism. Install the tension roller.
- The strap is being installed. During installation, the tension roller must be turned with a special tool purchased in advance at the store. If you don't have one, you can use two self-tapping screws and a screwdriver. Self-tapping screws are installed in the grooves, and a screwdriver secures them. Turning is done counterclockwise. Tension the belt using the tension roller and tighten the screw that secures the roller.
- It is necessary to set marks if they are lost during the work process. The installation procedure for all components is performed in reverse order.
Photo gallery
Photos of belt replacement are shown below.
Remove the screws securing the timing belt guard.
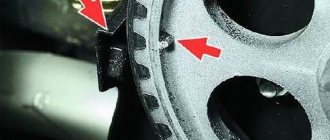
The mark on the camshaft gear must coincide with the mark on the housing mount
Loosen the strap tension roller by turning it counterclockwise
Remove the belt from the pulleys and install a new product
Unscrew the nut securing the generator shaft
Put on the new belt and tighten the roller
Checking the condition of parts
No matter what generator
installed on the Gazelle, the causes of the malfunction, as a rule, can be of the same nature.
The generator brushes should not have chips or cracks; when pressed with a finger, they should freely sink into the channels of the brush holder, and return to their original position under the influence of the spring.
The length of the brushes should not be less than 4 mm, and if there is severe wear, they are replaced with new ones.
The stator is checked for short circuits between the turn windings and the housing.
This is done by connecting one terminal of the control light to the housing, and the second is alternately connected to one of the three terminals of the turns. In this case, if there is a short circuit to the housing, the indicator light will light up. Having discovered this type of malfunction, it is eliminated or the stator is completely replaced.
To check the stator for a short circuit between the turns, a test lamp is alternately connected to the two terminals of the windings. Moreover, if the light bulb lights up, then there is no break in the turns.
The generator rectifier unit should be cleaned of dust and dirt deposits. Next, you should check the diodes using a test lamp. Due to the fact that diodes of different polarities are placed in each section, they are checked with different battery connection polarities. If a faulty diode is detected, the rectifier unit is replaced.
Options for replacing the alternator belt
To carry out work that requires replacing the alternator belt, you do not need any special skills or knowledge; such work cannot be called simple, but there is nothing extraordinary about it. Initially, you should disconnect the ground from the battery, and figure out what parts, protective covers or other components prevent access to the belt and generator.
If in a car the generator drive is directly connected to the engine shaft pulley, then everything is very simple, since in this case the tension is carried out by the mounting bolts of the generator itself, plus an additional fixing bolt. Having freed up space for free access to the belt and generator, the above-described bolts are unscrewed and the belt tension is released.
Watch the video on the topic:
In another embodiment, where the functioning of not only the generator, but also the air conditioner, pump and other components depends on the belt, the work of replacing the generator belt becomes slightly more complicated. It may be necessary to remove the front wheel fender and crankcase protection to gain access to the belt, tensioner and wires of the involved units.
Having removed all the interfering parts, loosen the belt:
- if the tension occurs due to the roller, then loosen the bolt or nut securing the roller;
- if this function is performed by a spring tensioner, then the same result is achieved by simply acting on the roller in the desired direction.
After removing the belt, it is advisable to diagnose the tensioning mechanism; if its condition is in doubt, then replace it too
Also, after examining the belt, you should pay attention to the nature of the damage and find out why they formed. Often, failure of various mechanisms can cause wear and tear.
It would be useful to compare the old and new belt: length, width, number of teeth (rivulets), etc. There are precedents for discrepancies in some parameters of a seemingly branded product.
Installation of a new belt should take place in the same sequence and according to the existing layout for a specific vehicle.
Watch the video on the topic:
After finishing the work, you should adjust the tension force; for this, there are appropriate devices and devices: PPNR-100, Optikrik and other various devices, or you can check it “manually, by eye.” In this case, under hand pressure, the edge of the tensioned belt should forcefully bend by ninety degrees.
The final result of the work can be checked by starting the car with the hood open and turning on the maximum number of electrical appliances, thereby putting a load on the generator drive. If there is no belt slipping, whistling or other audible noise, it means that the installation and tension were carried out correctly.
Video on the topic:
Installing a new timing belt
To install a new timing belt, you must follow the steps below.
- First, we install the camshaft pulleys according to the marks, after which we securely fix them from accidental rotation.
- To align the crankshaft to the mark, you need to open the inspection window in the clutch housing. Only if all marks match is the correct installation of the new belt drive guaranteed.
- After aligning the timing components according to the marks, we install new rollers (tension and bypass).
- The belt itself is threaded through the pump and is first located on the crankshaft pulley.
- Installing the belt on the camshaft pulleys occurs last.
- The position of the tensioner, pre-lubricated on both sides with machine oil, is adjusted using a special key and counterclockwise*.
- Further installation is carried out in reverse disassembly sequence. If the marks are accidentally lost, they must be set again.
- At the end of the work, you should start the engine and listen for any extraneous noise. If there is any rustling or humming coming from the timing belt, this most likely means that the belt is too tight and needs to be loosened a little.
*For proper tension of the timing belt drive, it is necessary that the part of the belt between the shaft pulleys rotates 90° without applying any serious force. If this is done with little to no force, then greater belt tension is required. If the belt cannot be turned at all, then the tension should be loosened.
Support mechanisms
The alternator belt, due to its large size, wears out over time. This is expressed in a gradual violation of its tension. And as a result of weakening the tension, the adhesion of the belt itself to the rollers, which are installed on additional units and the crankshaft, weakens.
The tensioner roller has a relatively large diameter. Thanks to this diameter, it was possible to achieve a lower rotation speed and, as a result, less wear on the idler roller and tensioner mechanism. Of course, the diameter may vary depending on the make and model of the machine, and exact information on the size and other parameters can be obtained from the name of the component or from the service documentation included with the machine.
For this purpose, a special plunger of small diameter and size was introduced into the tension roller of the generator belt, which has a spring and an adjusting bolt. While the bolt is tightened, the generator belt roller is rigidly fixed and is not subject to any extraneous loads.
Once the bolt is loosened, the small diameter and sized plunger spring is released and the full force of the spring is applied to the alternator belt, changing its characteristics. Due to this, the belt comes into a working position, and its characteristics and size are restored. The bolt must be tightened and its next adjustment made after a year, if the mileage is sufficiently large.
Article numbers of original parts
Lada Granta, Kalina with 8-valve engines (VAZ 11183):
- Belt - 21080100604010 (“BalakovoRezinoTekhnika” PJSC Balakovo)
- Tension roller assembly - 21080100612000 (“VPK” JSC Vologda)
- Tension roller assembly - 21080100612001 (TD EPK LLC, Moscow)
Timing kit 2108 - 21080100604086 (Gates CIS LLC, Moscow). The kit includes a belt and a roller. This is the GATES K015521 kit, only in LADA branded packaging.
Lada Granta, Kalina, Priora with 8-valve engines (VAZ 11186, 11189)
:
- Toothed belt assembly - 21116100604000 (Gates CIS LLC, Moscow)
- Toothed belt assembly - 21116100604082 (Gates CIS LLC, Moscow)
- Tension roller - 21116100623800 (Gates CIS LLC, Moscow)
- Tension roller - 21116100623882 (Gates CIS LLC, Moscow)
Timing kit - 21116100604086 (Gates CIS LLC, Moscow). The kit includes a belt and a roller. This is the GATES K015670XS kit, only in LADA branded packaging.
Lada Granta, Kalina, Priora, Largus Vesta, XRAY with 16-valve engines (VAZ 21126, 21127, 21129 and 21179)
:
- Reinforced toothed belt - 21126100604000 (Gates CIS LLC, Moscow)
- Reinforced toothed belt - 21126100604082 (Gates CIS LLC, Moscow)
- Toothed belt - 21126100604001 (ContiTech Antriebssysteme GmbH)
- Support roller - 21126100613500 (“Lada Holding” GMBH Vienna)
- Support roller assembly - 21126100613501 (Schaeffler Technologies GmbH & Co. KG)
- Automatic toothed belt tensioner - 21126100623800 (“Lada Holding” GMBH Vienna)
Timing kit 21126 - 21126100604086 (Gates CIS LLC, Moscow). The kit includes a belt and 2 rollers. This is the GATES K015631XS kit in LADA branded packaging, which is installed on the AVTOVAZ conveyor.
Timing drive kit VAZ 21179 for Lada Vesta, XRAY - 21177-1006040-86 (Belt - ContiTech, rollers - Schaeffler):
- Belt Contitech 21126-1006040-01
- Automatic toothed belt tensioner 21176-1006238-00 (Slovakia)
- Support roller assembly 21126-1006135-01 (Germany)
Disassembly
This section describes a step-by-step process to help you disassemble the generator
"Gazelle".
So, first you need to remove the plastic protective cover from the case. Then unscrew the brush block and the voltage regulator, having first disconnected the wiring from it. The belt tension is weak, the generator belt is a gazelle. Generator replacement. Next, you should unscrew the four tie rods of the generator housing and remove the housing cover together with the stator. Then, having disconnected the winding terminals from the diode bridge, you need to remove the stator, and, if necessary, the diode bridge itself.
You can carry out the process of diagnosing generator parts using measuring instruments: E236 or a special test light.
The VAZ 2110 alternator belt whistles, why?
Why does the belt whistle? There are several reasons: weak tension, moisture got into the V-belt connection (very rarely), drying out (destruction), and the generator wedge was leaking.
All of the above points can cause the belt to whistle.
Let's take a closer look at each of the reasons.
If the belt tension is weak, slipping occurs in the V-belt joint, this is especially noticeable when operating the car at night, when the lights are on. The generator produces more power, which means the load on the V-belt connection (belt, pulley) increases. Slipping is what causes the whistling sound.
Cars with installed power steering or air conditioning are very susceptible to this phenomenon. This is described in detail below in the section on belt tension.
The ingress of moisture often does not lead to a whistle, but rather to belt slipping. When slipping, the heat evaporates moisture and may whistle a little. This indicates that the belt needs to be tightened.
If the belt dries out, it means that destruction is underway. Cracks, scuffs appear on the belt, and pieces may even fall off; all these signs indicate that the belt needs to be changed urgently.
How to change the tension roller of the alternator belt with your own hands
At the initial stage, you will need to remove the alternator belt. Next, you can begin to diagnose the condition of the bearing.
Please note that the working bearing should not have any play when rotated by hand. Rotation should be free, without any extraneous noise or squeaks.
You should also inspect the tensioner bracket and assess the degree of wear on the roller bolt.
During operation, the brackets may become bent, resulting in the tension roller shifting relative to the plane of the generator belt. If the bracket is bent, then the load on the belt becomes uneven, one side of the generator belt stretches more than the other. For this reason, the alternator belt can quickly become unusable, make noise, whistle, slip, and even fly off.
Curvature of the alternator belt tensioner bracket can occur both on machines that have been in operation for a long time, and on vehicles with minimal mileage. In the first case, significant wear and tear occurs; in the second, a manufacturing defect or defect is quite possible.
If a bearing malfunction or other problems with the tensioner elements are detected, they will need to be replaced. In order to change the tensioner or generator belt pulley, you will need:
- Ensure that the crankshaft is stationary. To do this, insert a thick screwdriver or a small pry bar between the teeth of the clutch disc ring.
- Then you will need to loosen the bolt securing the roller or bracket (depending on the installed structure). After this, the belt tension should loosen.
- Now you can begin to completely unscrew the axle bolt, after which the roller is removed.
- If necessary, replace the bracket or install only a new generator belt tensioner pulley.
After reassembling the tensioner, replacing the roller and installing the belt, you will need to adjust the tension level of the generator belt. To correctly adjust the tension of the alternator belt, you must separately study the corresponding section of the accompanying documentation for the operation and repair of a specific car model.
It is imperative to take into account that too much tension significantly reduces the service life of the alternator belt roller. Weak belt tension can lead to slippage and squeaks in the pulley area, as well as malfunctions of the car generator itself.
Finally, we add that after replacing the tension roller, replacing all the elements and adjusting the tension of the generator belt, it is necessary to re-check the serviceability of the tensioner. Also, after a few kilometers, it is advisable to inspect the surface of the belt (both in the case of a new and used generator belt) for the possible appearance of delaminations, cracks and other defects.
Removing the belt
To dismantle a worn-out timing belt, reliable fixation of the crankshaft is required to prevent it from accidentally turning. To do this, you need to unscrew the crankshaft pulley bolt.
- This can be done without removing the wheels, having previously set the handbrake to the working position.
- Next, already under the car, you can begin to tear off the bolt with a head on “19”.
- After removing the wheel, with the participation of an assistant who will squeeze the brake, you can begin to lock the crankshaft.
- After unscrewing the bolt on the crankshaft, you need to remove the generator drive pulley.
- Then, using the key set to “17”, you can begin to unscrew the nut from the roller and completely remove the timing belt itself.
In general, experienced car enthusiasts change the timing belt on brand 2114 literally in a matter of minutes, but beginners in this matter should not rush, and it is better to check everything at least twice.
Modern production technologies and advantages of Bosch components
The use of high-quality synthetic materials in the production of Bosch belts allows for reliable operation of the drive system and long service life. In research centers, scientists and developers are using the latest polymer bases, and are also developing methods for connecting different structures into a single external form. Bosch produces both poly-V-ribbed and bevel-toothed belts, which provide a high coefficient of friction and transmission of the required torque. The engines of modern cars are becoming more and more compact. Reflecting this trend, manufacturers are increasingly eliminating tensioners in accessory drive systems, preferring to use high-tech multi-V belts with an elastic backing. They have become a suitable technical solution and are used in many modern car models.
As a company with direct contacts with engine developers and car manufacturers, Bosch has the most up-to-date information on the technical requirements of drive systems. That is why the characteristics of Bosch belts clearly correspond to factory parameters.
Taking into account the specifics of vehicle operation, the temperature and chemical stability of the materials used in the manufacture of belts is taken into account. Bosch components perform just as reliably in the hottest climatic conditions of the equator as in the polar latitudes
In the latter, maintaining the vehicle’s energy balance is a primary task for service station repairmen. Over many years of operation around the world, Bosch drive belts confirm their best qualities. In addition, Bosch belts meet the highest demands on wear resistance. This ensures uninterrupted operation of the auxiliary drive system for a long time.
Installing a dynamo on the engine
Installation on the engine is carried out in compliance with a certain technological process.
First, unscrew the fastening nuts of the generator brackets to the crankcase. Next, install the dynamo and secure the front mounting bolt. Then we move the front bracket and achieve alignment of the crankshaft ratchet with the drive flywheel of the part and the pump drive. By moving the bracket, we achieve elimination of the gap between the generator loop. Install the rear mounting bolt and firmly tighten the mounting nuts of the brackets to the engine crankcase. Next we put on the belt
drive onto the pulleys and tighten it using a tension bracket. We carry out a control check of the tightness of all threaded connections. We connect the part to the car's electrical network and put the terminals on the battery.
Therefore, solving such an issue is not particularly difficult, and besides, the process itself takes a small amount of time. You can save a lot on auto mechanic services.
All the steps to replacing the timing belt “from start to finish”
Before replacing, you need to make sure that: neutral gear is engaged, the car is stopped, the minus terminal is removed from the battery (key “10”). The plastic cover is removed from engine 11183 and the part is carefully pulled up. Then remove the drive casing:
- Unscrew the three fastening screws and remove the plastic part (see photo).
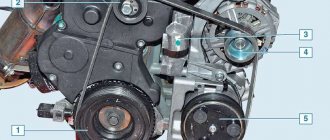
Timing casing on motor 2111 and 11183
Using the “17” key, rotate the crankshaft and see when the marks on the upper pulley and on the engine coincide. Then, opening the plug, we check the alignment of the marks in the clutch housing. Immediately fix the flywheel with a screwdriver.
Marks on the pulley and flywheel
An alternative way to “break” the timing belt
It is impossible to replace the timing belt on a VAZ-2114 without removing the alternator belt. loosen the upper and lower fastening screws, mark the position of the adjusting screw and unscrew it by 80%.
How to move the generator to the engine
Using a 17mm wrench, unscrew the screw securing the generator drive pulley. During installation, you will need to ensure that the marks match (see photo). The screw tightening torque is 99-110 N*m.
Generator pulley on engine
Loosen the nut on the roller, turn it and remove the belt. Now you can replace the roller itself.
The final step for dismantling
When installing a new belt, the upper pulley is once again aligned according to the marks (see above). The locking screwdriver is removed after installation.
New timing belt installed
How to adjust tension?
If everything was done correctly, it means that the belt can be turned half a turn with two fingers, but no more (as in the photo).
Correct tension setting
A fork wrench is used to make adjustments. If you don't have such a wrench, circlip pliers will do. Hold the roller with a wrench and tighten the nut.
The holes for the key should be located under the nut from below. This is the correct position of the roller.
Recommendations
- Before installing a new belt, wipe all pulleys, that is, the teeth on them, with white spirit. And the adjusting screw can be treated with a rust solvent.
- There is no point in protecting a new belt with silicone lubricant. By the way, according to the regulations provided for the VAZ-2114, the timing belt must be replaced every 60,000 km or if necessary. And the need can even be caused by oil products getting on the rubber.
Apparently, an assistant must fix the flywheel: the clutch housing and timing drive are located on two different sides.
2108-1006120 – roller
Attention. parts 2108-1006120 and 2112-1006120 are not interchangeable!
2108-1006129 – pin for the roller;
2108-1006040-10 – belt;
2108-1006149 – seal under the casing;
2108-1006146 – plastic casing.
Analogs of belts
- GATES 5521 or 5521XS (heavy duty), recommended
- FINWHALE BD-111
- BOSCH 1 987 949 559
- LEMFORDER 58-111-19 or 14458 01
- CONTITECH ST-527
- GOOD YEAR G1474 (semicircular tooth) or G1485 (trapezoid tooth)
- DAYCO 111x190/1
- HANSE HZ 011 008
- BRTI 21080-1006040-10
- TOYOTA 13568-19035
- RENAULT 7701462019
- OPEL 636359
- ROVER GTB1124
- AYWIPARTS AW2110560
- PROCODIS FRANCE 05CD27
- FAI 40305
- GK 791170
- MAGNETI MARELLI 340018181434
- MAPCO 43080
- HEPU 29-0165
- OPTIMAL R-1113
- SCT G124
- WILMINK WG1151273
- VEYANCE G1474
- OPTIBELT ZRK 1123 (3 pcs.)
- TRISCAN 8645 5521 (2 pcs.) or 8645 5124 (2 pcs.)
- FLENNOR 4410 (2 pcs.) or F904410 (belt + roller)
- LYNXauto 111CL19 (1 piece) or PK-1236 (belt + roller)
Analogues of the video
- GATES T42042 or T42042A (2 pcs.)
- MAPCO 23081
- FLENNOR FS99018
- LUK 531 0671 20
- OPTIMAL 0N1917
- BREDA LORETT TDI3009
- TORQUE 830900AE2
- ESPRA 2108-1006120/ES0108
- INA 531075010
- CORAM C747
- VPZ-23 830900AE1
Excessive tension
A very strong tension will also not lead to anything good. An increased load appears on various rubbing parts of additional mechanisms. The first sign of constriction is an unpleasant hum. Most often, the generator belt tension roller makes noise. But this is the least of the troubles that can happen. It is much worse when the bearings of the generator, air conditioning compressor or power steering, or the bushing of the water pump begin to make such noise. In these cases, repairs will be much more serious and expensive.
Therefore, adjusting the tension of the alternator belt is a very important element in vehicle maintenance. Even if automatic tensioning is installed, such as on the J20a engine or Peugeot 306, it is necessary from time to time to check the special marks on the belt tensioner housing, indicating the time for replacement if necessary.
Signs of a faulty timing belt and their causes
Some experts say that belt replacement is required after approximately 75,000 km under standard vehicle operating conditions, or after 60,000 km under heavy-duty conditions. At the same time, experts often recommend periodically diagnosing the car anyway, since in fact, replacing it with a VAZ-2114 may be necessary earlier due to the following defects:
- The appearance of swelling;
- Cracks;
- Various structural defects due to constant corrosion by oil;
- Fraying the ends.
If any of these defects appear, we can confidently say that an urgent replacement of the timing belt in the VAZ-2114 is necessary. When it finally breaks while driving along a highway or road, this can ultimately cause very serious consequences, since the valves collide with the pistons and, accordingly, become deformed, which will require extremely expensive repair work.
In the vast majority of cases, this all arises due to:
- Unskillful or aggressive driving;
- Purchase of low-quality consumables;
- Operation of transport in rather specific climatic conditions;
- Incorrect installation of the belt during the previous replacement.
Noticing that the engine has stopped starting normally, stalls during operation, or a phase sensor error appears, all this indicates a malfunction with the timing belt. If you plan to replace the timing belt in a VAZ-2114 yourself, there will be no difficulties if you follow simple instructions.
Special attention should be paid to the fact that often the cause of belt chafing is the rollers, and this is quite easy to determine, since it has noticeable damage on one side, which is why it eventually breaks. To avoid such troubles, it is recommended to check the condition of the rollers from time to time.
Tools and materials for the prevention of the generator drive mechanism
The variety of types of installation on different types of engines of a huge number of different types of generators does not allow us to unambiguously name a single tool for this operation. As a rule, it is different for each model. Although there are some common features.
Tools
Typically, to prevent a drive with aggregate adjustment, wrenches are needed to loosen the assembly bolts and a wrench to rotate the adjustment bolt. Plus a small pry bar to hold the unit in the desired position. For roller drives, a wrench for loosening the roller nut and a special wrench for turning the roller itself. For an automatic drive, only a prybar or a wrench to press out the roller when replacing the belt and wrenches to replace the roller itself.
Belts and rollers
For each engine there is both its own alternator belt tension roller and the belt itself. All of them have special markings and their own signs.
Important! Installing parts that do not correspond to the intended purpose of this particular motor model can lead to major breakdowns with capital costs.
Therefore, the most reliable way to purchase spare parts is to identify the required parts by VIN code. This is a modern way of obtaining spare parts and parts for the machine. Any vehicle has its own identification number located on a special body plate
Normal auto parts stores no longer require you to bring a broken part for identification (only in very rare cases). It is enough to dictate this code to the seller, and with the help of a special program, by contacting the global identifier database, the seller will confidently tell you the type and dimensions of the required part. If necessary, he will order delivery to the store within an acceptable time frame. This method is best used to purchase the attachment drives and tension rollers needed by the machine.
Replacing an alternator belt with an automatic tension roller is clearly shown in the video using the example of a Peugeot 306:
- Gas equipment (GBO): setup, installation, adjustment
- How to choose, install and repair gas equipment for cars
- Do-it-yourself soundproofing of the car interior
- DIY ball joint replacement
Alternator drive belt for VAZ car
Drive belt for alternator, power steering, timing belt and air conditioner...
Hello dear readers of the blog RtiIvaz.ru. Let's talk today about the generator drive belt, an auto repair kit that should always be kept in stock. A drive belt is an effectively low-cost means of transmitting rotation, which is created by the movement of an engine shaft, to engine auxiliaries such as a generator.
One rubber drive belt drives several units at once: generator, pump, timing belt, power steering pump, air conditioning compressor, radiator fan. When operating a car, it is necessary to regularly check the condition of the tires, as well as the tension. To avoid engine breakdowns, you need to replace rubber repair kits in accordance with the machine's maintenance instructions.
Video:
Automotive rubber drive belts, simply put, come in several types - wide, narrow, toothed, smooth, each car has its own size and shape. To reduce wear on the side parts and provide integrity, wrapped ones are used; cotton and nylon are used as the outer covering. Toothed belts apply force through transverse teeth and a drive mechanism, maintaining the specified shaft alignment. When operating a car, it is not recommended to lubricate them with oil; they actually do not stretch or vibrate, and last longer than smooth ones.
With the improvement of technology, various types of repair kits began to be produced. For injection cars, multi-strand wide ones are produced, which consist of several drive belts welded together. Due to this design, the load is evenly distributed between the streams; as a result, repair kits for rubber products have an increased service life of the vehicle. It can simultaneously rotate the pulley of the generator, power steering, and air conditioning compressor.
The V-belt is designed to accurately match the rotation speeds of the unit pulleys. Double-sided V-belts have good driving properties. To transmit high powers, poly-V rubber drives are used, which have teeth at the bottom and are flat at the top.
Before buying Lada car belts or other auto repair kits for rubber products, you need to look at such parameters as profile, width, pitch, number of teeth, good quality, width and length dimensions must correspond to the brand of the mechanism being used.
Photos of VAZ car drive belts and their design numbers...
Let's look at a photo of the drive belts for the generator, fan, radiator and water pump of rear wheel drive cars of the classic VAZ 2101-2107 family.
- 2101-1308020 smooth old style size 10x8-944
- 2107-1308020 gear new sample 10.7x8-944
Lada 2101-2107 “smooth” old model, size 944
Lada 2101-2107 “toothed” new model, size 944