This setting is safe for the audio system, but is not absolutely true for all audio systems. Further adjustments are made for the specific system and listener.
Setting up the radio depends on its specific model; here we will look at the settings that are available on almost any radio.
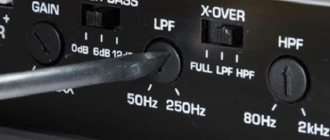
1. Setting up the radio: 1.1 Bass Boost - EVIL! Forget about him! Set it to 0 or OFF 1.2. Loudness - loudness compensation; in systems with external amplifiers, we first set the loudness compensation, then we coordinate the levels of the GU and amplifier, or do not use this function at all. If the GU and the external amplifier are matched in level and then turn on the loudness compensation, clipping may occur! 1.3. Equalizer - you can use it to compensate for shortcomings in the sound of the system; personally, I initially set it completely to 0, then, when identifying shortcomings in the sound, I adjust the sound over time. Here, too, when increasing certain frequencies on an external amplifier, clipping may occur, it is worth remembering. 1.4. Sound Retriever and other various “sound improvers” - As in the case of loudness compensation, they are set before the GU is coordinated with the amplifier, or we do not use it at all. 1.5. Radio crossover: If there is one, set it to - 1.5.1 HPF - Depends on the type of speakers, open the specification and look at how many Hz it plays and set the cutoff. Approximately 16 cm midbass from 80 Hz, 13 cm - 100-125 Hz. Mid 150-200 Hz. Once again, this is not the ultimate truth, it all depends on the specific speaker and how many watts will be supplied to it (the lower the cutoff, the less watts can be supplied to the speaker). The order of the filter is by ear (the higher the order of the filter, the less likely it is that the speaker will fail at high powers) 1.5.2 LPF - Depends on the type of acoustic design of the subwoofer. Approximately 60 - 80 Hz. The filter order is by ear. It is advisable to set the level to 0, and adjust the volume directly from the amplifier.
The amplifier's settings depend on whether it is equipped with filters. If HPF and LPF are set on the radio, then it is not necessary to set them on the amplifier; you can simply open the filter as much as possible. If there is no crossover in the radio, we set the cuts on the amplifier. Turn Bass Boost to 0
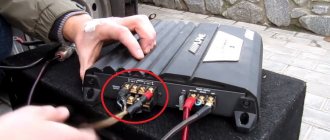
2. Setting up the amplifier for speakers: 2.1. Turn on HPF filter 2.2. We set the cut in the same way as described in paragraph 1.5.1 2.3 Set Gain (Level): - Turn on a well-known track. — We set the maximum volume on the radio (WITHOUT DISTORTION). This does not mean that you need to turn the volume up to maximum, for example: the pioneers have a maximum of 62 volume divisions, we set it somewhere around 45-50. Different radio models behave differently, at a bass club I tested it with a Pioneer DEH 80PRS oscilloscope, even at a volume of 62 without “improvers” it doesn’t clip. But it’s not a fact that your radio will behave the same way, so turn it up to about 80% of the maximum volume. — We begin to turn the Gain (Level) until we hear distortion in the sound, as soon as we hear it, we turn the Gain back a little. - Run other tracks and listen to see if there are any distortions on them, if there are, then turn down the Gain - Remember! The volume that you set on the radio when setting Gain is the maximum! No more twisting!
3. Setting up the amplifier for the subwoofer: 3.1 Turn on the LPF filter (if you are using a monoblock, you don’t need to turn anything on) 3.2 Set the cutoff in the same way as described in paragraph 1.5.2 3.3 Setting up the Subsonic (infra-low-pass filter). If you have a subwoofer designed like a Bass Reflex (FI), Quarter-Wave Resonator (QW), or Horn, we definitely use Subsonic. The filter is set 3-5 Hz below the box tuning frequency. 3.4 Gain is adjusted in the same way as in paragraph 2.3
The initial setup is complete, keep an eye on the speakers for the first time; minor adjustments to the settings may be required. Don't forget to warm up your speakers after purchase. Provide proper nutrition to avoid clipping! Follow the prosado
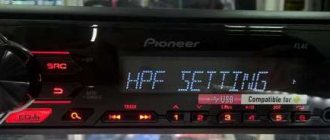
HPF / LPF (HPF / LPF)
Hight pass filter (HPF), also known as a high-pass filter (HPF), filters out (cuts off) low frequencies, leaving high ones.
When setting up a subwoofer amplifier, set the control to about 20 Hz to cut out infrasound and not waste energy, since you won't hear it anyway. For mid-range speakers, the HPF is set around 80 Hz to remove the low frequency range for which the speaker is not designed and will not be able to play it. If you have separate channels or even a separate amplifier for tweeters (tweeters), the HPF is set in the region of 3000 - 5000 Hz, depending on the model, so as not to burn them.
All figures given are approximate, to obtain more accurate and safe values, study the characteristics of your speakers!
Low pass filter (LPF), also known as a low pass filter (LPF), is the opposite of HPF and cuts off the upper frequencies, leaving the lower ones.
For subwoofers, it is set in the region of 50-80 Hz, depending on the type of design (ZYA, FI, etc.) in order to cut off frequencies for which the subwoofer is not intended. The same goes for midrange drivers, cut them around 1400-1600 Hz.
If possible, you can limit tweeters to 20,000 Hz, but this is not necessary.
Gain Level
Gain (sensitivity) is often confused with volume, but this is not entirely correct.
Gain is an adjustment of the amplifier's input sensitivity to match the radio. But let’s not get into the weeds and consider this setting from the point of view of what is useful for the user.
Sometimes the Volts (V) value indicated on the regulator can be misleading. The fact is that sensitivity is measured in Volts. The smaller V, the higher the sensitivity, the louder the speaker will play and vice versa.
To begin with, it will be useful to watch a clear video about how gain works on an amplifier:
Adjusting gain by ear (method 1)
Having a good sub link, do not use an equalizer and various bass enhancers, forget about bassboost on the amplifier - so before adjusting the gain, make sure that all this is turned off!
Set the control to minimum and play music that you usually listen to. Turn up the volume of the radio by 3/4 of the maximum; if you hear distortions in the sound of the subwoofer earlier, stop and turn down the volume a couple of notches. Go to the amplifier. Have an assistant slowly turn up the gain control until new distortion appears, and when you hear it, stop the rotation and turn it down by 10%.
Adjusting gain by ear (method 2)
If you don’t trust your hearing and are afraid not to hear changes during time, then use a more accurate method - using sinuses.
If you are tuning a subwoofer, then use 40 Hz, if your case is tuned above 40 Hz or you have a closed box, then take 50 Hz (download sines in the Downloads section). To set the gain for the midbass amp, use 315 Hz.
Sine or tone (in our case) is a tone signal of a certain frequency, changes in the sound of which you can easily hear
Set the gain to minimum, turn on your sine and turn up the volume of the radio. When changing the sound of the tone signal, stop and turn it down a couple of notches (set the maximum volume limit to this value if your radio has such a function). Go to the amplifier. Similarly to the first method, add gain. When the sound changes, stop and turn it down 10%.
Adjusting Gain Using a Multimeter or Oscilloscope
Adjusting the gain level using instruments is a smart and precise adjustment. At the same time, neither the speaker nor your ears are strained. This setup is shown in detail in the video on our YouTube channel:
Communities › Car Audio › Blog › Violets, I can’t configure kap-49 either.
Hello, how to properly configure the Eighteen Sound (18 Sound) 6ND410 violet and Kicx kap-49 amplifier, SONY XAV-741 radio. On the radio I cut the HPF to 120Hz on the amplifier I cut it to about 380. The problem is that at high volumes it becomes a mess, and there are a lot of high frequencies (the tweeters are turned off) and at the same time, on the radio in the equalizer, the bass is turned off to the max, the sound is not very pleasant (squeaky, there is no roughness in the voice). When the equalizer is turned off, the sound is much more interesting, well, don’t turn it up too loud because of the bass, I’m afraid of burning the violets. Where should I turn the amplifier? On the radio there is a manual adjustment of positions, is there anything I can tweak there? To be honest, I’m very tired of turning the amplifier, and I don’t have the strength to turn the radio itself, I already want to burn them and forget everything.
Bassboost
Bassboost - increases the volume at a certain frequency, usually 40-45 Hz.
When using a bass boost, the chance of burning the subwoofer increases sharply, since clipping occurs much earlier. In most cases, bassboost is not needed and if you are a beginner, then just accept the rule “Don’t touch bassboost!”
Experienced people can use it to increase the frequency response shelf in order to draw out dips in certain frequencies, but these are already deep settings and the effect does not always justify the risk.
Quantity
With such a system it will be possible to voice over parties, go to competitions and take prizes. In terms of sound, it will give odds to many nightclubs and concert venues. When you drive up, you can be heard from a block away. As they say in such circles, this is money that is heard.
HOW CAN YOU SAVE?
We calculated the prices for new components, but you can also save money by buying the same thing on the secondary market. If you don’t know much about car audio, then it’s better to take with you someone who understands this and can check everything, otherwise they may deceive you and sell you a non-working speaker or amplifier.
You can choose used components on Avito, Yula or in specialized VKontakte groups (one of the largest is “used car audio”), as well as on the bass club forum. Every day, dozens of advertisements for the equipment you are looking for appear throughout Russia. Of course, it’s better to choose in your city, then you can make sure the product works. But if the required product is available at the other end of the country, it is better to resort to the help of a guarantor. A guarantor is a person who understands car audio and has a certain authority, usually there is only one in the city. For a little money, he will go, look at the goods, make sure that the seller is honest and, if everything suits you, he will pick up and send you the goods. You can find a list of people with contacts on specialized forums.
What to collect from?
You should carefully select components. There are many selection criteria other than the sound of certain brands. Be sure to take into account the dimensions depending on the intended location of the audio system. Just in case, select parts with at least two pairs of linear outputs. And look at the appearance: the design should be combined with the interior of the cabin.
Once you decide on the sound, pay attention to the place where you are going to put it. Dimensions and installation depth play a huge role when installing the system. The optimal choice is two-component speakers from a well-known brand.
Lately, door podiums have become quite popular. True, the “filling” of the door and its trim often take a long time to adjust to the purchased components.
Speakers aren't everything
The choice of a subwoofer is determined by the same criteria as acoustics: diameter, installation depth and sound feature. Therefore, the advice related to acoustics will also apply to the subwoofer.
An amplifier is an essential element of any audio system. Your choice should fall on a renowned company. These, as a rule, are made of more resistant materials and high-quality components, and can also withstand increased loads.
Red or blue?
Don't forget about the wires! Wires are divided into three types: acoustic, interconnect and power. Power ones are needed to connect the head unit and amplifier and the power source. There is an opinion that the more expensive the better. In our case, this is true only for wires of the highest price category. Daxx, Stinger, Belsis and Chernov wires perform well.
Sometimes a capacitor is added to the system to eliminate bass sag when there is insufficient power from the generator and battery. You may encounter such situations if, for example, you are going to participate in car audio competitions. Please note that for a power of 500W, 0.5F is enough. Focus on models with automation if you don’t want to bother with connections. If you are making a system “for yourself,” a capacitor is not needed.
Amplifier installation locations
- Under one of the front seats. Pros: close to the power source, radio; does not occupy functional space. Cons: overheats, inconvenient to install speaker wires.
- Under the back seat. Pros: does not take up useful space, does not overheat. Cons: as a rule, there is little space, and, consequently, low power of the device; far from the radio and power supply.
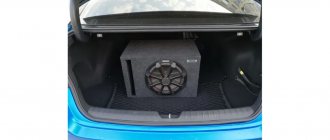
- Under the trunk lid. Pros: a lot of space for placement (you can install any device of any power), excellent ventilation, does not take up useful space, does not interfere. Cons: if the trunk shelf is very thin or flimsy, then the amplifier can create extraneous sounds, loosen the shelf, and the connectors in it can become loose; If the amplifier is designed to power not only a subwoofer, but also speakers, then it is very inconvenient to do the wiring.
- Place it on one side of the trunk. Pros: convenient installation, does not take up much functional space, convenient connection, you can install several amplifiers, good cooling of the device. Cons: far from all devices.
- On the trunk lid. They don’t take up space, good ventilation, easy connection, beautiful. Cons: possible loosening of the device and the trunk lid itself, possible short circuits of wires in places of kinks, far from all devices.
- On the back of the rear seats. Pros: plenty of space for installation, good cooling, convenient installation, ability to route wiring in detail on different sides of the machine, powerful mount, does not take up functional space. Cons: wires may break if the backrests are folded frequently, far from the sources.
- On the wall of the subwoofer. Pros: close to acoustics, does not take up extra space, installation and dismantling is simple, powerful cooling. Cons: strong vibration of the sound source can damage the amplifier.
(2 ratings, average 4 out of 5)
Find out in advance what you need
Before purchasing components, be sure to determine the wiring diagram. It determines exactly what you need, as well as a theoretical price range. The following are the most common and convenient schemes.
- Head unit - front subwoofer - 4-channel amplifier for front and subwoofer.
Classic. Budget-friendly, easy to install and configure. It is also good because it saves space in the car. The disadvantages include the low power of the system, but this does not significantly affect the sound quality. - Head unit - front - rear - subwoofer - 5-channel amplifier for front, rear and subwoofer.
It is based on the previous scheme. It differs only in that it provides sound in the rear part of the cabin. The setup is more difficult than the first scheme, and it is not always possible to achieve the desired result. - Head unit - front - subwoofer - 2-channel amplifier to the front - 2-channel amplifier to the subwoofer.
Do you like powerful bass? Then this diagram is for you. We get more power by connecting a two-channel amplifier to a subwoofer with a bridge. - Head unit - front - subwoofer - 4-channel amplifier for the front - 2-channel amplifier for the subwoofer.
The most expensive of the presented schemes. And the best. Sound quality and power are achieved through channel-by-channel amplification.
Connection diagram for a passive subwoofer to a 4-channel amplifier
To connect this type of speaker to a 4-channel amplifier, you will have to use a standard circuit.
Connection diagram for 4 channel amplifier and subwoofer
So:
- First, the subwoofer and other speakers are connected to the amplifier.
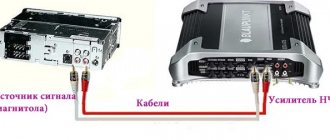
- Then the amplifier is connected to the car radio.
- Having received the signal directly from the car radio, the amplifier distributes it. Part of the signal is sent to the sub, and part to the tweeters.
Amplifier 4 channel connect subwoofer
Note. Often the subwoofer is placed in the trunk of a car. In view of this, it is necessary to stretch cables there through the entire cabin. In this case, the path from the battery to the trunk is implied, and so much cable needs to be calculated.
Connection diagram for subwoofer and 4 channel amplifier
- When wiring cables, you need to make sure that the positive wire is protected with something, for example, corrugation. Basically, this means protecting the part that is located in the engine compartment, as close as possible to the battery.
We collect
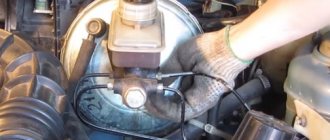
First, you should do the wiring. We select the cross-section of the power wire corresponding to the total power of the amplifier and head unit. We pull the plus and minus into the interior. Remember: wires passing through metal must be covered with a piece of plastic or rubber tubing to avoid a short circuit to ground.
The positive wire must be connected through a bulb with a fuse whose rating corresponds to the fuse on the amplifier. The flask must be positioned no further than 30 cm from the battery.
Run the power wires through the power distributor to the head unit and amplifier. They should be soldered to the head unit wiring harness, run the positive wire through the plug fuse. Protect the solder joint with heat shrink casing. Connect the block to the head unit, the interconnect wires to its linear outputs and install it in its original place according to the attached instructions. Crimp the ends of the power wire going to the amplifier with terminals.
Important!
It is better to run all wires separately from each other, although an intersection of 90 degrees is allowed.
Pay attention to the location
Place the high-frequency speakers on the lining of the windshield pillars, approximately at eye level and turn them towards the glass. So, they will work as a reflection, creating the width and height of the sound stage. To put it simply: we point the left speaker towards the passenger seat, the right one towards the driver’s seat.
When you're done connecting, double-check that everything is correct. After that, turn on the head unit and you can start setting up.
Connect the amplifier and install the subwoofer. If you have a sedan, then turn the sub towards the back of the passenger seats. If it’s a hatchback or station wagon, then go to the fifth door. Now you can connect the subwoofer!
Setting details
After connection, the installed system must be properly configured. Tuning means setting the cutoff frequencies for acoustics and subwoofer on the amplifier, setting the incoming and outgoing sensitivity. As well as setting up the sound processor, if available.
Imagine that the filters in the amplifier are better than those in the head unit. And set all settings on the head unit to 0.
- Set the filter for the subwoofer channel to “LPF”. Set the crossover cutoff frequency from 50 to 70 Hz.
- Front channel filter to “HPF” position. The frequency is also in the range of 50-70 Hz.
- Adjust the sensitivity as follows: on the amplifier set the setting to “0”, on the head unit increase the volume to the maximum value. Then turn the sensitivity control on the amplifier upward until noticeable distortion appears in the sound of the system. Turn it down and the sensitivity is adjusted.
Important!
If the bass is localized on the subwoofer, then it should be connected in antiphase: turn the phase adjustment knob 180 degrees. If it is not there, swap the “+” and “-” in the subwoofer connection.
Launch everything and listen. If, when you start the radio, you hear clicks in the subwoofer and crackling sounds in the speakers, then check the wiring and, if necessary, rewire.
Setting up an amplifier for the front: how to connect via, step-by-step instructions
Many car owners do not know what tuning an amplifier to the front is. There are several options for self-adjustment. The choice of method depends on the needs of the driver.
What is front amplifier
Before connecting the front of the amplifier, you must carefully examine the panel. This will help determine the output to the subwoofers. There are anterior and posterior channels. The first ones are designated by the inscription REAR. The latter have a FRONT pointer. Rear channels are often called rear channels. The front is an amplifier for multi-channel audio systems.
How to connect the front
To connect the front through an amplifier, follow the step-by-step instructions. It consists of several successive stages. Otherwise, problems may arise if the car owner connects the system to the output of the rear speakers:
Which radio do you recommend buying?
- 4734 votes - 50% of all
- 1366 - 14% of all
- 1042 votes - 11% of all
- 814 - 9% of all
- 640 - 7% of all
- Other... 4%, 369 369 - 4% of all
- 151 votes - 2% of all
- 2%, 147 147 - 2% of all
- 141 votes - 1% of all
- 93 votes - 1% of all
- Include wiring from the audio system speakers with the required connectors at the front.
- Connect the radio by connecting the required cable to the player in the car.
- Distributes a sound signal. The amplifier must independently supply a pulse to the subwoofer and high-frequency speakers. The same applies to mid-range speakers.
Connecting the front through an amplifier will help you adjust the desired parameters of the device. This will be extremely easy to do. Before setting up, you need to decide on the control options during the connection process. Each amplifier has a Crossover Selector. It is designed to switch filters. When the device operates in the LP position, it operates at low frequencies.
Are you a car driver?! Then you can take this simple test and find out... Go to the test »
If you connect the AP, the amplifier is with modifications deactivated. There is a special regulator on the rear panel. It is used to change frequencies at the cutoff of filters. The power is adjusted by using Level. It will allow you to select the desired level. Bass Boost enhances low frequencies.
How to set up the front
The initial adjustment of the edge on the amplifier involves adjusting the crossovers and frequency level. The reason for the enhancement does not matter. To configure the amplifier taking into account the front parameters, you need to disable modifications and sound adjustments. When this is not possible, the sound control is set to zero. It is advisable for motorists to take into account that 2 procedures cannot lead to the same result.
Passive crossovers are set to medium high-frequency power. A similar action will be needed when turning off RF signals other than 0. When adjusting, set the value to 3 dB. For the low-pass filter of active crossovers, the indicators are adjusted to the same values. They range from 75 to 80 dB.
The sound gain on the channels should be at a minimum level.
The value is preferably the same as on acoustics. Completing all steps involves adjusting the connected amplifier to the connected setup to the front.
After the necessary preparation, the input sensitivity of the system is adjusted. If you follow the included guide, you may notice an incorrect ratio. Therefore, they set the indicator based on personal feelings. However, you should not choose the maximum level. The gain value is reduced to reduce the volume headroom. This allows for better sound quality.
To determine the correct gain value, it is recommended to listen to music. Then the setup will be more effective. In individual audio files, the value is increased until sound distortion appears. Then the indicator is reduced. For high volume, the level of noise occurrence is determined. After completing the gain adjustment, proceed to setting the subwoofer.
To configure channels, connect the wire from the installation to REAR. The front speakers are connected with a cable to the connectors. Then set the low frequencies to zero. It should be the same for both subwoofer channels.
Finally, the speaker crossover is installed on the HP. To adjust REAR, select the LP mode. Then the phase setting parameter is changed. This will make the sound more harmonious.
You may also like
Source: https://omagnitolah.ru/podklyuchenie/usilitelya-pod-front.html