Today, every car, regardless of type, is equipped with special protection for all electrical systems. This protection is called a fuse. They are installed so that in the event of a short circuit or malfunction, the system can turn off via a fuse, thereby protecting itself from breakdown. Fuses are used for every electrical circuit, from a small light bulb to an engine's ignition system. More important engine systems are equipped with special relays, they protect various pumps, electric motors and other powerful sources of electricity consumption.
The fuse is a small structure consisting of a plastic casing with a fusible element inside. If a short circuit occurs, the thin contact melts under the influence of current, which interrupts the electric current. The simplest electrical fuse is a thin copper wire inserted into a circuit. If the upper limit of the supplied current increases, the contact begins to melt and interrupts the flow of electricity. Here there is a description of all fuses and relays for VAZ 2113, 2114, 2115 models of injection and carburetor types, old and new models.
Scheme
The entire line of VAZ 2109 cars can be divided into two branches - those produced before 1998 and those produced after 1998.
Older cars are equipped with fuse blocks whose marking is 17.3722. This power supply consists of a housing and an engineering board. Wire contacts, fuses and relays are soldered to the board.
Newer versions of nines, the production of which began in 1998, here the power supply is marked 2114-3722010-60. Here we are already seeing fuses.
If we talk about fuse blocks, the factor of the fuel injection system used - carburetor or injector - plays absolutely no role. BP will differ only by the year of manufacture of the car. Therefore, the mounting blocks for the carburetor and injector are the same.
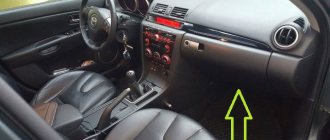
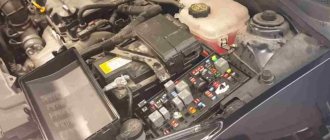
The required mounting block is also located the same everywhere - in the engine compartment opposite the driver's seat, almost under the windshield.
Differences
Are there any differences between the old and new versions of the power supply? Of course. They are as follows:
- The parts of the mounting block are marked differently;
- The fuse ratings are different;
- The new power supply does not have a relay for the cooling system fan motor and a time relay for the rear window washer device.
In the engine compartment
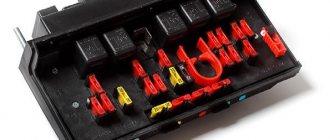
The module is represented by a complete collection of fuses and relays.
To gain access to the panel, you will need to unclip the plastic clasps of the cover and remove it from the fastenings. Inside you can find two configurations of components - this depends on the year of manufacture of the car. All elements responsible for protecting the main power circuits of the car are introduced here.
Old style power supply
Let's first consider the old-style power supply units, which are still quite often found on VAZ 2109 cars. Moreover, as we have already said, with both injection and carburetor engines.
| Fuse number | Current strength | The chain he protects |
| F1 | 10A | Backup fuse |
| F2 | 10A | Turn signal indicators, hazard signal breaker (in hazard mode), hazard warning light |
| F3 | 10A | Rear brake lights, interior lighting |
| F4 | 20A | Rear window heating element, rear window heating switch contacts, carrying socket, cigarette lighter |
| F5 | 20A | Horn (horn), horn switch |
| F6 | 30A | Backup fuse |
| F7 | 30A | Heater fan electric motor, windshield washer electric motor, electric radiator fan relay, rear window heating relay, rear window heating indicator light, glove box light |
| F8 | 7.5A | Backup fuse |
| F9 | 7.5A | Backup fuse |
| F10 | 7.5A | Left side light |
| F11 | 7.5A | Right side lamp |
| F12 | 7.5A | Right low beam headlight |
| F13 | 7.5A | Left low beam headlight |
| F14 | 7.5A | Left high beam headlight, high beam indicator lamp |
| F15 | Right high beam headlight | |
| F16 | 15A | Turn signal indicators and emergency flasher relay-breaker (in the turn signal indication mode), turn signal indicator indicator lamp, rear reverse lights, gear motor and windshield wiper activation relay, oil pressure indicator lamp, hand brake indicator lamp, coolant temperature indicator, fuel level indicator, fuel reserve warning lamp, voltmeter |
BP 17.3722
Relay
In addition to the fuse designations, it will be useful for you to know which relay number in the mounting block is responsible for which functions.
| Relay number | Functions |
| 1 | Performance of the front optics cleaning elements |
| 2 | Rear window washer motor performance |
| 3 | Protection against breakage of turn signal and light signaling lamps |
| 4 | Protection against failure of the windshield wiper motor |
| 5 | Allows you to determine the performance of the lamp |
| 6 | Rear window defogger overvoltage protection |
| 8 | High beam lamps |
| 9 | Low beam lamps |
| 11 | Responsible for the operation of the engine cooling fan. If this relay fails, the risk of engine overheating increases. |
| 12 | Klaxon operation |
Old PSU
How to troubleshoot?
The most common reasons that the brake light on the VAZ 2114 does not work are the following factors:
The most common and at the same time the most easily removable of the above reasons is a blown fuse. To identify such a malfunction, you need to examine the fuse box. A 10-amp fuse F3 is responsible for the brake lights, which also protects the ignition switch, computer and interior lighting.
Malfunctions in the operation of the latter may also indicate a malfunction of the stop fuse (and in this case, troubleshooting should begin with the block). If it turns out that the fuse has blown, then you should replace it with a new, similar one.
A new fuse installed in place of a failed one must be designed for exactly the same maximum current. If it is less, the fuses will blow more often, and if it is more, the protected device itself may burn out.
The problem may also be in the fuse block itself - sometimes the tracks on its printed circuit boards burn out or the contact legs oxidize. In order to check its serviceability, it is enough to measure the voltage at the contacts of the newly installed fuse.
Another common reason why the brakes of the VAZ 2114 do not light up is a malfunction of the limit switch that turns on the signals. It is located on the brake pedal bracket and is always in working order, regardless of whether the car engine is turned on or not.
It works automatically when you press the pedal. In order to check its serviceability, it is enough to see whether the power supply is suitable for its contacts (on one of the contacts the presence of power must be constant). In addition, if you press the pedal and thus turn on the limit switch, you can measure the voltage at its connectors.
If there is no current at the switch contacts, you should check the wire going to the limit switch from the fuse box. If the test shows that the wire is faulty (there is a break), then it should be replaced with a new one and the test repeated.
Otherwise (if everything is in order with the wire), you should disconnect it (as well as the other wire suitable for the second connector) from the switch and connect directly. If after such an operation the brake light works, then the limit switch itself has failed and should be replaced.
You should purchase a new brake light limit switch that is exactly the same model as the failed one. Installing a different type of switch may result in incorrect signal operation.
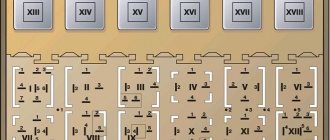
New model power supply
Here the mounting block diagram is arranged a little differently, but it is more relevant for owners of the VAZ 2109, since most of the nines that have survived to this day are modernized versions.
The scheme is relevant for both carburetor and injection types of engines.
| Fuse number | Rated current | The electrical circuit for which it is responsible |
| 1. | 8A | Backup fuse |
| 2. | 8A | Backup fuse |
| 3. | 8A | Backup fuse |
| 4. | 16A | Radiator fan relay winding, electrical circuit of switch and heater motor |
| 5. | 3A | Hazard warning switch in turn signal mode, turn signal switch, turn signal switch, turn signal warning light, turn signal warning light, reverse optics switch, reverse lights, tachometer, voltmeter, gasoline level indicator, gasoline level sensor, gasoline level warning light, pointer coolant temperature, temperature sensor, warning lamp and emergency oil pressure sensor, brake emergency lamp, brake system hydraulic switch, hand brake switch |
| 6. | 8A | Brake light switch and bulbs, interior lighting |
| 7. | 8A | Room lighting lamps, indicator lamp for switching on the dimensions, lamp for illuminating the heater and cigarette lighter handles, glove compartment lamp, switch and lamp for instrument panel illumination |
| 8. | 16A | Horn, horn switch, radiator fan motor |
| 9. | 8A | Left side lamp, left rear side lamp |
| 10. | 8A | Right side lamp, right rear side lamp, fog light switch, fog light indicator light |
| 11. | 8A | Turn signal switch and breaker, turn signal lamps, warning lamp in emergency mode |
| 12. | 16A | Cigarette lighter, socket for carrying lamp |
| 13. | 8A | High beam right headlight |
| 14. | 8A | Main beam of the left headlight, high-range optics warning lamp |
| 15. | 8A | Low beam right headlight |
| 16. | 8A | Low beam left headlight |
Relay
As for the relay in the mounting block of the new model for the VAZ 2109, the pinout is as follows.
| Relay number | Its functions |
| K1 | Without it, the rear window washer motor will not work. |
| K2 | Responsible for the operation of turn signal lamps and light signaling |
| K3 | Provides operation of the windshield wiper |
| K4 | Protects brake lights and vehicle dimensions |
| K5 | Provides operation of high beam lights |
| K6 | Guarantees operation of the optics washer device |
| K7 | Protects the power window motor if your vehicle has one. |
| K8 | Sound signal or just a horn |
| K9 | Protects against high voltage going to the engine cooling fan |
| K11 | Responsible for the operation of the rear window heating device |
| K12 | Provides operation of low beam lights |
It is necessary not only to understand the location of a particular fuse or relay, but also to know how to replace a failed element.
Relay for turn signals, alarm and ignition relay for VAZ 2107
The turn signal and ignition relay is located behind the instrument panel. To replace or check the relay, you need to remove the instrument panel and you can see it behind it:
| Relay number | Relay purpose |
| R4 | Ignition relay VAZ 2107 |
| R5 | Relay for alarm and turn signals VAZ 2107 |
Dismantling and replacement
If one or another equipment fails, you must first check the condition of the fuse responsible for it.
In practice, removing and removing an unusable fuse or relay is not difficult. To do this you need:
- Raise the hood and disconnect the minus from the battery. Since you are working with the fuse box responsible for electrical equipment, the car should not be energized at this moment;
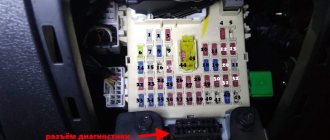
- Find the mounting block. It is located in the engine compartment opposite the driver's seat directly under the windshield. The top of the block is covered with a plastic cover. To remove it, simply press the latches on the sides;
- Remove the cover and look at the back side. There is an electrical diagram showing the location of one or another fuse or relay. Just find the element that is responsible for the failed equipment according to the tables above;
- Remove the fuse. All mounting blocks are equipped with special pliers. Manually removing fuses is not recommended. The relays are removed by gently rocking up and down;
- Replace the failed component.
Fuse failure is determined by the melted filament. These are fusible elements that melt and make contacts, preventing equipment from being damaged by excessive voltage.
That's it, all that remains is to replace the fuse block element, close the cover, replace the battery terminal and check the functionality of the equipment.
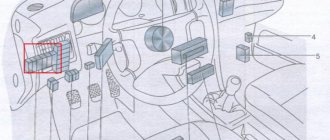
In the cabin
There is no installer inside the machine. Instead of the usual cabin module, it uses individual elements and relays scattered throughout the car. They can be found everywhere, under the dashboard, inside the doors, on the gearbox pipe. The reason for this decision was simple savings. The manufacturer considered that installing a separate module into the car would be too “kosher” and scattered fuses wherever possible.
Elements responsible for circuits of equipment not related to the engine are mounted here.
VAZ 2109 fuses: where they are, replacement
Unlike the VAZ 2110, Lada Priora, Lada Granta, the VAZ 2109 fuse box is pre-installed in the engine compartment.
The regular location was not chosen in the best way.
Often the mounting block is flooded with water, the terminal contacts oxidize, and the insulating layer on the wires dries out. And in bad weather, the driver has to crawl under the hood and look for a faulty element. It is especially unpleasant in winter, in frost, snow, and ice.
The defect was eliminated starting with the VAZ 2110. The fuse block (hereinafter referred to as the fuse block) was moved into the cabin, under the dashboard on the left side.
Description of fuses
During the systematic operation of a technical device, due to weather conditions, fuses often fail, overheat, and become deformed.
To restore the performance of the car and its elements, it is necessary to replace the fuses (hereinafter referred to as modules) with new ones. The “update” process is not complicated, but requires care on the part of the repairman. Incorrect installation may damage the vehicle's electrical power system.
The VAZ 2109, as well as older models, has 16 modules and 12 relay switches preinstalled. This is in an old-style power supply unit. In the new PSU model, after 1998, the quantity also remained the same, although the craftsmen reduced the number by three modules.
- PSUs of the old type: they are marked 17.3722, structurally they consist of a plastic case, an engineering board to which the model wires and relays are soldered;
- New model power supply: 3722010-60, design in the form of a plastic case with pre-installed fuses.
Note to the driver!!! It is a misconception that the type of fuel injection system affects the PSU model. The mounting blocks for the carburetor and injector are the same.
Location: engine compartment, on the left side, under the windshield.
Malfunction of the lights themselves
If during the check from the fuse box to the limit switch no problems are found, then you should move on. Now you should test the wiring from the second limit switch connector to the stop connectors with a tester. If it is working, then you need to check the board. The printed circuit board on which the taillights are mounted is not ideal, and is one of the biggest problems of all VAZ cars.
Its tracks often burn out or peel off, causing the lights to stop working. This problem can be solved in two ways - either re-solder the tracks (which can be done with a regular soldering iron, although not in road conditions) or replace the board with a new one (most motorists choose the second option).
Another reason why the VAZ 2114 brake lights do not work may be oxidation of the lamp sockets. In order to eliminate this problem, it is enough to clean all contacts from oxides that have appeared on them.
This is best done in one of the following ways:
You should absolutely not use gasoline or other solvents to clean contacts.
The last option for faulty stops is the light bulbs themselves. It makes no sense to give any detailed advice here - you just need to replace the burnt out light bulbs with new ones.
By following all the tips listed above, the car enthusiast gets the opportunity to check the entire electrical circuit of the brake lights, starting from the fuse box and ending with the bulbs in the lamps. Thanks to this, the guarantee that the fault will be accurately detected and eliminated is 100%.
Layout diagram, pinout
| Name / amperage (A) | Designations / what they are responsible for |
| F1 (10) | Reservation |
| F2 (10) | Turn signal indicators, hazard warning lights, hazard warning lights |
| F3 (10) | On the brake light, interior lighting of the VAZ 2109 car |
| F4 (20) | Heated rear window, plug, for cigarette lighter |
| F5 (20) | Sound signal |
| F6 (30) | Reserved |
| F7 (30) | Heater fan, windshield washer, radiator cooler activation relay, rear window heating, warning lamp, glove compartment lighting |
| F8 (7.5) | Reserved |
| F9 (7.5) | Reserved |
| F10 (7.5) | Left dimensions |
| F11 (7.5) | Right dimensions |
| F12 (7.5) | Low beam (right) |
| F13 (7.5) | Low beam (left) |
| F14 (7.5) | Left headlight DS |
| F15 (10) | Right headlight DS |
| F16 (10) | High beam indicator, fuel pump |
Designations and markings of the relay mounting block
| Number | What is he responsible for? |
| P1 | Cleaners (wipers) of front optics |
| P2 | Rear window washer |
| P3 | Turn signal lamp relay, light alarm |
| P4 | Wiper motor |
| P5 | Diagnostics of warning lamps on the tidy (high panel) |
| P6 | Surge protection |
| P7 | High beam lamp protection |
| P8 | Low beam lamp protection |
| P9 | Cooling fan |
| P10 | Klaxon |
| P11 | Reservation |
| P12 | Reservation |
The price of a new type power supply starts from 2000 rubles, individual melting elements from 100 rubles, a set from 350 – 450 rubles, depending on the manufacturer.
In Euroblocks, the fuse current was increased by 0.5 Amperes. Instead of the old 7.5 Amperes, 8.0 Amperes are installed. Remember this when choosing and purchasing consumables for repairs or replacement with a VAZ 2109 (8, 16 valves).
Signs of faulty fuses
- The module has changed color, black dots and carbon deposits are visible on the surface;
- An indicator on the instrument panel indicates a malfunction in the engine compartment;
- When the engine is running, the ignition is on, and the battery is charged, some mechanisms do not work or do not work correctly;
- In the interior of the car you can hear the smell of burning, melted in the area where the mounting block is located;
- The modules feel hot to the touch.
Additional mounting block Priora
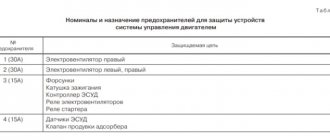
- F1 (15 A) – main relay and starter interlock circuit fuse;
- F2 (7.5 A) – fuse for the power supply circuit of the ECU (controller);
- F3 (15 A) – Priora fuel pump fuse;
- K1 – main relay;
- K2 is the place where the Priora fuel pump relay is located.
Attention!
The relay and fuse diagram may differ depending on the configuration and production date of the vehicle. Current diagrams of the mounting block are presented in the operating manual for the date of manufacture of the vehicle ().
Let us remind you that on our website you can find detailed instructions for repairing the Lada Priora with your own hands.
Keywords: Lada Priora mounting block | Lada Priora torpedo
17 8 7 6 4 5
Share on social networks:
Replacing fuses on a VAZ 2109
Preparatory stage:
- Plastic tweezers for removing the module;
- Rags;
- Additional lighting, provided that work is carried out in the dark.
Sequencing:
- We place the car within the perimeter of the repair zone;
- We turn off the engine, open the hood;
- Loosen the fasteners, remove the battery terminals;
- There is a mounting block on the left side, under the windshield; we snap off the plastic cover;
- We look at the inside where the fuse layout is indicated. We find the faulty one by the exact number or by a visual sign;
- We remove it with tweezers, insert a new one into its original place, and put on the lid.
In an old-style power supply, it is more difficult to identify a faulty module, since you need to remove each of the fuses one by one.
Upon completion, we start the engine and check that the systems are working properly.
Reasons for premature failure of fuses
- A natural factor is the duration of operation without intermediate prevention;
- Ingress of moisture, formation of condensation, oxidation of terminals, drying out of the insulating layer, open circuit of the electrical supply;
- Third-party mechanical damage, accident, impact, collision;
- Deformation of the car wing, windshield, which contributed to damage to the mounting block;
- Short circuit in the electrical supply circuit;
- Direct exposure to ultraviolet rays.
Note to the driver!!! The reason for the inoperability of a particular mechanism is not always a faulty fuse. It often happens that the power supply line is damaged, the terminals are oxidized, the contact is loose, and the units are worn out. Be sure to carry out visual diagnostics in order to assess the technical condition of the car and correctly calculate the amount of consumables.
Subject to compliance with the manufacturer's operating recommendations, the fuse life is from 40,000 km. If you encounter any difficulties with installation, contact certified service stations or auto electricians for help.