Every gearbox has a clutch, but sometimes it fails due to the fork. Its task is to connect and thereby disconnect the torque from the wheels. This is an important thing to do in design.
In principle, all the parts in a car are important and they work together with each other. The motor transmits its torque to the gearbox, and that in turn to the axle. That is why, if something goes wrong, then everything will not work correctly. There is a clutch between the power unit and the gearbox, the quality and serviceability of which affects the speed and smoothness of gear shifting.
The fork itself is designed to help shift gears and often it wears out and needs to be replaced. This is exactly what we will tell you about, but first we will understand the principle of operation, the symptoms of the malfunction, and finally, we will touch on the replacement process.
Clutch selection
The manufacturer installed carburetor (2103 with a volume of 1.5 l) and injection (2106 with a volume of 1.6 l) engines on different VAZ 2107 models. Despite the external similarity, the clutch of these models has certain differences. The diameter of the basket pressure plate in both cases is 200 mm. But for the basket for 2103 the width of the pressure plate is 29 mm, and for 2106 it is 35 mm. Accordingly, the diameter of the driven disk for 2103 is 140 mm, and for 2106 - 130 mm.
Some car owners install a VAZ 2121 clutch on their VAZ 2107, which is noticeably stiffer and more reliable than the original one.
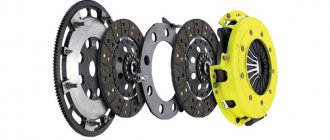
Clutches for the VAZ 2107 are produced by both domestic and foreign manufacturers
All VAZ models with rear wheel drive are suitable for clutch kits from classic cars of famous brands.
How to get to the service station?
Unfortunately, equipment does not always fail near your home or service station. It happens that the clutch fails somewhere on the highway, and the nearest service station is several kilometers away. It is irrational to push the car in such a situation, so you have to use other methods.
Follow a simple algorithm:
- Engage first gear (at this moment release the gas pedal).
- Turn the key in the ignition. At the moment when the engine starts to “pick up”, add gas. Proceed carefully so that the car does not stall.
- Continue driving at 1st speed. Don't try to engage second gear without using the clutch, especially if you don't have the skills, although it is possible. Incorrect activation may result in unit failure.
Before following the tips mentioned, do the following:
- Park the car on a slope or at least a straight road so that the vehicle does not roll back.
- Warm up the engine before driving.
- Plan your route in advance. It is desirable that you have to deal with fewer traffic lights and intersections along the way.
- Turn on the emergency lights.
- Make as few movements to the left or right as possible.
If you have determined why the clutch pedal has failed, but you cannot fix the problem on the road and you cannot move off in first (second) speed, call a tow truck or stop the car, ready to tow the car to a garage (service station). Good luck on the roads and of course no breakdowns.
The clutch is the weakest link in the transmission, so it often fails. In particular, car owners are often faced with a situation where the clutch pedal does not return to its original position after being pressed. Therefore, we suggest that you familiarize yourself with all the possible causes of such a malfunction and ways to eliminate it.
Preparatory process for removing the clutch release fork
The functions of the clutch fork on all cars are the same; they are somewhat similar to a regular mechanical lever. By pressing your foot on the pedal using a hydraulic or cable drive, you create a force on the outer support of the fork.
According to the principle of a lever resting on bushings or a ball joint, the internal support through the coupling, if any, transmits force to the release bearing, and then the pressing force of the leaf spring is turned off. Under the influence of the applied force, the clutch disc moves away from the flywheel, disconnecting the transmission from the engine. The clutch is disengaged as long as you keep the pedal depressed. All this time, the release fork and release bearing are in a loaded state.
Important! Train yourself to depress the pedal for no more than 1-2 seconds, this will preserve the “health” of the clutch disc, release bearing and fork. The force applied to one end of the clutch fork can exceed 100 kg
Considering that the average driver can press the pedal more than 50 times in an hour in the urban driving cycle, the load on a stamped part 3 mm thick is quite considerable. Therefore, deformation and even breakage are possible, not to mention wear and tear of the support area.
The force applied to one end of the clutch fork can exceed 100 kg. Considering that the average driver can press the pedal more than 50 times in an hour in the urban driving cycle, the load on a stamped part 3 mm thick is quite considerable. Therefore, deformation and even breakage are possible, not to mention wear and tear of the support area.
Structurally, most of the fork with support is located inside the clutch housing. From the outside you can only see the outer support of the clutch fork and the hydraulic cylinder of the drive. It can be removed by partially disassembling the unit. You will have to work under the machine, where even the simplest operations require considerable effort due to the small working space.
Before starting work, make sure that the problem with the clutch is a broken or bent fork geometry:
After releasing the outer part of the fork, check its free movement by hand. A bent or broken part will have too much free play to match the adjustments. If, with not very strong hand pressure, the free end of the fork moves with slight resistance in both one and the other direction, the part needs to be replaced.
Causes and main malfunctions
- Often the main reason for mechanism failure is improper operation of the vehicle. For example, if a car is stuck in a snowdrift and the driver continues to press on the gas, this significantly reduces the service life of the vehicle. The same goes for slippage.
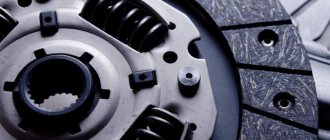
- In addition to the CC disc itself, the release bearing, designed to smoothly engage and disengage the clutch, can also fail. As a rule, before the actual breakdown, the driver may hear a strange squealing noise - this usually indicates a bearing failure.
- Another reason why you can understand that it’s time to change the CC is the natural wear and tear of clutches as a whole and their individual components. This is normal if the mechanism has already exhausted its service life. As a rule, driven pulleys most often fail as a result of natural wear and tear. By the way, their service life on average is about 100 thousand kilometers. If you prefer an aggressive driving style, the service life of the disc can be reduced by two or even three times.
- A common cause of CC failure is considered to be the low quality of installed parts. Statistics show that today in the domestic auto parts market sometimes up to 50% of low-quality products are found. The huge number of counterfeits and their sale have caused this problem. Therefore, when purchasing parts, pay attention to the manufacturer; we recommend installing only original spare parts on cars.
- If engine fluid gets on the friction linings. Friction linings are very important for a vehicle and if they get dirty with engine oil, this can cause the mechanism to break down. In practice, a similar problem most often arises when the seals break or their service life has expired. In any case, until the cause of the oil leak is eliminated, it is too early to talk about repairing the SS.
Replacing the fork on 2106, 2107
On classics, a cracked fork is a fairly common occurrence, and car enthusiasts have gotten used to changing it without removing the box. To do this, the ends of the new fork are ground at an angle of 45 degrees so that it can fit under the pressure spring. A hook with the end bent 5 centimeters would also be useful; we will use it to hook the spring. We need to get under the fork support pin (bolt with a ball head), and the paws get between the release bearing hub and the spring. After a certain number of attempts, their number depends on your accuracy and patience, the clutch fork will fall into place.
It is worth noting that on GAZelle cars it is also possible to replace this part without removing the box, using the method described above. For a GAZelle with a 402 series engine, this is generally a weak point, and owners of these models constantly complain about a weak fork and its constant breakdown. One solution to this problem is to install a reinforced fork from another model (Valdai), but it also has its own subtleties and nuances that are undoubtedly worth studying before proceeding with the replacement procedure.
The clutch pedal has failed, how to solve the problem?
If a breakdown is detected, try to restore the device’s functionality using one of the following methods:
1. Change the cable. To complete the work, prepare a set of wrenches, pliers and a replacement cable. It’s good if you have an open-end or socket wrench at hand (it’s more convenient with them).
Then proceed like this:
- Raise the hood of the car.
- Find the place where the cable is fixed to the tip.
- In case of breakage, remove the tip using a wrench.
- Go to the interior and remove the cable from the pedal, then pull it towards you and remove it completely.
- Take a new part and install it in place of the damaged cable. At the same time, assemble the mechanism using the reverse algorithm.
After completing the work, adjust the pedal travel. Set free play (30 mm) and total travel (about 147 mm).
Clutch pedal adjustment
2. Replace the spring. If the clutch pedal does not return due to a broken spring, proceed as follows:
- Prepare the spring. It is advisable to have it at hand. Otherwise, you will have to go to the store to buy.
- Lift the hood cover and unscrew the cable nut.
- Remove the old spring.
- Take the new element and put it in place. Be careful to avoid damage. Start the engine and drive 100-200 meters. If there are no clutch problems, continue driving.
Replacing and repairing the clutch release fork
To pull out the old plug, do this:
:
❶
First, remove the cylinder from the clutch. Sometimes it is pulled out with a rod. Then we remove the component with hoses.
❷
We remove the cover on the fork and inspect the assembly.
❸
We check the condition of the casing. All contaminants must be removed.
❹
We install the plug. There is a spherical finger on the casing; petals from the part retainer are inserted here.
❺
Inspect the bearing hub with wire spring. The legs of the product are to be installed here.
This will position the fork at the spring and hub positions.
❻
We assemble the mechanism and restore all the parts.
That's all the instructions for replacing and repairing the clutch release fork. All that remains is to evaluate the operation of the mechanism by making a test drive.
This is one of the constituent elements of a complex car system, thanks to which the entire mechanism functions fully and efficiently.
Thanks to this element, the clutch is disengaged. When you press the pedal, this part moves the pressure clutch, as well as the release bearing, thus ensuring that the inner edge of the spring moves forward and directly turns off the device.
If there is any malfunction of this element, the driver is faced with problems turning off the system, so it may either not turn off at all or not turn off completely.
In any case, this subsequently leads to malfunction of the entire mechanism, as well as to its rapid wear.
To fix this kind of breakdown, you must first of all learn how to replace this element.
So, the answer to the question “How to change the clutch fork?” consists of performing the following series of actions.
- Initially, you need to remove the return spring, so next we expand the rod.
- Then you need to unscrew the working cylinder and remove the rod from the fork.
- Next, remove the protective cover of the plug.
- We take away the old part.
- We replace the broken element with a new one.
As you may have guessed, when replacing such a part it is not necessary to completely disassemble the gearbox. We use the fork hatch, which is used to perform the replacement.
Before replacing the clutch release fork, you must initially refine it on a grinder. If your new part cannot be filed, you should return it back to where you bought it because it is of poor quality.
Next, you need to grind the rivets down to about 1-1.5 mm; this is considered the optimal value. This result can be achieved by using a file. We also need to chamfer the ends of this element and then grind the hole between the forks (this is done in order to ensure passage for the ball-head bolt). This work must be done very carefully, the main thing is not to overdo it, since if the bolt goes in too loosely, problems may arise with the new element.
Our further actions should be to install the part in place through the hatch. To do this, we first need to orient the flat edges of the release bearing clutch horizontally and place the tip of the spring towards the hatch. Then you need to push the new element into the hatch; to do this, you can lightly hit it with a hammer. You need to make sure that it goes through the ball head bolt and is located on the bearing coupling
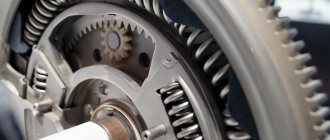
Types and design of clutch forks
Today there is a wide variety of designs of clutch forks, but they are all divided into two types according to the principle of operation:
Clutch lever fork Rotary clutch fork made by die-forging technology Non-separable rotary clutch fork
In general, clutch lever forks are a lever, at one end of which there are two paws to rest against the release bearing, and at the opposite end there is a hole or special fastener for connecting to the drive. The fork has a support inside the clutch housing, which ensures that this unit operates like a lever. Depending on the type and location of the support, there are:
- Ball separate - the support is made in the form of a short rod with a spherical or hemispherical tip on which the fork is located. The fork has a recess for support, and fixation on the ball end is carried out using spring brackets;
- Axial integrated - the support is made in the form of a plate, which is connected to the fork by an axis. The parts are connected by means of an axle threaded and fixed in holes drilled in the eye of the support and the legs of the fork;
- Axial separate - the support is made in the form of two removable posts or lugs directly in the clutch housing, the fork rests on the posts via an integrated or removable axle.
Ball joints typically have yokes made from sheet metal, the parts most commonly found in passenger cars and commercial trucks today. To increase strength, stiffening ribs are made on the fork; reinforcing linings and other elements may also be present on the part.
Both types of axle supports are most often provided for hot-formed forks and, due to their increased strength, these parts are most widely used in truck drivetrains. The feet of such parts can have different shapes - round or semicircular, oval, etc. Also, reinforcing elements can be located on the paws - steel crackers or rollers that are in direct contact with the clutch.
The rotary clutch forks are generally made in the form of a shaft on which there is a fork with two legs and a lever for connecting to the clutch release drive. By design, such parts are of two types:
- Non-separable - the fork is made by welding two legs and a rotary lever to the shaft;
- Collapsible - the unit consists of a steel shaft on which a removable fork and swing arm are fixed.
Non-separable forks are most often used on passenger cars; they are made of steel sheet blanks (stamped from a sheet several mm thick) welded on opposite ends of the shaft. Workpieces can be subjected to thermal hardening.
Collapsible forks are most widely used in trucks; the basis of the part is a steel shaft, on one end of which a fork is mounted (usually made by die-forging), and on the other - a rotary lever. Typically the fork has a split clamp with a hole for a bolt; this design allows it to be mounted on the shaft in any position and, if necessary, to be adjusted. The rotary lever is mounted on the shaft using a spline, which prevents the parts from turning during operation. Forks can have additional reinforcing elements on the legs in the form of rollers or crackers, and the fork legs themselves are subjected to thermal hardening.
All forks, regardless of type and design, are mounted inside the clutch housing, on the side or below the clutch/release bearing. Lever forks are located on a support (or two supports) fixed with a threaded connection. Typically, the rear part of the fork extends beyond the clutch housing; to prevent dirt and water from penetrating into the unit, a protective cover made of rubber (corrugation) or non-woven materials (tarpaulin or its more modern analogues) is provided. The cover is secured with special clamps.
The swivel forks are installed in the holes in the clutch housing into which the ends of the shaft fit. In this case, the rotary lever can be located both inside the crankcase and outside it. In the first case, only a cable or rod connected to a lever comes out of the crater; in the second case, part of the shaft comes out of the crankcase. Rotary forks can be installed through bushings (sleeve bearings) or rolling bearings; oil seals or other seals are used to protect the clutch housing from water and contamination.
Clutch release fork
The clutch fork performs the function of disengaging it (hence the name release fork, or clutch drive fork). This is a kind of lever, when acted upon, the pressure plate is retracted and the clutch is disengaged. It can also be called a clutch engagement fork, because with the reverse action, when you release the pedal, the fork engages it.
This part is usually found in manual transmissions, and much less often in hydraulically driven gearboxes. Let's look at the design of the clutch fork using the example of cars of the VAZ 2110-2112 and VAZ 2106-2107 families. The fork consists of a lever and two legs mounted on a metal rod.
The classic clutch fork looks a little different.
Symptoms of a faulty plug
Like any other part, it is subject to wear, and manufacturing defects are also possible (however, it is extremely rare due to the simplicity of the design). When the fork breaks right away, the pedal simply sinks and it is unlikely that you will be able to continue moving. But it happens that a crack appears in the fork, and then the clutch begins to grasp lower and lower, and adjustment helps only for a short time, and as the crack expands (increases), the pedal drops again.
Simplicity is simplicity, but replacing this part results in a rather troublesome task, since replacing the clutch fork entails removing the gearbox. If on a classic (VAZ 2016-07) you can try to carry out this procedure without removing the gearbox, as some sources claim, then with the front-wheel drive VAZ family this is completely excluded.
Replacing the fork on 2106, 2107
On classics, a cracked fork is a fairly common occurrence, and car enthusiasts have gotten used to changing it without removing the box. To do this, the ends of the new fork are ground at an angle of 45 degrees so that it can fit under the pressure spring. A hook with a bent end of 5 centimeters would also be useful; we will use it to pry the spring. We need to get under the fork support pin (a bolt with a ball-shaped head), and the paws get between the release bearing hub and the spring. After a certain number of attempts, their number depends on your accuracy and patience, the clutch fork will fall into place.
It is worth noting that on GAZelle cars it is also possible to replace this part without removing the box, using the method described above. For a GAZelle with a 402 series engine, this is generally a weak point, and owners of these models constantly complain about a weak fork and its constant breakdown. One solution to this problem is to install a reinforced fork from another model (Valdai), but it also has its own subtleties and nuances that are undoubtedly worth studying before proceeding with the replacement procedure.
Replacing the clutch fork on 2110, 2112
First of all, remove the clutch fork pressure spring. After this, remove the plastic shaft retaining sleeve and the fork boot. Now you can carefully remove it. Be sure to check the condition of the bushings, both the lower metal and upper plastic, and, if necessary, replace them if there is severe wear. The boot also does not interfere with inspection for breaks. We install the new fork in the reverse order, not forgetting to first lubricate the bushings.
Replacing a VAZ 2110 clutch without removing the box and draining the oil
The clutch plays the role of a link in a car between the transmission and the engine. This element of the internal combustion engine takes on the “impact” and all the loads that arise when transmitting torque from the engine to the gearbox. Therefore, the clutch can be conditionally classified as consumables, since it wears out quite often and requires immediate replacement. It is impossible to influence the wear of the clutch, unless you manage to change gears without its participation, although in this case it will not go unnoticed in relation to other parts of the engine.
Clutch replacement is necessary in the following cases:
- If the clutch begins to “lead”, that is, when engine power decreases.
- If the clutch is not fully engaged, that is, it “slips.”
- If you hear extraneous sounds when turning on - clicks, jerking, etc.
- In case of unauthorized disengagement of the clutch.
- In case of vibration when pressing the clutch pedal.
In this article I will tell you how to replace the VAZ 2110 clutch at home without removing the box and draining the oil.
To work you will need:
- Jack;
- Inspection pit or lift;
- Set of socket and open-end wrenches: “19”, “17”;
- Mount or amplifier pipe.
Replacing the VAZ 2110 clutch step by step instructions
1. “Tear off” the left wheel mounting bolts, then jack up the front of the car and place it on the sawhorses.
2. Remove the wheel and unscrew the two lower ball joint bolts.
3. Remove the “-” terminal from the battery.
4. Remove the mass air flow sensor, then loosen the clamp securing the mass air flow sensor corrugation and remove the air filter.
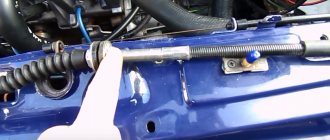
5. Now you need to remove the clutch cable from the clutch fork. Loosen the two mounting nuts that secure the cable to the bracket on the gearbox.
6. Unscrew the bolt securing the starter to the box, then unscrew the first bolt securing the gearbox.
7. Head on “19” amplifier pipe. There is another gearbox mounting bolt nearby.
8. Loosen this nut and the upper starter mounting bolt.
9. Remove the connector from the speed sensor, then unscrew the speedometer cable.
10. Remove the longitudinal brace paired with the lever.
11. Now unscrew the lower starter mounting bolt.
12. Unscrew the 3rd gearbox mounting bolt; in the area of the right CV joint there is another nut that needs to be unscrewed.
13. Unscrew the two torque rod mounting bolts.
14. Loosen the nut located on the clamp of the gearbox control drive rod, then remove this rod from the box.
15. Place a support under the engine, then unscrew the two nuts securing the rear cushion. This is done just in case, so that if the engine lowers too much, your hoses do not break.
16. Carefully move the gearbox away from the engine and lower it to the floor, it will hang on the axle shafts.
17. I recommend replacing the clutch release bearing at the same time.
Assess the wear, replace the disc, and if necessary, the clutch basket, check whether the petals are normal.
Further assembly is carried out in reverse order. Thank you all for your attention, this is actually the simple way to replace a VAZ 2110 clutch without removing the box and draining the oil.
Do-it-yourself VAZ 2110 clutch replacement video:
Types of car wheels: their pros and cons
Replacing the Lada Kalina speed sensor with your own hands
Throttle valve heating: what is it, what is it for and is there any point in turning it off?
- Comments 30
- Pingbacks 0
And yet the box was removed, even though it hung on the axle shafts.
And the meaning. The box was eventually removed. What has changed for the better? =))) You still have to lift it and put it back in place, but if you do it alone, then it’s a complete ass. This option is in the trash. I would simply screw in other, longer bolts instead of the original box mounting bolts. Then everything was the same, only I moved the box to the side on extended bolts and that’s it. It would remain suspended and at the exact level of the bolts. I replaced the clutch and moved it back with bolts and that's it. The only thing is that you just need to turn the flywheel a little from side to side so that the splines of the shaft and the clutch driven disc bushing coincide so that the box sits in place. That's it, comrades =)))
Thanks for the comment Max147, maybe someone will like your version more than ours. The long bolt idea is really good!
Longer bolts will not fit there!
Guys, don’t talk nonsense and don’t mislead others, with long bolts the box won’t move the required distance, you comrade don’t even know what you’re talking about. And you obviously don’t understand repairs...
Alternatively, long heels
Yes, they didn’t save much in terms of time or labor costs. Drain the oil - one nut, 5 minutes. Remove the drive - 2 nuts, 10 -15 minutes. As it was rightly noted, pushing the gearbox back together with the drives is still a hemorrhage. And the whole box is covered in oil, the seals may very well be leaking, so you still have to pull out the drive. IMHO, remove completely, wash, clean, replace seals if necessary... And what kind of speedo cable? I haven't seen it on 10s.
They took it off - they didn’t take it off. At least the benefit is that the box is not far away. When you work alone, this is important. The drives center it and make it easier to slide it into place. Well, when you remove the drives from the box, you won’t be able to turn anything. Although sliding it along long pins (I don’t know who first came up with it) is even easier. That's what I did. The gap is not large, but the clutch with the basket passes. Shorten the mandrel. You have to work in a gap, but it’s easy to push the box into place without any extra fuss.
Slava, there really is a speedometer cable for ten. Today I made a speedometer, and when purchasing a speed sensor, the seller clarified whether it had a cable or not) I was shocked!
Yes, I’m not 100% sure, I’m just saying that I haven’t seen it. Although there were a large number of 2110 1996-2007 under repair. On all of them, even on those with a mechanical odometer there was just a sensor and no cables. Perhaps the seller is confusing it with 2109-2115, yes, some had a sensor + cable. Maybe someone has a speedometer drive cable set to 10, don’t be lazy, write a comment, we’ll be in the know.
Well, I don’t know, Igor. If you did as the author describes the process and everything worked out easily for you, then my respect to you. I tried to do this once, I spat, and I was exhausted! Not only that, like a gynecologist, you work in a limited space, but also try to stick the box in place. Especially in one. Is it centered on the drives? On the contrary, it breaks and warps on grenades. The drives also have weight, and naturally pull the gearbox down, which is why misalignment along the input shaft is especially important. Well, it’s very difficult to stick it (the box) into place. I haven’t tried it with longer guide bolts, but maybe this method works. Didn't check. In the end, I want to say that the author’s method is no simpler than the classical one. And what’s more, MORE PROBLEMATIC!
Replacing and repairing the clutch release fork
To pull out the old plug, do this:
:
❶ First, remove the cylinder from the clutch. Sometimes it is pulled out with a rod. Then we remove the component with hoses.
❷ Remove the cover on the fork and inspect the assembly.
❸ Check the condition of the casing. All contaminants must be removed.
❹ We install the plug. There is a spherical finger on the casing; petals from the part retainer are inserted here.
❺ Inspect the bearing hub with wire spring. The legs of the product are to be installed here.
This will position the fork at the spring and hub positions.
❻ We assemble the mechanism and restore all the parts.
That's all the instructions for replacing and repairing the clutch release fork. All that remains is to evaluate the operation of the mechanism by making a test drive.
Troubleshooting the operating system of a vehicle, including clutch failures, first involves diagnostics. It is carried out in case of severe malfunctions of vehicle components. Detection of a malfunction in the clutch system most likely entails its complete replacement or individual components.
The presence of precise recommendations from auto developers and mechanical engineers provides information about the service life and timing of replacement of the clutch and its spare parts. However, regulated deadlines in real life depend more not on the recommendations of specialist developers, but on driving style, level of load during vehicle operation and other factors.
Ways to fix clutch problems
So, you know how to determine clutch wear and understand that it’s time to change it. Now let's talk about ways to fix this problem. There are several signs of failure; we will consider solving the problem with each of them separately.
If the clutch does not disengage
In this case, eliminating the causes is accompanied by the need to:
- adjusting the drive itself;
- thorough cleaning and lubrication of the splines;
- adjusting or replacing the driven pulley;
- As a rule, another solution is to replace the friction linings.
Sooner or later, any CC will fail and will have to be replaced. Malfunctions in the hydraulic system can be corrected by bleeding the system to eliminate air trapped in it. Also in this case, you will need to check the tightness of the connections; the pipeline must also be intact. Sometimes, to fix the problem, you need to replace the working and master cylinders if all the working fluid has left them.
If the SS is slipping
Problems with slipping are eliminated by adjusting the drive and replacing worn-out linings. When engine oil gets on the linings, the clutch begins to slip, so this problem needs to be solved. The linings are thoroughly washed with a solvent, and the cause of the oil must also be eliminated.
Other breakdowns
Extraneous sounds also indicate a malfunction. For example, if noise appears when the mechanism is turned off, this may indicate a lubricant leak or a broken bearing that needs to be replaced. If noise appears when you turn it on, this may indicate a breakdown of the damper or fork springs. In such cases, the plates connecting the casing to the pressure pulley often fail. You can find more instructions on replacing the clutch on our resource by using the search.
Diagnostics and maintenance of the clutch release fork
Finally, the transmission release fork can be removed by pulling it out, disengaging it from the release bearing clutch and removing it from the ball joint.
The following parts are subject to immediate rejection and replacement:
- having any cracks in the power part of the fork or the area of contact with the ball joint;
- wear of the support point on the ball joint has exceeded the permissible values;
- In the places where the fork engages with the release bearing, metal wear and large play are observed.
KAMAZ clutch device
The vast majority of KAMAZ vehicle models are equipped with a traditional mechanical transmission, which includes a clutch with manual (or rather, foot) control. This unit ensures interruption of the flow of torque removed from the engine flywheel and supplied to the gearbox at the moment of gear shifting, as well as for a smooth start of the vehicle from a standstill and performing other maneuvers associated with changing the speed limit (in particular, when braking).
Today, all KAMAZ trucks use dry friction double-disc clutches of two main types:
• Model 17 - diaphragm clutch. Clamping of the discs is ensured by a central diaphragm spring, integral with the basket; • Model 14 and 142 - clutch with coil (regular) springs. Clamping of the discs is ensured by a number of cylindrical pressure springs located around the circumference. The Model 14 uses 12 compression springs and the Model 142 uses 24 springs.
Diaphragm clutches are used primarily on new KAMAZ models, but traditional clutches with peripheral springs are also widely used. Both types of clutch have a similar design, differing only in the design of the release mechanism, which is mounted on the basket. Let's look at the design of each type of clutch, but first let's look at the part common to both types of clutch - the friction disc package.
The basis of the clutch is a package of two drive, one driven and one pressure plate. The drive and pressure disk are in engagement with each other using spikes on the outer surface, the inner drive disk is made in the form of a flywheel, it is connected to the engine flywheel through a shaft. The package of drive disks is assembled in such a way that they can move along the axis, as a result of which the distance between them changes.
Between the drive disks are driven disks (or clutch disks), mounted on a shaft directly connected to the input shaft of the gearbox. The driven discs are much thinner than the driving ones, they are made of a material with a high coefficient of friction, or they carry friction linings made of the same material. The discs are mounted on the shaft using a splined connection.
In the normal position, the disk pack is compressed (which is provided by springs), it rotates as a single unit, so the torque removed from the engine flywheel is transmitted through the drive and driven disk pack to the gearbox. If the driver presses the clutch pedal, the discs are moved away from each other using the release mechanism, and the flow of torque is interrupted. It is at this time that you can change gears or brake without fear of breaking the gearbox.
The main difference between a diaphragm clutch and a coil spring clutch is the design of the release mechanism and, as a result, the design of the basket.
Diaphragm clutch. The basis of the clutch is a housing called the basket. The housing is covered by a package of friction discs, and at its end there are petals of a diaphragm spring. The spring petals work like levers - in the center the clutch rests on them, and on the opposite sides they press on the pressure plate. In the working position, the disk pack is compressed by a spring; when the clutch is disengaged, the petals facing the center are pressed inward, and on the reverse side, rising, they move the pressure disk, as a result of which the drive and driven disks are moved away from each other.
Clutch with coil springs. This type of clutch also uses a basket, but the disc pack is compressed by 12 or 24 coil springs. The clutch is released using four release levers located in a circle above the discs. The principle of operation of the levers is the same as that of the diaphragm spring - the clutch is disengaged by the clutch, which pushes the arms of the levers facing the center of the basket, as a result of which the levers on the reverse side lift the pressure plate.
Compressing the disc pack (i.e., operating the clutch) is accomplished using a simple mechanism that consists of a clutch fork, a clutch fork shaft, and a shaft lever.
Symptoms of a faulty plug
Like any other part, it is subject to wear, and manufacturing defects are also possible (however, it is extremely rare due to the simplicity of the design). When the fork breaks right away, the pedal simply sinks and it is unlikely that you will be able to continue moving. But it happens that a crack appears in the fork, and then the clutch begins to grasp lower and lower, and adjustment helps only for a short time, and as the crack expands (increases), the pedal drops again.
Simplicity is simplicity, but replacing this part results in a rather troublesome task, since replacing the clutch fork entails removing the gearbox. If on a classic (VAZ 2016-07) you can try to carry out this procedure without removing the gearbox, as some sources claim, then with the front-wheel drive VAZ family this is completely excluded.
Causes of malfunctions
Clutch failures are usually caused by aggressive use of the vehicle. For example, this is slipping in place or when the car is stuck. In this case, it is better to push the car than to skid in place; the effect will be greater. Also, clutch failures occur due to the start of movement with grindings. “Gas to the floor” before the cutoff also contributes to the occurrence of malfunctions.
Such actions reduce the life of the clutch disc by more than 2 times. However, not only it suffers from this, but also the clutch bearing. It is quite easy to understand that it is he who has failed. Its structure is the same as that of other bearings, so if it breaks, it will make unpleasant sounds. The noise will begin to disappear if the clutch is fully depressed, but when you start driving or release the pedal in neutral, the noise will begin to repeat. If the car has a clutch cable, it may stretch, which is also a malfunction. This element cannot be repaired, so only replacing it will help.
Movement without bearing
If the bearing fails, the clutch will always be slightly depressed, even if the pedal is not touched. In such a situation, you need to move differently than usual. When the engine is not running, you need to engage the gear. After this, you need to start the engine and start driving. To do this, you must have a good battery, since the car will not start moving if it is weak. In this situation, you need to get to a car service center. In this case, the gear cannot be changed, since the gearbox components will experience enormous loads and the gearbox may also fail. In the event of a breakdown, it is best to tow the car or call a tow truck.
Experienced motorists claim that it is possible to switch to the next gear with a faulty clutch, that is, without using it. This is done as follows: you need to pick up high engine speeds, but not bring it to the cutoff, then release the gas pedal and change gear. If the engine does not reach the required number of revolutions, the gear will not engage, and when you try to shift, an unpleasant crunch will be heard. This method greatly wears out the gearbox and engine components, so it should only be used in emergency cases. If you can’t change gear and it’s a long way to get to a car service center, then only towing or a tow truck will help.
Many cars have a clutch cable. If it breaks or fails, the clutch will also be considered faulty, and operation of the vehicle will be impossible. In this case, the disk will always be in one position, which means it will not be possible to change gear. You can understand that the clutch cable will soon become unusable by two signs: slipping and incomplete gear shifting. This element cannot be repaired; only replacing it will help.
Jerk
If the car starts to move jerkily, this may be a consequence of several malfunctions at once. This can be caused by failure of the clutch disc, as well as wear of the damper springs. Only analysis will help you find out what exactly is faulty.
Remove the clutch release fork
After placing the car on the inspection hole and installing additional supports under the wheels, remove the gearbox and clutch assemblies in the following sequence.
Cars with rear wheel drive
We disconnect the cardan and reverse sensor from the gearbox, unscrew the fastenings of the box to the body and engine. For Lada cars, access to the clutch basket can be obtained after the gearbox has been pulled out of engagement with the engine, moved back 10-15 cm, and secured for safety on some kind of stand. For "Muscovites" and "Volgas" you will need to remove the gearbox completely and dismantle the clutch housing attached to the engine.
To remove the diaphragm spring pressure plate, we use a small pry bar to lock the flywheel in one position. We unscrew the basket fastening bolts located around the circumference of the disk with an open-end or spanner wrench. By removing the pressure plate and clutch plate, we gain direct access to the transmission release mechanism.
Car with front wheel drive
To replace the clutch release fork, you will also need to remove the gearbox and clutch pressure plate (basket). Removing the gearbox on front-wheel drive vehicles is a more labor-intensive procedure compared to the “classic” ones due to the need to carefully disconnect the gear selection mechanism, subframe and attaching the gearbox to the engine. To more accurately carry out the sequence of work, you should use the operating manual for a specific car model.
Advice! Before removing the clutch basket from the flywheel, mark their relative positions using paint. When reassembling, this will help restore the correct position and reduce possible imbalance of the assembly.
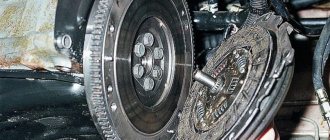
How to replace the clutch on a VAZ 2106 with your own hands
It is quite difficult to imagine a car engine without a clutch. The main task of a car clutch is to ensure a smooth engagement of speeds by briefly disconnecting the engine from the transmission. Thanks to the clutch, the car can move off smoothly without overloading the engine and preventing premature wear of all its parts, as well as gearbox parts. Overloads are caused by inertial moment, which is formed due to the rotation of engine parts during a sudden sharp slowdown in crankshaft speed.
Replacing the VAZ 2106 clutch disc, as well as the clutch basket, is usually done at the same time. This process is not simple and requires certain skills and dexterity, so if you have only recently learned how to change spark plugs yourself, it is better not to take risks and entrust the work to specialists. Replacing the clutch can be done in two ways, with or without removing the gearbox; it is this less labor-intensive and convenient method that we will use today. This work is carried out on a lift or inspection pit.
REPLACING THE CLUTCH OF A VAZ 2106 WITH YOUR OWN HANDS
- Secure the vehicle with wheel chocks.
- Disconnect the cardan shaft from the gearbox, as well as the clutch slave cylinder.
- Remove the reverse light switch wires from the contacts.
- Disconnect the clutch cover from the side of the cylinder block, unscrew the yoke from the bottom side.
- Using a socket on “13”, unscrew the two fastening nuts that secure the gearbox mount, then remove it.
- Move the gearbox as far as possible from the engine until the shift lever rests against the rear of the bottom hole.
- The transmission will hang from the downpipe of the muffler as a safety net, install an additional support under the rear of the box.
- Grasp the flywheel with a mounting tool and unscrew the 6 bolts securing the clutch basket using a 13mm wrench. Continuously turn the crankshaft to ensure you have access to the bolts.
9. Move the clutch basket towards the box, using the resulting opening, remove the clutch disc.
Replacing the VAZ 2106 clutch disc with your own hands
10. After this, move the basket towards the engine and remove the clutch basket.
11. After pulling it out of the clutch housing, remove the clutch fork and remove the release bearing from the transmission input shaft.
Video Replacing the aircraft in a VAZ 2107 car
In this video, the author explains how to replace a broken element in a classic car.
The clutch is an important component of the transmission system. In turn, the clutch fork is an indispensable element that allows the parts to slowly connect and turn off the torque
Each mechanism of the car is interconnected, the engine transmits torque to the gearbox, which in turn to the wheels. But it is worth remembering that there is a clutch mechanism between the engine and the gearbox. How quickly the gears will change and pick up speed will depend on its serviceability and quality of work.
The clutch fork is one of the mechanisms that helps change gears, but due to various circumstances, this part sometimes fails. Let's consider the principle of troubleshooting, the principle of replacement and the cost of work.
Malfunctions
The most common clutch failures occur, resulting in slipping or incomplete disengagement of the mechanism. The second option involves engaging any gear “with a crunch” with the clutch fully depressed. At the same time, the gearbox stroke is increased compared to the standard one. The first option usually occurs due to friction between the disc and the flywheel. In such cases, an unpleasant burning smell also often appears in the cabin. Vehicle acceleration deteriorates and consumption increases.
Is it possible to operate the car with such breakdowns?
If the clutch breaks down according to the options described above, daily use of the vehicle is strictly not recommended. As a last resort, you can drive to the nearest service center. In this case, you need to drive extremely carefully, without accelerating, move off smoothly and carefully change gears. It is best to double release when driving a car with a faulty clutch. This method was widely used on older cars.
Its essence is as follows: to shift to a higher gear, you need to squeeze the clutch and move the lever to the neutral position, then release the clutch, squeeze it again and shift into gear. To change gear to a lower one, you must do the same. These actions run the risk of damaging the synchronizers. To preserve them, it is recommended to increase the engine speed. This method can also be used during normal driving. It greatly facilitates the operation of the gearbox and engine. Double squeezing increases the service life of all components and assemblies, and especially synchronizers, which practically do not feel the load.
The process of replacing the clutch pedal fork on a VAZ 2107 photo and video review
The clutch fork (hereinafter referred to as BC) is an important component of the transmission system of any vehicle. Scientifically speaking, this element transmits pressure from the slave cylinder or clutch cable to the release bearing, ensuring the movement of the car. The bearing itself is the transmission component between the clutch and the drive, which is physically located on the release clutch. It is the clutch fork that ensures the movement of the clutch and bearing.
In most cases, VAZ 2107 cars are equipped with a single-plate clutch, the operation of which is ensured by a special drive. Double-disc clutches are usually installed on more powerful vehicles and trucks. But this does not mean at all that the VAZ 2107 cannot have a double-disc element.
In any case, when you press the clutch pedal, the drive ensures the movement of the aircraft, which, in turn, acts on the bearing. The latter, as a result of moving the fork, presses on the petals of the spring element of the pressure plate. The spring bends towards the flywheel, simultaneously disconnecting from the pressure plate, thereby freeing it.
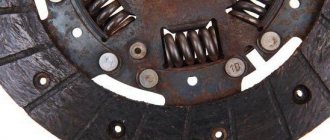
When the driver releases the clutch pedal, the pressure plate begins to interact with the driven components as well as the flywheel. At this time, torque is transmitted from the engine to the gearbox, which occurs due to friction forces. This process of clutch functioning is in no way possible without a working fork. The BC for the “classics”, which is 2107, is shaped like a slingshot.
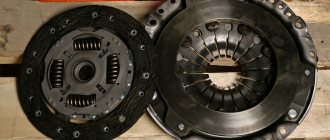
New and old forks for VAZ 2107
Replacing an element
Replacing the aircraft in a VAZ 2107 car can occur in several ways. In the first case, it is necessary to remove the gearbox, which is a rather labor-intensive process that cannot be accomplished by any driver. In the second case, you can change the element without removing the gearbox. Domestic motorists encountered this breakdown so often that they found a simpler way out of this situation.
Instructions for replacing the clutch fork on a VAZ 2107
When and how to replace the clutch fork?
First of all, if the clutch fork fails, you will not be able to drive the car normally, since the clutch simply will not work. Of course, you can get to the repair site if you know how to drive without a clutch. However, we are not talking about normal operation of a vehicle with such a breakdown.
The clutch actually connects the engine and the gearbox, and this connection can be interrupted by pressing the clutch pedal in the passenger compartment. It is necessary to interrupt the transmission of torque from the engine to the gearbox to change gears. The clutch also reduces shock, vibration and other loads, protecting the engine and gearbox.
A single-disc clutch consists of the following main elements:
- pressure and driven disk;
- release bearing and its coupling;
- diaphragm spring;
- clutch forks;
Simply put, one side of the clutch assembly is attached to the engine flywheel, and on the other side the gearbox shaft is connected through a splined connection. This clutch is always closed (the discs are pressed against each other). In this case, to open the clutch (in fact, to distribute the pressure and driven disks), the clutch release drive is used.
So, after pressing the clutch pedal in the cabin, the force is transferred to the clutch drive, resulting in the movement of the clutch fork. This fork, in turn, transmits force to the release bearing, which moves, influencing the petals of the diaphragm spring of the pressure plate (clutch basket).
The petals of the spring are pressed, the outer edge of the basket moves away from the pressure plate, and tangential springs also help it press out. As a result, the disks open, and torque from the motor is not transmitted to the box. After the driver releases the clutch pedal, the diaphragm spring exerts force, the pressure and driven disks close, the torque is again transmitted from the flywheel and the transmission of torque to the box resumes.
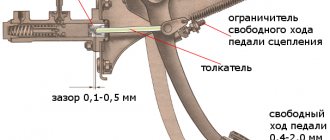
If the car's clutch does not respond well to pedal pressure, problems with the fork should not be ruled out. At the initial stage, you can adjust the free play of the clutch fork, but you must remember that this is a temporary measure. After a short period of time, malfunctions in the clutch on/off mechanism will appear again.
If the clutch is not worn out, and there is no noise or vibration during its operation, and the clutch drive does not cause any other complaints, then the fork is often the source of problems. As a rule, a crack appears on the plug, after which the element is actively damaged.
- To verify that the fork is causing the problem, it is recommended to inspect the mechanism. To do this, the car is driven into a pit or raised on a lift, then the dirt boot is moved, which covers the clutch fork. Having adjusted the lighting (control lamp, flashlight, etc.), it is possible to inspect the plug.
- If cracks and obvious defects are visible, then they will be noticeable. Often the fork cracks in the part where the part transitions into a smooth flat surface of the part where it transitions into a flat plane. However, even if there are no cracks, the fork may still be severely worn in other places.
- Also, the clutch fork breaks in some cases (when driving, the clutch pedal drops sharply). The fork also bends from mechanical stress, that is, physical deformation of the clutch fork occurs. This occurs as a result of breakdowns of the clutch itself, since in order to bend the part, the force required is quite large.
- The clutch fork legs themselves often wear out. This often happens on cars with high mileage, where the clutch fork has not been changed for a long time. The fork legs directly affect other clutch elements, and defects at the point of their contact with the clutch inevitably lead to malfunctions.
- We also note that even a new fork may have defects, that is, when purchasing spare parts (especially non-original ones), you need to immediately inspect the product for possible defects.
Signs of a faulty VAZ clutch fork
The main signs of a faulty VAZ 2107 clutch are:
- it is difficult to change gears;
- the driven disk slips;
- vibration appears;
- The pressure bearing whistles;
- the clutch is hard to disengage;
- The pedal does not return from the lower position.
Destruction of the pressure plate and basket casing can lead to very serious consequences
Video
- How to identify clutch faults?
- 1. What is clutch?
- 2. Signs of clutch failure
- 3. The most common causes of clutch malfunctions
- 4. Self-diagnosis of clutch faults
- 5. What to do with a faulty clutch?
Regular use of a car sooner or later leads to operational failures of its individual systems, which are often caused by malfunctions of the engine, chassis or any other mechanism. Problems with the clutch also cannot go unnoticed by the car owner, because the appearance of even the slightest malfunction in the operation of this unit is already “felt”.
How does the clutch work?
The principle of operation varies, but the most famous and common is frictional. The system is simple, the work occurs using friction. But in addition to it, there is a hydraulic principle system, a fluid that drives the entire system. There is also an electromagnetic system that uses an electromagnetic field to make the entire system work. Combined mechanisms are very rare.
There is a release disk system, which is also called a basket. It's placed between the springs and the flywheel, and in the center of it all is a thrust bearing. There is also a driven disk, which is attached to the clutch, clutches and springs. In addition to all this, there are pedals, levers and the fork itself, but everything listed above is the most important.
If the pedal is released, the driven disk rubs and thereby transmits torque to the box. But if the pedal is pressed, the disc no longer rubs, but instead the fork begins to work, which goes into the flywheel.
The clutch is a special system device that connects the engine and transmission. It performs important functions in a car. First of all, it transmits torque. However, in addition to this, it protects the engine and transmission from any damage or stress. Thus, it prolongs their performance.
The mechanism of the device consists of such parts as a pressure and release disk. Its other name is a basket, which is placed between a special flywheel and springs. There is a thrust bearing in the center. In addition, there is a driven disk, which is attached with a clutch, springs and friction linings. These are the most basic elements of the system. It also includes clutch pedals, levers and finally the clutch fork.
The whole principle of operation of the mechanism is that when the pedal is released, friction occurs on the driven disk, as a result of which torque is transmitted to the transmission. In the reverse position, the friction force stops acting on the disk and the clutch fork begins to work, due to which it goes back to the flywheel.
Vibration
A faulty clutch can cause vibration, this is not surprising, because the assembly undergoes a rotational movement and imbalance causes vibration.
It happens that after replacing the clutch with a new one, vibration appears. It would seem that everything seems to be new, but when starting off there is some kind of vibration and jerking. Most likely, you came across a restored basket, the so-called refurbished, that is, the clutch is changed at a car service center, the old set is sent to the factory for restoration, and sometimes such imperfections happen. Such a set usually costs less than a new one, but it’s not a fact that they won’t push it on you under the guise of a new one. The box should say refurbished
.
On an old, battered clutch, if when starting off, the damper springs have become loose, or the basket begins to fall apart; if vibration occurs while driving, the basket is most likely torn; a slight vibration may indicate slight wear of the basket, especially if only the disk was replaced at the last time. In general, the clutch is a part that must be dynamically balanced; if the center of mass is suddenly disturbed, then in any case vibration will result at certain engine speeds. The flywheel will not give such a vibration for no reason, it just comes off and punches everything in its path if it is not screwed on properly.
Preparatory stage
Before changing the clutch on a VAZ 2110, you need to prepare a place for repairs and tools. For this process, the most suitable solutions are: a car lift or an inspection hole. If there are no such conditions, due to a hopeless situation, it is possible to replace the clutch with a 2110 in “Spartan conditions”. It is enough to find a flat surface area in a garage box, a parking space or in the yard.
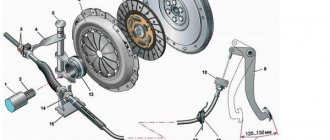
Clutch diagram for VAZ 2110: 1 - release bearing guide sleeve; 2 — gearbox input shaft; 3 — cable lead; 4 — clutch release fork; 5 — fork axle bushing; 6 — pressure disk assembly (basket); 7 — driven disk; 8 - flywheel; 9 — clutch pedal; 10 — mechanism for automatic adjustment of cable length; 13 — clutch release clutch (release bearing); 14 — lower tip of the cable sheath; 15 — bracket installed on the gearbox housing; A - the displacement distance of the leash, checked when installing the cable (27 mm).