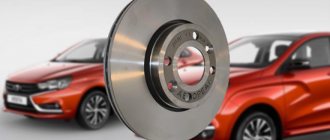
The brake system of a car must always be in good technical condition, and this primarily concerns the brake pads. On the VAZ “Seven” they rarely have to be changed and the main reason for this is wear of the friction lining. The emergence of problems with the brake mechanisms is indicated by corresponding signs that indicate the need for inspection and repair or replacement of the brake elements.
- What are they used for?
- What are there
Front
- Rear
- Brake pad problems
Extraneous sounds
- Skid
Video: why the car pulls to the side when braking
- Dismantling
Video: replacing front brake pads on classic Zhiguli cars
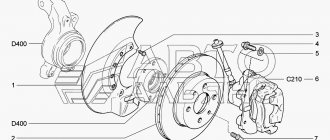
Front brake device for VAZ 2107
1 — fitting for bleeding the front brake drive; 2 — connecting tube of working cylinders; 3 — brake pad wear indicator wire; 4 — wheel cylinder piston; 5 — wheel cylinder clamp; 6 — brake pad lining; 7 - sealing ring; 8 — dust cap; 9 — pins for securing the pads; 10 — bolt securing the caliper to the bracket; 11 — steering knuckle; 12 — caliper mounting bracket; 13 — caliper; 14 — protective casing; 15 — cotter pin; 16 — pad pressure spring; 17 — brake pads; 18 — wheel cylinder; 19 — brake disc.
- Having disconnected the wires of the 3 front pad wear indicators from the plug connections of the wires, remove the cotter pins 15, and then the pins 9 with the springs, remove the springs 16 and the brake pads 17. Mark the pads so that during reassembly you can install them in their original places.
- Having straightened the locking plates, unscrew the two bolts 10 that secure the caliper to the bracket, and remove the caliper.
NOTE! It is possible to remove the front brake (without brake disc) complete with brake pads. In this case, it is enough to disconnect the plug connections of the brake pad wear indicator wires, disconnect the caliper hose and unscrew the caliper mounting bolts 10.
How to choose pads?
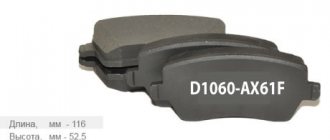
The appearance and markings of the pad can say a lot about them. In particular, the marking contains an indication of the friction coefficient, indicated by two letters (averaged during heating - the first letter, averaged after cooling - the second). Unfortunately, it can not always be found:
| Marking | Meaning |
| C | <0.15 |
| D | 0.15-0.25 |
| E | 0.25-0.35 |
| F | 0.35-0.45 |
| G | 0.45-0.55 |
| H | 0.55-0.8 |
Attention! If the second letter does not match the first (for example, GE), it is best to refrain from purchasing.
Excessively large inclusions of reinforcing particles should also be of concern: this is a crude technology (as a rule, in the manufacture of cheap pads, chips are produced on a lathe, minimally crushing them).
Friction coefficient marking
How to choose spare parts
How long the pads will last depends on the driver’s driving style (aggressive driving) and the conditions under which the car has to be driven. The pads wear out faster if the car moves around the city in jerks: either picking up speed in fairly short sections, or using sharp braking.
Helpful advice: When choosing spare parts, it is not enough to be guided by cost or brand. When purchasing new brake pads, buy them from the same batch. The features of friction lining production are important. If the spare parts are from the same batch and from the same manufacturer, the difference in the physical and mechanical properties of the material will be insignificant.
The procedure for replacing brake pads is carried out on both wheels of the same axle at once. Wherein:
- Be sure to analyze the condition of the parts and mechanisms of the brake system.
- To assess brake disc wear, use a caliper and measure its thickness.
- Check the entire assembly for damage and find out if the geometry of the structure is broken.
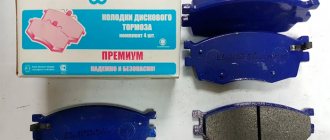
ROSDOT
A team of experienced professionals and JSC TIIR, with the participation of European specialists, create elements of brake systems for VAZ cars from harmless friction materials. The raw materials for the friction composite do not contain asbestos, nickel, or copper; they are purchased in Austria and Germany, some of which have no analogues in Russia.
Considering their low cost, ROSDOT brake pads have good wear-resistant characteristics and heat dissipation. Thanks to the use of Italian mastic, the pads do not emit extraneous noise at low temperatures and when they get wet. In terms of price-quality ratio, Rosdot front and rear brake pads have no equal. The products maintain stability of the friction coefficient over the entire operating range of temperatures, speeds and pressures;
Advantages:
- high braking efficiency;
- ergonomics;
- disc-saving properties;
- reasonable price.
Flaws:
- wear out quickly.
Step-by-step process for replacing brake pads
After preparing all the tools, first measure the fluid level in the corresponding reservoir. The engine must be turned off. If the indicator is exceeded from the maximum, select some of the fluid so that nothing subsequently gets on the brake disc.
Raise the handbrake and place chocks under the wheels to prevent the car from rolling. Only now can you lift the car using a jack. Remove one wheel and clean the entire mechanism responsible for braking using a rag. If rust is visible, apply WD-40 for easy removal of the guides.
Unsplit the guides with thin-nose pliers. Place a drift in a convenient position and carefully knock out the guides (not completely) to the extent that the brake pads are freed.
Remove the pressure springs from the pads. Now take pliers and use them to press the pistons into the cylinders. Once completed, you can remove the brake pad from the mechanism.
After dismantling the part, carry out an analytical inspection - determine the degree of production; if everything is normal, replacing it is a waste of time. The part can still continue to work out its service life, and the malfunction itself lies in a completely different functional unit of the car. If you determine the presence of wear, prepare a new pad for installation.
Read, it may come in handy: How to choose brake pads
Take some grease and apply it to the guides. Be especially careful - the product should not come into contact with other functional components of the brake system.
To successfully install a new brake pad, all steps are performed in reverse order:
- Install the block.
- Install the springs.
- Reinstall the guides to secure the pad.
- Use thin-nose pliers to tighten the guides.
- Check that all mechanisms are secure, after which you can install the wheel.
- Lower the jack and remove the supports.
Once the procedure is complete, repeat the same with the other front wheel.
Once the pads are installed, start bleeding the brakes. To do this, simply press the corresponding pedal sharply several times. Then check the brake fluid level in the reservoir. If the level is lower than required, add the missing amount.
If you feel that you do not have enough experience to perform this work, contact a private workshop where a specialist will complete the work in a short time.
Did you like the article? Share with friends:You may also be interested in VAZ
STS
The Russian company “STS Company” produces good quality products for the low-price niche.
They have good friction properties and thermal stability. Together with the Friction Materials Group company (monitoring compliance with norms and standards), a unique friction composition of 15 components was created. “STS Company” produces a large line of brake pads for rear and front discs, suitable for the entire model range of VAZ cars. Based on the test results, it was found that at a speed of 100 km/h, with cold brakes, it showed good friction coefficients of 0.48.
When they were heated to 250 degrees, the coefficient decreased slightly, to 0.41. After repeated braking, the indicator dropped to 0.38. Thanks to the high-tech composition of the friction mixture, after cooling, performance is fully restored. Suitable for cars in the budget segment with a normal driving style. The pads are of good quality at a reasonable price. The service life of the lining set is about 40 thousand km.
Advantages:
- reliability;
- wear resistance;
- compliance with European standards;
- low price
Flaws:
- disk oiling;
- reduction of the friction coefficient during repeated braking.
What is needed to remove the caliper
- screwdriver or bit;
- keys for 17, 14 and 10;
- pliers;
- a piece of rubber tube or bolt with a diameter suitable for the inner diameter of the brake hose tip;
- marker.
It is necessary to remove and install the caliper when replacing it in case of deformation or damage. This is also a necessary action in order to repair the VAZ 2107 caliper.
To carry out the work, you must lift the car on a lift or use a jack. The latter option is somewhat more tedious, but ideal for home use.
Cost of brake pads for VAZ 2107
The price of high-quality pads for a classic VAZ, of course, depends on the lining materials used, technological features and manufacturer.
| Front pads for VAZ 2107 | |||||
| Brand | TIIR (original) | Allied Nippon 3.7 | ATE 4.0 | Ferodo 3.8 | Finwhale 3.5 |
| vendor code | 2101-3501090 | ADB 0281 | 13.0460-2966.2 | FDB 96 | V 211 |
| Price | 260 rub. | 340 rub. | 700 rub. | 430 rub. | 370 rub. |
| Rear pads for VAZ 2107 | |||
| Brand | VAZ (original) | TSN 2.8 | ATE |
| vendor code | 2101-3502090 | TSN 2.3.1 | 03.0137-0232.2 |
| Price | 750 rub. | 500 rub. | 1240 rub. |
It should also be emphasized that there are now a lot of fake brake pads for such a popular car. Therefore, choose only trusted manufacturers and pay attention to the packaging, configuration and labeling on the products. For example, the Ferodo brand uses tape with red or blue stripes to seal a box of pads.
Removing the brake caliper
To remove the caliper you must do the following:
- lift the car on a lift or jack up the wheel on which the brake caliper needs to be removed;
- Using a wrench, remove the bolt securing the brake hose bracket;
- remove the bracket so that it does not interfere with further actions;
Important: under the bracket fastening bolt there is a spring washer, which must not be lost when dismantling the bolt and bracket.
- unscrew the bolt securing the brake hose;
- remove the bolt after first removing the two o-rings;
- insert a rubber tube or bolt of a suitable diameter into the hole in the brake hose tip to prevent brake fluid from leaking out;
- Use pliers to remove the cotter pins securing the brake pad pins;
- pull out the pins securing the brake pads and remove them using a bit or a thin, but not sharp, screwdriver;
- remove the retaining springs from the brake pads;
- remove the brake pads;
Advice: if you plan to use the brake pads in the future, they should be marked with a marker so that during reassembly they can be installed in the same place where they were. If this is not done, they will wear out faster and brake worse.
- bend the locking plates of the washers on the caliper mounting bolts;
- unscrew and remove the bolts securing the caliper to the steering knuckle;
- Remove the brake mechanism (caliper) of the VAZ 2107 from the brake disc.
Important: the upper and lower caliper mounting bolts differ in the shape of the head. When installing the unit in place, it is necessary not to mix them up.
How the repair is carried out
If the mechanism is damaged or there are deformations, it must be completely replaced. Repairing a VAZ 2107 caliper involves replacing non-working cylinders. The repair procedure is as follows:
- The device is fixed in the jaws of a vice.
- Unscrew the fastenings of the connecting metal tube. After this, the tube must be removed.
- Knock out the working cylinders from the guides.
- If there are none, remove the clamps and replace them with new cylinders.
- Place the cylinders in the guides, and then install the connecting tube, followed by tightening the fittings.
- If it is necessary to repair the brake cylinders on the caliper, then the essence of the repair actions is to change the rubber seals.
- To make repairs, you will need to remove the cylinder and then remove the rubber cap from the cylinder using a screwdriver.
- Press the piston out, then remove the sealing ring using a screwdriver.
- In place of the old ring you need to install a new one from the repair kit. The cylinder, as well as the piston and ring, must be lubricated with brake fluid.
- Install the piston into the mechanism cylinder.
Read, it may come in handy: How to find what is creaking - insidious acoustics
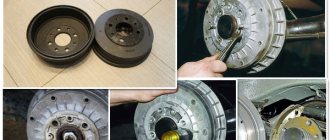
Where are the rear brake pads located?
If the car is fully equipped, that is, all the wheels will be in place, etc. You will practically not be able to see the rear pads, since they are located under the drum itself, or to be more precise, inside it, so in order for you to more or less be able to see the pads, then you will need to first remove one of the rear wheels and then remove the ram itself and only then will you see the brake pads in front of you.
Installing the brake mechanism and bleeding the system
The restored caliper of a VAZ 2107 car is put on the disc and secured with bolts to the steering knuckle. The pads are inserted into the gap and fixed with guide springs; if necessary, parts are replaced with new ones. The brake hose and tube are installed in place, and the system is filled with fluid to the specified level. Repair of the brake mechanism ends with bleeding to remove it from the system.
This process on a VAZ 2107 car is carried out as follows: a hose of a suitable diameter is put on the nipple of the working cylinder. Its other end is lowered into a container with liquid. The assistant sits behind the wheel and presses the brake pedal several times and holds it in that position. Using the key, release the nipple and let out the air. We repeat this action until bubbles stop appearing in the container.
When do you need to change rear brake pads?
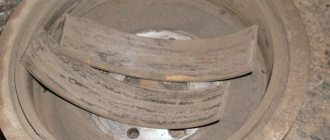
They need to be changed if the thickness of the lining (the lining is present on the pad itself and only it brakes the car) has become less than 1.5 mm, but to understand what the thickness has become, you will, of course, need to remove the drum and only then take a look on the thickness of the lining itself (The lining in the photo below, so that you can simply understand, is indicated by a red arrow, and the blue arrow indicates the block body).
Isn’t there any other way to understand when the pads have become unusable, you ask? So it is possible, namely, the first signs of wear on the pads will be a squeaking sound when you press the brake pedal, which will come from the rear; over time, this squeaking sound can develop into a stronger sound and, ultimately, if you don’t pay any attention to this, it may a strong grinding sound of metal on metal will begin, this will tell you that most likely the pads are to blame.
Note! If you have a similar situation, but only a grinding noise comes from the front part when braking, then this will indicate that your front brake pads need to be replaced. For information on how to replace them, read the article entitled: “Replacing front pads"!
And what’s more, if when you remove the old pads from the car, or take new ones out of the box, then be sure to inspect them and if you find oil on the brake pad itself, if the pad itself moves away from the body, and also if If you find chips and various kinds of cracks in this same lining, then this pad needs to be replaced and its further use does not make any sense.
Article number and cost of good front brake pads for VAZ 2107 from third-party manufacturers
When choosing which pads to put on the front axle of a VAZ 2107, the car owner should take the most responsible approach to the selection of consumables. They will bear the main force when stopping the car.
Original products produced by TIIR have mediocre quality and satisfactory performance characteristics, so there is an opinion among owners that it is better to supply an analogue. Recommended brake pads are shown in the table below.
Table - Good analogues of the original front pads
| Manufacturer | vendor code | Approximate cost, ruble |
| Ferodo | FDB96 | 560-670 |
| Road House | 208000 | 510-650 |
| TRW | GDB140 | 900-1100 |
| Delphi | LP92S | 240-300 |
| Shafer | SB20166 | 200-280 |