In a situation where the fuel pump on a Lada Priora car does not work, the causes of the problem are not so difficult to detect. But if a problem occurs somewhere along the road, then without fixing the problem you will not be able to continue your journey and you will have to look for a way to tow the car to the nearest service station. But not all faults related to the fuel supply are fatal; some of them can be detected and eliminated independently.
The fuel pump does not work on the Lada Priora: reasons
In a situation where the fuel pump on a Lada Priora car does not work, the causes of the problem are not so difficult to detect. But if a problem occurs somewhere along the road, then without fixing the problem you will not be able to continue your journey and you will have to look for a way to tow the car to the nearest service station. But not all faults related to the fuel supply are fatal; some of them can be detected and eliminated independently.
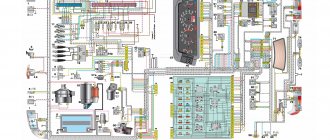
Location and operation of the fuel pump
The fuel pump in the Lada Priora car operates from an electric drive, which is turned on after turning the key to the ignition position. Within a few seconds, it pumps fuel into the fuel system so that the pressure in it reaches 3.7 bar, while a characteristic low buzzing sound is heard inside the cabin. When the pressure mark is reached, you can start the engine.
The unit works continuously, just because of the noise of the motor, the sound made by the pump is no longer audible. A special RTD regulator with a bypass valve maintains the required pressure in the fuel line.
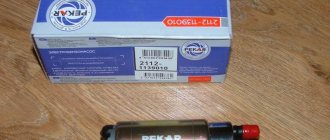
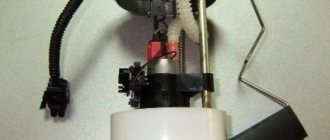
The whirring of the fuel pump can be heard inside the car because it is located inside the fuel tank, located under the rear seat of the Priora. There is also a built-in fuel coarse strainer and a level sensor with a float. Gasoline pumped by the pump is supplied to the injectors through a fuel line tube made of thick-walled copper tube.
Symptoms of unit malfunction
Malfunctions of the Priora fuel supply pump can manifest themselves in different ways.
Sometimes it fails completely, in other cases it maintains too low pressure in the system. Symptoms of problems are:
- after turning the key in the ignition switch, the characteristic sound of the fuel pump is absent, and the engine does not start;
- when the ignition is turned on, the pump pumps, the power unit starts, but when you try to move away, the engine stalls and starts with difficulty;
- The car jerks while driving, stalls and does not want to start.
The first symptom indicates a malfunction in the electrical circuit that supplies power to the unit. Also, a complete failure may be the result of a breakdown of the pumping device itself, and it has to be replaced. Fortunately, such breakdowns are quite rare. Electric fuel pumps installed on VAZ cars are considered quite reliable devices and operate without problems for 150-200 thousand km.
The remaining 2 symptoms indicate that the amount of fuel supplied to the injectors is not enough for normal driving. If the car somehow starts and idles, then there is no longer enough fuel to move. Since the characteristic symptoms of low pressure in the line are similar to the symptoms of problems with other units and systems, it is necessary to carry out diagnostics and more accurately determine the cause.
Diagnosis and Troubleshooting
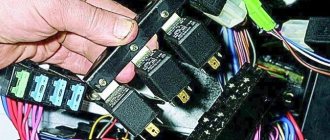
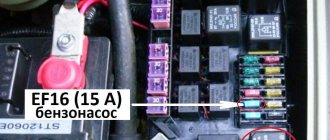
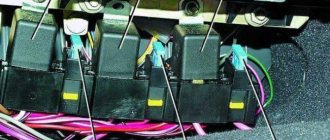
It is relatively simple to verify that the electrical network is faulty - this can be done without removing the fuel pump. When the sound of its operation is not heard when the ignition is turned on, you must immediately check the fuse responsible for this circuit. It is installed in a block mounted at the bottom in front of the front passenger seat. You need to remove the block cover, find the fuse marked F3, rated for 15 A, and replace it. This kind of work can be done on the road.
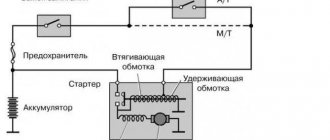
If the operation of the fuel pump has not resumed, you should switch your attention to relay K2, located in the same block. It closes the power circuit of the pumping device based on a signal from the controller. You can also check the serviceability of the relay in road conditions, for which you will need a piece of copper wire. Diagnostics are carried out in the following order:
- Remove relay K2 from the connector.
- Turn on the ignition.
- Using a wire, connect the contacts marked “30” and “87”; the numbers are marked on the relay. Another option is to apply power to pin “11” located in the diagnostic connector. The +12 V voltage can be taken nearby, from the cigarette lighter.
- If you hear the pump humming, then you need to change relay K2.
If after the above manipulations the unit is still “silent”, it is necessary to check the integrity of the wiring and the reliability of the contact at the place of its connection. This will require a device, so it will not be possible to carry out such work in the middle of a field. Unless you can check the serviceability of the fuel pump itself by disconnecting the connectors from it and supplying 12 V directly from any convenient source. If the pump still does not hum, it should be replaced.
Be careful when connecting wires directly and make sure that there are no drops of gasoline nearby, as a spark may cause it to ignite.
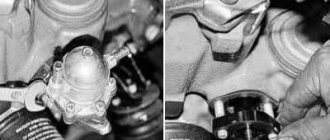
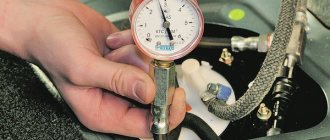
It will not be possible to diagnose insufficient fuel supply to the injectors under road conditions, unless you carry a pressure gauge with a corresponding hose for connection to the fuel rail. The amount of gasoline supplied is characterized by the pressure in the network, to measure which you will need a pressure gauge. The check is performed as follows:
- Twist off the plastic cap covering the diagnostic fitting. It is located at the end of the fuel rail and is a regular spool.
- Press the spool rod to release the pressure in the line. In case of gasoline leakage, place a small container under the spool. Perhaps the malfunction will make itself felt already at this stage if there is no pressure in the network and no fuel flows from the fitting.
- Unscrew the spool and put the hose from the pressure gauge onto the fitting. With the ignition off, apply 12 V directly to the pump. To clearly record the readings, it must work for at least 10 seconds.
Reasons for failure of the starting system
Most often the following happens:
- For some reason the electric starter does not turn on - the reason is a broken wiring, short circuit or breakdown of the traction relay;
- the starter starts, but an uncharacteristic clicking sound is heard - damage to the coil of the above relay or discharge of the battery;
- the start works, but the starter does not turn or rotates too slowly - the battery is dead.
In addition, the reason here may lie in:
- loss of contact;
- brush wear;
- collector contamination;
- short circuit of the winding wires.
It also happens that the starter works normally, but the flywheel still does not rotate.
Here, first of all, you need to make sure that the attachment to the crater installed on the clutch is not broken. Then you will have to check the integrity of the teeth of the flywheel itself or the drive gear.
It happens that the 16-valve Priora does not turn off the starter after the power plant is factory installed. This happens due to a malfunction of the clutch that ensures the free movement of the unit in question. Sticking of the relay contact group also leads to the same result. If this malfunction occurs, you must immediately turn off the engine.
Problems with the Priora plant often arise due to ignition failure. In this case, you need to make sure that:
- the coils are securely fastened to the power plant;
- there was no break in the ignition wires in its low-voltage circuit;
- whether the spark plugs are working (if there is no spark, you will need to replace the ignition coil).
And finally, it is impossible to start the engine if there is a breakdown in the power system. You will need to check the air filter. If it is not clogged, you need to inspect the connector contacts in the injection system (do not forget to also look at the fuel pump - if it does not make noise, then most likely there are problems with the electrical network) and make sure that the fuel pressure is normal.
Before performing the steps mentioned above, be sure to disconnect the negative connector on the battery. This should only be done with the ignition off.
Why the Lada Priora fuel pump does not pump and what to do
For high-quality and proper operation of the vehicle, it is necessary that all its elements are in good condition. As for the “power supply” and parts related to the fuel system, they should be as debugged as possible in the car. Otherwise, there is a risk that the car will not start. Sometimes it happens that the gas pump stops pumping fuel. Let's find out why this happens and how to deal with it.
What to do if the fuel pump of the Lada Priora has stopped pumping: reasons, solutions
If the pump stops working properly or works every once in a while, as a rule, the engine does not start (16 valves). This happens for the following reasons:
- tank fuse blown;
- tank relay is faulty;
- the gas tank itself is faulty;
- problems with wiring and adjacent contacts;
- problem with the controller;
- problems with the alarm system, etc.
Checking the fuel pump of a carburetor car (mechanical)
Mechanical fuel pump - diagram
To check the operation of the fuel pump, you should:
- Remove the fuel hose from the carburetor inlet fitting.
- Immerse the hose in a specially prepared transparent bottle. By actively using the pumping lever manually, we notice how strong and dense the fuel is supplied. Air impurities should not be visually noticeable.
Delayed jet output is not a sign of a breakdown, especially if the car has been parked for a long time. As a rule, diaphragms eight and nine are the main cause of malfunction.
Be that as it may, you need to inspect both the strainer and the inlet/outlet valve.
The fuel pump does not work on the Lada Priora
On the Lada Priora passenger car, as on other cars with an injection engine, the operating algorithm of the electric fuel pump is as follows:
- as soon as the driver turns on the ignition, he should hear within 3-4 seconds the noise of the fuel pump starting, which raises the gasoline pressure in the fuel rail so that the engine can start normally;
— after the pressure in the fuel rail rises, the fuel pump turns off;
— next, the driver turns the ignition key to the “starter” position, as a result of which the engine crankshaft begins to rotate and the crankshaft position sensor (CPS) is immediately activated, the pulses of which go to the electronic control unit (ECU);
— The ECU, in turn, turns on the relay, when the contacts of which are closed, voltage is supplied to the terminals of the fuel pump and if it is working properly, it will begin to perform its function, which is to supply gasoline from the tank to the fuel rail;
— and if the crankshaft stops rotating, the DPKV will stop sending pulses to the ECU, which will de-energize the relay, its contacts will open and the fuel pump will stop working;
Knowing this algorithm, it is much easier for the driver to find a malfunction as a result of which the fuel pump refuses to work. But it is worth adding that all electrical circuits are protected by fuses and troubleshooting usually begins with checking them. Considering that there are two options for turning on the fuel pump: the ignition key in the “ignition on” position and the ignition key in the “starter” position. Then you will have to check two fuses, which are located in the side of the tunnel on the front passenger side.
When the ignition is turned on, electric current from the battery flows through fuse F1 (15 A) into the circuit of the main relay K1, which supplies plus to the coil of the fuel pump relay, as a result of which its contacts are closed and voltage is supplied to the terminals of the fuel pump. After a few seconds, the controller, having collected the necessary information, turns off the main relay, and since the electric current went to the fuel pump through it, the fuel pump naturally turns off. And when the ignition key is turned to the “starter” position, the electric current from the battery flows through fuse F3 (15 A), and the fuel pump relay K2 turns on the ECU, according to the DCPV signal. That is why the driver needs to check both fuses.
If at least one of the above devices fails, even a working fuel pump will not work. You can check the condition of the fuel pump itself by applying voltage to its terminals directly from the battery.
Starter operating principle
This device itself is a conventional electric motor. A gear is installed on it, which meshes with the flywheel, which rotates when the power unit starts. A traction relay is also attached to the housing. The functions of this element include:
- gear movement control;
- starter disconnection.
When the key is turned to the starting position, voltage is supplied to the relay, exciting the electromagnet windings, then the contacts close. At the same time, the gear begins to rotate and the motor starts.
The fuel pump relay does not turn on.
If the fuel pump does not work, then first of all you need to check the attraction of the main relay and the fuel pump relay. If the main relay does not click, then it is necessary to check its switching circuit and its serviceability. How to do this is described in the article the main relay does not turn on,
In the case when the main relay turns on, but the fuel pump relay does not, it is necessary to check the power at pins 85 and 86. When using a test lamp, its current consumption should not exceed 0.25A, otherwise damage to the controller may occur. If the control lamp does not light up on any terminal, then the relay is not receiving power. This may be caused by a blown fuse or a broken power cord.
In the case when the lamp burns brightly on one terminal, and at half-glow on the second, and the relay may be activated, you should remove the relay from the socket and connect terminals 85 and 86 with a test lamp. When the ignition is turned on, the control lamp should light up and go out after approximately 20 - 30 seconds. If the lamp lights up and there is poor contact in the connection between the block and the fuel pump relay. If the lamp does not light up, there may be a break in the wire connecting the relay to the controller or the controller itself may be faulty.
Malfunctions
Malfunctions of the mechanical device include malfunction of the discharge or suction valve, damage to the diaphragm, deformation of the drive roller or rod, as well as wear of the adjusting gasket between the roller and the balancer.
In the electrical element, in addition to malfunction of the valves and damage to the diaphragm, there is also a failure of the solenoid valve and a break in the electrical circuit connecting the drive to the battery.
The fuel pump does not work, the relay turns on.
Checking relay power.
In the case when the fuel pump relay turns on when the ignition is turned on, but the pump itself does not work, you need to check the power at terminal 87 of the fuel pump relay. To do this, touch terminal 87 of the relay socket with the output of the control lamp connected to the vehicle ground, and the lamp should light up. If the lamp does not light, it means the fuse has blown or there is a break in the wire.
If there is power at terminal 87, you should remove the relay from the socket, and instead place a jumper between pins 87 and 30. In this case, if the pump and connecting wires are working properly, the pump should start working and if this happens, the relay should be changed. If the pump does not start working, then, without removing the jumper, you need to touch the power wire on the fuel pump with a test lamp connected to the vehicle ground.
Checking the fuel pump power circuit.
If a submersible pump is installed on the car as part of the fuel module, you need to remove the connecting connector and touch one of the thick wires. When you touch one of them, the indicator lamp should light up. If the lamp does not light up on any of the wires, then it is necessary to eliminate the break in the wire from the fuel pump relay to the module connector or the pump itself, if the pump is of a remote type. One of the reasons for the break may be the anti-theft blocking of an installed non-standard alarm system.
In the case when the test lamp lights up on one of the thick wires of the connector or one of the terminals of the remote pump, you need to connect these terminals with a test lamp to each other. In this case, the control lamp should light up. If the lamp does not light, it is necessary to eliminate a break or poor contact in the wire connecting the pump to the vehicle ground.
If, when checking the wires and relay for turning on the fuel pump, no malfunction is detected, the electric motor of the fuel pump or its connection to the module connector is faulty. It is not difficult to find the cause by removing the fuel pump module from the tank. If there is poor contact with the connector, melting of the plugs will be visible. If melting is not noticed, then to check the pump itself, you can connect it to the battery. It should be taken into account that operating a submersible pump without liquid will damage the pump. A faulty pump should be replaced.
How to remove the electric starter
The procedure in this case is as follows:
- remove the terminals from the battery;
- the “plus” connector is removed from the starter;
- removed from the relay block;
- The nuts securing the faulty unit are unscrewed.
Then you can safely remove it.
Next you will need to check the functionality of the relay. To do this, take emergency wires to start from another car. The negative one is installed on the battery and on the starter housing. “Plus” is connected to the relay. The latter in this case (if it works properly) is triggered and moves the gear. The absence of this reaction indicates a breakdown of this element.
When there is no reason to suspect the relay, you need to try to start the starter itself. The “minus” remains in place, and the “plus” is set to the lower output of the relay. The motor should start working. A negative result indicates wear of the graphite brushes.