Welcome! From today's article you will learn how to replace a windshield wiper trapezoid and repair it. You will also learn for yourself how to completely disassemble and reassemble the windshield wiper trapezoid. The replacement of the trapezoid will be carried out on cars, as can be seen from the title of the entry of the “Samara” family.
Note! Together with the repair of the windshield wiper trapezoid, the article also added the repair of the motor gearbox, which is also a very important and basic element in the work of the wipers!
When should you replace the trapezoid with a new one? In some cases, it must be replaced if it fails, and in some cases it does not need to be replaced with a new one at all; it is enough to simply remove it and then repair it.
When the trapezoid fails, as a rule, the car's wipers begin to work incorrectly, that is:
- They may work slowly for no apparent reason.
- Or not work at all.
Replacement
The process of replacing brushes on a VAZ 2109 is not difficult. The type of fastening on all machines in this series is a hook. Installing new brushes includes the following steps:
- the leash should be located perpendicular to the windshield - it is fixed in this position;
- The plastic body of the fastening is squeezed with two fingers - after which, by rocking, the part is pulled out of the seat.
It is necessary to carry out all actions as carefully as possible. Otherwise the plastic may be damaged
It is advisable to carry out replacement at a positive temperature. When negative, the plastic becomes brittle and very easy to damage. If the owner of the car does not plan to use the old brush in the future, there is no need to stand on ceremony with the fastening.
What to do if the wipers don't work
It is performed in several approaches. Necessary:
- Do the work of disassembling the unit.
- Determine the breakdown.
- Depending on the situation, the part is replaced or repaired.
- At the end of the procedure, the knot is completely assembled.
Checking the wiper relay
When the VAZ 2109 wipers stop working, they also clean the contacts after removing the relay from the mounting block. Afterwards everything is put back in its place. The operation of the mechanism will be indicated by a signal, like a click. In case of failure, the unit should be replaced.
Bimetal wiper mechanism
When the bimetallic fuse was activated, a high temperature was allowed on the motor of the cleaning structure. Therefore, the bimetallic plates opened. And when the temperature drops, the wipers resume normal operation. However, the fact that the windshield wipers of the VAZ 2109 do not work requires that the work be completed. To ensure that excessive heating does not recur, check the entire structure
It is important to find the cause of the heating and eliminate it
To carry out this work, you should install:
- service life of the lever system;
- determine the degree of wear;
- wash and lubricate the levers.
Motor wiring
In the wiper motor, you can easily detect irregularities in the wire winding by connecting directly to the battery. The motor is working properly.
Checking the limit switch gearbox
The gearbox mechanism must not have loose fasteners.
It is worth paying attention to mechanical damage. They shouldn't exist
Also, if the wipers of the VAZ 2109 stopped working, rust may have appeared on the contacts of the limit switch. To be sure of serviceability, a car service center checks for ringing from the relay to the switch under the steering wheel.
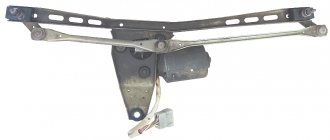
Complete disassembly of the windshield wiper trapezoid and its repair:
Note! When repairing the windshield wiper trapezoid, do not, under any circumstances, if you do not have the appropriate experience, remove the armature shaft adjustment screw. When it is turned out, the axial clearance at the shaft is violated!
Removal: 1) First, use a wrench to unscrew the nut that secures the trapezoid crank.
2) And then remove the crank by prying it up with a screwdriver.
3) Now, picking up the wrench again, unscrew the three bolts that secure the motor-gearbox to the bracket.
4) When the three bolts are unscrewed, use a screwdriver to unscrew the two screws that secure the wires to the fuse, and then disconnect them.
5) Next, grab the motor-gearbox with your hand and carefully remove it from the bracket.
6) Next, using a screwdriver, remove the retaining ring from the gearbox shaft.
Note! Behind the locking ring there are adjusting washers, which also need to be removed. By the way, for more accurate reassembly, the adjusting washers must be marked, for example, using a felt-tip pen, and when reassembling, install each one in its place!
7) Now unscrew the three screws that secure the cover to the gearbox. After unscrewing, remove the cover.
When the cover is removed, underneath you will see the gearbox panel, which will also need to be removed.
9) Then, turning the gearbox slightly, remove the gear from it by hand.
10) Next, remove the two screws that secure the gear housing.
Note! The second screw is located on the other side of the gearbox!
11) After removing the screws, remove the two small plates from the motor housing.
12) And then disconnect the gearbox housing from the electric motor housing.
13) Next, remove the armature from the motor housing.
Note! When the armature is removed, blow out the motor housing with compressed air to remove all small particles of coal dust from it!
14) Now move to the windshield wiper trapezoid, and then remove both locking rings from both trapezoid rollers.
Note! Under the locking rings there are adjusting washers, which also need to be removed!
15) Next, disconnect the rod from the wiper bracket and then remove the adjusting washers from both rollers.
Note! After disconnecting the rod, move to the bracket and from it, in the same way, disconnect the sealing rings on both sides, which are located in the grooves of this bracket!
Is it possible to make the wipers of the VAZ 21099 faster?
Popular wisdom has developed a way to increase the speed of the wipers on the VAZ 2108-99 by shortening the supply circuits of the gearmotor.
To do this, the wires from contacts “1” and “2” of the wiper connector are cut. A relay is installed in each gap:
For example, the gray wire (No. 1 in the block) is connected to pin 86 of the relay, and pin 85 of the relay is connected to ground (No. 4 in the block). Thus, the relay coil will work when the 1st speed wipers are turned on. All that remains is to stretch the wire from the positive terminal of the battery to terminal 87, and the end of the cut wire going to the gear motor to terminal 30 of the relay.
In a similar way, the relay “crashes” into the 2nd speed brush circuit.
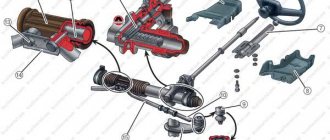
windshield wipers for VAZ 2108, VAZ 2109, VAZ 21099 - design features
The windshield wiper kit type 33.5205 consists of an electric drive, arms and brushes. The movement of the windshield wiper blades is parallel. The windshield wiper connection diagram is shown in Fig. 9.21. Windshield wipers can be domestic or imported. Windshield wipers are interchangeable in connection and mounting dimensions. The gearmotors (electric motors with gearboxes) of these windshield wipers are also interchangeable, although they have some differences in design. The windshield wiper has three operating modes: the 1st and 2nd modes are constant (but with different speeds of movement of the blades), and the 3rd mode is with intermittent movement of the wiper blades. The windshield wiper electric motor is excited by permanent magnets, three-brush, with two rotation speeds. To protect the electric motor from overloads when the brushes freeze to the glass, there is high resistance to their movement, or when the windshield wiper mechanism gets stuck, a reusable thermo-bimetallic fuse is installed in the wiper. For imported gearmotors, the fuse is installed under the gearbox cover on the limit switch panel, and for domestic gearmotors, the fuse is located on the wiper drive bracket. The intermittent operation of the windshield wiper is ensured by an electronic relay type 52.3747 installed in the mounting block. This relay also turns on the windshield wiper motor (low speed) when the windshield washer is turned on. A relay of type 526.3747 without terminal “K” is installed in the mounting block 2114-3722010. Its characteristics are the same as those of relay 52.3747. This relay can also be installed in the previous mounting block. On some VAZ 2108 and VAZ 2109 vehicles, tailgate glass wipers can be installed along with washer solenoid valves. The windshield wiper connection diagram is shown in Fig. 9.22. The tailgate glass wiper consists of a gear motor, a lever and a brush. Laying the lever with a brush on the right in the direction of travel of the car. A thermobimetallic fuse is installed in the windshield wiper gear motors to protect against overloads. For a windshield wiper, when the gearmotor is loaded with a torque of 0.49 N•m (0.05 kgf•m), a supply voltage of 14 V and an ambient temperature of (25±10)°C, the number of double strokes of the gearmotor shaft should be (50±5) min, and current consumption is no more than 2 A.
USEFUL ADVICE Over time, the inserts of the windshield wiper blades lose their elasticity due to the aging of the rubber and the brushes do not fit tightly to the glass, leaving uncleaned areas during operation. Temporarily, before purchasing new windshield wiper blades, you can try to restore the functionality of the old blades. Soak your windshield wiper blades in clean gasoline for a minute, then wash thoroughly with soap and water. Often after this the brushes become like new again.
Rice. 9.21. Wiring diagram for the windshield wiper and washer on a VAZ 2108, VAZ 2109, VAZ 21099:
1 — windshield wiper motor; 2 - thermobimetallic fuse; 3 — electric motor of the washer pump; 4 — windshield washer solenoid valve; 5 — mounting block; 6 — ignition switch; 7 - ignition relay; 8 — switch for windshield wipers and washer; Short circuit - windshield wiper relay; A - the order of conditional numbering of the plugs in the wiper block; B - to terminal “30” of the generator; a — 2nd speed windshield wiper blade; b — 1st speed windshield wiper blade; c — spring plate of the limit switch; d, d - contact posts of the limit switch; C1, C2 - noise suppression capacitors; L1, L2 - chokes
Rice. 9.22. Switching diagram for the tailgate glass wiper on VAZ 2108, VAZ 2109 cars:
1 — electric motor of the washer pump; 2 — solenoid valve for turning on the rear window washer; 3 — mounting block; 4 — ignition switch; 5 — switch for windshield wipers and washer; 6 — rear window wiper; A - to terminal “30” of the generator; B - the order of conditional numbering of the plugs in the rear window wiper block
Dimensions
The driver and passenger side brush lengths are different. The difference is small - only 20 mm. If possible, avoid installing brushes of the same length. Otherwise, a path of water will form in the middle of the windshield during rain. Which will lead to a significant deterioration in visibility. The rear window is equipped with a 300 mm long brush.
The rear hemisphere allows for the installation of a brush 400 mm long. In this case, the lower part of the window will not be affected. But you will have to limit the stroke of the brush on the gearbox. To do this, you need to disassemble the motor that drives the brush.
| Year of issue | Generation - body | Driver side | Passenger side | Rear | Mounting type |
| 1987-2004 | 1 | 530 mm | 510 mm | 300 mm | "hook" |
Original articles
It will no longer be possible to find original parts for this car produced by AvtoVAZ.
It is only important to note: in the assortment offered by stores, it will not be difficult to choose a high-quality analogue. In the last years of car production, the manufacturer no longer made brushes independently.
Ready-made solutions were purchased from Bosch.
Original articles used back in the Soviet Union:
| vendor code | Car model | Group | Part serial number |
| 21086-52050 – driver’s side 2108-520505 – passenger’s side | VAZ 2109 | Frame |
Replacement options
There are quite a lot of companies involved in the production and sale of various brushes. Including for the VAZ 2109. When choosing, you should give preference to well-established manufacturers
But it is important to remember: there are always many counterfeits of well-known brands. Please inspect the boxes carefully before purchasing.
This will avoid purchasing a fake.
All presented brushes are divided into 4 main categories:
- frame;
- frameless;
- hybrid;
- winter.
Frame
Designated as classic. They are distinguished by their low price and simple design. The strength of such products is great. But a serious disadvantage is the poor aerodynamic shape. When air resistance occurs when driving at speeds over 100 km/h, the brush rises slightly above the glass surface. Which leads to a decrease in the contact area. Deterioration in the degree of glass cleaning.
Frameless
Brushes of this type do not have the disadvantages of classic models. They have an optimal aerodynamic shape and look aesthetically pleasing. At the same time easy to install. The only negative: low strength. At the same time, the cost is relatively low.
Hybrid
Hybrid – a design that has all the advantages of classic and frameless brushes. Today this is the best option. Low cost, coupled with low aerodynamic resistance and good cleaning properties, makes their use convenient and effective. The brush itself is made of a single piece of rubber. There is a frame inside. Some modifications are equipped with a spoiler. Which makes the brush even more streamlined.
Winter
Winter wipers are distinguished by their elasticity - even at sub-zero temperatures they clean the glass well. The effect is achieved by adding rubber to the rubber composition. It retains its flexibility regardless of the ambient temperature. As a result, its cleaning qualities do not change in any way.
| Replacement options | |||
| Name | vendor code | Characteristics | Price |
| Frame | |||
| CHAMPION | E51B02 | Universal | From 610 rubles for 1 piece. |
| Frameless | |||
| Trico Flex | FX500+FX500 | Symmetrical spoiler | From 1.7 thousand rubles |
| Hybrid | |||
| NWB AERO RAIN 50 + 50 cm | ND-020+ND-020 | ND (Aero rain wiper) | From 2 thousand rubles |
| Winter | |||
| Maruenu Gyraless Snow 50 + 50 cm | TS-50+TS-50 | With tourmaline | From 4.5 thousand rubles per pair |
When choosing new wipers, take into account:
- mode of operation of the vehicle;
- maximum driving speed;
- the region in which the car is located.
If the car is used in the Far North, then it is advisable to purchase winter brushes. Driving at speeds over 100 km/h - the windshield will only be cleaned with the proper aerodynamic shape (frameless, hybrid blades). If you have no experience, you should contact a consultant.
Some drivers purchase several pairs of brushes at once:
- for summer;
- for winter;
- for long trips and highway driving.
It is very comfortable. Allows you to avoid unnecessary expenses. Spare parts are always available.
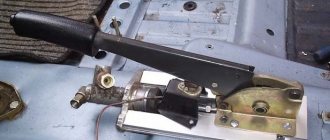
Lada 2109 Lyubimytaz › Logbook › Restoration/repair of trapezium wipers VAZ 2109
Good afternoon! The conversation, as you understand, will be about restoring the functionality of the wipers.
The car sat in the yard for 2 months, and after sitting down behind the wheel, the devil beguiled me to pull the wiper lever - they moved a couple of centimeters and came to a dead stop. Autumn is coming, options:
1. replacing the wiper relay (issue price 150 rubles) - did not help .2. replacement of a trapezoid with a motor (the assembled price of 3800 alarmed me, and it was decided to proceed according to version 3). 3. disassemble the trapezoid and separate the motor. Next, connect it directly without a trapezoid and check whether it turns or not, thereby determining what exactly is the problem (issue price is FREE)
and then the dancing with the tambourine began...
— The most hemorrhoids involved removing the trapezoid, but of course, whoever doesn’t give up wins. Having disassembled and connected the motor directly - OH A MIRACLE! The motor is alive and turning!
— Further, having examined the trapezoid, I saw acidification of one of the rods. Armed with white spirit and a brush, everything was cleaned, then treated with WD40, and on top of all the rods I coated all the rods with additional motor oil (NOT OIL!)
— We put the motor and trapezoid back together, connect it — BUT DO NOT INSTALL IT ON THE CAR! We just connect the cable. You need to first make sure it works. — It was nice to see that the system worked.
— Next, install it on the car in reverse order
ATTENTION! When installing, the trapezoid needs to be aligned! It's very simple to do:. — Pay attention to the small piece of trapezoid that is attached to the motor
Its small part sets the direction of the wipers! If the windshield wipers catch on the rubber band while driving, or if you stop in the middle of the windshield, then the position is set incorrectly. On the drive I found the following advice:
— Pay attention to the small piece of trapezoid that is attached to the motor. Its small part sets the direction of the wipers! If the windshield wipers catch on the rubber band while driving, or if you stop in the middle of the windshield, then the position is set incorrectly
On the drive I found the following advice:
“question about the trapezoid. I have a new trapeze, but I just can’t understand why, when turned on, the leashes first go down 3-4 cm and then clean as usual, but very strongly - they touch the elastic on the left side of the stand and then don’t go down quite down, 3-4 cm from the bottom elastic band, and then everything repeats, first down then as usual... what's the problem? I installed another trapeze - the same garbage (((
Look how the trapezoid, or rather its small piece, is attached to the motor. Its small part should be directed parallel to the motor. And adjust the leashes
In my case, this small piece had to be moved all the way to the right (if you are facing the windshield, i.e. towards the driver.)
Result: 4 hours - and savings of almost 4 thousand rubles. So think about whether it’s worth overpaying?!
Signs of breakdown
Why might the wipers not work? There are quite a few reasons, since VAZ 2109 windshield wipers consist of many components.
Failure or partial failure of any of them can lead to failure or disruption of the proper operation of the wipers.
Signs include the following:
- The wipers have stopped completely and do not respond to pressing the levers;
- The intermittent wiper mode has stopped working;
- The wipers are too slow;
- The windshield wiper operating mode activated from the interior does not correspond to the actual movements of the blades.
Causes
Like the symptoms, the causes of the malfunction can be varied:
- Oxidation of contacts;
- Fuse failure;
- Open circuit of wipers;
- Worm gear malfunction;
- Switch failure;
- Damage to the electric motor of wipers, etc.
Possible malfunctions of the purifier
The wiper motor does not work, the bimetallic fuse does not operate and fuse F16 in the mounting block does not blow:
— The power supply wires of the gearmotor are damaged, the wire tips in the connecting blocks are oxidized
Check the wires, replace damaged ones. Strip the tips
— Damaged wiper switch
Replace the wiper switch in the steering column switch
— Stuck motor brushes, severe contamination or burning of the commutator
Check, eliminate stuck brushes or replace damaged parts; clean the collector
— Broken wire in the armature winding of the electric motor
Replace the armature or gear motor
The wiper motor does not work, the bimetallic fuse trips or fuse F16 in the mounting block blows:
— The levers of the wiper mechanism are deformed and touch body parts
Check, straighten arms or replace wiper
— The brushes are frozen to the glass
Tear the brushes away from the glass without damaging the rubber band.
— A foreign object has entered the wiper mechanism
Check, remove item
— Short circuit in the motor armature winding
Replace the gear motor or motor armature
The wiper motor does not operate intermittently:
— Damaged wiper switch
Troubleshooting methods
If the wipers on a VAZ 2109 do not work, then you can detect and fix the breakdown yourself.
The renovation is taking place in stages:
- first the assembly is disassembled;
- then faults are identified;
- then repair or replacement of faulty parts is carried out;
- At the final stage, the assembly of the unit is performed.
Removed glass cleaner
Dismantling consists of the following sequence of actions:
- First of all, you need to de-energize the car by removing the negative terminal from the battery.
- Next, the brush arms are installed in a vertical position, then the fastening nuts are unscrewed. Now they can be removed.
- Armed with pliers, we pull the levers off the slots, trying not to damage the threads.
- The plastic protective caps are removed from the slots.
- Then you need to unscrew the nuts securing the bracket and you can remove them along with the washers that are located under them.
- Next, in the engine compartment, you need to disconnect the wire block that serves to power the windshield wiper motor.
- At the next stage, it is necessary to move the heater fan so that it does not interfere with removing the mechanism. To do this, unscrew the fastening screws.
- We remove the cover from the mounting block and dismantle all the relays located in it, since they will interfere with further work.
- Unscrew the lower bolt securing the purifier bracket.
- Then we remove the plastic wire holder through the gap in the body and remove it so as not to lose it.
- We remove the device rollers through the holes in the body. Then, slightly lifting and moving the windshield wiper with the motor up and to the side, remove the assembly.
Next, the mechanism is completely disassembled. A visual inspection of all parts is carried out, including the wipers of the VAZ 2109. A broken brush can be replaced, but it is better to change both. If mechanical damage is detected or parts are severely worn, they need to be replaced.
After all faults have been detected and eliminated, we reassemble the unit in the reverse order and install it in its original place. After the repair, it is necessary to connect the negative terminal on the battery and check the operation of the windshield wiper.
Complete disassembly of the windshield wiper trapezoid and its repair:
Note! When repairing the windshield wiper trapezoid, do not, under any circumstances, if you do not have the appropriate experience, remove the armature shaft adjustment screw. When it is turned out, the axial clearance at the shaft is violated!
Removal: 1) First, use a wrench to unscrew the nut that secures the trapezoid crank.
2) And then remove the crank by prying it up with a screwdriver.
3) Now, picking up the wrench again, unscrew the three bolts that secure the motor-gearbox to the bracket.
4) When the three bolts are unscrewed, use a screwdriver to unscrew the two screws that secure the wires to the fuse, and then disconnect them.
5) Next, grab the motor-gearbox with your hand and carefully remove it from the bracket.
6) Next, using a screwdriver, remove the retaining ring from the gearbox shaft.
Note! Behind the locking ring there are adjusting washers, which also need to be removed. By the way, for more accurate reassembly, the adjusting washers must be marked, for example, using a felt-tip pen, and when reassembling, install each one in its place!
7) Now unscrew the three screws that secure the cover to the gearbox. After unscrewing, remove the cover.
When the cover is removed, underneath you will see the gearbox panel, which will also need to be removed.
9) Then, turning the gearbox slightly, remove the gear from it by hand.
10) Next, remove the two screws that secure the gear housing.
Note! The second screw is located on the other side of the gearbox!
11) After removing the screws, remove the two small plates from the motor housing.
12) And then disconnect the gearbox housing from the electric motor housing.
13) Next, remove the armature from the motor housing.
How to remove wipers and wiper motor on a VAZ 2109
Dismantling the entire wiper and electrical system on a VAZ 2109 car looks more complicated and cumbersome compared to diagnostics and repair. In order for the work of the ball to be completed correctly and calmly, it is done in stages. By correctly distributing the progress of work, you can come to its quick completion.
Start of repair:
- First, the car is de-energized. To do this, remove the negative terminal from the battery.
- Remove the brush arms.
- The protective plastic caps are removed.
- The bracket fastenings are removed.
- Disconnect the wires that supply power to the wiper motor.
- Unscrew the fan screws.
- Dismantling the relay - remove the cover from the mounting block.
- Where the purifier bracket is attached, release the bolt from below.
- The plastic wire holder is removed and removed.
- Remove the assembly by moving the windshield wiper away.
When starting repairs, they inspect the wipers and all parts of the car. Damaged parts are completely replaced. After work, they do the installation. Having assembled and installed all the mechanisms in place, connect the negative terminal to the battery. Then check the operation of the wipers.
When the entire assembly is disassembled, they find out the condition of all the wiper mechanisms. The breakdown is obvious.