Hello, dear motorists! Although the number of cars with fuel injection now takes up the lion's share of the market, we cannot forget about carburetor cars. There are many cars with a carburetor fuel system, and therefore, the question of how and with what to flush the carburetor yourself remains relevant.
Unless, of course, you are planning to change the carburetor to an injector on your car. And washing the carburetor with your own hands will help you restore some of the technical parameters of the carburetor and, to a certain extent, reduce fuel consumption.
Provided that the carburetor is cleaned: systematically, in compliance with the cleaning technology and using a carburetor cleaner. Although, folk craftsmen say that you don’t necessarily need a carburetor cleaner. At home, solvent 645-652 works just as well. But, this is a matter of your taste when cleaning and flushing the carburetor with your own hands.
Basic carburetor maintenance work: cleaning and flushing
Like any mechanism, unit or device of a car, a carburetor requires routine maintenance. Thanks to timely and systematic maintenance, the factory parameters and settings of the carburetor will perform their functions longer.
What needs to be done during scheduled carburetor maintenance:
- mandatory washing of the carburetor outside;
- check the technical condition of visible components and elements of the carburetor;
- wash the strainer at the entrance to the carburetor float chamber;
- wash the float chamber itself;
- clean the jets from all kinds of deposits;
- carry out adjustments: idle speed, starter and carburetor float mechanism.
Let's make a reservation: cleaning the carburetor as part of systematic maintenance can take place without dismantling the carburetor.
How to clean a carburetor with your own hands - people's driving experience
Naturally, in the collection of tips from folk craftsmen on how to clean a carburetor, the carburetor manufacturer’s instructions for performing maintenance are always present at the core. In any case, when using a proprietary carburetor cleaner, or gasoline, kerosene, etc., do not forget about fire safety precautions. So, cleaning the carburetor, in order.
Carburetor cleaning - external washing and strainer cleaning
External cleaning is carried out using a brush and any carburetor cleaning product: diesel fuel or kerosene. It is not advisable to use gasoline. After external washing, it is advisable to blow out the carburetor with compressed air. How to bleed a carburetor? The ideal option is an air compressor; if you don’t have it, you can use a car compressor.
Before you start washing the carburetor, do not forget to remove the air cleaner, and make sure that no dirt gets into the internal cavities of the carburetor.
Cleaning the carburetor strainer. Its clogging is a fairly rare occurrence, however, once every 1-2 years or after 50 thousand km. The filter needs to be cleaned. Everything is simple here, the main thing is not to disturb the grid itself.
Clean the mesh filter with a solvent, rinse the filter cavity, and install the filter back, tightening the plug tightly.
Cleaning the carburetor - washing the insides of the carburetor
With just one caveat so as not to repeat myself. When using carburetor flushing fluids, always remember that a strong solvent can damage non-metallic parts of the carburetor (diaphragm or gaskets). Therefore, wash them separately and only with gasoline.
To clean the float chamber: remove the air filter, loosen the fuel hose clamp, remove it. After removing the float chamber, do not touch the float so as not to bend or damage the float. Do not lower the carburetor cap with the float down.
To avoid contamination of the float chamber with fibers from rags, clean the float chamber using a rubber bulb, sucking out fuel from the bottom of the chamber. If necessary, clean the bottom of the chamber with a thin, stiff brush, and repeat the operation with a rubber bulb.
We clean the main fuel air jets using compressed air. If the nozzle is very clogged, then thin copper wire is used to clean it.
What fluid to use to flush the carburetor
Given the huge range of auto chemicals, no one will give you clear recommendations on this matter. We can only say with confidence that the branded carburetor cleaning fluid helps remove all deposits that arise in the carburetor during its operation.
When using any of the existing carburetor cleaners, reviews of which you will find on the Internet, remember that first, no matter how much they praise it, thoroughly study the instructions for using the cleaner.
For example, Abro, a carburetor cleaner, according to the manufacturer: removes carbon deposits and poorly soluble resins. Affects the reduction of exhaust gas toxicity. And the Hi gear carburetor cleaner reduces fuel consumption. Although, an increase in fuel consumption is not always hidden in a dirty carburetor.
The manufacturer, as a rule, recommends using a carburetor cleaner every 5-7 thousand km when using low-quality gasoline. mileage
As a result, we summarize: cleaning and flushing the carburetor, with normal fuel, is necessary 1-2 times a year, or with a mileage of 20-50 thousand km.
Types of carburetors
The power unit is designed to create an air-fuel mixture in the combustion chambers. The finished fuel assembly enters the cylinders, where it ignites. Correct configuration of the power system unit creates conditions for stable and economical operation of the engine.
Carburetors are often found on domestic VAZ (classic) cars and come in several types:
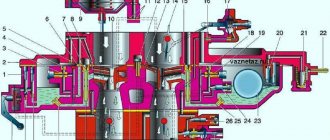
- Float The simplest, most reliable and widespread carburetor. These include Solex, Ozone and DAAZ. The device consists of a float and mixing chambers. Gasoline enters the first cavity, where a float is installed, resting on the valve shut-off needle. When fuel is consumed, the liquid level in the chamber decreases, and with the help of a needle, gasoline enters the cavity of the cell until the valve operates. From the float chamber, fuel flows through the nozzle into the atomizer. The mixing cell is designed to distribute the finished mixture among the cylinders.
- Membrane-needle-shaped. The device consists of chambers that are separated by membranes connected to each other by a needle-shaped rod. Moving from one point to another, the needle opens and closes the fuel supply valve. This simple type of power system is most often used on lawn mowers, airplanes and trucks.
- Bubbler. The old-style device was located on the fuel tank under a blind cap, from which 2 pipes came out: one to the engine, the second for air. Under the hatch, oxygen was mixed with fuel vapor and supplied to the combustion chamber.
Modern cars are equipped with injectors; today this is the most popular and economical option. Adjustment and cleaning of the injector is carried out using special equipment.
Carrying out cleaning
Washing and cleaning the carburetor can take from one to several hours. This depends on the level of knowledge of the specialist performing the operation, the degree of contamination and the means and materials used.
- First of all, fasteners are unscrewed , and then the fuel hoses are folded back. This must be done carefully, as they may contain fuel residues. Then disconnect the electrical connector of the magnetic valve. You will need to remove the cover from the carburetor and then place it on the table so that the floats are on top. This position reduces the risk of damage to the brackets.
- Before flushing the carburetor, you need to clean the strainer . For cars with high mileage, this operation is recommended to be done once every one and a half to two years. New cars need such washing less often. To wash it, you need to pour fuel into the float chamber through the fuel pump and remove the filter holder. The latter is washed out with a spray or special liquid. We blow out the mesh filter using an air cylinder or a compressor. Using a rag with a special product, we rub the surface above the filter plug and mount the filter elements in their places.
- from the float chamber using a rubber bulb. The remaining carbon deposits can be poured with a small amount of gasoline and blown out again with a blower, repeat until the container is clean. The float itself must be intact and during its operation it is undesirable to allow it to touch other structural elements.
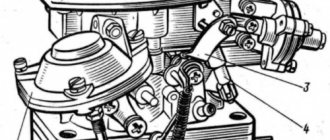
- The jets must be removed carefully using a slotted screwdriver. Thin wooden sticks will help you get them out. Each emulsion well and nozzle must be thoroughly purged with compressed air. This must be done on both sides. First, the opposite direction from the worker is selected. Either thin copper wire or rigid fishing line will help get rid of contamination inside the jet. Under no circumstances should steel needles or objects made of materials of increased hardness be used for this operation to prevent damage to the channels.
- Now we clean the accelerator pump , first removing this part of the structure. We check the ball in it for free movement, and clean any possible blockages in the channels in the same way as the jets.
- The overall seal of the carburetor must not be compromised. To ensure this, we install a new gasket and assemble all the elements into place. After this, tighten the fasteners with sufficient force.
Removing jets for cleaning
How to determine the degree of pollution?
The unit becomes clogged mainly due to low-quality flammable materials entering the power unit, with which dust, dirt, water, and rust enter the fuel supply system. Some particles leak through the filters and end up in the carburetor.
The degree of contamination of the power supply unit can be determined by the following signs:
- sudden dips in the gas pedal;
- floating engine speed;
- difficult starting on a hot or cold engine;
- increased smokiness;
- increased fuel consumption;
- power drop.
Similar symptoms may appear when the engine or ignition system malfunctions, so you first need to diagnose all units, then eliminate the cause.
Symptoms of pollution
Every owner should know when to start worrying and flush the carburetor. The critical state of this element can be determined by a number of characteristic features:
- significant dips during sudden acceleration and delayed response when pressing the accelerator pedal;
- unstable idling, speed becoming floating;
- difficulty starting a cold or hot engine;
- presence of high toxicity and smoke;
- significant reduction in power and increased fuel consumption.
Unfortunately, it is not always possible to say that the source of the problem is the carburetor when the above symptoms appear. Therefore, in such cases, it is imperative to first carry out a full diagnostics of the engine. Only after this can you start thinking about how to clean the carburetor.
If you constantly monitor the condition of this unit and regularly clean it, this will subsequently allow you to avoid many unpleasant moments, including unnecessary financial expenses and loss of time due to vehicle downtime.
Owners who neglect to wash this unit in a timely manner often experience the symptoms described above. In especially severe cases, when it is heavily clogged, dust and dirt as a result of vacuum may even end up inside the cylinder, and this can lead to the appearance of scuff marks on its mirror and carbon deposits on the surface of the piston.
What tools will you need?
To set up and clean eight carburetors (2108, 21081, 21083 Solex, as well as 2105–2107 “Ozone” and many others), you will need the following tools and accessories:
- Slotted screwdrivers with 3-5 mm blade.
- Phillips screwdrivers 3-5 mm.
- Open-end wrenches from 7 to 19 mm.
- L-shaped keys from 8 to 13 mm.
- Set of probes.
- Syringe or rubber bulb.
- Calipers.
- Tweezers.
- Thin copper or steel wire.
- Container for washing.
- Solvent, gasoline or special carburetor cleaner.
Instead of wrenches, you can use a set of heads, ratchets, and instead of probes, drills of the required diameter.
Cleaning, cleaning carburetors 2108, 21081, 21083 Solex and 2105, 2107 Ozone
Maintenance of carburetors 2108, 21081, 21083 Solex and 2105, 2107 Ozone mainly comes down to external cleaning and internal cleaning, as well as basic settings and adjustments.
The frequency of these procedures is once a year, and then only on condition that the contamination has reached such a degree that it interferes with the operation of systems and mechanisms (moving moving parts is difficult, channels, jets, float chambers, etc. are clogged) or in a situation where sudden blockage affects the efficiency of the carburetor.
External carburetor cleaning
Washing the external surfaces of Solex and Ozone carburetors can be carried out before making adjustments or, as previously written, before annual maintenance.
To carry out external cleaning of the carburetor, you must have a can of aerosol liquid for cleaning carburetors or 0.5 liters of acetone, a small brush and a lint-free rag. We remove the air filter housing, plug the carburetor from above with a rag so that dirt does not get inside, and successively apply aerosol from a can or acetone with a brush to each outer surface of the carburetor. We wait a couple of minutes. Using a brush, carefully and thoroughly, we remove the dissolved dirt from the recesses and flat surfaces. If desired, you can additionally wipe the outer surfaces with a rag moistened with gasoline or diesel fuel. After cleaning, blow the carburetor with compressed air from a pump or compressor.
Carburetor cleaning
We will clean the channels, jets, float chamber, and fuel filter. Very often, especially when the car has been in use for long periods of time, tar deposits accumulate in the channels and jets of the carburetor, reducing their cross-section, black and brown varnish deposits accumulate on the diffusers and walls of the mixing chambers, and sediments brought from the gas tank are deposited in the mesh filter and the float chamber.
You can clean all this equipment without removing the carburetor from the car engine, except in cases where it is completely coked. To do this, purchase a can of aerosol carburetor cleaner from the store, remove the air filter housing, and start the engine. We spray it into the carburetor from above, while periodically turning the throttle valve drive lever of the first chamber by hand so that the carburetor is properly “gassed.” We repeat this operation several times, trying to get the aerosol not only into the mixing chambers, but also into the channels of the air jets of the Main dosing systems of both chambers (they are clearly visible from above).
Places for cleaning Solex and Ozone carburetors
Next in line is the idle system. With the engine running, pull out the choke so that the rpm is at least 3 thousand. We completely unscrew the solenoid valve or the holder of the fuel jet of the idle system (depending on the carburetor model). And spray the aerosol directly into the hole formed. It’s worth giving the throttle a little with your hand again. After the procedure, blow out the fuel jet in the solenoid valve or holder and screw it back in.
Solenoid valves Solex and Ozone
Next is the float chamber. To clean it, you need to remove the top part of the carburetor (its cover). Use a rag to blot off all the gasoline in the float chamber. Pour acetone into it and let it sit for a while. Use a rag to carefully remove the bulk of the dirt, and use a brush to remove the rest. On a Solex carburetor, the structure of the float chamber is not very convenient for cleaning, so you can use a thin slotted screwdriver, the blade of which is wrapped in a rag, as an additional tool for cleaning recesses and inconvenient places. After cleaning, blow out the float chamber with compressed air.
Solex and Ozone float chambers
Since the carburetor cover has been removed, it is very convenient to unscrew the fuel and air jets and remove the emulsion tubes of the main carburetor metering systems. We also remove the accelerator pump nozzle. Soak everything removed in acetone for about fifteen minutes, then blow it with compressed air and install it back.
We clean Solex and Ozone gas pumps
And finally, a fuel filter at the inlet to the carburetor. We unscrew its plug and remove it from the hole. Soak briefly in acetone and then clean with a toothbrush. We blow it out and put it back, after making sure that there is no dirt in the hole where we screw it in.
Filters and plugs Solex and Ozone
After cleaning and cleaning the carburetor, you should adjust the operation of its main systems and mechanisms and generally set it up for normal operation.
Carburetor adjustment and tuning
We adjust and tune the carburetor in this sequence, although this is not necessary, it seems to me the most optimal. — Adjusting the fuel level in the float chamber of Solex and Ozone carburetors — Adjusting the air damper drive of Solex and Ozone carburetors — Adjusting the throttle valve drive of Solex and Ozone carburetors — Adjusting the starting device of Solex and Ozone carburetors — Adjusting the idle speed of Solex and Ozone carburetors
Notes and additions
— For a more complete and thorough cleaning of Solex and Ozone carburetors, you should remove the carburetor from the car engine. Disassemble and set aside all gaskets, diaphragms and rubber parts. Soak two parts of the body and the lid for 10-12 hours in a container with acetone. Then blow it with compressed air under a pressure of at least 6-8 atmospheres, put everything back together and install it on the engine. — There is another method of cleaning the carburetor, a non-disassembling one. To be honest, it is a little dubious, but its use for preventive purposes is quite possible. For 20 liters of gasoline in the gas tank, fill 0.5 liters of acetone and drive. It is advisable to do this filling before active use of the car, so that it does not stand, but drives.
Source
Step-by-step cleaning instructions
The power system can be cleaned in two ways: with dismantling or without removal.
With removal
To clean the carburetor by dismantling, you must:
- remove the unit and unscrew all jets;
- put the rubber elements aside so that the cleaning agent does not get on them;
- place the part in a prepared container with cleaning liquid and leave for 12 hours;
- after cleaning, thoroughly blow out the mechanism with compressed air;
- assemble the unit and install it on the car;
- set idle speed.
When disassembling, it is important to remember the location and numbers of the jets.
Without removal
To wash the carburetor without removing it, you need to unscrew the air filter cover, remove the filter element from the housing, and spray a carburetor cleaning aerosol into the chambers of the unit. Then use a special nozzle to process all the holes of the power unit. If desired, the procedure can be repeated. It is necessary to ensure that there is no debris or scale left on the equipment.
Then you need to start the engine, let it run for 5-7 minutes at idle and apply the product to all cavities of the carburetor while the power unit is running. Turn off the engine and continue processing for 5-10 seconds. The last cleaning step is to adjust the idle speed, replace the filter element and screw on the cap.
There is another way to clean the fuel supply system without dismantling the elements. To do this, you need to pour a special substance into the fuel tank and refuel with gasoline. The product penetrates the unit and eats away various contaminants.
Other washing methods
Sometimes it happens that there is no special means for cleaning the working unit nearby.
In such cases, solvent No. 646 can help. Although you shouldn’t rely too much on it. The effectiveness of this cleaning method is quite low, and it only allows for a short period of time to remove contaminants from the surface of the carburetor. The proper operation of this part depends not only on the frequency of its cleaning, but also on the product used. In order not to make a mistake in choosing this product, you need to carefully familiarize yourself with its composition and properties in the store. It is imperative to take into account the activity of using the cleaning agent. We should also not forget that all elements of the fuel system require regular cleaning. To ensure proper operation of the carburetor, it is recommended to clean it of dirt every 10-15 thousand km.
Trouble-free operation of a vehicle depends on many components, not least of which is the carburetor. Every car owner should regularly check its condition. This is especially true for those who use low-quality fuel. This factor increases the likelihood of clogging by an order of magnitude. But you can avoid the negative consequences caused by a dirty carburetor if you clean it regularly.
Every car owner can handle this task with his own hands, so you don’t even have to turn to specialists for help. When disassembling this power unit, it is only necessary to remember the location of the main parts. But first you need to understand what is the best way to flush the carburetor.
This must be a special composition designed to remove contaminants from the internal and external surfaces of the working unit. It is not recommended to save on the purchase of cleaning fluid, otherwise this may soon result in new, even more serious problems for the car owner, the elimination of which will require not only more time, but also financial costs.
Most new gasoline cars are equipped with fuel injection systems. However, on our roads there are a sufficient number of cars with carburetor engines. They often have weaker performance characteristics, but remain popular due to their high self-repairability.
Most systems in carburetor cars can be put in order in a garage with a minimum set of auxiliary tools. The list of available operations also includes carburetor cleaning.
Types of cleaners
To clean the carburetor, 2 types of cleaners are used:
- Aerosols or sprays - used manually, have convenient attachments that allow you to clean elements in hard-to-reach places.
- Liquid – allows you to automatically flush the unit. The product is poured into the gas tank, mixed with fuel and, upon entering the power unit, gradually cleans it.
Experienced motorists advise using aerosols and sprays, because... they cope with the task more effectively.
Care products
Any modern carburetor cleaning spray is an order of magnitude more effective than the compounds that were available before. And first of all, this is manifested in their higher quality.
Types of cleaning compositions
Car owners do not have any particular problems with how to flush the carburetor at home. There are two types of cleaning products available to them today:
Before using an aerosol cleaner, it is necessary to completely disassemble the working unit. In this case, a higher efficiency of the procedure is guaranteed. In the second case, when a special liquid is used, such complex manipulations are not required. The cleaning composition is simply poured into the gas tank, where, after mixing with fuel, it ends up in the carburetor, simultaneously removing all contaminants from the internal walls. Subsequently, the dirt enters the combustion chamber, and from there it exits through the exhaust pipe.
Tips for choosing
In order not to make a mistake when choosing a cleaner, you must follow a number of rules:
Safety rules should not be neglected. The aerosol cleaner contains many flammable components, so if handled carelessly, a fire hazard may arise. It is also necessary to take into account that such liquids have a specific odor. For this reason, it is recommended to clean this unit not only away from sources of fire, but also when creating conditions for good ventilation.
Properties and features of the products
The main tasks of a carburetor cleaner are to soften scale and remove various debris through corrosion. Therefore, cleaners contain special caustic chemicals:
- acetone;
- toluene;
- benzene;
- carbon compounds and inorganic substances;
- acids.
Some liquid products contain oils and additives to lubricate the carburetor.
A special feature of car cleaners is the ability to use two types of cleaner at once - aerosol and liquid.
Liquid for filling into the tank
Not everyone knows how to clean the carburetor on a VAZ 2109. We recommend contacting the automotive chemicals department, which sells a large number of liquid preparations for cleaning the carburetor. Typically the volume is up to 150 milliliters, which must be poured into the tank before refueling and this fuel must be completely used until the reserve light comes on.
According to the manufacturer, such measures will allow:
- Remove dirt and deposits;
- Improve the quality of engine starting;
- Reduce exhaust toxicity;
- Reduce fuel consumption;
- Improve engine responsiveness.
We recommend paying attention to the company Hi-Gear, which has proven itself in this area and offers truly high-quality liquid. Such preparations are used once every 3-15 thousand kilometers, depending on the operation and quality of the fuel being poured.
Rating of popular cleaners
List of the most popular carburetor cleaners:
- Liqui Moly. A high-quality product that removes scale well, also rinses channels and cleans throttle valves.
- Abro carb cleaner. Quickly clears blockages from the power supply unit, valve mechanisms and piston heads.
- Ravenol Carb Reiniger Spray. Quickly and efficiently removes carbon deposits and debris from plugs and injectors, COX and all channels of the unit.
- 3M PN 08796. Automotive chemicals effectively remove resins, scale and various debris from the air flow regulator on the carburetor.
- HI Gear HG 3201. The spray allows you to clean the power unit without disassembling it.
There are many more proven cleaners that can perform high-quality cleaning and restore the characteristics of the carburetor.
How to clean a carburetor at home
Hello, dear motorists! Although the number of cars with fuel injection now takes up the lion's share of the market, we cannot forget about carburetor cars. There are many cars with a carburetor fuel system, and therefore, the question of how and with what to flush the carburetor yourself remains relevant.
Unless, of course, you are planning to change the carburetor to an injector on your car. And washing the carburetor with your own hands will help you restore some of the technical parameters of the carburetor and, to a certain extent, reduce fuel consumption.
Provided that the carburetor is cleaned: systematically, in compliance with the cleaning technology and using a carburetor cleaner. Although, folk craftsmen say that you don’t necessarily need a carburetor cleaner. At home, solvent 645-652 works just as well. But, this is a matter of your taste when cleaning and flushing the carburetor with your own hands.
Basic carburetor maintenance work: cleaning and flushing
Like any mechanism, unit or device of a car, a carburetor requires routine maintenance. Thanks to timely and systematic maintenance, the factory parameters and settings of the carburetor will perform their functions longer.
What needs to be done during scheduled carburetor maintenance:
Let's make a reservation: cleaning the carburetor as part of systematic maintenance can take place without dismantling the carburetor.
How to clean a carburetor with your own hands - people's driving experience
Naturally, in the collection of tips from folk craftsmen on how to clean a carburetor, the carburetor manufacturer’s instructions for performing maintenance are always present at the core. In any case, when using a proprietary carburetor cleaner, or gasoline, kerosene, etc., do not forget about fire safety precautions. So, cleaning the carburetor, in order.
Carburetor cleaning - external washing and strainer cleaning
External cleaning is carried out using a brush and any carburetor cleaning product: diesel fuel or kerosene. It is not advisable to use gasoline. After external washing, it is advisable to blow out the carburetor with compressed air. How to bleed a carburetor? The ideal option is an air compressor; if you don’t have it, you can use a car compressor.
Before you start washing the carburetor, do not forget to remove the air cleaner, and make sure that no dirt gets into the internal cavities of the carburetor.
Cleaning the carburetor strainer. Its clogging is a fairly rare occurrence, however, once every 1-2 years or after 50 thousand km. The filter needs to be cleaned. Everything is simple here, the main thing is not to disturb the grid itself.
Clean the mesh filter with a solvent, rinse the filter cavity, and install the filter back, tightening the plug tightly.
Cleaning the carburetor - washing the insides of the carburetor
With just one caveat so as not to repeat myself. When using carburetor flushing fluids, always remember that a strong solvent can damage non-metallic parts of the carburetor (diaphragm or gaskets). Therefore, wash them separately and only with gasoline.
To clean the float chamber: remove the air filter, loosen the fuel hose clamp, remove it. After removing the float chamber, do not touch the float so as not to bend or damage the float. Do not lower the carburetor cap with the float down.
To avoid contamination of the float chamber with fibers from rags, clean the float chamber using a rubber bulb, sucking out fuel from the bottom of the chamber. If necessary, clean the bottom of the chamber with a thin, stiff brush, and repeat the operation with a rubber bulb.
We clean the main fuel air jets using compressed air. If the nozzle is very clogged, then thin copper wire is used to clean it.
What fluid to use to flush the carburetor
Given the huge range of auto chemicals, no one will give you clear recommendations on this matter. We can only say with confidence that the branded carburetor cleaning fluid helps remove all deposits that arise in the carburetor during its operation.
When using any of the existing carburetor cleaners, reviews of which you will find on the Internet, remember that first, no matter how much they praise it, thoroughly study the instructions for using the cleaner.
For example, Abro, a carburetor cleaner, according to the manufacturer: removes carbon deposits and poorly soluble resins. Affects the reduction of exhaust gas toxicity. And the Hi gear carburetor cleaner reduces fuel consumption. Although, an increase in fuel consumption is not always hidden in a dirty carburetor.
The manufacturer, as a rule, recommends using a carburetor cleaner every 5-7 thousand km when using low-quality gasoline. mileage
As a result, we summarize: cleaning and flushing the carburetor, with normal fuel, is necessary 1-2 times a year, or with a mileage of 20-50 thousand km.
Reliable engine operation depends on many elements, including the carburetor. If you use low quality gasoline, then at some point this unit of the power system may become clogged. Gradually, plaque appears on the inner walls of the carburetor, problems arise with the filter, jets and float chamber. It is in such cases that the need to clean the carburetor most often arises.
Which cleaner is better to choose?
There are many options for cleaners on the market at affordable prices from different manufacturers. When choosing, you should carefully study the instructions to find out the exact composition of the product. The active components that the cleaner contains dissolve deposits. Special impurities help fight carbon deposits and corrosion. The more chemicals in the product, the more effectively the unit is cleaned.
When choosing, you should study the manufacturer’s reputation and look at reviews of each product. Information about quality products can be obtained from experienced motorist acquaintances.
Preparation
First of all, you need to prepare thoroughly. Buy an aerosol spray can. In fact, the caring owner of a carburetor car must keep it with him at all times. It is also called “carbcleaner”.
To clean the carb, it is enough to remove the VF cover, spray the product on the unit, after which the rotation of the motor unit should return to normal. However, such a solution only produces results. But you can try to clean the carburetor channel this way first.
In addition to the can, you also need to prepare a set of keys for removing the VF cover and the solenoid valve inside the device (on some cars this is mandatory).
Instructions for use of aerosol cleaner
A special substance is placed in a metal can weighing 400 g. The cleaning aerosol is under pressure. The kit includes a dispenser and a nozzle in the form of a tube for penetration into hard-to-reach places.
When spraying the spray on the surface of all carburetor parts, fire safety precautions must be observed. The product should not be used in rooms with poor ventilation or near open fire. When carrying out work, it is necessary to protect your eyes and hands and avoid contact of caustic substances with mucous membranes or skin.
Why do this
The serviceability of this element of the fuel system significantly affects the quality of engine operation. Significant pollution causes excessive fuel consumption, negatively affects the dynamic properties of the car and has a negative impact on the environment. A regular cleaning procedure can almost completely restore its functionality. After all, even small specks that get into the jets can create significant problems.
Indirect signs will help identify the need for cleaning without disassembly. These include a clear decrease in dynamics and interruptions in fuel supply. You also need to pay attention to the spark plugs. If they are covered with a large layer of black soot or soot, as well as if they are clearly white, then you should think about how to clean the carburetor. The normal color for candles is a slight brownish tint.
Using a compressed air cylinder
How to adjust the carburetor?
The unit is adjusted to save fuel and maintain maximum engine power. To do this you need:
- adjust the suction so that the damper closes and opens completely;
- set the correct gaps between the edges of the air and throttle valves and the walls of the chamber;
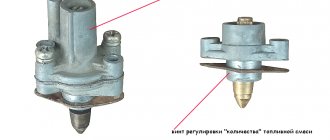
- adjust the mixture quality and quantity screw;
- set the float position.
The settings depend on the type and type of carburetor. Before you start setting up, you need to study the instructions for this model.
Is it possible to wash it at home without special products?
If you do not have the opportunity to use special products to flush the carburetor, you can do it without them. To do this, simply soak the necessary parts in kerosene (gasoline, acetone) overnight, and in the morning start cleaning and blowing them. With the right approach, the effect will be no worse. But under no circumstances follow the advice of “experts” who recommend pouring a little acetone into the tank or carburetor to clean the fuel system! Yes, acetone perfectly dissolves and removes dirt, carbon deposits, paint residues and even water. But it also dissolves seals, gaskets, and valves made of plastic and rubber!
As you can see, cleaning the carburetor with your own hands is not at all difficult. The main thing is to have a good cleaning product, the necessary tools and a few hours of free time. And to prevent this process from becoming a habit, fill only high-quality fuel into the tank of your car.
Source
Washing with partial disassembly
Let's consider the process of flushing a carburetor with its partial disassembly using the example of a Solex carburetor and Jet 100 Ultra. You don't need to buy a lot of it. One 200 ml can will be enough. The cost of this product is 450–500 rubles. In addition to the special liquid, you will also need:
- set of wrenches;
- Phillips and slotted screwdrivers;
- pliers;
- a container with a wide “neck” with a volume of 2–3 liters (for soaking the carburetor lid);
- a container with a wide “neck” with a volume of 0.2–0.5 l (for soaking small parts);
- kerosene (refined gasoline, acetone);
- tire pump or compressor with a tapering tip;
- toothpicks;
- old toothbrush;
- a clean, dry, lint-free cloth (preferably rough);
- a small wooden spatula (like an ice cream stick).
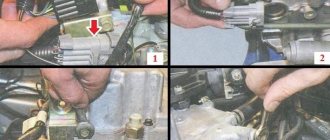
- Open the hood. Remove the air filter cover by unscrewing the nut with a 10mm wrench and opening the 4 spring latches.
To remove the cover you need to unscrew the nut and press the latches
Removing the air filter housing
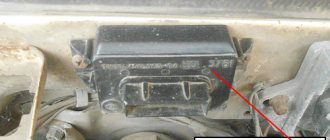
The power wire is connected to the solenoid valve
To remove the cover, you need to unscrew five screws
The cover must be carefully removed so as not to damage the gasket.
The valve is unscrewed with a 13 key
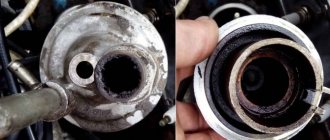
The fuel filter is located under the plug
The jets are unscrewed with a slotted screwdriver. Below them are emulsion tubes