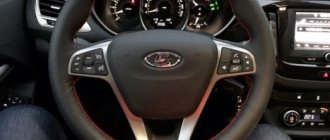
The multi-steering wheel on the Lada Vesta car ensures comfortable movement in the car. In addition, the steering wheel is an element of the interior, a lever for controlling the behavior of the car and additional options. The Lada Vesta multifunctional steering wheel, also known as the multifunction steering wheel, is present in the top-end and luxury configurations of the Lada Vesta. In other variations, its capabilities do not go beyond the standard. Finishing materials are not of high quality. But it can be connected using a special adapter for the multifunction steering wheel.
Steering wheel size: diameter 37-39 cm.
Installing a multifunction steering wheel on a Lada Vesta car is possible, even if it is not included in the factory equipment. This function allows you to put buttons on the steering wheel, increasing the level of safety while driving, since climate control and the operating mode of the multimedia system are adjusted using the keys on the steering wheel. You can change the covering materials (braid, leather trim, trim - also known as a cover) yourself if you know the size and diameter of the Lada Vesta steering wheel. You can also do heating. The heated steering wheel function on the Lada Vesta is especially pleasant on frosty days in winter. After reconstruction, you will get a multifunctional unit. Read the article to the end and master all these repair skills!
Connecting cruise control keys
To connect the cruise control keys, follow the procedure.
Subsequence
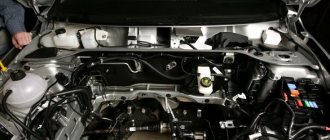
Route three wires to the computer through the window above the pedals (the source is located in the engine compartment) and connect to the block. Study the diagram according to which the wires for the buttons are led from the electronic unit. The snail with wires for the buttons has blocks from which the wires should lead to the corresponding blocks on the electronic unit.
Correspondence
| Block on the snail | Block on the electronic unit |
| 6 | c3 |
| 9 | s2 |
| 2 | e3 |
Using the installed keys, you can turn cruise control on and off, or turn it off for a certain time interval.
Connecting buttons to the radio
Connecting the buttons on the steering wheel begins with completing the wired cruise control system with the radio wiring. Connect the wiring to the multimedia device into the blue connector. To avoid mistakes, study the wiring diagrams.
If a new radio was installed during operation, you will need an adapter for the specific type of audio system.
After connecting, test the functionality of the new functions. As a result of a correctly completed connection, the keys will highlight and select the operating modes of the radio:
— sound adjustment;
- switching music files;
— selection of menu items;
— selection of file storage media;
- Instant volume mute.
Cost of steering wheel with buttons
The price for the model with buttons depends on the store. Most Lada Vesta car owners purchase products with keys in virtual stores. The order is placed for article number 8450006832. The cost ranges from 5000 to 7000. If the vehicle owner needs an airbag, the price increases by another 1000-15000. For leather covering you will have to pay another 2000-2500 rubles.
To save money, you can use an overlay with keys on a standard steering wheel. This option is more difficult to connect and difficult to find, since it is not popular.
Where can I buy?
It is usually easiest to purchase such products online. The reason is that at the car market or in a simple store there may not be a steering wheel cover specifically for the Lada X-Ray or Vesta. Some people order goods through Aliexpress, since the products there are cheaper. And if delivery time is not critical for you, you can use this platform. However, if you want to receive the braid faster, it is better to place an order in a Russian online store.
The table below shows the most popular resources where you can place an order, as well as their prices:
Instructions for luxury equipment, which has gray wires
Sequencing:
- There are holes on both sides of the Lada Vesta steering wheel. Insert the rods into them and press.
- The base of the airbag rises. You need to carefully remove it.
- Carefully separate the wires.
- Unscrew the central locking screw and pull the control wheel towards you without any effort. The wires should exit through the hub opening.
- If it is necessary to install the steering wheel, carry out all the steps in reverse order.
The steering wheel in the car is locked tightly. Therefore, when removing it, do not make any effort, gently swing it.
If you connect the gray wires to the steering connector, you can access the cruise control controls. To control the multimedia system, you need to connect five wires to the block using bls terminals. On the reverse side of the bundle of wires, a mini ISO connector is installed, which connects to the audio system.
Test the correct connection. All keys must function as intended. If the backlighting of the cruise control keys does not function, then a flashing is required. After checking, the airbag is installed.
Instructions for other configurations of Lada Vesta where there are no gray wires
This connection option is more complicated, since the connection to control the multimedia device is carried out independently. You will need a bundle of three wires and an additional block for the cochlea. Dismantle the old model and replace it with a new one. Wires are pulled from the audio system and connected to the steering connector. A pre-prepared bundle of three wires is supplied from the electronic control unit to the audio system. Together with the multimedia wires, it is connected to the steering block.
How to remove the steering wheel
It's not difficult to remove. It is enough to study the sequence of events and strictly follow them. The main condition is that the ignition is turned off.
Sequence of actions for removing the old steering wheel
- We insert metal rods into the holes on the sides of the steering wheel and press on them;
- The base of the pillow rises, which makes it possible to carefully remove it;
- After removing the cushion, it is possible to unscrew the central fixing screw using an extension and a bit. The wheelbase is in a straight position;
- After removing the bolt, pull it towards you without any effort;
- Lead the steering wiring through the central hole;
- Remove the fuse (red on the right side) and install it in the center of the circulation device.
The new Lada Vesta multifunction steering wheel is installed in the reverse order.
Stages of self-installation of the steering wheel
Required tools:
- ratchet;
- extension;
- Torx head T50;
- two-fingered puller;
- rags, gloves;
- additional lighting as needed;
- torque wrench.
Algorithm of actions for withdrawal:
- We place the car on a flat platform, provide safety measures, fix the rear wheels, and squeeze the parking brake.
- Open the hood.
- Remove both terminals from the battery.
- Open the driver's door.
- We set the steering wheel to the position of linear movement of the technical device.
- We move the metal latches on the steering wheel.
- We remove the airbag module.
- Disconnect the connectors with wires from the airbag and the transport fuse.
- Unscrew the steering wheel retaining bolt.
- We remove the steering wheel from the splines.
Then we carry out preventive maintenance and replacement as necessary. We install the steering wheel (hereinafter referred to as the steering wheel) again. Tightening torque 3.8-5.0 kgf/m (38-50 Nm) with a torque wrench.
Note to the driver! After removing the steering wheel, do not violate the angle of rotation of the wheels or rotate the column shaft. With such actions, you run the risk of disrupting the wheel alignment angle; another diagnostic will be required at a stand at a service station.
Braid
The steering wheel is covered with high quality leather. A leather version of the Lada Vesta steering wheel is installed on luxury and top-end trim levels of the car. This finish looks very elegant, sophisticated, and increases the operating comfort of the steering wheel. In the economical configuration, the steering wheel pad is made of more modest materials. Vesta owners are improving the finishing quality of the control wheel. You can purchase and change the braid yourself. In addition to the finishing itself, the kit contains everything you need for replacement: threads, glue, knife, leather trim, plastic clamps for fixing, instructions. The cover for the Lada Vesta multi steering wheel is selected by color and depends on the interior trim.
Peculiarities
- a reliable grip on the steering wheel, which helps the driver to have a keen sense of the road;
- innovative design;
- high quality of materials used in production (used by the world's leading automotive brands);
- high quality workmanship by craftsmen of the highest category.
Lada Vesta steering wheel reupholstery
Many owners of basic cars do the reupholstery of the Lada Vesta steering wheel with their own hands. The leather version looks solid.
To install a braid made of high-quality, expensive material, you will first need to remove the steering wheel.
See the sequence of actions above.
- If control keys are present, remove them.
- The braid is applied so that the seams match each other exactly.
- Along with the braid, the set contains clamps. They fix the position of the braid. Mark the position of the recesses.
- Using the knife included in the kit, easily make indentations on the surface. The recess size is 3-4 mm. Same depth. Several such slits are required to remove all the edges of the braid.
- Check the alignment of the joints again.
- Apply the adhesive composition to the back surface of the steering spokes, and in the same area on the inner surface of the leather braid.
- After 5-10 minutes we glue the surfaces. Using the same method, we connect all parts of the leather braid.
- Take a piece of thread from the kit no longer than 80 cm. Wind the thread into the groove of the seam. Thread will be needed to fasten the lower steering parts.
- Then a piece of thread 1-1.3 m long is required. It is needed to sew together the most voluminous section - the upper part from one iron rod to another.
- Use a needle to thread the thread through the holes, removing it to the front surface.
- Burn the ends of the thread with fire.
- Hold the ends of the braid with your hands and adjust the tension with a thread.
- Use a small screwdriver or knitting needle to secure the thread in each stitch of the selected stitch.
- Having stitched to the edge of the second metal rod, secure the thread in the same way.
- When the entire braid is stitched, tuck the edges of the material into the prepared holes.
Do-it-yourself reupholstery is not a complicated, but labor-intensive process that cannot be rushed and requires care.
Reviews
| № | Positive |
| 1. | Dmitry Vasilyevich , 43 years old (drive2.ru): Lada Vesta has basic equipment, steering wheel without functional buttons. I’m used to it, I’m not going to change it, and it’s expensive when buying a new original one. |
| 2. | Sasha , 48 years old (prom.ua): in the third year of operation of the car, I decided to replace the RK. I bought the original one with the factory part number, the price is 5600 rubles without the airbag module. |
| 3. | Ivan , 39 years old (autotoday.com): bought a plastic cover with buttons for 2,500 rubles. Although not original, it fit perfectly. I connected it myself, I didn’t contact the service. |
| 4. | Gennady Mikhailovich , 45 years old (rozetka.ua): on the advice of his comrades, he installed an overlay on the RK with buttons. I ordered the service at a service station. Satisfied with the quality of work, functionality, affordable price. |
| 5. | Nikolai Petrovich , 43 years old, (avtoflit.com): I bought the car second-hand, got it from the previous owner in good technical condition. The standard steering wheel has a plastic cover with buttons for adjusting speed and radio volume. |
| 6. | Semyon Vasilievich , 46 years old, (autotoday.com): I am satisfied with the quality and functionality of the remote control with buttons, it was not in vain that I paid over 6,000 rubles. I installed it myself, I didn’t go to a workshop. |
| 7. | Gennady Vasilyevich , 43 years old, (drive2.ru): two years after buying the car, he replaced the standard steering wheel with a new one with mechanical buttons. Now I’m less distracted by activating modes, switching, and watching the road situation more. |
| Negative | |
| 8. | Sergey Nikiforovich , 50 years old (prom.ua): installing a plastic cover on the steering wheel was not successful for me. The speed increase button in cruise control mode is inactive. I will contact the service station for diagnostics. Garage mates suggested that there was a defect in the mechanical key. |
| 9. | Georgy Semenovich , 47 years old, (avtoflit.com): I do not recommend buying plastic steering wheel covers for the Lada Vesta. It's better to pay more and buy a factory part. |
| 10. | Zhorik , 34 years old, (drive2.ru): twice contacted auto electricians at service stations to diagnose mechanical keys on the overlay. There are always some problems with non-original accessories. |
| 11. | Vasilyevich , 49 years old, (autotoday.com): The plastic cover served me for two years, after which the mechanical buttons began to fall out. The quality is very, very primitive. |
Related link:
Wheels for Lada Vesta Cross – types and prices
How to make a heated steering wheel on a Lada Vesta
The need for a heated steering wheel function is especially felt in cold winter weather. The warm surface will warm your hands, which is very pleasant in the cold. To make the steering wheel heated, follow the procedure:
- Remove the steering wheel;
- Use wire as a heating element. You can use copper, chrome. Diameter 0.3-0.4 mm;
- Make a bundle of 4 pieces of wire;
- Make two entrance holes;
- Wrap the wire around the surface of the control wheel (you can only wrap it on its upper part - this will heat up faster and more efficiently);
- Make small slits on the back surface so that the wire threads cut into them and subsequently do not move or unwind;
- Connect the wire harness to the power supply (you can use a sound signal - it is suitable for power);
- Select the heating on/off button;
- Install it on the side from which it is more convenient to press;
- Fold the wiring, install the airbag, install the steering wheel;
- Test the installed function. Normally, after 1.5-3 minutes the surface will not be cold; after another 1.5-2 minutes it will be noticeably warm.