Remember, like on sevens and shochs, before refueling you unscrew the tank, but the cap does not unscrew. Having strained myself, I went and heard such a loud hissing, as if you were opening a bottle of beer, not just a bottle, but a keg. To prevent such hissing, an adsorber valve was invented. 10 and Priora have this system.
But it’s not just a matter of hissing; it turns out that with this hissing, harmful fumes burst out, polluting the environment. The price is too expensive for today's ecology. And more importantly, the solenoid valve for purge the canister on a Priora car saves gasoline.
After turning off the car, the system begins to work, it drives vapors through the filter and returns fuel to the tank.
The adsorber itself on the Priora consists of a carbon filter - that is, there is carbon inside. The entire system consists of 11 spare parts. The adsorber for Priora is not expensive in itself, its price starts from 800 rubles. But the whole system costs from 5,450 rubles. Replacing a valve or adsorber on a Stoda will cost from 1000 rubles. Some drivers don't see the point in this system and simply remove it. Apparently the consumption is higher, or the Priora doesn’t go with it, it just knocks, and there’s 0 usefulness from it. They simply remove the adsorber valve, and instead put a fine filter, all gases naturally escape into the atmosphere. In fact, the working system does not affect traction in any way. The Priora drove its 11 seconds and continues to do so.
In rare cases, immediately after starting the engine, the car owner may be disturbed by a malfunction of the adsorber valve. This can be confused even with more serious breakdowns that relate to the incorrect operation of the internal parts of the Priora car engine - for example, it makes a clicking noise, which, unknowingly, can be confused with hydraulic compensators. In this article we have collected signs and malfunctions of the system, so read to the end.
The built-in purge valve for the Priora adsorber is, one might say, a necessity. It is precisely because of the presence of this part that the car meets European environmental safety standards. It runs much cleaner than older cars, and the valve itself allows you to save precious drops of gasoline to release them into the combustion chamber.
Is it worth turning off the adsorber, pros and cons, possible consequences
Before turning off the adsorber in a car, it is important to understand how much this will affect the performance of the vehicle, including environmental ones, as well as driving safety.
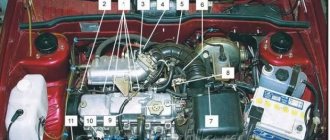
In the article we will analyze the purpose and operating principle of the adsorber, where it is established, when it needs to be changed and whether it is possible to turn it off and drive without the device, how to properly remove it on a VAZ 2110, 2112, 2114, Lada Priora, Grant, Largus, Gazelle and whether it is necessary to flash the ECU after shutdown devices.
What is the correct name for an adsorber or absorber?
Both concepts exist in the world. But despite the fact that from the Latin “sorbeo” and “absorbeo” are translated almost identically: adsorber - (from Latin ad - on, with and sorbeo - absorb), and absorber - (from Latin absorbeo - absorb), the semantic load both words convey different meanings.
- In our case, we are talking specifically about an adsorber, since this is a device that, with its solid surface, absorbs gaseous or soluble substances without undergoing chemical reactions. There are periodic and continuous devices.
- And an absorber is a device that completely absorbs gases (vapors) inside, followed by a chemical reaction, as a result of which one of the substances is completely absorbed by a special liquid (absorber).
Therefore, for our situation, the first option will be correct.
Purpose and principle of operation
Adsorber - is a container filled with activated carbon, which acts as a filter element. This element is the main part of EVAP - Evaporative Emission Control (gasoline vapor recovery system).
The system has been integrated into the fuel system of cars with Euro-2 standards and higher. Those. you won’t see an adsorber on a VAZ classic or even a 2108 model, not to mention Moskvich, Volga 3110, etc.
The goal is to reduce harmful emissions into the atmosphere and eliminate gasoline odors in the car interior.
But despite the simplicity of the design, in addition to the housing and the filter element, the adsorber consists of:
- Branch pipes: air supply, vacuum, gasoline vapor removal.
- Separator - here the vapors are condensed and drained back into the tank.
- Gravity (emergency) valve – blocks the overflow of fuel when the machine overturns.
- The solenoid valve (or vacuum valve - for example, found on some Nissan models) is one of the important elements (details below).
- Other additional devices (depending on the car model).
Fuel vapors accumulating in the gas tank must go somewhere. In old cars they escaped into the atmosphere through a special tube. In modern vehicles, fuel tanks are isolated from the external environment.
Gasoline vapor, through a separate outlet pipe, enters the adsorber and condenses there in the form of fuel, which is returned back to the tank or to the intake manifold. In the first case, the process occurs with the engine turned off, in the second - with the engine running.
As soon as the car starts, the ECU sends a signal to the solenoid valve. The latter opens and the activated carbon (sorbent) is purged. Fuel vapors are “extracted” from the sorbent and immediately enter a special receiver and then into the combustion chamber.
To find out more about what an adsorber is, follow the link.
What are the dangers of a faulty valve?
Incorrect operation of the adsorber and its entire system will sooner or later lead to the fact that the fuel tank will no longer be ventilated with proper regularity. Next, a vacuum occurs, after which deformation and damage to the pump usually occurs.
When there is no ventilation of the device in question on the Lada Priora, gasoline begins to accumulate in the intake manifold. This will lead to engine malfunctions. The spark plugs become clogged, the catalyst and a device such as a lambda probe fail.
Where is it installed?
As a rule, the adsorber is installed under the hood on the right in the direction of travel of the car, for example, in the VAZ 2110 it is in the form of a barrel.
In other cars, it can be square and installed to the left of the engine (in the direction of travel), under the air duct (Lada Granta), the vacuum brake booster (some Nissan models) or in the radiator area. For VAZ 2114 it is located near the battery and air filter.
On the Volkswagen Passat B3, the adsorber is located under the air filter on the right side in the direction of travel.
Other vehicles - see your model's owner's manual.
Why do they refuse the adsorber?
Despite the advantages of this design solution, and these are: fuel economy, absence of odor in the cabin, reduction of harmful emissions into the atmosphere (although many do not care about this), the adsorber has a number of significant drawbacks, due to which many seek to disable it or completely remove it.
Disadvantages, they are also signs of malfunction:
- Expensiveness of the product (not for all cars). Replace or remove? More often, preference is given to the second option. For example, on an Acura MDX the price of the product varies within 10,000 rubles. For VAZ – from 800 rubles.
- A malfunction of the device leads to interruptions in the operation of the unit: the engine does not pull (poor acceleration of the car, stalls when driving uphill, transporting goods, floating idle speed on a warm engine, if the tank is plastic, then with a clogged adsorber, constantly compressing and unclenching (in the absence of a bypass valve in the lid), it may eventually burst due to the pressure of gasoline vapors; if it is metal, then it will become deformed. One of the characteristic signs of a malfunctioning adsorber is a hissing sound when the fuel tank lid is opened, caused by the movement of air into the tank (not out) and the appearance of the smell of gasoline in the cabin, incorrect fuel level.The appearance of error p0443 (the cause of the error is a clogged or faulty solenoid valve).
We identify the causes of malfunctions on the Priora adsorber
On the Lada Priora we are considering, a valve failure is indicated by low engine thrust, and dips appear at idle. Also, while the engine is running, you will not hear the characteristic sound of the valve operating. There are other signs of device malfunction. A hissing sound may occur when opening the fuel tank cap. If the car owner notices a hissing sound, it means that the tank is under vacuum, which indicates that there is a malfunction in the ventilation system. The sensor will need to be replaced.
How to disable or remove the adsorber on a car and do you need to reflash the ECU?
You need to understand that when the adsorber is removed, the solenoid valve is turned off, which is directly connected to the controller and controlled by the latter.
This will lead to error p0443, which we already mentioned above. The tubes are also silenced, in particular the one that goes to the intake manifold.
What is the disadvantage of such a shutdown?
The fact is that through the tube that goes to the intake manifold, air is constantly sucked in; even in idle mode, the so-called small purge of the adsorber occurs. At high speeds from 1500 – 2000 and above there is a lot of purging.
In the ECU firmware, constant air leaks and the flow of fuel vapor are taken into account when forming the air-fuel mixture, despite the fact that all this goes past the mass air flow sensor, the causes of the malfunction of which can be found out by clicking on the link.
If you plug the pipe, which many people do, a certain amount of air will not flow into the intake manifold bypassing the ECU, but the latter still takes them into account.
That is, the controller takes into account one volume of air, but another (smaller) one actually enters. As a result, the amount of fuel is generated by the ECU based on more air than is supplied. This leads to an over-enrichment of the air-fuel mixture.
As a result, the engine does not work correctly, because the mixture is constantly over-enriched where it is and is not needed, and fuel consumption increases.
It is also worth talking about the transient mode of operation of the engine, which can manifest itself when approaching an intersection, a traffic light, lying to a policeman, at the moment when the gas is released.
At this moment, a failure may occur - a decrease in speed below idle. The engine seems to choke, it doesn’t have enough air, the reason is an over-enriched mixture. After a few seconds, the situation is resolved electronically.
Therefore, it would be correct to disable the adsorber in the following ways:
- After removing the device, install a nozzle with a diameter of 1 mm into the tube that goes directly past the mass air flow sensor. This will, at least partially, solve the problem, since only air without gasoline vapors will be supplied in doses.
- The ECU is being reflashed (difficult). If it is impossible to remove the Check error, you may need engine chip tuning, which is expensive.
- Dismantling the entire system except the solenoid valve, which operates idle.
- By installing a resistor (valve emulation) in the electrical circuit at 200 - 250 Ohms and 2 watts. To do this, bend the legs of the resistor and insert them into the valve chip. We secure everything with electrical tape. But this doesn't always help.
How to disable the adsorber on a VAZ 2110, 2112, 2114
Taking into account the recommendations above, we do the following:
- Disconnect the power connector from the valve.
- Disconnect all pipes from the adsorber and remove the latter along with the mount.
- We fix the valve in a place where the plug with wires and pipes will reach.
- Connect a hose with a fuel filter to the lower fitting (see photo below).
- To the upper end fitting we connect the pipe going to the intake manifold.
- We put another filter on the pipe going into the tank, similar to the first one.
With this scheme, when the valve opens, clean air enters the system, albeit without gasoline vapors.
We exclude the valve
This method is even simpler. We dismantle everything, including the valve. We put a fuel filter on the pipe coming from the gas tank, and we plug the pipe going to the intake manifold with a bolt and clamp.
The consequences of this method are described above, but this method also has the right to life.
As for Priora, Granta, Lada Largus, Gazelle and other cars, the absorber is turned off in similar ways as described above.
Toyota Chaser
It is worth considering one of the foreign cars, for example, the Toyota Chaser.
The shutdown principle is similar to the previous ones:
- Locate the canister valve. It is located near the mass air flow sensor on the air filter housing.
- Disconnect the chip with wires and all pipes from it (Check may light up on the instrument panel).
- Find the adsorber, disconnect the pipes from it and plug it.
- Disconnect the pipe going to the valve from the throttle assembly and plug it with a bolt and clamp.
- Place a fuel filter from a carburetor VAZ on the pipe going to the tank.
Checking the canister purge valve
1. Disconnect the block with wires and visually check the condition of the contacts. If oxides are detected on them, we treat the terminals with a means for cleaning and protecting electrical contacts.
2. Remove the adsorber valve. We measure the resistance of the valve winding with a multimeter, which should be within 20-30 Ohms. The canister valve should be replaced if a short circuit or break is detected in the valve winding.
3. To avoid short circuit, one terminal of the valve should be insulated with PVC pipe. We supply 12 V from the battery to the valve terminals. At this moment, the valve terminals should open with a characteristic click. We repeat the test, creating a vacuum in the valve with a rubber bulb.
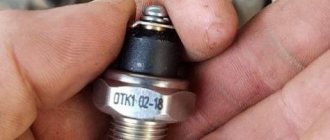
Life hack: Priora car adsorber valve - check, replacement, price
Remember, like on sevens and shochs, before refueling you unscrew the tank, but the cap does not unscrew. Having strained myself, I went and heard such a loud hissing, as if you were opening a bottle of beer, not just a bottle, but a keg. To prevent such hissing, an adsorber valve was invented. 10 and Priora have this system.
But it’s not just a matter of hissing; it turns out that with this hissing, harmful fumes burst out, polluting the environment. The price is too expensive for today's ecology. And more importantly, the solenoid valve for purge the canister on a Priora car saves gasoline.
After turning off the car, the system begins to work, it drives vapors through the filter and returns fuel to the tank.
The adsorber itself on the Priora consists of a carbon filter - that is, there is carbon inside. The entire system consists of 11 spare parts. The adsorber for Priora is not expensive in itself, its price starts from 800 rubles. But the whole system costs from 5,450 rubles. Replacing a valve or adsorber on a Stoda will cost from 1000 rubles. Some drivers don't see the point in this system and simply remove it. Apparently the consumption is higher, or the Priora doesn’t go with it, it just knocks, and there’s 0 usefulness from it. They simply remove the adsorber valve, and instead put a fine filter, all gases naturally escape into the atmosphere. In fact, the working system does not affect traction in any way. The Priora drove its 11 seconds and continues to do so.
In rare cases, immediately after starting the engine, the car owner may be disturbed by a malfunction of the adsorber valve. This can be confused even with more serious breakdowns that relate to the incorrect operation of the internal parts of the Priora car engine - for example, it makes a clicking noise, which, unknowingly, can be confused with hydraulic compensators. In this article we have collected signs and malfunctions of the system, so read to the end.
The built-in purge valve for the Priora adsorber is, one might say, a necessity. It is precisely because of the presence of this part that the car meets European environmental safety standards. It runs much cleaner than older cars, and the valve itself allows you to save precious drops of gasoline to release them into the combustion chamber.
The principle of operation of the adsorber on Priora
The breather is a container filled with activated carbon. Two hoses extend from it - outlet and inlet, and it itself is part of the engine power system. It operates like any storage tank: when gasoline vapors rise through the tubes from the gas tank, some of them manage to turn into liquid and flow down to the gas tank.
The second part of the vapor enters the inlet tube of the absorber and remains inside the container. They condense because activated carbon acts as a catalyst for the operation. The process occurs with the engine turned off - while the power system is at rest. After this, the fuel will be used by the engine.
The absorber valve, which operates on the principle of electromagnetic induction, is responsible for the release of fuel in the Lada Priora. The causes of malfunctions can be eliminated by simply replacing the Priora adsorber purge solenoid valve. A special absorber sensor is responsible for its movements. Like any other part that performs similar functions, it is critical to maintaining the functionality of the automotive system.
The ECU independently controls many of the processes taking place under the hood. Among his responsibilities is the preparation of the fuel-air mixture with the correct proportion. This means that the ECU must correctly use the available resources (fuel) by connecting the breather to work.
How is the valve checked?
To carry out this procedure you need:
- Disconnect the block with wires, and then visually check the condition of the contacts. If you find oxides, immediately treat the contact terminals with special cleaning agents.
- Then remove the valve and measure the resistance of its winding with a multimeter; it should be between 20 and 30 ohms. If a short circuit or winding break occurs, replace the part.
- Insulating one of the valve outlets with a PVC tube will help to avoid a short circuit. Apply 12 V from the battery to the contact terminals; their opening should be accompanied by a click. Then the test will need to be repeated by creating a vacuum in the valve using a rubber bulb.
Standard adsorber for Priora - article number, device, price and location
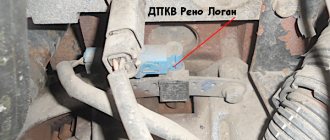
The breather of the Priora car absorber is located on the top left relative to the engine cover. Replacing the absorber valve is not difficult, given that the instructions and steps are simple. Finding it is quite easy: the breather hose goes to the throttle to direct fuel in the desired direction.
Gasoline consumption will depend on the quality of its operation - the efficiency of the power system will decrease, since part of the engine vapor will be released into the atmosphere, as was the case in old cars. The VAZ-2170 catalog implies the presence of the following components in the “Gasoline Vapor Recovery System”:
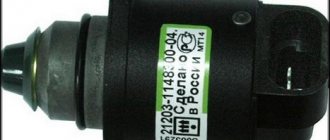
- Breather (adsorber valve) - 2170-01164042-00, price - about 800 rubles.
- Hose 115 cm long - 2170-01164087-20, price - about 500 rubles.
- Hose 70 cm long - 2108-31164103-10, cost - 350 rubles.
- Hose 90 cm long - 2110-31164109-12, cost - 400 rubles.
- Hose 25 cm long - 2110-31164105-12, cost - 150 rubles.
- Steam removal tube – 2170-01164084-01 – 150 rub.
- Front steam exhaust pipe – 2170-01164244-01 – 200 rub.
- Tube – 2170-01164282-00 – 300 rub.
- Adsorber – 2170-01164010-00 – 800 rub.
- Separator – 2170-01164005-01 – 1500 rub.
- Middle steam outlet tube - 2170-01164248-00 - 300 rubles.
Replacing the canister purge valve
To carry it out, you will need to sequentially perform the following steps:
- first, the latch's stupor moves upward;
- by pressing the latch, disconnect the block with wires from the valve;
- to disconnect the tube connecting the valve to the inlet pipeline, press the spring clips;
- the tube connecting the adsorber to the valve pipe is disconnected in the same way;
- The process will be completed by removing the valve itself from the bracket.
What can break - malfunctions
Symptoms of a system malfunction are often associated with two parts - a purge limiter, or an adsorber sensor (price from 350 rubles).
On a Priora car, signs of a system malfunction may be as follows: While the engine is idling, the speed fluctuates. The ECU must supply the correct amount of fuel to the injector to make its operation stable. Due to a lack of data (the sensor does not work), the ECU “goes astray”.
Fuel consumption has increased. In VAZ-2170 cars there may be several reasons for increased fuel consumption. The same bad gasoline familiar to all drivers creates a real troubleshooting puzzle. Therefore, the gasoline vapor recovery system may not be related to the breakdown - pay attention to other signs of malfunction.
The check light came on
- The engine, warmed up to normal temperature, does not start the first time. This means that the "exhaust" cannot open to allow fuel to flow to the throttle, and the engine does not receive gasoline to make the first cycle.
- Engine thrust has decreased. Acceleration has become very “heavy”, and the car seems to strain when the driver presses the gas pedal harder, increasing the speed.
- The breather of the Lada Priora absorber is knocking. An unpleasant clattering sound is due to the fact that the part is simply worn out.
The VAZ-2170 car is characterized by the following breakdowns related to the gasoline vapor recovery system:
- the winding is frayed or shorted;
- wiring damage;
- mechanical damage to the valve;
- sensor malfunction.
Signs of a sensor malfunction are:
- floating idle speed;
- unstable engine operation, loss of traction;
- poor acceleration (the engine cannot take “spare” gasoline from the absorber of gaseous substances.
Specific errors must be looked at using the diagnostic connector - this way the diagnostic information will be much more accurate.
Replacement of components of the fuel vapor recovery system of a VAZ 2170 Priora
- Repair manuals
- Repair manual for VAZ 2170 (Priora) 2004+.
- Replacement of fuel vapor recovery system components
The components of the fuel vapor recovery system (canister, fuel vapor separator, canister purge valve, gravity valve) are removed for inspection or replacement when a persistent smell of gasoline appears due to leaks in the components and pipelines, as well as failure of the canister purge valve.
In addition, leakage of the adsorber and failure of the purge valve can cause unstable engine idling until it stops. You will need: a 10" wrench, a flat-blade screwdriver.
| Note Before removing the evaporative emission system components, disconnect the wire from the negative terminal of the battery. |
Fuel vapor separator
installed in the left rear wheel well.
1. Place the vehicle on a lift or inspection pit.
2. Remove the left rear wheel (see “Replacing a wheel” ).
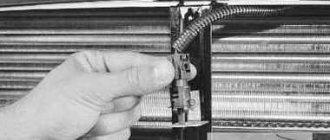
| 3. To remove the separator, squeeze the quick release connector... | 4. ...and remove the fuel drain pipe from the gas tank fitting. |
| 5. Use a screwdriver to pry off the holder of the fuel drain pipe... | 6. ...and release the holder along with the tube. |
| 7. Unscrew the nut securing the steam pipe holder from the separator to the adsorber. | 8. Open the steam pipes by squeezing the quick connector latch. |
| 9. Unscrew the four nuts securing the holders of the steam outlet tube and the fuel drain tube. | 10. Unscrew the two nuts securing the separator bracket to the body... |
11. ...and remove the separator assembly with bracket, pipes and gravity valve.
| Note This is what the assembled separator looks like. To replace, purchase exactly the same one along with tubes and a gravity valve, since the tubes are not removable. |
12. Install the fuel vapor separator in the reverse order of removal.
Adsorber
The fuel vapor recovery system is installed in the engine compartment on the radiator trim on the right. Due to the specific layout of the car, access to its mount directly on the car is quite simple.
| 1. To remove the adsorber, squeeze the fastener of the quick-release connector... | 2. ...and remove the fuel vapor supply pipe to the purge valve. Similarly, disconnect the fuel vapor intake pipe from the separator. |
| 3. Remove the two adsorber mounting bolts... | 4. ...and remove the adsorber. |
| Note This is what the adsorber looks like. Buy exactly the same one to replace it. |
5. Install the adsorber in the reverse order of removal.
Canister purge valve
installed in the engine compartment on the decorative engine cover.
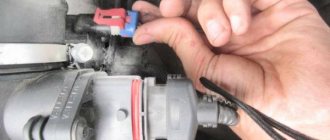
| 1. To remove the valve, press the lock... | 2. ...and disconnect the wiring harness block from the valve. |
| 3. Press out the spring clip... | 4. ...remove the clamp... |
| 5. ...and remove the valve from its mounting bracket. | 6. Loosen the clamp securing the fuel vapor supply hose from the adsorber... |
| 7. ...and disconnect the hose from the purge valve fitting. | 8. Loosen the clamp securing the fuel vapor supply hose to the throttle body... |
9. ...and disconnect the hose from the valve fitting.
| Note This is what the adsorber purge valve looks like. Buy exactly the same one to replace it. |
10. Install the canister purge valve in the reverse order of removal.
↓ Comments ↓
1. Car structure
1.0 Car structure 1.1 General information about the car 1.2 Passport data 1.3 Car keys 1.4. Controls 1.5. Heating and ventilation of the cabin 1.6 Ensuring a comfortable air temperature in the cabin 1.7. Doors 1.8. Passive safety equipment on the car 1.9. Seats
2. Recommendations for use
2.0 Recommendations for use 2.1. Safety rules and recommendations 2.2 Running in the car 2.3 Operating the car during the warranty period 2.4. Preparing the car for departure
3. Problems along the way
3.0 Malfunctions along the way 3.1. The engine does not start 3.2 Malfunctions of the fuel injection system 3.3 Idle speed has disappeared 3.4. Interruptions in the operation of the 3.5 engine. The car moves jerkily 3.6 The car accelerates poorly 3.7 The engine stalled while driving 3.8. Oil pressure dropped to 3.9. Engine overheating 3.10. The battery does not recharge 3.13. Knocks in the engine 3.16. Wheel puncture
4. Maintenance
4.0 Maintenance 4.1. General provisions 4.2. Inspection work 4.3. Lubrication and filling works 4.4. Diagnostic work 4.5. Repair and adjustment work
5. Engine
5.0 Engine 5.1 Design features 5.2 Possible engine malfunctions, their causes and solutions 5.3 Useful tips 5.4 Checking compression in the cylinders 5.5 Removing and installing the decorative engine casing 5.6 Removing and installing the engine splash guard 5.7 Installing the piston of the first cylinder to the TDC position of the compression stroke 5.8 Replacing the drive belt gas distribution mechanism and tension roller 5.9 Replacing the power unit supports 5.11. Replacing engine seals 5.13. Engine cylinder head 5.15. Engine repair 5.16. Lubrication system 5.17. Cooling system 5.18. Power supply system 5.19. Design Features
6. Transmission
6.0 Transmission 6.1. Clutch 6.2. Gearbox 6.3. Front wheel drives
7. Chassis
7.0 Chassis 7.1. Front suspension 7.2. Rear suspension
8. Steering
8.0 Steering 8.1 Design features 8.2 Possible steering malfunctions, their causes and solutions 8.3. Steering column 8.4. Steering linkage 8.5. Steering gear
9. Brake system
9.0 Brake system 9.1 Design features 9.2 Possible malfunctions of the brake system, their causes and solutions 9.3 Bleeding the brake system hydraulic drive 9.4 Removing and installing the vacuum brake booster 9.5 Replacing the brake pedal axle bushings 9.6. Main brake cylinder 9.7. Front wheel brakes 9.8. Braking mechanisms of the rear wheels 9.9. Pressure regulator 9.10. Brake hoses and tubes 9.11. Parking brake
10. Electrical equipment
10.0 Electrical equipment 10.1 Design features 10.2. Battery 10.3. Mounting block (relays and fuses) 10.4. Generator 10.5. Starter 10.6. Ignition switch (lock) 10.7. Electronic engine control system (ECM) 10.8. Ignition system 10.9. Lighting, light and sound signaling 10.10. Windshield cleaner 10.11. Washer reservoir 10.12. Electric fan of the engine cooling system 10.13. Electric motor of the heating and ventilation system fan 10.15. Cigarette lighter 10.16. Instrument cluster 10.18. Electronic anti-theft remote control system 10.19. Immobilizer 10.21. Replacing sensors and switches
11. Body
11.0 Body 11.1 Design features 11.2 Possible body malfunctions, their causes and solutions 11.3 Removing and installing windshield frame lining 11.4 Removing and installing soundproofing upholstery in the engine compartment 11.5. Removing and installing bumpers 11.6 Removing and installing the fender liner and protective wing cover 11.7 Removing and installing the front fender 11.8 Removing and installing decorative sill trims 11.9. Hood 11.10. Trunk lid 11.11. Doors 11.12. Seats 11.13. Seat belts 11.14. Rear view mirrors 11.15. Interior fittings 11.16. Instrument panel 11.17. Heater 11.20. Body care
12. Applications
12.0 Appendix 12.1 Appendix 1. Tightening torques of threaded connections, Nm 12.2 Appendix 2. Fuels, lubricants and operating fluids 12.3 Appendix 3. Nominal filling volumes 12.4 Appendix 4. Basic data for adjustments and monitoring 12.5 Appendix 5. Spark plugs used on vehicles 12.6 Appendix 6. Lamps used on a car 12.7 Appendix 7. What you need to have in a car 12.8 Appendix 8. Tools used when repairing a car
13. Electrical diagrams
13.0 Electrical Diagrams 13.1 Diagram 1. Instrument Panel Harness Connections 13.2 Diagram 2. Vehicle Front Wire Harness Connections 13.3 Diagram 3. Engine Electronic Control System (ECM) Harness Connections 13.4 Diagram 4. Vehicle Rear Wire Harness Connections 13.5 Diagram 5. Light Harness Connections license plate light 13.6 Diagram 6. Left front door wiring harness connections 13.7 Diagram 7. Right front door wiring harness connections 13.8 Diagram 8. Rear door wiring harness connections
How to check the canister valve for functionality
To check the absorber limiter on the Priora, you will have to remove it. There is a difference regarding fastening. For engine 21126, the mount is a plastic casing, and for 21127 it is a mount that is located at the intake manifold. To remove a part, do the following:
- Stop the car, lift the hood, remove the negative terminal from the battery.
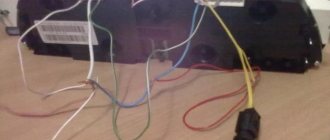
- Press the fastener of the lead wire and disconnect it.
- Press down on the latch. After this, slide the vent up along the guides.
- Disconnect the inlet pipe. If you can’t heat it up, pour hot water on it.
Check as follows:
- Inspect the hoses, look for mechanical damage if any.
- Try to fill the restrictor with air using a bulb or pump. At the same time, maintain the tightness of the small part - use clamps.
- If air is not blown through, the part works.
- Apply current from the battery. A click should appear as a signal to start working. When resetting the wire, you should hear another click, indicating proper operation.
Replacing the adsorber valve with Priora
When all signs of malfunction are present, replacement is required. If a faulty sensor is not replaced in a timely manner, it can cause problems in the fuel system as a whole. To carry out replacement work on the LADA Priora, you will need a multimeter and small pieces of wire.
You need to remove the adsorber first. It needs to be checked. It is necessary to prepare the car and loosen the clamp and disconnect the wires directly from the purge valve. On the car, connect the multimeter probe marked “-” to ground.
Then you need to turn on the ignition. Then check the voltage at the terminal block of the wires. All terminals have their own designation, it is on the block.
Remember, the voltage at the pin is 12V. If it is lower, or is not there at all, then the problem is a discharged battery or a malfunction of the car’s electronic unit.
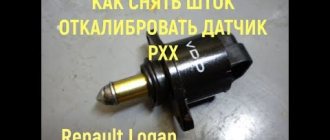
The sensor is replaced as follows: turn off the ignition, move the valve up, and release the lock. Remove the device from the bracket. For easy assembly, it is better to mark the order of connection to the sensor with a marker.
Use a Phillips screwdriver to loosen the clamps and disconnect the hoses one by one. First, the hose going to the adsorber is disconnected, then the hose going to the throttle valve, or rather to its body. Now you can replace the sensor with a new one and assemble everything in reverse order.
How to repair the adsorber and valve
Often the nature of damage to these parts is very large, since they operate under high wear conditions. The valve really shouldn't be repaired because the part is so small. But the main device often breaks down because the foam rots inside it. Coal breaks through the tubes and clogs the solenoid valve.
To repair, you will need to replace the foam separator. To do this, you will need to remove part of the gasoline vapor recovery system:
- Open the hood, stand on the left. Stretch your hand slightly down where the gasoline vapor recovery system is located (on the left edge).
- Clamp the two clamps that hold the separator outlet tubes. Remove the fitting tips.
- Using a “10” wrench, unscrew the bolts securing the radiator.
- Pull the adsorber towards you.
Source