Technical characteristics of the radio
Kalina's standard audio system
Technical characteristics of the standard radio in the Kalina “Lux” configuration:
- 2DIN touch screen;
- presence of stereophonic radio;
- ability to play multimedia files;
- ability to synchronize with a cell phone;
- work with bluetooth.
Device development - WindowsCE 6.0. RAM - 128 MB. Fifth generation central processing chip. These characteristics cannot but please fans of AvtoVAZ products, because now the car has become much more pleasant to drive.
Radio tape recorder Kalina: technical characteristics in the “Norma” configuration differ from the “luxury” one in the absence of a touch screen, Bluetooth connection and synchronization with a cell phone. The size of the radio is 1DIN, removable panel. Some configurations have 4 speakers and an antenna. The radio receives wide range radio waves, can play discs of different formats, and work with USB drives and SD cards.
It is also good that cars with radios have passed all special tests before being released to the masses. They were tested at extremely low and extremely high temperatures, electromagnetic compatibility was checked with modeling of the radio interference spectrum.
How to connect a radio
Connecting the head unit depends on the vehicle modification. When installing the radio, you need to firmly snap the ISO plugs in place, and then reinstall the antenna connector.
If the product is equipped with a wired remote control, it is located on the steering column or the front of the instrument panel. The wire is laid inside the panel along the standard lines of the electrical harnesses.
With 2 speakers
The 2-speaker circuit is used only on cargo vans; the loudspeakers are located in the doors under the plastic panels.
The radio is ready for use immediately after connecting to the standard connectors. The car owner can install additional speakers in the cabin by laying separate speaker wires to them.
With 4 speakers
On passenger versions, 4 speakers are used, which improves the sound quality in the cabin. The wiring has a separate harness leading to the speakers in the rear doors.
Rules for choosing an audio system
Before you begin installing the radio on Kalina, you should select it at a car dealership or hardware store. The choice should be approached carefully and carefully. And before going to the store, it is better to decide on your desires and capabilities.
When choosing a radio for your car, you should decide which music media will be used as the main one. This will help you save some money. If, for example, a car owner is sure that he will not need a CD or cassette player, then why should he overpay for a radio with these functions.
For those choosing CD players, there is one minor drawback that manufacturers are trying to combat - the loss of music fragments due to shaking during a trip. But progress does not stand still, and the mechanics are improving. The presence of ISO in the car and, accordingly, in the audio device will simplify the connection. The presence of a USB adapter will allow you to play music from various media.
Pioneer model range
When choosing a car radio, you should pay attention to the power ratings. They have a maximum and minimum threshold. Maximum power is rarely used, except in extreme situations. The choice should be made according to the rated power, that is, the one that is used most often. Manufacturers often indicate only maximum values on packages, so when choosing, you need to carefully study the instructions (passport), and not the box.
It is also worth paying attention to the control panel. It should be extremely simple and convenient, since it will most often be used while moving. Intricate designs can distract from the road. Convenient and understandable buttons and adjustable backlight brightness will only be beneficial. It is imperative to check the range of perceived frequencies. Since radio stations mainly broadcast in the range from 80 to 110 MHz, it is better that the tuner also has this range.
Pay attention to the number of outputs to the speakers and the resonant frequency, it should be lower.
Connecting the amplifier via the ISO connector of the radio
To connect an amplifier using a high-level input, you should take the signal from the output to the radio speakers (standard ISO).
This is the simplest method, suitable for undemanding listeners. This is because the signal going from the radio to the external amplifier has many circuits (pre-amplifier, radio amplifier, external amplifier voltage divider, power amplifier) that introduce their distortions.
Stages of dismantling the Kalina radio
Car owners do not always install a radio in an empty place. Often, before installing a new audio system, you have to dismantle the standard one. Many drivers are not satisfied with its quality and characteristics. In addition, according to reviews from car owners, the standard radio very quickly begins to “freeze”, “slow down” and “glitch”. That is why the owner of a Lada Kalina car first has to remove the existing audio system, and only then install a new one, chosen independently.
Stages of removing the original Kalina radio:
- dismantle the top removable panel;
- remove the plastic frame;
- using the keys included with the standard radio, remove the system from the tunnel: insert the keys into the sides of the radio and pull it towards you;
- disconnect the connectors with wires and the antenna.
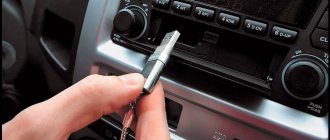
You can install the radio with the help of specialists in a specialized center. But it’s realistic to do everything yourself, because there’s nothing complicated about it. The procedure takes no more than two hours, it all depends on skill and experience.
Car enthusiasts can give their stock radio another chance by tuning it. Reflashing the software settings will make the interface more convenient, the performance and service life of the device will increase.
Installation of 1 din radio in Grantu standard and norm
What is needed to install a radio in a VAZ 2190:
- The radio itself is also the head unit;
- flat screwdriver;
- Straight arms.
Abbreviations and symbols in the text:
- GU – head unit;
- MMS – multimedia system;
- DIN (din) – installation size for acoustics in a car.
Step-by-step instructions for installing the head unit
- a narrow flat screwdriver or plastic spatula for installing acoustics;
- 1-din radio with frame.
The seat in Grant is designed for 1 din. To work with large 2-din sizes, you will need to cut out the partition and install a decorative frame.
Step 1. Using a flat-head screwdriver, remove the plastic plug for the radio. To do this, carefully pry it around the edges and pull it towards you.
The placeholder for the radio is installed from the factory.
Step 2. On the back of the plug there is a mount for ISO connectors. There are two connectors: music power and wires for the speakers.
Nuances of installing an audio system
Dismantling of the standard audio system is completed
Without knowing all the intricacies of connecting the radio, it will be impossible to carry out the installation correctly, as a result this will lead to rapid discharge of the battery.
Connect the radio in parallel sequence with the red and yellow wires. This connection allows the system to be turned on and off only using a button on the panel of the device itself. Sometimes the radio circuit is specially designed so that the amplifier is powered in standby mode. Such a system consumes more energy, so the battery drains quickly.
What is the correct installation of a radio? To begin with, you should highlight 4 main wires, each of which has its own color and performs a specific function. The black wire goes to ground, the yellow one provides power to the memory and the audio system itself, the red one provides a signal to turn on the MMC, and the blue one turns on the antenna and other possible devices.
Before connecting, professionals recommend assembling a simple circuit that will allow you to connect the radio through the ignition, due to which the battery will be charged much longer. When working with wires and circuits, you will need to pinout the connector. This will make the circuit easier to work with and understand.
The circuit is assembled in the following order:
- two diodes are soldered onto the board - VD1 and VD2;
- the red wire is soldered to the VD1 anode;
- another red wire is soldered to the cathode of VD1 and VD2;
- both blue wires are connected to the VD2 anode.
The joints can be protected with special cambrics - this will avoid breakdowns.
Before connecting the circuit, you will have to remove the radio and the slide; it is not necessary to remove the console.
All wires must be connected in the correct order:
- wire No. 1 is connected to the contact from the rear window heating button;
- The 2nd wire is connected to the multimedia system;
- wire No. 3 is soldered to blue, which is responsible for turning on the antenna;
- The 4th wire is soldered to the blue antenna wire.
The previously assembled board can be secured inside the torpedo with a fixed tie. When connecting all contacts, only the soldering method, insulated with heat shrink, is used. Screwing of wires is excluded. Before starting work, be sure to disconnect the battery.
With this connection, the radio will turn on only when the ignition is turned on, but if it is turned off, it will continue to work until the driver turns it off. Restarting is possible when the car is started again.
Pinout of a standard Euro connector
A Euro connector is a standard plug used in most countries around the world. When connecting equipment, you may encounter non-standard wires tangled in a bundle. This problem is solved by purchasing adapters and pinouting the radio chips.
Standards 1din and 2din
Speaker system connectors come in two types: non-standard ones from the manufacturer, mostly pin-type, and standardized European ones, which are located at the back. Installation of equipment with a special audio connector from the manufacturer will require the use of a special proprietary connector. If the plug is ISO, then you can connect to it directly. There are two types of Euro connectors: 1din and 2din, the difference is in the height of the car radios. The two-block one is twice as tall; it is not connected to all cars, because there is no space on the panel for the required dimensions.
Radios with European 1din are the most common.
When installing car radios, wires with a small diameter of 1.5-2 mm are used, for power lines - with a large cross-section. Failure to follow these simple rules will distort the sound and damage the equipment.
Manufacturers in Japan, the USA and some Chinese use the 2din standard.
Upper power connector A
The plug is used to supply electricity to the receiver, antenna and amplifier, as well as when it is necessary to control the backlight or turn off the sound signal. Standard color markings are used. Outputs 1-3 and 6 are not used in low- and mid-price segment speakers; they are intended for additional options for high-end products.
Connection types
- The first is the connection in the socket of wires of two colors, yellow and red, turning the receiver on/off does not depend on the ignition. The method is inconvenient because it predisposes the battery to discharge if the acoustics are not turned off;
- The second wire is connected through the ignition switch, the yellow wire is connected to the on-board computer.
Functional purpose of the receiver outputs
| ANT | The connector is used if the car has a retractable antenna |
| Remote | Multiple speakers can be connected |
| Illumination | Allows you to change the intensity of the device's glow |
| Mute | Adjusting the sound |
| A4 | Turn on/off |
Pinout of radio ISO connector
| A 4 | Color yellow | Battery + Power |
| A 5 | Color blue | Antenna. |
| A 6 | Color orange | Backlight |
| A 7 | Color red | Ignition, 12V. When disconnected, reset settings to factory settings. |
| A 8 | Color black | Acoustics |
Bottom speaker connector B
Used to connect amplifiers (2 cables each). The sound of the equipment depends on whether all connectors are connected correctly. The main thing is not to confuse them, otherwise the acoustics will be of poor quality.
Rules for connecting speakers by color marking of wires
| Color white | Left front |
| Color grey | Right front |
| Color green | Left rear |
| Color violet | Right rear |
Second installation option
There is another way to connect the radio, which will ensure that it is turned on not through the ignition switch, but using a separate button.
First, you should buy a suitable button and a contact block with the wires intended for it at any auto store. All this is not very expensive and will require no more than one and a half hundred rubles. Moreover, it doesn’t matter what the button is if the owner does not need order on the console. It can be from the main beam, or with a different image, the main thing is that it fits under the connector for spare buttons, where the plug is located. The only point is that it is advisable to choose a button with an indicator.
Installation and connection
Hyundai car radio connector pinout
Hyundai car radios (see 2 din Hyundai car radios: review and installation) can be installed and connected from scratch with your own hands. This process is creative and does not require any special knowledge. It is enough to use the pinout presented above and some important points that we provide below.
Built-in and stationary
First of all, you need to remember that car radios can be installed differently. Head units can be built-in or stationary. Built-in ones today are most often found with a removable front panel. As for car radios built-in on skids, they are less common.
What is MMC Kalina 2?
Depending on the selected vehicle configuration, the consumer receives MMC Kalina 2 with various options. At the time of choosing the necessary equipment, the future owner must carefully study this issue. It is possible to install a 2 din radio with or without a CD drive, touch screen. In the last few years, car owners have given preference to models with touch control mode.
Radio malfunctions and methods for diagnosing them
As you know, the Lada Largus is equipped with an audio system with a set of speakers already from the factory (depending on the configuration). The amplifiers are located in the front and rear door panels. To connect non-original speakers, several wiring harnesses are provided (including for increasing power using an amplifier when connecting a subwoofer). Since the connector plugs do not comply with the current standard, to connect another head unit you will need to additionally purchase adapters.
A standard car radio sometimes brings not only the pleasure of listening to music, but also some problems. The device may not work or function incorrectly for various reasons. In general, the list of faults includes only those that an ordinary driver (without special knowledge of electrical engineering) can fix with his own hands, without the need to contact a specialized center.
Benefits of new technologies
MMC Lada Kalina 2 is characterized by a simplified control system. Now all the necessary options can be obtained with 1-2 taps on the screen. The system is equipped with a more functional resistive screen. Unlike the standard Kalina radio with a capacitive version, the resistant screen has improved performance characteristics. The device is able to operate without failures in any temperature conditions.
Lada owners often complained that in sunny weather it became impossible to use the car radio. This is due to the numerous glares that make the characters on capacitive screens almost unreadable. The designers, when developing the second version of the radio, took this drawback into account.
If desired, the car owner can choose a model with a mini-visor that protects from glare.
The maximum display area of MMS Kalina 2 is 7 inches. Its operation is based on the Windows CE 6 operating system. The version developed specifically for radio tape recorders has characteristics close to optimal. It takes a few seconds to turn on the device. The amount of RAM ranges from 128 to 256 MB. Firmware for the Kalina 2 radio has significantly improved the technical capabilities of the equipment. Now they are as follows:
- support for wav, wma, mp3 formats;
- 6 programmed shades of music playback;
- the display of the Lada Kalina 2 radio shows information about the song and album during playback;
- there is the ability to play video in wmv format;
- the multimedia system supports maximum video resolution at 320*240 pixels;
- it is possible to play video files of other formats, but for this you will have to use a convector;
- availability of FM radio;
- micro SD card support;
- Lada radio firmware makes it possible to view images saved in bmp, gif, jpe, jpg, jpeg formats;
- The maximum photo size is not limited, but if it exceeds 2 MB, then the Kalina multimedia firmware will open it from 2 to 10 seconds.
Connecting external devices
Domestic developers made sure that their creation was maximally adapted to work with third-party devices. The 2 din radio allows the use of wireless hands free, mobile phones and external information sources.
In order not to overload the Lada with unnecessary wires and inputs, the connection between the radio and an external device occurs via the Bluetooth protocol. It is enough to set the necessary settings once for the system to remember them.
If you wish, you can download music from external media to the internal memory of the radio or listen directly from a flash drive or phone. If the second is selected, then the sound comes from the speakers installed in the car or wireless headphones. When it comes to connecting memory cards, they must be formatted in a certain way - FAT16/FAT32. The connection connector is located on the back side.
Repair and warranty service are as follows. If the installation of the radio in Kalina was carried out correctly, then once a year it is necessary to do a preventive examination at a service center.
If the service period has passed, then everything can be done at home. All wires must be carefully disconnected. Using a screwdriver, loosen the fastenings and remove the radio. Then it is delivered to the workshop, where the failed element is replaced.
Removing the standard radio in Grant Lux
The difference between grants of the luxury configuration: the MMS (multimedia system) installed from the factory. This is a 2 din device.
To remove standard acoustic grants:
- take a knife or plastic spatula to dismantle the acoustics and disconnect the decorative trims to the right and left of the radio. It is not necessary to take pictures;
- in the gap between the cover and the panel we find the head unit lock. There are two of them on both sides. Press it out with a screwdriver;
- we take out the GU on ourselves.
Everything is described in detail in the video:
Replacing the standard MMC in Grant
The process - after removing the acoustics, we install a new system.
Difficulties: you may have to finish the fastenings of the new system for VAZ ones. Plus you need the right frame. The factory MMC frame may not fit.
Have you bought a new 2 din radio, but there is no frame for sale? You can do it yourself. Example at the link.
Connecting the radio Kalina 2
When connecting the control input of a car radio, it is very important to determine which of the contacts on the block is power and which is control.
For non-standard car radios, carefully read the instructions; usually the radio adapter has a connector that allows you to swap the power-control pair. Make sure the connection is correct.
For a standard radio, bite off a thin jumper on the Kalina audio connector. In most cases, the thick wire that comes in is the power wire, and the thin wire is the control wire. Using an ammeter, measure the current in the power-control circuit when the radio is turned on. The current consumption on the control wire should not exceed several mA; if measurements show that the current is 200 mA or higher, then this contact is a power contact, in this case it is necessary to swap the wires in the block.
When connecting a standard radio, there is no universal arrangement of contacts. Based on installation experience, even on seemingly identical radios, there may be differences in connections.
Below are photographs of two standard radios installed on viburnums from the factory.
As you can see, the power and control circuits are swapped, despite the fact that this is the same radio model, which is installed from the factory and has the same part number.
If you connect it incorrectly, you are guaranteed to damage the comfortLIN module; at best, only the radio output; at worst, complete failure is possible. Be extremely careful.
Also, be careful when replacing the standard radio under warranty, it may well turn out that they will change it to the opposite option to yours.
In the photographs presented, it can be noted that the radios are distinguished by the presence of a radiator next to the connectors on the first, and its absence on the second. You can indirectly determine the position of the guides using this data, but there are no guarantees that there is no third option. Be prepared for surprises from AvtoVAZ and double check where you connect what.
The manufacturer installs audio systems of various types on Lada Kalina 2 and Lada Granta cars. In this review, we will look at the operation of the audio system (FM, USB, SD card, Bluetooth, Handsfree) with catalog number for Lada Granta: 2190-7900010-20 and Lada Kalina: 2190-7900010-40, the only difference between them is in the fastenings. These standard radios are Kalina 2 and Granta, installed on the “norm” package.
Pinouts for various brands of cars and radios
Before getting started, read the instructions for the receiver, and also pay attention to the markings and features of the product itself. The pinout of radios is influenced by standard connectors in different cars.
Pinout diagram for ISO connectors for pioneer radios
Connecting the acoustics of this well-known brand, which is popular among motorists, has some features. Be sure to read the installation manual before starting work. Installation is simple, the main thing is to understand the purpose of each color. In addition to the instructions, the kit includes two “chips” with 4 pairs of contacts: for power and acoustics.
In order not to burn out the acoustics, before connecting the speakers you need to connect the radio, check that it lights up and switches.
toyota
The pinout of acoustics of this brand is carried out according to standard diagrams. It is optimal to choose a power supply system from a battery, in this case there is no risk of its discharge.
| № 1 | A+ |
| № 2 | GND |
| № 3 | BAT+ |
| № 4 | Backlight |
| № 5 | Antenna |
| № 6 | Speakers (RR+, RR-, RF+, RF-, LF+, LF-, LR+, LR-) |
When connecting the radio, standard circuits are used.
| № 1 | ANT |
| № 3 | L.R. Line output |
| № 4 | GND. Line output |
| № 5 | R.R. Line output |
| № 6 | CD–LCH |
| № 7 | CD - GND |
| № 8 | CD–RCH |
| № 9 | CD - Reset |
| № 10 | CD – CD clock out |
| № 11 | CD – DSPL select |
| № 12 | CD – data out |
| № 13 | CD – clock in |
| № 14 | CD – data in |
| № 16 | A+ |
| № 17 | GND |
| № 18 | ANT GND |
| № 22-27 | Speakers (LF-, LR+, RF-, RR+, LF+, LR-, RF+, RR-) |
| № 28 | Mute |
| № 29-30 | Speakers (LF-, LR+, RF-, RR+, LF+, LR-, RF+, RR-) |
| № 31 | ANT CONT |
| № 32 | CD ACC Constant |
| № 33 | AMP Constant |
| № 34 | BUP |
nissan
| № 1-6 | Speakers (LR+, RR+, LR-, RR-, LF+, RF+) |
| № 7 | A+ |
| № 8 | Backlight |
| № 9 | BAT+ |
| № 10 | Speakers LF- |
| № 11 | RF speaker |
| № 12 | Antenna |
| № 13 | GND |
honda
All models of car radios are equipped with a universal European plug for connection to the socket.
| № 1 | Speaker RR+ |
| № 2 | Speaker LR+ |
| № 3 | Backlight |
| № 4 | BAT+ |
| № 5 | A+ |
| № 6 | Antenna |
| № 7-10 | Speakers LF+, RF+, RR-, LR- |
| № 13 | GND |
| № 14-15 | Speakers LF-, RF- |
Standard European pinout.
alpine
Alpine TDE-7823W: 1 – BAT+,
| № 2-5 | Speakers LR-, LR+, RR-, RR+ |
| № 7 | Amplifier |
| № 8 | Antenna |
| № 9 | GND |
| № 10-13 | Speakers LF-, LF+, RF-, RF+ |
| № 5-12 | A+ |
mitsubishi
All models use standard European speaker pinout.
| № 1-2 | Speakers RR+, LR+ |
| № 3 | Antenna control |
| № 4 | Backlight control |
| № 5-8 | Speakers LF+, RF+, RR-, LR- |
| № 10 | A+ |
| № 11 | BAT+ |
| № 12 | Backlight control |
| № 13-14 | Speakers LF-, RF- |
| GND |
Radio capabilities
On the right side of the radio there is a USB connector, which is designed to connect:
- USB Flash card (USB 2.0 and 3.0 up to 64 GB);
- USB Flash player with a memory capacity of at least 1024 MB;
- USB HDD with FAT32 file system;
- Mobile phone (only in charging mode).
On the left side of the radio there is a slot for SD cards. SD Memory Card Slot: Supports SD, SDHC cards of size 32 X 24 X 2.1 mm. SDHC up to 32 GB, SD up to 32 GB.
The file allocation table (FAT) of the connected device must be version FAT16 (2 GB). The maximum number of primary partitions should be no more than 4. It is advisable that the directory tree of the connected device have no more than eight levels. There should be no more than 1000 files in one directory.
While playing files, the display shows all the necessary information about the track. The playback source is selected using the AUDIO button on the left side of the radio. The radio has equalizer presets (JAZZ, POP, CLASSICAL, VOCAL and USER). The range of timbre adjustments for bass, treble, balance, front/rear balance is from “-7” to “+7” units.
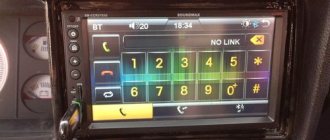
The radio has Bluetooth and Handsfree functions. You can connect your phone by long pressing the handset button. When pairing on the phone, the inscription “MMC12” should appear in the list of found devices, the default password is “0000”. After successful connection, the BT icon will appear on the display of the radio. There is no phone book on the Kalina 2 and Grant radio, but it is possible to save up to 6 numbers in the radio’s memory. The audio system also remembers the last outgoing and incoming calls. The manufacturer does not guarantee operation of a phone in Handsfree mode that uses two or more SIM cards.
The radio allows you to listen to audio files from your mobile phone. To do this, you need to connect your phone to the radio via Bluetooth and launch the player on your phone. The manufacturer states that certain cell phone models may not work correctly with this radio, but this is not a sign of a malfunction.
The Kalina 2 and Granta radio has its own battery, which allows you to save user settings after disconnecting the battery for 10 days.
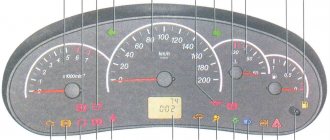
Advice for future and current owners of VAZ push-button radios
The release of standard VAZ “devices”, devoid of an expensive “sensor”, has been expected for a long time. Back in the first half of the year, we were told that such a unit should appear in the fall. As you can see, VAZ was embarrassed to build a graphic display into the radio, and all information on the screen is displayed in standard symbols. The only available backlight color is emerald (there will be more of these colors in crossovers). The device is a “turn on and listen” device, and in standby mode the display displays the time.
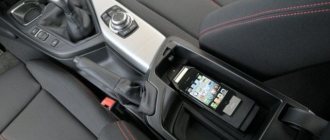
The fact that the manufacturer placed the USB port right on the face of the radio is not bad. Now owners have the opportunity to quickly connect a USB drive, or use the standard port as a power source. It will be easy to connect a smartphone or tablet and place it on the dashboard. This is cool! It is recommended to immediately install a short USB flash drive into the USB port to protect it from dust. And it’s also advisable to occupy the port intended for SD cards with something.
All radios produced by Itelma LLC are well aware of a file system such as FAT32. This means that you need to format flash drives in it, onto which audio files in MP3 and WAV format will then be recorded. The signal to the speakers standardly installed in the doors comes without distortion, and the power of the built-in amplifiers is unlikely to seem insufficient to anyone. Enjoy it for your health.
We can state the fact that the new head unit developed by AvtoVAZ turned out to be more than twice cheaper than the touch media center. So, there is no need to succumb to the persuasion of sellers to buy a 7900010-40 radio for 10, 8 or 6 thousand rubles. However, we will leave the choice to the owner.
In fact, VAZ acted very unusually by releasing another “device” in a non-standard form factor. Car dealers should not have any problems with the availability of one or another radio, since the car plant has been working on pre-orders since September. True, it will be difficult to purchase the “device” in question separately from the car, unlike luxury media. The main thing is that two requirements are now met at once: the owner does not overpay for unnecessary options, and at the same time uses only standard VAZ equipment. It would have been like this a long time ago... Let's say if the radio was 1DIN high, it would be equipped with a removable muzzle, but what's good about that?
Video review of the radio
The standard radio for Kalina 2 and Grant has all the necessary functions for a modern car. The audio system works flawlessly, there are no freezes, all operations are performed instantly. The build quality is at a high level. The only disadvantage is the lack of a CD/DVD drive, but nowadays discs are becoming a thing of the past. The standard radio of the Lada Kalina 2 and Granta without an LCD display is a good alternative for those who find physical buttons more convenient than a sensor.
Download the manual for operating the radio (from page 173): To download files you need to log in to the website
Let us remind you that AvtoVAZ installs radios with an LCD display on the “Lux” configuration.
Using my station wagon as an example, I would like to write a little about the standard audio preparation of the Lada Kalina. As far as I know now, all cars, starting with the “norm” configuration, have audio preparation, which includes:
- Plugs for connecting the radio
- Wires for front speakers
- Wires for rear speakers
Now I will describe everything with photographs and in more detail below. So, the plugs for connecting the radio are located under the plug below the heater control unit. If you remove this plug, there will be two gray and brown connectors.
The radio is connected very simply, gray color is up, brown color is down. As for the wires in the front doors, to get to them you need to remove the front door trim. The example below shows the conclusions already in the door trim cut under the column:
But at first we had to search a little for the rear ones; on the left side the wire was quickly found, since it was located near the trunk light:
And the right one is located under the trunk trim, glued with tape to the metal of the rear arch, so you will first have to look for it with your hand under the trim or remove it altogether. Here is an example of the already routed wires:
Many potassium growers wrote that they don’t have any wires even at the “normal” level, but I was convinced of the opposite. For example, my 2011 Kalina Station Wagon. I tried to connect the rear wires to the speaker, everything works fine, the music flows. So installing music with standard audio preparation is as easy as shelling pears.
About the connectors of the standard MMC Grants/Kalina 2
The back of the radio is as follows:
You can immediately notice the familiar ISO connector (brown and gray pads in the photo):
As well as the top row of mini connectors (blue, green and empty slot). This connector is called mini-ISO and has the following circuit:
Now about the amplifiers. Typically, an amplifier has two groups of inputs: linear and high-level input. You can use any of them, and here are the features of connecting the amplifier to the standard Granta/Kalina 2 radio:
Search
Not long ago, AVTOVAZ began producing the Lada Kalina with a head unit. Previously, radio installation in Kalina was offered only by dealers in car showrooms as an additional service that was paid for by the client. Now the buyer has a choice between installing a music system with his own hands or buying a car with a head unit already installed.
Kalina sound installed
Technical characteristics of the head unit in the Kalina Lux selection:
- 2DIN touch screen;
- presence of stereo radio;
- ability to play multimedia files;
- ability to synchronize with a mobile phone;
- works with bluetooth.
Device development - WindowsCE 6.0. RAM - 128 MB. 5th generation CPU. These features cannot but please fans of AvtoVAZ products, because now driving a car has become much more enjoyable.
Kalina Radio Recorder: The Norma's technical specifications differ from the luxurious lack of a touch screen, Bluetooth connectivity and mobile phone synchronization. The size of the radio is 1DIN, removable panel. Some trim levels have 4 speakers and an antenna. The radio receives a wide range of radio waves, can play discs of different sizes, and work with USB drives and SD cards.
It's also funny that the car with the walkie-talkie went through all the special tests before going to the masses. They have been tested at extremely low and very high temperatures, and electrical compatibility has been verified by simulating the radio interference range.
When choosing a radio in your car, you must decide which media to use as the main one. This will save money. If, for example, a car enthusiast is sure that he does not need a CD or tape recorder, then why pay for a radio using these functions.
How to install a 2 din radio receiver Pioneer AppRadio SPH-DA110 in Lada Granta (OK)?
For those who choose CD players, there is one small drawback that manufacturers are trying to combat - loss of music fragments due to shaking while traveling. But progress is not in place, and the mechanics are improving. Having an ISO in the car and, accordingly, in the audio device will simplify the connection. The presence of a USB adapter allows you to play music from different media.
When choosing a radio, you should pay attention to the power characteristics. They have the most and a low threshold. Higher power is rarely used except in extreme situations. The choice should be made according to the rated power, in other words, the one that is used in most cases. Often, manufacturers indicate only the highest values on the packaging, so when choosing, you should carefully consider the annotation (passport), and not the box.
You may also like
It is also worth paying attention to the control panel. It should be as simple and convenient as possible, because in most cases it will be used while driving. Exquisite design can distract the road. Convenient and understandable buttons and backlight adjustment will only be useful. Be sure to check the spectrum of perceived frequencies. Since radio stations mostly broadcast in the frequency range from 80 to 110 MHz, it is better to have a tuner.
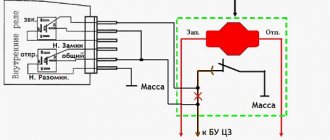
Two configurations and two schemes
In the “Norma” version, if it has a central locking system, you can use two control wires. Ground is supplied to one of them if the locks need to be opened, and to the second one if the locks need to be closed. The period of connection to ground should take 0.7 seconds, and most alarms have such a setting.
If we talk about the “Lux” configuration, the control wires will not help us here. The relay contacts built into the alarm will have to be connected to the breaks in the power cords. Despite all the complexity, there were no complaints about this scheme, and we will consider it right now.
The “luxury” option is the most complex
First you need to make sure that the central locking system in the car is really connected according to the “Lux” scheme. The control button located on the door must be trigger (non-latching). If you have exactly this type of car, you will have to tinker. It will be necessary to extend 4 power cables to the signaling unit. These cords, in turn, must go from the break point of the two standard wires (yellow-white and yellow-black). Find them in the bundle under the threshold.
Any alarm system is supplied with two relays, one of which is activated for closing, the second for unlocking the locks. Power cables drawn from the break points are connected to the relay contacts.
The part of the yellow-white wire that goes to the actuators is connected to the common contact. Another relay contact (normally closed) is connected to the second half of the cable. They connect to the yellow-black wire in a similar way, but here an opening relay is used, not a locking one. Each of the normally open contacts receives power.
Any power wiring is supplied with power through a fuse.
In our case, the rating “15 Amperes” is used. Immediately before installation, you need to call the pair of wires that are directed to the actuators. The probe should show a value of 1.2 - 1.3 Ohms. And of course, when performing installation work, you first need to remove the negative terminal from the battery. Be careful!
Connection option for “Norma”
Let's say there is a switch in the driver's door, but it has two fixed positions. Then it will be easy to connect the alarm. You will need to make not 4, but 2 taps, and not from the power cords, but from two signal cords. There is no need to make breaks, just make a T-shaped connection. The diagram here looks standard:
You can complete the installation without breaking the wires at all.
In the circuit discussed above, there is no fuse. We connected to the signal wiring, not the power wiring, and theoretically we can not be afraid of any short circuits. Still, it is better to insulate the free terminals on the signaling. The same applies to all connection points.
Standard audio preparation
Using my station wagon as an example, I would like to write a little about the standard audio preparation of the Lada Kalina. As far as I know now, all cars, starting with the “norm” configuration, have audio preparation, which includes:
- Plugs for connecting the radio
- Wires for front speakers
- Wires for rear speakers
Now I will describe everything with photographs and in more detail below. So, the plugs for connecting the radio are located under the plug below the heater control unit. If you remove this plug, there will be two gray and brown connectors.
The radio is connected very simply, gray color is up, brown color is down. As for the wires in the front doors, to get to them you need to remove the front door trim. The example below shows the conclusions already in the door trim cut under the column:
But at first we had to search a little for the rear ones; on the left side the wire was quickly found, since it was located near the trunk light:
And the right one is located under the trunk trim, glued with tape to the metal of the rear arch, so you will first have to look for it with your hand under the trim or remove it altogether. Here is an example of the already routed wires:
Many potassium growers wrote that they don’t have any wires even at the “normal” level, but I was convinced of the opposite. For example, my 2011 Kalina Station Wagon. I tried to connect the rear wires to the speaker, everything works fine, the music flows. So installing music with standard audio preparation is as easy as shelling pears.
What is iso
ISO is an international organization that develops standards and regulations for various industries. The abbreviation sounds the same in all languages. A Russian manufacturer working in accordance with standards labels its products with the abbreviation “ISO” or “ISO”. All well-known developers of car radios equip their products with two types of standard plugs. Each looks like an eight-pin rectangular connector.