Adjusting the ignition is one of the most common tasks faced by our compatriots. This procedure allows you to get rid of improper operation of the engine, thereby preventing wear of its structural elements. Find out more about how to set the ignition yourself and what methods exist in this material.
Adjustment algorithm
A 12-volt light bulb, a set of probes and a special wrench for rotating the crank shaft are all that is needed to ensure ideal ignition of the fuel mixture using this method.
Which lights should light up when the ignition is turned on?
Here's how to proceed:
- Remove the upper cap of the ignition switch;
- Use a fine file to process the contacts, trying to remove all metal oxides and bulges formed on the surface;
- Bring the contacts as close as possible to each other (they need to fit tightly, with their entire plane).
Advice. If the contacts do not sit on each other with their entire plane, then it is recommended to slightly bend the fixed contact. This is done only when absolutely necessary, after thoroughly cleaning the contacts from oxides and tubercles.
- Turn the crank shaft to a position where the maximum possible distance is formed between the distributor contacts;
- Loosen the screw that holds the entire contact system;
- Insert a 0.4 mm measuring rod between the contacts and secure the holder as before.
Attention. It is necessary to provide such a gap between the contactors so that the 0.4 mm probe moves in this place with some force.
The same is done with probes of 0.35 and 0.45 mm. The crank shaft rotates using a key, and if it is missing, then in no case through the starter. You can ask an assistant to slowly push the car in 4th or 5th gear.
Distributor clearance using a light bulb
After setting the required gap, a specific UZSK value is set. However, you should know that this classic setting option is only suitable for new distributors assembled without any errors. Otherwise, additional adjustments have to be made.
The procedure for setting a light bulb to the ideal moment of ignition of a combustible mixture is carried out as follows:
- The main armored wire is removed from the distributor cover;
- It leans against any part of the body;
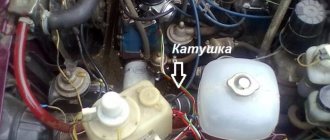
- The light bulb is connected to the wiring going from the spool (coil) to the distributor.
Note. The light bulb (indicator) must be connected so that it lights up when the distributor contacts are disconnected and goes out when they are closed (naturally, after turning on the ignition with the key).
- You should slowly rotate the pitcher in accordance with the clockwise movement until the indicator goes out;
- Remember the position of the slider in the distributor;
- Continue rotating the crank shaft;
- Re-fix the position of the slider after turning on the indicator;
- Measure the distance between the marks made.
Attention. To provide an UZSK means multiplying the number π by 360 x the diameter of the distributor body, and then dividing the resulting amount by the distance between the marks. The final result will be the same angle, calculated in degrees and minutes. Of course, it is recommended to compare it with the values prescribed in the manual.
Ignition on an exposed distributor
To set the OZ:
- Turn the CVshaft so that the mark on its pulley aligns with the notch on the timing cover (the distributor rotor should be positioned exactly opposite the armored line of the first cylinder of the power unit);
- Now you need to connect a 12 volt light bulb with one end to the wiring (distributor-woman), and the other to ground;
- Remove the main armored wire from the distributor cap and attach it to the body;
- Loosen the screw that holds the distributor body;
- Next, turn on the ignition;
- Rotate the crank shaft according to the movement of the clock until the indicator goes out;
- After this, slowly turn it back until the indicator lights up;
- Immediately after turning on the light, stop the rotation and secure the fastening screw of the distributor housing.
It is recommended to check all adjustments while driving. What does it mean? Here's what: immediately after making the appropriate settings, you should sit in the cabin and warm up the car engine, then accelerate to a speed of 40-50 km/h, always in 4th gear.
While driving, you need to check the following points:
- If you sharply press the accelerator pedal all the way at medium speed, detonation pops should be clearly audible, and the car should quickly increase its speed;
- If detonation knocks are not heard when you press the pedal, you need to stop, open the hood and turn the distributor against the movement of the clock by 1 line (look at the scale that is on the base of the distributor housing);
- If detonation continues for a long period of time (more than 2 seconds), and the car does not gain speed confidently, then the distributor should be turned clockwise, also one notch.
Lamp for checking the distributor
Ideal detonation should last exactly 1-2 seconds.
Installing the ignition with a UAZ light bulb
- — 12 V light bulb with soldered wires;
- — a set of probes;
- — special key for rotating the crankshaft;
Adjust the angle of the closed state of the distributor contacts (UZSK). To do this, remove the cover of the breaker-distributor and clean its contacts with a file, removing all the formed oxide tubercles. After cleaning, make sure that the contacts are fully adjacent to each other. If necessary, adjust by slightly bending the fixed contact.
Turn the crankshaft to a position where the distance between the contacts of the distributor is greatest. Unscrew the screw fixing the contact group on the bearing plate and insert a 0.4 mm feeler gauge between the contacts. Select the position of the contact group at which the probe moves with force, and fix it by tightening the screw. Use 0.35 and 0.45 mm feeler gauges to check the gap size.
Use a special wrench to rotate the crankshaft. If it is missing, rotate it slowly, carefully pushing the car in fourth or fifth gear. Do not use the starter for this purpose. Having set the required gap, the required UZSK value is automatically set, but only in new distributors assembled without violating the technology and dimensions. Therefore, make additional adjustments.
Remove the central high-voltage wire from the breaker cover and place it against ground. Connect a light bulb to the wire going from the distributor to the ignition coil. Turn on the ignition: the light will light when the breaker contacts open and go out when they close. Begin to slowly rotate the engine crankshaft clockwise.
As soon as the light goes out, mark the position of the slider on the distributor body. Also note the position of the slider when the light bulb lights up. Measure the length of the circular arc along the breaker body. To calculate the UZSK, multiply pi (3.14) by 360 and the diameter of the distributor body, and then divide by the measured length of the arc between the marks. The resulting result will be the angle in degrees and minutes. Compare it with the recommended values in the instruction manual.
To adjust the ignition timing angle (IAF), turn the crankshaft so that the mark on its pulley coincides with the mark on the timing cover (see operating instructions). In this case, the distributor slider should be opposite the high-voltage wire of cylinder 1. Connect the light bulb with one wire to the wire going from the distributor to the ignition coil, and the other to ground. Remove the center wire from the breaker cover and place it against ground. Loosen the bolt securing the distributor housing. Turn on the ignition.
Start turning the distributor body clockwise until the light goes out. Then slowly rotate it in the opposite direction until the light turns on. As soon as the light comes on, secure the breaker housing with a bolt in this position. After making all adjustments, check the result in motion.
Warm up the engine, accelerate to 40-50 km/h in 4th gear. When you sharply press the gas pedal, characteristic detonation knocks should appear and a confident increase in speed should begin. If there is no audible detonation, turn the distributor counterclockwise 1 notch on the scale at the base of the housing. If detonation knocks last more than 1-2 seconds, turn the distributor by the specified amount clockwise. Repeat the procedure until detonation is obtained, lasting 1-2 seconds.
If during driving tests the position of the distributor was greatly adjusted, this indicates a malfunction in the power system or ignition system.
- How to set the ignition on a VAZ 2106 correctly according to the marks
UOZ and UZSK
As you know, the dynamics and fuel consumption of carburetor cars are completely dependent on the UOZ and UZSK. The first abbreviation means the initial advance angle, and the second - the angle of the closed state of the group of contacts.
You should know that each car model has its own individual characteristics and its own adjustment values. That is, knowing how to set the ignition using a light bulb is not enough. You also need to understand the individual values and settings of a particular car. You should always try to bring both angle values to the maximum acceptable level.
UOZ and UZSK
The spark charge must be created with a certain advance, since this or that time is needed for the combustion of the fuel mixture. The engine has different speeds, therefore the advance angles must change in accordance with the amplitude of rotation of the crank shaft.
Having learned how to set the ignition through a light bulb, you can independently establish clear ignition of the fuel mixture of your car.
Incendiary physics - advance, distributor and UOZ
How to set the ignition? What is UOZ? Where did the runners rotate in domestic cars? What does the expression “set by spark” mean? - there are many interesting questions to which owners of modern cars may not give the correct answers.
What is ignition timing - also known as ignition timing? Is this some kind of attribute of ancient cars or something unshakable, akin to universal gravity? Most modern car owners are unaware of this. All car systems are controlled by numerous controllers, and therefore timely sparking in the engine cylinders is entirely their responsibility. Meanwhile, a huge number of ancient machines are running around the country, unfamiliar with processors and other chips. Therefore, questions like “How to regulate the SOP?” still sound today.
It's always a pleasure to answer technical questions. But first you have to remember some “incendiary” terms.
Terminology
Ignition distributor
- an electromechanical device that ensures timely supply of high voltage pulses to the spark plugs.
It is often called a distributor
.
Ignition advance
- ignition of the working mixture in the cylinder before the compression stroke ends.
Ignition timing (IDA)
— the angle of rotation of the engine crankshaft from the position corresponding to the appearance of a spark on the spark plug until the piston reaches top dead center.
Contact ignition system
- a system in which switching of the ignition coil is provided by a mechanical interrupter.
When and why do you need to adjust the ignition?
First, a little theory. If the working mixture in the cylinders burned instantly, then there would be no problems with advance in principle. Set it on fire at top dead center and everything is fine. But the mixture does not burn instantly: it takes milliseconds. In this case, the actual rotation speed of the crankshaft is, of course, not constant. Therefore, you cannot stupidly ignite the mixture at the same time under different engine operating modes: it will burn either too early or too late. The result will always be disappointing - the engine pulls poorly, overheats, runs unstably, detonates, etc.
In particular, if you start “sparking” too early ( large
), then the gas pressure will increase sharply until the piston reaches top dead center, preventing its movement.
Because of this, the power will decrease and the efficiency of the engine will deteriorate, it will lose throttle response and will jerk at low speeds. With late sparking ( low CV
), the mixture will burn for a long time with an expanding volume, and therefore the gas pressure will be significantly lower than the calculated one. Power and efficiency will decrease, and the engine will overheat greatly, since the mixture will burn out throughout the entire expansion stroke.
There is only one treatment method - ignite the working mixture according to the speed and load on the engine. In addition, adjustment of the OZ may be required when switching to gasoline with a different octane number. By the way, on very ancient cars (at the beginning of the last century), the ignition timing was regulated by the driver: a special handle was provided. But it soon disappeared, because the engine acquired a distributor with a centrifugal mechanism inside.
The centrifugal regulator usually contained a pair of weights balanced by springs. As the rotation speed increased, the weights diverged to the sides and rotated the support plate on which the breaker was located. The higher the rotation speed, the more the weights diverge and the higher the SOP becomes.
The further pursuit of efficiency added a vacuum colleague to the centrifugal regulator as assistants. The fact is that as the load increases, the filling of the cylinders with the combustible mixture also increases, since the driver puts more pressure on the accelerator. At the same time, the percentage of residual gases in the working mixture decreases, which helps to increase the combustion rate. Therefore, the SOP must be reduced.
On the contrary, when the load on the engine decreases, the filling of the cylinders decreases, the content of residual gases increases, and therefore the working mixture will burn more slowly. In this case, the OZ needs to be increased. This problem is solved by a vacuum regulator that monitors the vacuum in the engine intake pipe. The higher the load, the lower the vacuum, and vice versa. In most classic engines, centrifugal and vacuum regulators work together.
If the octane number of the fuel does not correspond to the one that guided the designer when designing the engine, then even with optimal operation of the mentioned regulators, you should not expect normal operation of the engine. The most unpleasant phenomenon that can occur is detonation. Roughly speaking, this is an explosive combustion of the mixture, fraught with major repairs. To prevent detonation in classic engines of a bygone era, it was necessary to open the hood and manually turn the distributor housing in the desired direction. Filled with low-octane gasoline - if you please, delay the ignition...
It goes without saying that in modern engines the optimal SOP is set by the control controller. It monitors speed, load, octane number, temperature, etc.
Step-by-step instruction
You can install the ignition on a VAZ 2106 in 13 simple steps:
- We remove the spark plug of cylinder No. 1, close the hole for the spark plug with a rubber plug and finger.
- Using a special wrench, turn the crankshaft. As you move, the compression stroke should begin in the first cylinder. At this moment, the piston will move upward, creating internal pressure. You will feel it when the rubber plug begins to squeeze out of the hole.
- At this moment we begin to monitor the progress of the mark on the pulley. It should ultimately align with the mark on the timing belt. If you are using fuel with an octane rating of 95 or 92, then you need to align it with the second mark (5 degrees). If the fuel used is 72 or lower (which happens very rarely today), then you need to strive for the third mark (0 degrees)
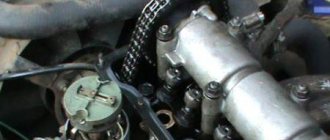
- Remove the cover from the distributor, having first unfastened the latches.
- Due to the movement of the crankshaft, the distributor rotor must face the first cylinder.
- Now it is important to ensure that the line of the distributor cover latches is parallel to the axis of the motor. If this condition is not met, the following procedures must be carried out.
- Remove the nut securing the distributor and turn it upward. Next, we twist the rotor axis and achieve its parallel position relative to the motor axis.
- We return the distributor to its place and screw the nut not all the way.
- Only now is the actual process beginning, thanks to which we will be able to correctly configure the contact ignition.
- We connect the volt-ohmmeter so that one end is connected to the coil terminal connected to the distributor cable with low voltage, and the other end is fixed to ground.
- Turn on the ignition. Carefully turn the distributor clockwise until the light switches off. If it doesn’t light up, then there’s no need to turn anything.
- Now we begin to turn the distributor in the opposite direction until the light bulb lights up. In this position, fix the distributor by tightening the nut tightly.
- The ignition adjustment is completed, you can turn off the ignition and return the distributor cap back.
Now we can verify whether the ignition was installed correctly. We start the engine and start driving. You need to accelerate to 45 kilometers per hour. Upon reaching the desired speed, engage fourth gear and sharply press the gas pedal. After a couple of seconds, the engine should begin to detonate (popping noises will be heard, “fingers” will begin to ring). As soon as the car reaches a speed suitable for the selected gear, the detonation will disappear.
If the detonation does not disappear, it means that you made the adjustment incorrectly and received the so-called “early” ignition. This means you need to slightly turn the distributor clockwise by half or one division. If detonation does not occur, then you have “late ignition” installed. In this case, turn the distributor counterclockwise by half or one division.
As soon as you were able to set the ignition on the VAZ 2106 correctly, make a reliable mark on the distributor body, which will serve as a good help for subsequent adjustments.
How to regulate OZ?
Aurally? By spark? By a light bulb? By strobe? Let's figure it out now.
Let’s say right away that we won’t talk about the strobe light. Firstly, the average driver simply does not have it at hand. And, secondly, it’s better not to mess with him. The fact is that the strobe light shows the ignition timing only when the engine is running, but at the same time, due to the centrifugal regulator, the OZ is shifted towards advance even at minimum idle speed. Therefore, generally speaking, there is no point in waiting for precise adjustment.
The correct adjustment recommendations are always contained in the specialized literature for a specific car model - they should be followed. Let's take for example the AZLK-2141 car with a UZAM engine and a contact ignition system. Please note that the slider on Ufa engines rotates COUNTERclockwise.
The sequence of operations for a Moskvich engine should be as follows.
- Loosen the distributor fastening.
- We determine the beginning of the compression stroke in the first cylinder. To do this, we turn out the spark plug of this cylinder, plug the hole with a suitable plug (even from crumpled paper) and turn the crankshaft with the starting handle until the plug pops out.
- We continue to turn the crankshaft until the first mark on its pulley aligns with the tip of the ignition installation pin pressed into the lower crankcase cover.
- We make sure that the slider is looking with its current-carrying plate at the contact of the distributor cover, corresponding to the wire of the first cylinder.
- We connect any low-power light bulb (for example, in a test screwdriver) with one end to ground and the other to the low voltage terminal of the coil connected to the breaker.
- Turn on the ignition and turn the distributor body counterclockwise until the breaker contacts close. The lamp shorted by the breaker should go out.
- Holding the slider, apply a small force clockwise to eliminate gaps in the drive mechanism, then slowly turn the distributor clockwise until the light comes on.
- Tighten the distributor fastening. Don't forget to return the candle to its place!
On cars like the VAZ-2108, which switched to electronic ignition, but at the same time retained both centrifugal and vacuum regulators, the procedure is completely similar - up to a different location of the standard marks. The slider rotates counterclockwise. However, the probe lamp must be connected between the switch and the ignition coil, and in no case to the Hall sensor.
What does the expression “set by spark” mean? Roughly speaking, the same as with a light bulb. In this case, instead of a light bulb, use a spark plug that has been unscrewed in advance, the threaded part of which must be connected to the engine ground. Instead of the light bulb lighting up, we catch the moment the spark jumps - that’s all.
Setting the spark advance angle
How to set the ignition with your own hands? When installing electronic ignition in your car, you can use several methods, one of them is adjusting the angle by spark. To do this, using the crankshaft, the piston of cylinder 1 is set to a lower TDC. In this case, the distributor should be directed towards the cylinder wire contact. If it faces the other way, you need to turn the flywheel again.
Next, the central high-voltage cable should be removed from the distribution unit cover, the contact of which should be placed approximately 0.5 cm from the car body or cylinder head. The distributor fastening should be loosened, after which the ignition will be activated. The body of the interrupter assembly rotates, and by the movements of the slider you should find the desired position at which a spark will appear between the contact of the high-voltage cable and the ground of the car. Next, the breaker moves counterclockwise (very slowly), and you need to catch the moment when the spark no longer appears (the author of the video about setting up an RCD using a special strobe device is Vladislav Chikov).
How to set the ignition of a VAZ 2106 with your own hands
One of the most important factors affecting the operation of the internal combustion engine is the ignition system. Incorrect operation of the ignition system leads to detonation. In this case, detonation actively destroys the cylinder-piston group.
Considering that many cars do not have a so-called electronic ignition system, it is very important to be able to set the ignition correctly. The quality of engine operation, its starting, as well as fuel consumption, dynamic performance of the vehicle, the overall resource of the internal combustion engine, etc. depend on this.
Next, using the example of a VAZ 2106 car, we will look at ignition adjustment and possible problems that arise in the ignition system, which cause malfunctions in the car’s engine.
Replacing the starter relay
Another common problem on VAZ 2107s with a carburetor is a malfunction of the starter relay. When you turn the key in the lock, the system makes a click, but the retractor relay does not operate. Replacing the relay is very simple.
First you need to remove the starter from the relay. Unscrew the 2 bolts that secure it. Slide it to the right and take it out, turning it backwards. Unscrew the nuts securing the starter and relay.
Unscrew the terminal.
Turn it to the side.
Remove the 2 bolts securing the relay to the starter.
Remove the relay.
Install the new one in reverse order.
What does the contact ignition system of VAZ cars consist of?
As you know, long-term and uninterrupted operation of the internal combustion engine of any car depends on many factors:
- operating conditions of the power unit and load;
- quality of fuel and lubricants;
- operation of the power system;
- proper operation of ignition systems, etc.
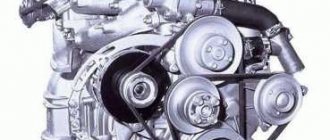
As for ignition, the contact ignition system is structurally simple, inexpensive to maintain, reliable and efficient. Main components using the example of VAZ 2106:
- distributor VAZ 2106;
- mechanical drive of VAZ 2106 distributor;
- high voltage wires;
- spark plug.
Checking the ignition angle while the vehicle is moving
It is best to check the functionality of the ignition system after any adjustment while driving. This is due to the design features of the distributor and the octane number of the gasoline used. It happens that the ignition angles set according to the marks do not provide sufficient dynamics and throttle response. Adjusting by ear according to the beginning of detonation will help:
- We accelerate the car to a speed of 45-50 km/h on a flat section of the road;
- We turn on direct transmission (fourth on the VAZ 2106) and press the gas pedal all the way;
- A characteristic ringing sound (detonation) should appear, which will disappear after 2-3 seconds, and the acceleration will be smooth and powerful without failures;
- If detonation does not disappear throughout the entire acceleration, then the ignition angle is “early”;
- The complete absence of ringing and sluggish dynamics indicate a delayed spark in the cylinders;
- We adjust the position of the distributor in place, turning it by 3-5 degrees;
- When the adjustment is completed, the position of the distributor body relative to the block is marked with a mark or paint.
Ignition adjustment work should be carried out regularly. The service interval for a simple contact ignition system is 15,000 km, for an electronic one - twice as long. The condition of the spark plugs and high-voltage wires is also regularly checked. All setup operations can be easily done independently; a garage is not needed for this. The skill of independently repairing the ignition of a VAZ 2106 will always come in handy on a long journey or in winter, when problems arise with starting.
Adjusting the ignition of the VAZ 2106 is a very important and useful procedure. Several points depend on it:
- uninterrupted operation of the power unit;
- easy start;
- normal fuel consumption;
- acceleration dynamics.
If the ignition is adjusted incorrectly, detonation may occur during operation of the power unit. And this, in turn, can lead to a major overhaul of the engine itself.
It’s interesting that in practice, many drivers have their own opinion on how to set the ignition on a VAZ 2106. Some use what is called “by eye,” while others purchase a strobe light for this purpose. Some people don’t try to do it themselves and entrust this work to car service specialists.
To set up the ignition on a VAZ 2106 car with your own hands, use the instructions below.
You need to take with you to the garage:
- candle key;
- key to 13;
- a voltmeter or an ordinary twelve-volt light bulb.
Contact ignition is installed on the first cylinder.
Set the ignition timing using marks of different lengths that are placed on the timing cover.
Ignition of VAZ 2106: possible malfunctions and signs of problems
If the contact ignition system fails, this affects the operation of the internal combustion engine, namely:
- the engine does not start;
- uneven engine operation;
- when you press the accelerator pedal, the operation of the internal combustion engine does not become uniform;
- misfires;
- crankshaft speed is not equalized;
- The internal combustion engine does not develop full power.
Now let's look at the main causes of malfunctions in the ignition system of a VAZ 2106 car, as well as ways to eliminate them. First of all, incorrect operation of the ignition system is due to untimely ignition of the mixture in the combustion chamber, which leads to imbalance in the operation of the internal combustion engine and loss of power, increased fuel consumption, smoky exhaust, etc.
Causes of failures in the ignition system:
- wear of the contacts of the distributor cover;
- failure of the “runner”;
- distributor bearing failure;
- malfunctions in the operation of the mechanical drive of the distributor (the “pig” is faulty);
- failure of the distributor capacitor;
- breakdown of high-voltage wires or protective caps of spark plugs;
- breakdown of the spark plug skirt contact on the engine body;
- wear of contact elements of spark plugs;
- general breakdowns in the vehicle's power supply system (lack of charging of the generator, insufficient voltage in the vehicle's electrical system);
- installation of low-quality or defective spark plugs.
Maintenance of the contact ignition system includes removing oxide from contacting or rubbing contact elements, replacing mechanical hinge and bearing connections, as well as replacing spring-loaded contact groups (runner).
First stage: adjust the angle of the closed state of the contacts
A similar procedure is necessary in the case of classical and transistor ignition systems. In the case of using a thyristor system, the UZSK indicator does not particularly affect the overall functioning of the element.
First of all, you should dismantle the distributor cover. If you have a classic ignition system, we clean the contacts of the distributor (you just need to remove the tubercle on one of the contacts). Next, it is important to check whether the contacts are in sufficient contact with each other. If necessary, everything should be adjusted.
Then, during the installation of the UZSK VAZ 2106, we turn the crankshaft to maximize the distance between the contacts. We unscrew the screw, insert a 0.4 millimeter thick probe between the contacts, and fix the position with the screw. It is important that the thicker feeler gauge cannot penetrate the gap.
Next, rotate the crankshaft using a special wrench. If it is not there, then move the gearbox to fourth speed, after which we slowly push the car.
Next, adjusting the ignition 2106 involves setting the desired UZSK value. It is important to achieve an angle that reaches 55 degrees, with the range being between 52-58 degrees. To do this, you should use a tachometer, which has a built-in function specifically for measuring UZSK. To do this, we assemble the distributor, connect the tachometer to it, and then start the engine. Having discovered that the indicator is outside the required parameters, you should start adjusting the gap again.
You can also remove the high-voltage wire from the distributor cover and then connect it to the ground of the vehicle. Next, we connect a 12-volt light bulb to the wire that is connected to the coil. If you turn on the ignition, the light will come on when the distributor contacts are open. In the case of a tristor system, instead of a light bulb we take a voltmeter. Rotate the crankshaft until the contacts are open. We measure the angle that will be obtained in this position. You can also measure the arc length along the distributor body (it should reach 31-34 mm).
Ignition adjustment of VAZ 2106: preparatory work
If malfunctions occur in the operation of the ignition system, it becomes necessary to adjust it. It is possible to adjust the ignition system either independently or in specialized service centers.
To accurately adjust the ignition, you need a strobe device, which allows you to adjust the car’s ignition in such a way that the internal combustion engine power is maximum, fuel consumption is minimal, and emissions into the atmosphere are within the permissible limits.
How to set the ignition on a VAZ 2106 with your own hands
For independent work on adjusting contact ignition, you will need the following tools and equipment:
- socket wrench set to “13”;
- voltmeter or 12 volt test light;
- spark plug wrench (for installing and removing spark plugs of a car’s internal combustion engine).
The adjustment is carried out on the first or fourth cylinder. Please note that on the VAZ 2106, the ignition is set using marks located on the gas distribution mechanism cover (short - advance angle 10°, medium - advance angle 5°, long - advance angle 0°).
So, in order to understand how to set the ignition on a VAZ 2106 yourself, you need to study the procedure for performing the work. Let's look at how to set the ignition of a VAZ 2106 to the first cylinder:
- Having unscrewed the spark plug of the first cylinder, close the spark plug hole with a rubber plug;
- using a spanner wrench, turn the crankshaft to the compression stroke position in the first cylinder (the rubber plug will be squeezed out);
- continue to turn the crankshaft until its mark coincides with the mark on the timing belt (the middle mark is fuel grade “92” or “95”, the long mark is fuel grade below “72”);
- Unfasten the latches and remove the ignition distributor cover;
Basic aspects of different types of ignition, contact adjustment
Overall, installing an electronic ignition is not a particularly difficult task if you approach it wisely. If you have difficulty setting it up, you can use a device to set the ignition timing; you can find it for sale in any store. It should be noted that if your car is equipped with gas equipment, installing an ignition timing variator will help you.
You also need to take into account that regardless of the system - electronic or mechanical - the procedure for setting the angle looks identical. The only difference is that in the mechanical version, sparks appear as a result of opening the contacts.
So before adjusting, you should adjust the gap between the contacts:
- The crankshaft must be turned until the greatest distance appears between the contacts.
- Using a feeler gauge, you need to check the gap and compare it with the one prescribed by the car manufacturer.
- Using the plate, you need to set the appropriate gap and tighten all the screws.
What's the result?
Although there are several options for setting the ignition on a VAZ 2106, the method discussed above is the most correct and accurate. Moreover, all stages of the work performed are quite simple.
If you have the tools and skills, even a novice car enthusiast can handle setting the ignition. If problems arise with ignition adjustment, you can always seek help by using the services of qualified technicians at a service station.
Finally, we note that the most important criterion when setting the ignition is not engine power and fuel consumption, but the maximum possible exclusion of engine detonation.
We also recommend reading the article on how to determine whether ignition is early or late. From this article you will learn about the signs that indicate that the ignition is earlier or the ignition is late, as well as why and what ignition adjustments are needed in this or that case.
For this reason, after adjusting the ignition, it is important to check the operation of the engine not only with a strobe light, but also in all modes to ensure there is no detonation and normal operation of the power unit under load.
Ignition performance monitoring
The results of the ignition adjustment must be tested while the car is moving. Before this, pre-warm the engine and after accelerating 45-50 km/h, engage 4th gear and vigorously press the gas pedal. If the ignition is adjusted correctly, at this moment characteristic popping noises as a result of detonation should appear briefly (1-2 seconds) and immediately disappear, followed by a vigorous increase in speed. If this does not happen, turn the distributor body 1 position counterclockwise. When detonation continues for more than 2 seconds, the housing must be turned clockwise by 1 division.
Distributor installation
This procedure occurs differently on all cars. Very simple installation of the distributor on domestic Moskvich vehicles, ZAZs and GAZs. In the shank of their distributors there are two crescents of different sizes. Exactly the same sector is present in the drive located in the engine block. When installing the distributor, it is enough to ensure that the direction of the crescents of the shank coincides with the drive.
On the body of the distributor of most cars from foreign manufacturers there are special marks for reference, which greatly simplifies its installation.
How can you set the ignition timing?
Ignition timing adjustment is required for complete combustion of fuel in the chambers. Due to the fact that gasoline does not burn instantly, it must be ignited a little before the piston reaches TDC. Therefore, the moment of spark occurrence must be clearly regulated.
Video - problem of early ignition on VAZ 2106:
There are several ways to perform this procedure. Many craftsmen trust exclusively their ears and prefer to do everything by ear. Some auto mechanics use light bulbs or a strobe light to set ignition timing.
Adjusting the ignition by ear
The process occurs at idle speed of a running, warmed-up engine (if necessary, you can slightly tighten the choke to ensure stable operation).
- The nut securing the distributor body is loosened, after which it begins to slowly rotate in different directions.
- In the position where the engine speed is at its maximum, you need to try to “accelerate”. If, when you press the pedal sharply, no interruptions, pops or shots occur, and the acceleration of revolutions is rapid, then the required position has been found.
- From this point, turn the distributor body 1-2° clockwise, and then tighten its lock.
Completing the last point is necessary so that the ignition is not too “early”, which creates unnecessary resistance to the rotation of the crankshaft.
Note! Sometimes it is not possible to achieve ideal engine operation due to incorrect operation of the fuel system components or poor quality of the fuel mixture. In such cases, you need to be content with the most optimal solution, and after adjusting the carburetor, adjust the ignition again.
Setting the spark advance angle
The piston of the first cylinder must be set to the upper position by rotating the crankshaft until the pulley mark coincides with the first mark on the timing block.
In this case, the distributor should be directed towards the contact of the wire of the first cylinder. If it turns out to be in the other direction, you need to perform another full revolution of the flywheel. You can also look for the desired position by unscrewing the spark plug from the first cylinder.
The central high-voltage wire is removed from the distributor cover, and its contact is placed at a distance of 5 mm from the vehicle ground. After loosening the distributor lock, you need to turn on the ignition.
Slowly turning the distributor body, you need to move the slider left/right to find the position at which a spark will occur between the wire contact and the ground.
Next, moving the distributor a millimeter in a counterclockwise direction, you should catch the moment at which the spark stops appearing, and then tighten the latch.
Adjusting the ignition by light bulb
Initially, the piston of the first cylinder is installed in the position preceding the TTM (aligning with the middle mark) in the manner described above. Next, one wire of a regular car light bulb is connected to ground, and the other to the wire leading from the coil to the distributor.
Video - how to set the ignition by a light bulb:
When the ignition is turned on, the distributor housing rotates in different directions until the light comes on. Having stopped the distributor in this position, you need to fix it.
There are very rarely cases when a machine works great even with significant mismatches of marks. This may be caused by incorrect previous engine assembly or timing chain stretching.
Installing the ignition with a UAZ light bulb
I found this method of adjusting the ignition on a 2106 on the Internet. It seemed simple to me to do in a garage, and I was wondering: is it possible to adjust the ignition on a UAZ in the same way?
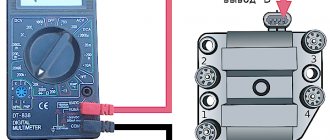
This method can be called classic, since it is described in almost all automotive literature. You will need a 12 V light bulb with two wires connected to it (options are a voltmeter or the probe described below) and a special one. key for turning the crankshaft (preferred). Using a key, we turn the crankshaft so that the mark on the pulley is positioned in a given way relative to the marks on the cover of the gas distribution mechanism (see Fig. 1), and at the same time the distributor slider is opposite the high-voltage wire of the 1st cylinder (cylinder counting comes from the front of the engine). If there is no special key, you can engage 4th gear and push the car until the crankshaft reaches the desired position. We connect one of the wires of the light bulb to the wire going from the distributor to the ignition coil, and connect the second to the ground of the car. We remove the central wire from the distributor cover and lean it against ground. Loosen the bolt securing the distributor body. Turn on the ignition.
Turn the distributor body clockwise until the light goes out (the distributor contacts are closed). Then slowly rotate in the other direction until the lamp lights up (the contacts open). In this position, fix the distributor body with a bolt.
If a transistor or thyristor ignition system is used, it is possible that the voltage at the contacts of the distributor is not enough to light the light bulb. In this case, you need to use a voltmeter or diode probe. https://forum.uazbuka.ru/attachment.php?attachmentid=68528&stc=1&d=1295854653
I found this method of adjusting the ignition on a 2106 on the Internet. It seemed simple to me to do in a garage, and I was wondering: is it possible to adjust the ignition on a UAZ in the same way?
In a standard UAZ induction distributor there is an arrow on the stator and a mark on the rotor. You combine the marks on the HF pulley, and then the marks in the distributor and you don’t need any light bulbs (:
Well, yes.