In what cases should you replace the low beam bulb?
To prevent low beam failure from catching the car owner on the road, it is necessary to carefully monitor the condition of the lamps in the headlights and, if the first symptoms of malfunction are detected, immediately replace them with new ones. These are primarily the following signs:
- Direct lamp burnout when turned on before a trip.
- Deterioration in power, brightness and luminous flux.
- Constant flickering.
- Switching on every other time.
- Burnout of one or several light bulbs (filaments) in the headlight, for example, not only the low beam, but also the high beam.
Moreover, depending on the type, signs of damage to the light source may have their own specifics. So, the first sign of the need to change an LED is a significant deterioration in its brightness. LED elements can work for a very long time, but the quality can drop sharply. Therefore, it is better not to wait until the lamp goes out completely, but to replace it with a new one.
Xenon disease in low beam is the difference in ignition time between the right and left headlights. In this case, the problem may not necessarily be hidden in the lamp itself, but also in the electronic initiation device. Halogen lamps are the most difficult to detect when they break. As a rule, they do not show visible signs until they completely burn out. However, in most cases, such an event does not occur before the service life specified by the manufacturer. Therefore, at the end of it, it is better to replace them with new ones, or at least carry them with you in reserve.
Why might the low beams not turn on?
In addition to burnout, the lighting device may not turn on for a number of reasons:
- Relay contacts have oxidized. To understand that this particular reason caused the lamp to turn off, you need to listen to how the relay works. If the contacts are oxidized, the relay will constantly click. To eliminate the breakdown, you need to clean the power terminals.
- The fuse has blown. This equipment cannot simply break; perhaps liquid got on the lamp base, resulting in a breakdown. The fuse should be changed and the cause of the problem should be identified.
- If there is zero voltage at the connector contacts, then it is better to immediately contact a technician; you will not be able to solve the problem yourself.
In the absence of all of the above reasons, the probability of the lamp burning out is 99%.
Reasons for frequent light bulb burnouts
The manufacturer indicates the working life of halogen and other lamps on the packaging - from 500 to 750 hours. But often elements do not fulfill the required deadline for the following reasons:
- The voltage level of the on-board electrical network does not correspond to the norm or constantly “jumps”.
- Water gets inside the headlight unit.
- In the power supply circuit of the lights, contact is lost due to oxidized terminals or broken wires.
For normal operation of lighting fixtures, a constant voltage of 12–13.5 volts is required. Exceeding the specified threshold leads to an increase in the brightness of the glow (imperceptible to the eye) and a reduction in service life. Frequent replacement of the low beam lamp is the result of constant operation at increased voltage provided by the car generator.
The reasons lie in the following malfunctions:
- problems with the electronic voltage regulator;
- drive belt slippage;
- problems with the generator.
It is quite easy to detect excess voltage - connect a voltmeter to the battery terminals, start the engine and take a measurement at idle. If the reading exceeds 13.5 volts, look for one of the following faults.
Dimensions of VAZ 2104, 2105, 2107 do not light up
On VAZ 2104, 2105, 2107 cars there are 4 side lights (dimensions): one in the front headlights and one in the rear lights.
Failure of any of them to work is a fairly common occurrence. Let's look at the reasons for this malfunction - “why the lights on VAZ 2104, 2105, 2107 cars don’t light up.”
Symptoms of a malfunction: “VAZ 2104, 2105, 2107 dimensions do not light up”
One dimension, two dimensions (front or rear, right or left side, crosswise) or all of them may not work.
Causes of the malfunction “dimensions of VAZ 2104, 2105, 2107 cars do not light up”
The side light bulb is burnt out
The most common reason. One light bulb, or several at once, can suddenly burn out. In some cases, it may be impossible to visually identify a burnt-out light bulb. Therefore, we replace the burnt out one with a known good one. You can use a similar one from a nearby headlight.
The contacts of the light bulb in the socket have oxidized
We rotate the light bulb in the socket several times to remove the oxidized layer and restore contact. In the future, you can clean everything with sandpaper.
Lost ground to headlights or taillights
Loss of contact with ground leads to failure of not only one size, but also the entire headlight or rear light.
The “negative” wires of the front headlights and rear lights with side lights on VAZ 2104, 2105, 2107 cars are attached to the car body. It is necessary to clean the mounting location to ensure good contact with ground. Usually the negative wire is the black wire from the headlight connection block, attached to the body next to the headlight or tail light.
Broken contact in the headlight or rear light connection block
Either it has oxidized or the block is not attached tightly. In such a situation, either one side lamp or the entire headlight may not light. We put on and take off the pad several times to restore contact.
The track in the rear light board has crumbled
During long-term use of the vehicle, or if a low-quality part is installed, the track to the side light lamp socket in the rear lights may shed (burn out).
Contact is broken in the connecting blocks of the relay and fuse mounting block
Check the pads Ш12 (Х12), Ш13 (Х13), Ш9 (Х9), Ш6 (Х6) of the mounting block. Or Ш2 (Х2) - terminals 1 and 3 if all the dimensions do not light up.
The fuse in the mounting block has blown
If fuse No. 14 (F14) is blown, the side lights in the front left headlight and rear right headlight will not light. If No. 15 (F15), then the marker in the front right headlight and rear left lamp will not light up, that is, crosswise.
The fuses must be replaced with serviceable ones and the cause of their burnout must be determined in the future. There may be a short circuit in the electrical circuit.
The external lighting switch on the instrument panel is faulty
All dimensions will not light up. Remove the switch and remove the wire block from it. Connect the leads of the black and yellow-red wires with a piece of wire. Turn on the ignition. If the dimensions light up, the switch is faulty and must be replaced.
“Open” in the electrical circuit connecting the side lights
It is necessary to check the sections of the circuit responsible for the non-burning light using the connection diagram. Read more: “How to find an open circuit in a car’s electrical circuit.”
Scheme for switching on the external lighting of a VAZ 2105 car
Wiring diagram for dimensions 2107.
Connection diagram of dimensions (external lighting) of a VAZ 2107, 21074 car
Notes and additions
— For a mounting block with finger fuses, the designation of the pads is “Ш” and the fuse is “№”. For mounting block with blade fuses “X” and “F”.
— On VAZ 2104, 2105, 2107 cars, A12-4-1 (T4W) side light bulbs are used in the headlights and rear lights.
TWOKARBURATORS VK -More information on the topic in our VKontakte group TWOKARBURATORS DZ -and in Yandex Zen
— Turn signals of VAZ 2104, 2105, 2107 do not work
— External lighting switch VAZ 2107
— The low or high beams of VAZ 2107, 2105, 2104 do not light up
— Checking high-voltage wires on VAZ 2104, 2105, 2107
— Connection diagram for the electric motor of the heater fan VAZ 2104, 2105, 2107
— Contacts of steering column switches VAZ 2104, 2105, 2107
Replacing the low beam bulb:
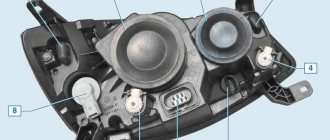
Note! In fact, such a headline will not be very correct, since this replacement will be made on the outer headlight, but not everyone knows what it is and therefore it will be easier for people, but still, so that you know for those who don’t know, the outer headlight is the one that goes closer to the wing, see the photo for more details:
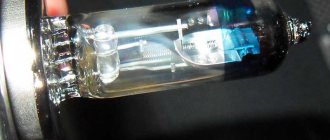
To replace the lamp in this headlight, you will need to stock up on: H412V 60/55W bulb, as well as a screwdriver!
1) First, unscrew and remove the headlight trim from the vehicle. (For information on how to remove the trim, see the article entitled: “Replacing headlights on a VAZ”, point 3)
Note! If during the removal of this headlight you have problems with removing the cladding, that is, you will not be able to remove it, then take a screwdriver in your hands and use it to carefully pry up the protective cladding and then remove it from its installation location!
2) Next, loosen but do not completely remove the screws that secure the headlight rim.
3) Then take the headlight itself with your hand and turn it until all the screws disengage and move into the hole, thanks to which the headlight will need to be removed.
Note! When you remove the headlight, disconnect the wire block from its rear part and thereby completely remove this headlight!
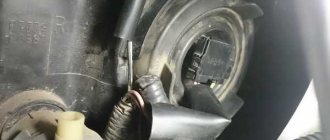
4) Now that the headlight is removed, turn it over and use a screwdriver to remove the two springs that secure the lamp itself.
5) And after the springs are folded back, remove the damaged (Burnt) light bulb from the inside of the headlight.
Note! Installing a new lamp and replacing the headlight itself occurs in the reverse order of removal!
When installing the cladding in its place, be careful not to break the tendrils of its fastening, and to prevent this from happening, install this cladding like this:
1) First install the headlight trim on the radiator trim only, but be sure to always start installation from the bottom.
2) And then slightly lift the headlight trim and thereby press it from above and it will snap into place.
Step-by-step instruction
To replace a burnt-out lamp in the low-beam optics on a VAZ model 2106, you will need screwdrivers (flat-head and cross-head) and pliers. The repair procedure itself consists of the following steps:
- Disconnect the vehicle's on-board power supply and, if possible, disconnect the wiring from the battery terminals.
- Use a flat-head screwdriver to remove the trim panel on the outside of the headlights.
- Use a Phillips screwdriver to unscrew the bolts (not completely) securing the rims of the glass cups.
- The headlight is grabbed by hand and turned until the fastening screws fit into the grooves and it can be removed.
- The optics unit is removed from its seat.
- The block with conductors is disconnected from the back.
- Next, the headlight is installed with glass on a flat surface, and a pair of spring-clamps are bent to remove the lamp.
- The burnt-out light source can then be removed from the unit by pulling it up.
- Replace with a new copy.
- Reassemble in reverse order.
- Connect the car's power supply and check that the installed low beam lamp is working properly.
Removing and installing headlights on a VAZ 2106
First you need to get rid of the spring, which can be removed quite simply with pliers:
Then unscrew all the remaining bolts securing the headlight housing and remove the rim:
Now we unscrew a few more screws that were under the VAZ 2106 headlight ring:
Next, we take out the case and pull out the wires from it, after squeezing out the sealing rubber from the inside:
The result of the work done is clearly shown in the photo below:
The price of one headlight on a VAZ 2106 is 500 rubles, respectively, if you decide to change the entire set, it will cost you 2000 rubles.
Replacing the high beam bulb:
Note! As you already noticed, the title was again written in a simple way, so to speak, in fact, replacing the light bulb in this article will be carried out on the internal headlight, and the internal headlights, as you already understood, are located closer to the radiator grille, for greater clarity they are shown in the photo below:
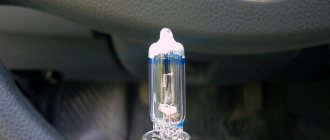
To replace the high beam lamp you will need to stock up on: A screwdriver, as well as the 3H412V 55WH1 light bulb itself. (What this lamp looks like, see below)
Even before you start changing this headlight, be sure to look at the section “Replacing the low beam bulb”, it will describe how to properly remove and install the headlight trim, so be sure to remove it and only after that proceed to the operation described below!
What headlights are used on the VAZ 2106
The head optics on the VAZ 2106 is a block in which two headlights are located: high beam and low beam. The low beam bulb is installed closer to the edge of the body. The elements have separate connections and are switched mechanically via a button or lever in the cabin. Standard for Zhiguli, halogen lamps with an H4 base of 12 Volts and a power of 60/55 W were used.
Halogen lamps remain the most popular today; many people use modern optics from Bosch or Osram when replacing them. It should be taken into account that according to the operating rules for lighting for the VAZ 2106, only halogen lamps can be installed in the headlights.
Bixenon
Many drivers decide to replace standard halogen lamps with modern bi-xenons. The main difference between a standard xenon lamp and a bi-xenon lamp is that bi-xenon is used for high and low beam, changing the brightness and length of the light flux depending on the angle of the protective curtain in the headlight unit.
When installing a xenon lamp, you will need to re-equip the headlight housing and install an ignition unit. The operating principle is based on the glow of the gas mixture after the arrival of a high-frequency pulse; the design does not have a standard filament.
Xenon lamps are more practical than halogen lamps, have a 200% longer service life, provide an even white light close to daylight, and are heat-resistant.
Tuning involves replacing both all four headlight lamps and installing two sets. In terms of illumination level, two bi-xenon headlights provide the entire spectrum of vehicle illumination. The diffuser is coated with chrome paint.
LED bulbs
LED blocks are used as an alternative to xenon. For VAZ equipment, the Sho-Me G1.2 H4 30W kits are considered the most popular. Three blocks of LEDs are mounted in the headlight housing, which provide head lighting. Advantages of LED headlights compared to standard optics:
- vibration-resistant elements;
- Moisture protection is installed for each block;
- 50% cheaper than xenon lamps;
The main advantage of LED lighting over xenon lighting remains quality. The high beam beam does not blind oncoming drivers and is easily adjusted. One of the disadvantages of LEDs is their high energy consumption.
Recommendations
When faced with the question of what running lights are on a car and how to service them, the driver of the vehicle begins to study the nuances and details of this process. The serviceability of lighting devices is mandatory for the safety of passengers and the car owner. Therefore, it is necessary to change and adjust the lighting on time and with a certain frequency.
LED low beam lamps
It is recommended to install LED low beam lamps. The advantages of the devices are their efficiency, affordable cost, and long service life. Along with other types of lamps, LEDs occupy a leading position. For drivers who are often on the road at night, it is recommended to install hella fog lights. They significantly improve visibility of the road surface and do not dazzle other road users.
It is impossible not to note the importance of the serviceability of the rear lights of the car. They must be powerful, have a durable body and excellent color temperature
The rear lights on the VAZ brightly illuminate the road in any weather and at night. A wide range of products allows you to choose modified spare parts with all kinds of additions and improvements. Thanks to this, the appearance of the car will become expressive and original.
Today, low beam h7 is considered the most popular and in demand. Installation is carried out on almost all cars in the same way, and the process is simple and quick. If the driver does not understand how to replace the low beam light bulb on Kalina, we recommend that you read the instructions above
It is important to follow the rules and take into account all recommendations, then the work will be done efficiently. This procedure will save money for the car owner.
Replacing bulbs in the reversing light and license plate light:
Note! Before we start replacing, let's figure out where the taillight lamps are located and where the license plate lamp is. Firstly, there are about four headlights in the rear light, one of which is located in the turn signal (indicated by Number 1), the second side light lamp (Number 2), the third reversing lamp (3) and the fourth brake light lamp (4). And the location of the license plate light bulb is indicated under the number 5!
To replace these lamps you will need to stock up: A screwdriver, as well as light bulbs. (The side light, as well as the license plate light, uses the A12-5 lamp. And for all the others, such as the turn signal, reverse light, and brake light, the A12-21-3 lamp is used)
For a better understanding of the situation, look just below the photo in which the rear trim has been removed from the luggage compartment, and the letter “A” indicates the socket in which the license plate light bulb is located, and the letter “B” indicates the nut that secures the lens to the headlight!
Replacing rear light bulbs: 1) To replace the bulbs, first remove the rear trim from the luggage compartment so that it is not in the way. (For information on how to remove the rear trim, see the article: “Replacing the gas tank,” points 2-5)
Note! And also if the side trim gets in the way, then you can remove it too!
2) Now carefully holding the diffuser, unscrew the nut from the inside of the trunk that secures it.
3) After unscrewing the nut, remove the lens from the car.
4) Next, lightly press with your hand the lamp that is installed in the headlight and then turn it slightly counterclockwise until the protrusions on the base of the lamp coincide with the grooves of the socket, and after matching, pull the lamp and thereby remove it from the car . (Absolutely all light bulbs are replaced in the same way)
Note! The new light bulb is installed in the reverse order of removal, and when installing the diffuser, first install it with the bottom part and only then, pressing it with your hand, tighten the nut in the inner part that secures this diffuser!
Replacing the lamp in the license plate light:
Note! In order to replace the lamp in this lantern, as you already understood, you do not need to remove the lens itself; you just need to remove the rear trunk trim to get to the lamp socket!
1) When the rear trim is removed, grab the socket in which the lamp is installed with your hand and then remove the socket along with the lamp from the flashlight.
Note! When removing a socket with a lamp, there is no need to remove the wiring block that is attached to the socket!
2) Now when you have the socket with the lamp in your hand, lightly press on this lamp and then turn it counterclockwise, and when it comes out of engagement, remove the lamp from the socket and insert a new one in its place.
Note! When you insert the socket together with the new lamp back, make sure that the protrusion that is on the socket (indicated by the letter A) meets the groove on the flashlight body, which is indicated by the letter B!
When all operations are completed, install the rear trim in its place!
Rear lights
The rear light on a Zhiguli consists of four lamps located in one housing:
- turn indicator;
- size;
- reverse light;
- stop signal.
The block is covered with glass or plastic with separate cells for each headlight. It is necessary to change the lamps in the rear headlights after the trunk trim has been removed, since the lens fastening nut is located in the passenger compartment. The license plate lamp socket is located near the rear headlights. The process of replacing light bulbs in the rear unit goes through stages.
- Holding the diffuser with one hand, unscrew the nut located in the trunk.
- Remove the diffuser.
Regardless of which lamp needs to be changed, clearance or stop, all lamps are removed from the VAZ 2106 taillight in the same way.
Lightly press the lamp. Turn counterclockwise. The protrusions on the base must match the gaps in the cartridge. Pull out the light bulb. Replace in reverse order.
The diffuser, before it is tightened with a nut, is always installed into the headlight unit from below and only then pressed by hand over the entire area.
Lighting repair
Possible causes of malfunction
So, if the low beam on a VAZ 2106 in one of the headlights has disappeared, then, as mentioned above, most likely the light bulb has burned out.
If replacing the lamp does not produce results, then the following malfunctions may occur:
The contacts in the block are oxidized or burnt; The fuse has blown; The relay has failed; The switch is faulty; There is a break in the circuit.
Below we will take a closer look at how to diagnose and fix the problem.
Replacing a light bulb
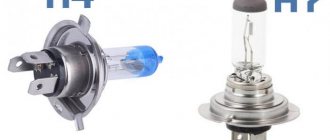
First of all, it should be said that the low beam lamp on the VAZ 2106 complies with the H4 standard, i.e. it has two threads, which allows the headlight to operate in two modes. Currently, such light bulbs are produced by different companies, both well-known brands and little-known companies.
It should be noted that domestic light bulbs are very popular among car owners. Their price is significantly lower than their imported counterparts, but at the same time they are not inferior in quality.
Advice! It is advisable to change the bulbs in two headlights at the same time, since their service life is approximately the same. In addition, different lamp models may differ in glow.
Instructions for doing this work look like this:
First of all, you need to use a flat-head screwdriver to dismantle the plastic panel that frames the headlights.
This completes the process of replacing the light bulb.
Replacing fuses
If after replacing the light bulb the low beam headlight on 2106 still does not light, you should check the fuses. They are located under the instrument panel.
In this case, you need to pay attention to two fuses:
- No. 5 – protects the left headlight from short circuit;
- No. 6 – protects the right headlight.
It must be said that the low beam on the VAZ 2106 often does not work due to the fuse contacts being bent or oxidized. In this case, they need to be bent and cleaned. If the protective element has melted, it must be replaced.
Troubleshooting other problems
If the low beam on a VAZ 2106 does not light up, then to detect a malfunction you will need a multimeter to test the wiring, or at least a test light. The circuit and equipment should be checked according to the diagram below.
It must be said that the high and low beam relays on the VAZ 2106, which are indicated in the diagram as numbers 6 and 4, often fail.
Therefore, you can start checking with them.
These, in fact, are all the reasons why external lighting may not work on the “six”.
Advice! Many car owners are interested in how to improve the low beam on a VAZ 2106, which few people are happy with? The problem can be solved quite simply - connect low beam lighting in the second headlight. The fact is that this device also has a double-filament lamp, however, the third contact is not connected to the circuit.
How to replace
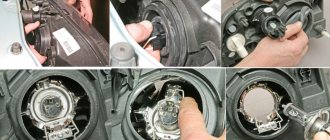
Always disconnect the battery before replacing lamps. It is enough to remove the negative terminal, but even for such a simple action sometimes you need a spanner. If the network is de-energized, dismantling can begin. The lamp base will be covered with a cover, and to remove it, no special tools are needed.
Each lamp is usually protected by a cover plate
There is always a plinth under the cover. First of all, disconnect the terminal block attached to the lamp contacts. The block with terminals is simply pulled back. No pliers or screwdriver are used in this step.
The block can be removed by hand
This is interesting: Error P0170 on Mitsubishi cars - step-by-step diagnostic and repair guide
The lamp base will be pressed against the headlight with a wire clamp. You need to press on the bracket and then disengage it.
At the last step, the lamp is not held in place by anything. You can pull it out and then install a new one in its place.
The old lamp was completely dismantled
When carrying out installation, all steps are performed in reverse order. The glass needs to be cleaned, for which the “Second” product is suitable. You should not touch a clean flask with your hands, so wear gloves.
To tighten the bracket, securing the base, you usually use a flat-head screwdriver.
Having installed the protective pad in place, check the work done. After connecting the battery, turn on the headlights. Let's say the lamp does not turn on, and the fuse, which was working, has burned out. Then you need to look for where exactly the short circuit appeared. Most likely, the positive wire was connected to the body.
It is better to change lamps in pairs, left and right at once. Even after replacement, it is recommended to carry out adjustments.
Adjust the direction of the light beam
Having driven the car away from the vertical plane by 5 meters, turn on the low beam. The top edge of the beam should be 75 mm lower than the center of the headlight. The boundary of the spot has the shape of a broken straight line, and the break point in the diagram is indicated by the letter “E”. Point "E" should not be moved to the left or right.
The car instructions indicate where the headlight adjustment screws are located. One of them adjusts the vertical tilt, and with the help of the second one changes the direction of the beam “right-left”. Something else hasn't been invented yet.
Preparation
Like any other process, replacing a lamp requires some preparation. First of all, you need to prepare the required number of new lamps, cotton gloves, pliers, keys, screwdrivers, a piece of clean cloth and alcohol.
The vehicle should be placed on a level surface and the handbrake should be applied. To prevent rolling, blocks are placed under the wheels. Next, disconnect the wire from the negative terminal of the battery. If the lamps are replaced in the right headlight unit, the washer reservoir must also be removed.
Required Tools
Replacing low beam elements differs on different cars. A simple option is open access to the back of the lantern to remove the burnt part and install a new one. In this case, you only need a 10 or 12 key to disconnect the car battery.
On some models, replacement will require removing the bumper, headlight or front wheel to access a special mounting hole. In this case, you should prepare:
Before removing the grille, bumper, wheel or headlight, the car should be washed in a car wash to avoid getting your hands dirty or scratching the paintwork with fine grains of dirt.
To change a light bulb, you need to carefully bend the clip or spring without using any tools.
Step-by-step lamp replacement
When the light goes out in one of the headlights, the driver first tries to find out the cause of the problem. If it is associated with a failed lamp, then you should replace the device with a new one. If this problem occurs and if the driver is not aware of how to change the low beam lamp on a viburnum, we suggest using the following instructions:
Replacing a low beam light bulb on a car
To correctly place the lamp in the right place, it is recommended to remember how it was originally connected and where the wires were located. Do not touch the glass of the lamp with your fingers, as this may damage the device.
Removing old light bulbs
There are no universal instructions for replacing low beam lamps in the headlights of any car. Therefore, you need to carefully study the operating instructions supplied with any model. If it is not in the technical documentation, you can contact the supplier or the manufacturer itself. As a last resort, a lot of useful information can be found on Internet resources devoted to this topic.
Nevertheless, you can still give some general recommendations for replacement:
This is interesting: The VAZ 2106 engine is troubled - we are studying the problem: can it be fixed with our own hands?
Installing a new lamp
When installing a new lamp, you need to consider two basic rules:
After the lamp has been changed, it is necessary to check its functionality. To do this, you need to connect the terminals to the battery, turn on the ignition and low beam.
Light correction
When a lamp is replaced, there is often a need to adjust the luminous flux. This happens for the reason that the filament in the new lamp is sure to move relative to the position of the previously installed one. However, this procedure is not so easy to perform - this will require special conditions - bringing the vehicle characteristics (tire pressure, ballast load, leveling) to factory parameters and a special adjustment stand. Therefore, it is hardly possible for the average car enthusiast to do it with his own hands - it is better to contact a professional car service center.
Advice! If the low beam lamp was replaced urgently and there is no time to stop by the workshop for professional adjustments, you can perform express adjustment yourself. To do this, you need to drive up to a garage door or a light-colored wall at a distance of about 5 meters and turn on both headlights. If there is no discrepancy between the repaired and intact ones, then no action is required. If the modified optics shine higher or lower, you need to use an adjustment screw, by turning which you can raise or lower the luminous flux.
Which lamps are suitable
Low beam headlights are the most frequently used optical element of any passenger car model. Many people use them not only at dusk, but also as daytime running lights. This is why they quickly fail. The VAZ 2106 series model is equipped with a 12-volt H4 lamp with a power consumption of 55 W. The characteristic features of such a lamp are the presence of two filaments - which determines its operation in two modes - far and near.
There are several types of lamps for low beam headlights:
- The incandescent light bulb is an outdated model, burns out quickly, is characterized by low energy efficiency, and is practically not used by modern manufacturers.
- Halogen. The most popular. They have a good service life and sufficient brightness and other lighting parameters for road conditions.
- Xenon. They are distinguished by a good bright white glow that is 3 times stronger than that of their halogen counterparts. Disadvantages - they require additional installation of an ignition unit, and can also blind oncoming road users.
- LEDs. They have the best characteristics - durability up to 100 thousand hours, high brightness, low energy consumption, no overheating. However, they are expensive and require a special reflector design for full operation.
Headlight faults and repairs
During operation, the owner of a VAZ 2106 does not always notice that the headlights are gradually becoming paler, forcing the driver to look closely at the road. The reason is the inevitable clouding of the lamp bulb after a certain time, so experts recommend getting into the habit of regularly replacing the lamps of the front lighting devices. If individual lamps or lights in the car do not light up, this may be due to:
- failure of one of the fuses;
- lamp burnout;
- mechanical damage to the wiring, oxidation of the tips or loosening of the electrical wires.
If the high or low beam does not switch, then most likely the high or low beam relay has failed or the contacts of the steering column switch have oxidized. In both cases, as a rule, replacement is required - respectively, a relay or a switch. It is also necessary to replace the three-lever switch if its levers do not lock or switch.
Experts recommend getting into the habit of regularly replacing headlight bulbs on your VAZ 2106
How to disassemble a headlight
To disassemble a VAZ 2106 headlight (for example, to replace the glass), you need to heat the sealant around its perimeter with a hairdryer, then remove the glass with a thin screwdriver or knife. A hairdryer is a convenient tool in this case, but not necessary: some people heat the headlight in a steam bath or in the oven, although this risks overheating the glass. The headlight is assembled in the reverse order - a layer of sealant is applied and the glass is carefully installed in place.
Replacing light bulbs
To replace a VAZ 2106 headlight bulb, you must:
- Remove the plastic cover using a flat-head screwdriver.
- Use a Phillips screwdriver to loosen the fastening screws of the rim holding the headlight.
Use a Phillips screwdriver to loosen the fastening screws of the rim holding the headlight.
- Turn the rim until the screws come out of the grooves.
The rim must be turned until the screws come out of the grooves
- Remove the rim and lens.
The diffuser is removed along with the rim
- Remove the headlight from the niche and disconnect the power cable plug.
The headlight should be removed from the niche, and then disconnect the power cord plug
- Remove the clamp.
To replace the headlight bulb on a VAZ 2106, you will need to remove the special lamp mounting clamp
- Remove the lamp from the headlight.
A failed lamp can be removed from the headlight
Reassembling the structure after replacing the lamp is performed in the reverse order.
Headlights corrector
A device such as a headlight range control is not used every day, but it can be useful, for example, when driving at night with an overloaded trunk. At the same time, the front part of the car “lifts up”, and the low beam is more like high beam. In this case, the driver can use the corrector to lower the beam of light down. In the opposite situation, when the corrector is configured for a loaded trunk and the car is empty, you can perform the opposite manipulation.
If the car is not equipped with a corrector, you can install this device yourself. Based on the type of drive, correctors are divided into hydraulic and electromechanical. The hydraulic one consists of the main cylinder and headlight drive cylinders, as well as a pipe system and a manual regulator, which is installed on the instrument panel. Electromechanical - consisting of a servo drive, wires and a regulator. The headlights are adjusted using a hydraulic corrector by changing the pressure of the working fluid (which must be non-freezing) in the cylinders. The electric corrector changes the position of the headlights using a servo drive, which consists of an electric motor and a worm gear: after applying voltage to the electric motor, the rotational movement is converted into translational motion, and the rod connected to the headlight by a ball joint changes its angle.
Video: operation of the electromechanical headlight range control on a VAZ 2106
Periodic cleaning is required not only on the outside, but also on the inside of the VAZ 2106 headlights. If you need to get rid of dirt and dust accumulated during operation, you can use one of the many special cleaning products
It is important that the product does not contain alcohol, which can damage the coating of the reflector and the optics will have to be changed. In some cases, toothpaste or cosmetic micellar nail polish remover may be sufficient to clean the surface of the headlight.
To wash the inside surface of the headlight without removing the glass, you need to remove the lamp from the headlight, pour water diluted with a cleaning agent inside and shake well several times, then rinse the container with clean water and dry.
Basic malfunctions in the vehicle lighting and light signaling system
Possible causes of malfunctions in the vehicle's lighting and light signaling systems and methods for eliminating them are given below.
| Cause of malfunction | Remedy |
| The entire lighting and light signaling system does not work | |
| Open circuit in the circuit common to all lighting devices from the ammeter to the central switch | Check the reliability of connections and serviceability of car wires |
| Contact failure in the switch | Check the switch for serviceability and replace if necessary |
| Individual headlights and flashlights do not light up | |
| Fuse blown | Replace fuse |
| Burnt out or broken lamp filament | Replace lamp |
| Lost contact in connecting blocks | Check the reliability of connections in the blocks |
| Poor contact in the lamp socket | Clean the oxidized contact, bend the spring contact of the cartridge |
| Breaker or switch failure | Check the serviceability of the switch and switch, replace them if necessary |
| Frequent burnout of incandescent lamp filaments | |
| Increased supply voltage | Check voltage regulator |
| Increased vibration of the lamp spiral due to weak fastening of the lamps in the socket, the optical element in the housing or the light device as a whole on the car | Check the fastening of the lamp, optical element and lighting device, secure them if necessary |
| Flashing lights | |
| Poor contact in the socket | Bend the spring contact in the cartridge |
| Wire break and periodic contact of broken wire ends due to vibration | Replace wire |
| Poor contact of wires at connections | Check the connection of plug blocks and wires. If necessary, ensure a reliable connection |
| Periodic short circuit of wires to ground in the power supply circuit of lighting devices | Replace damaged wires. Secure the ground wire |
| The low and high beam headlights do not switch | |
| Oxidation of headlight switch contacts | Check the switch with a test lamp, if necessary, disassemble it and clean the contacts |
| The brake light does not turn on | |
| Brake light switch malfunction | Check the switch with a test lamp, replace it if necessary |
| Disconnecting the wires from the brake light switch | Connect the wires |
| Brake light won't turn off | |
| Brake light switch incorrectly adjusted | Check the switch with a test lamp, adjust or replace if necessary |
| The turn signals do not work (in hazard warning mode, all turn signal lamps work) | |
| Blown fuses in turn signal circuits | Check wires, repair damage and replace car fuses |
| Turn signal lamps light up without blinking | |
| Sintering contacts of the breaker executive relay | Remove the breaker, open and clean the contacts, adjust the gap between them |
| The turn signals do not work in both vehicle maneuvering mode and hazard warning mode. | |
| Blown fuses in turn signal circuits | Check wires, repair damage and replace fuses |
| Poor contact in the turn signal switch or hazard warning switch connectors | Check the plug connections and ensure a secure connection if necessary. |
| Hazard switch malfunction | Check the switch with a test lamp, replace if necessary |
| The turn signal indicator lamp does not work | |
| Bulb burnout in one of the turn signal lights | Replace lamp |
| The turn signal and headlight switch levers do not lock | |
| Destruction of the lever clamp sockets | Replace switch |
| Lever lock ball popping out | Reinstall the locking ball |
| Turn signals do not turn off automatically after maneuvering | |
| Wear or destruction of the mechanism that ensures the return of the turn signal switch lever to the neutral position | Eliminate the malfunction, replace the switch if necessary |
| The turn signal and headlight switch levers do not move | |
| Sticking lever retainer balls | Check and eliminate jamming |
| The return sector of the switch lever is stuck | Eliminate jamming, replace switch if necessary |
| Headlights do not illuminate the road well | |
| Violation of headlight adjustment | Check and adjust headlights |
| Damaged or faded reflector | Replace the headlight optical element |
| Diffuser dirty | Clean the diffuser |
| Dimming the bulb of an incandescent lamp | Replace lamp |
Replacing the low beam lamp in a VAZ 2106 headlight - text description
Low beam is needed for driving around the city at night. Without him this would not be possible.
Replacing the low beam lamp in a VAZ 2106 headlight can be easily done in a garage. To do this, you need to disassemble the old one and prepare a new lamp.
What we do for disassembly:
- Press the headlight trim and disengage the clips, remove the headlight trim. If necessary, use a screwdriver;
- Loosen the three screws securing the headlight rims;
- Turn the bezel clockwise, and when the screw heads align with the holes, remove it;
- Take out the headlight;
- Disconnect the connector and remove the headlight;
- Unfasten the two lamp mounting springs and remove the lamp;
- Fold back the spring headlight holder, while squeezing it;
- Remove the lamp from the headlight.
To install a new lamp in a VAZ, do the following:
- Insert the light bulb into the headlight socket and fix it, turn it all the way to the right;
- Install the mounting spring and wire connector;
- Check if the light bulb is working correctly;
- Attach the housing to the back of the headlight.
- The new lamp must be held by the body to avoid oiling the bulb and causing it to burn. If greasy marks appear, they must be removed with alcohol.
- Install the headlight with the trim in reverse order.
A replacement must be made immediately as soon as problems arise with the neighbor. The operation is simple, so any car enthusiast without special skills can do it. You can also watch the video.
Step-by-step instruction
To replace a burnt-out lamp in the low-beam optics on a VAZ model 2106, you will need screwdrivers (flat-head and cross-head) and pliers. The repair procedure itself consists of the following steps:
- Disconnect the vehicle's on-board power supply and, if possible, disconnect the wiring from the battery terminals.
- Use a flat-head screwdriver to remove the trim panel on the outside of the headlights.
- Use a Phillips screwdriver to unscrew the bolts (not completely) securing the rims of the glass cups.
- The headlight is grabbed by hand and turned until the fastening screws fit into the grooves and it can be removed.
- The optics unit is removed from its seat.
- The block with conductors is disconnected from the back.
- Next, the headlight is installed with glass on a flat surface, and a pair of spring-clamps are bent to remove the lamp.
- The burnt-out light source can then be removed from the unit by pulling it up.
- Replace with a new copy.
- Reassemble in reverse order.
- Connect the car's power supply and check that the installed low beam lamp is working properly.
Lamps used on the VAZ 2106 car
| Name of lamps | Type |
| Headlight: | |
| AKG12-55 | |
| AKG12-60+55 | |
| Front light: | |
| A12-5 | |
| A12-21-3 | |
| Back light: | |
| A12-4 | |
| A12-21-3 | |
| A12-21-3 | |
| A12-21-3 | |
| Side turn signal lamp | A12-5-2 |
| License plate lamp | AS12-5 |
| Interior lamp | AS12-5 |
| portable lamp | A12-21-3 |
| Engine compartment lamp | A12-5 |
| Glove compartment lamp | A12-4-1 |
| Cigarette lighter socket lamp | A12-4 |
| Instrument and clock lighting lamp | AMN-12-3-1 |
| Rear fog lamp | A12-21-3 |
| Hazard warning lamp | A12-08-1 |
| Side light indicator lamp | AMN12-3 |
| High beam warning lamp | AMN12-3 |
| Battery indicator lamp | AMN12-3 |
| Indicator lamp for insufficient oil pressure in the engine lubrication system | AMN12-3 |
| Parking brake indicator lamp | A12-1.2 |
| Indicator lamp for insufficient fluid level in the hydraulic brake reservoir | A12-1.2 |
| Rear fog lamp indicator lamp | A12-1.2* |
| Rear window heating indicator lamp | A12-1.2* |
| Carburetor choke warning lamp | A12-1.2 |
| Trunk light | AS12-5 |
* Installed on car parts
Video about “Lamps used on cars” for VAZ 2106
Repair of relay RS702 battery charge lamp VAZ 2101-2103, 2106
RELAY VAZ 2106. DESIGNATIONS
Improvement of low beam in VAZ 2103-06
Connection diagram
The rear lights on the VAZ 2114 are connected to the vehicle’s on-board network using connectors, the pinout of which is given below.
The numbers in the photo indicate:
- turn indicator – blue (right), blue-black.
- side light – yellow (right), yellow-black.
- The brake signal is red.
- fog light – red-black.
- The reverse indicator is green.
Both lights are connected to one harness, which runs along the rear of the body from the right light fixture to the left, then along the left side to the mounting block located in the engine compartment immediately behind the windshield opposite the driver. The complete wiring diagram of the electrical equipment of the VAZ 2114 (injector) will look like this:
Complete electrical diagram of VAZ 2114
In this scheme we occupy the marked positions:
- 20 — reversing light switch;
- 26 — mounting block of fuses and relays;
- 27 — brake signal switch;
- 29 — ignition switch (lock);
- 33 — rear fog light switch;
- 35 - combined switch for side lights and headlights;
- 36 — alarm switch;
- 58 — rear light;
- 60 - additional brake light.
How to replace light bulbs
Unlike foreign cars, which even for minor repairs need to be smashed almost to pieces, replacing the bulbs in the rear light of a VAZ 2106 is not easy, but very simple. To do this, remove the trunk trim opposite the lamp (see section “Instructions for dismantling and installing the lamp”). Unscrew the nut securing the protective glass. She turns away with her bare hands, no keys needed. In early models the nut is brass, in later models it is plastic.
The protective glass diffuser can now be removed.
There are four light bulbs in front of us. All of them can be removed by lightly pressing and turning counterclockwise. We remove the burnt one and replace it with a new one, fixing it with light pressure and turning it clockwise. Place the glass in place and secure it with a nut. We return the upholstery to its place and fix it with self-tapping screws.
Replacing the license plate lamp
To replace this bulb, you do not need to remove the glass from the rear light. We fold back the upholstery and in front of us is a backlight lamp socket. We move it down and take it out along with the lamp.
Removing the license plate light bulb socket
We dismantle the burnt device by pressing and turning counterclockwise. We install a new one in its place. We return the cartridge to its place and install the upholstery.
Replacing the fog light bulb
Here we need a Phillips screwdriver. Unscrew the two screws that secure the glass. We remove it and gain access to the light bulb.
We replace the burnt out device with a new one and install the glass in place.
At this point, you can finish working with the rear lights on the VAZ 2106. Now we know how to replace light bulbs in lanterns and the lanterns themselves, and if necessary, we can also eliminate minor malfunctions of these lighting devices.
Previous Replacing car lamps What lamps are in the brake lights of a Ford Focus 3 and how to replace them? Next Replacing car lampsHow to change the tail light bulb on a VAZ 2107
Which lamps are suitable
Low beam headlights are the most frequently used optical element of any passenger car model. Many people use them not only at dusk, but also as daytime running lights. This is why they quickly fail. The VAZ 2106 series model is equipped with a 12-volt H4 lamp with a power consumption of 55 W. The characteristic features of such a lamp are the presence of two filaments - which determines its operation in two modes - far and near.
There are several types of lamps for low beam headlights:
- The incandescent light bulb is an outdated model, burns out quickly, is characterized by low energy efficiency, and is practically not used by modern manufacturers.
- Halogen. The most popular. They have a good service life and sufficient brightness and other lighting parameters for road conditions.
- Xenon. They are distinguished by a good bright white glow that is 3 times stronger than that of their halogen counterparts. Disadvantages - they require additional installation of an ignition unit, and can also blind oncoming road users.
- LEDs. They have the best characteristics - durability up to 100 thousand hours, high brightness, low energy consumption, no overheating. However, they are expensive and require a special reflector design for full operation.
Glass
When converting factory headlight units, acrylic or polycarbonate elements are used instead of tempered, heavy glass. When choosing, you should take into account the diameter of the new glass, adjusting it to the size of the standard blocks.
Acrylic headlights are made by heat shrinking using old glass as a matrix. The minimum thickness of a new plexiglass headlight is 4 mm. The advantages of an acrylic block are low cost and the ability to be manufactured in a workshop. The disadvantages include rapid wear of the part. Acrylic quickly becomes covered with microcracks after being hit by gravel thrown out from under the wheels of a vehicle in front, and loses transparency after overheating. It is recommended to additionally protect the headlights with armored film.
Polycarbonate headlights are two times lighter than glass and are characterized by increased resistance to mechanical damage. Compared to acrylic glass, polycarbonate glass does not become cloudy over time, does not lose light transmission, and is resistant to temperature changes.
What headlights are used on the VAZ 2106
The head optics on the VAZ 2106 is a block in which two headlights are located: high beam and low beam. The low beam bulb is installed closer to the edge of the body. The elements have separate connections and are switched mechanically via a button or lever in the cabin. Standard for Zhiguli, halogen lamps with an H4 base of 12 Volts and a power of 60/55 W were used.
Halogen lamps remain the most popular today; many people use modern optics from Bosch or Osram when replacing them. It should be taken into account that according to the operating rules for lighting for the VAZ 2106, only halogen lamps can be installed in the headlights.
Bixenon
Many drivers decide to replace standard halogen lamps with modern bi-xenons. The main difference between a standard xenon lamp and a bi-xenon lamp is that bi-xenon is used for high and low beam, changing the brightness and length of the light flux depending on the angle of the protective curtain in the headlight unit.
When installing a xenon lamp, you will need to re-equip the headlight housing and install an ignition unit. The operating principle is based on the glow of the gas mixture after the arrival of a high-frequency pulse; the design does not have a standard filament.
Xenon lamps are more practical than halogen lamps, have a 200% longer service life, provide an even white light close to daylight, and are heat-resistant.
Tuning involves replacing both all four headlight lamps and installing two sets. In terms of illumination level, two bi-xenon headlights provide the entire spectrum of vehicle illumination. The diffuser is coated with chrome paint.
LED bulbs
LED blocks are used as an alternative to xenon. For VAZ equipment, the Sho-Me G1.2 H4 30W kits are considered the most popular. Three blocks of LEDs are mounted in the headlight housing, which provide head lighting. Advantages of LED headlights compared to standard optics:
- vibration-resistant elements;
- Moisture protection is installed for each block;
- 50% cheaper than xenon lamps;
The main advantage of LED lighting over xenon lighting remains quality. The high beam beam does not blind oncoming drivers and is easily adjusted. One of the disadvantages of LEDs is their high energy consumption.
How to change optics
Currently, many car enthusiasts install alternative optics on the VAZ 2106 as front lights, but this does not always bring an equivalent solution to the problem. Thus, many motorists are replacing halogen lamps on their front headlights with xenon lighting elements, which significantly increases the vehicle’s aggression and luminous intensity, especially in the evening and at night.
However, you should know that updated optics, the price of which is quite high, is by no means a cheap pleasure. Instructions for replacing the front optics with a new one:
- Remove factory optics.
- Try on new products and make holes of the required diameter at the fastening points using a drill.
- Strengthen the updated product, first install mounting springs for installation, which will be required for subsequent adjustment of the luminous flux.
- Adjust the light beam.
However, only the low-beam optics of the VAZ 2106 will operate, and the high beam will be absent, although this drawback in the city and the illuminated highway does not seem to be a big problem. It is much worse if you have to travel long distances, where this disadvantage will cause serious inconvenience.
Main conclusions
To replace a burnt-out low beam lamp on a VAZ 2106, it is better to choose standard-installed halogen lamps with H4 characteristics of 12 V and 55 W. Other problems that lead to failure in this optics module include:
- A burnt-out element or oxidized contact in the fuse box.
- Relay failure.
- The ground connection wire is rusty.
When replacing light bulbs, you must strictly follow the instructions provided.
Welcome! Lamps - thanks to them, the road is illuminated, the interior lights are on, and much more. But there are times when a light bulb becomes unusable, let’s say the low-beam light bulb stops burning, and after that you have to look for information on how to replace this lamp. In order not to look for information anymore, we have especially for you collected it all in this article, so to speak, into one, and now when you need to change this or that light bulb on a VAZ 2106, by looking at this article you will learn how to do it.
Common problems
Other, more common problems that may cause low beam headlight bulbs to not light even after replacement include the following:
- Damaged fuses - contacts are oxidized or the protective element is melted. In the VAZ 2106 they are located under the dashboard.
- The low beam relay has failed. A continuity check of the electrical circuit with a multimeter is required.
- Poor ground contact on the path from the fuse block to the optics module. It is necessary to clean the oxidized joint.
Recommendation! To double the degree of illumination from the low beam in the VAZ 2106, you can connect the third contact in the high beam module - since a lamp with two filaments is also installed there.
https://youtu.be/S2rtfo2VOuY