Updated: 02/28/2021 12:59:54
Expert: Boris Vladimirovich Filatov
*Review of the best according to the editors of expertology.ru. About the selection criteria. This material is subjective in nature, does not constitute advertising and does not serve as a purchase guide. Before purchasing, consultation with a specialist is required.
In the hydraulic braking system, a special place is given to the brake cylinders. These units ensure the transmission of force from the pedal to the pads through the brake fluid. The slightest leaks in the cylinders make themselves felt by failure of the brake pedal and a decrease in the level of safety. Therefore, you cannot hesitate to replace it. On the domestic market, dozens of brands offer their products for hydraulic brake systems. Recommendations from our experts will help you choose the most reliable and durable unit.
Replacing the brake cylinder of VAZ 2113, 2114, 2115 with your own hands
If the braking of the car has worsened, a leak has appeared at the gas turbine engine, the fluid level in the system decreases, the master brake cylinder of the VAZ 2114, 2113, 2115 needs to be replaced. This is an important component of the car, it distributes forces between the circuits. If it fails, the functionality is incorrect, and the movement of the machine is unsafe. But the GRC does not break down right away; as a rule, it all starts with nuances. The procedure is simple, do-it-yourself repairs are possible without the help of a car mechanic. Before you figure out how to repair the GTZ, so that the work is correct, it is advisable to familiarize yourself with its structure.
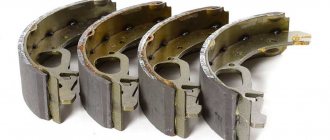
What to look for when choosing pads
Before replacing brake pads on Kalina, you need to understand the types of plates. These elements are:
- semi-metallic;
- low steel content;
- ceramic;
- polymer.
The semi-metallic brake pads on Kalina are based on steel fiber. Thanks to this, the part has a long service life and high technical characteristics. Metal elements are characterized by a good coefficient of friction.
The only drawback is rapid wear, especially if the part is cheap or made of low-quality material.
If Kalina brake pads contain a low percentage of steel fibers, then in terms of their quality characteristics they are durable and wear-resistant. The disadvantage of the part is the low production of the brake disc.
The ceramic elements contain inclusions of shavings. These are durable plates that can last a long time and provide a good coefficient of friction. However, their quality is still significantly worse than those described above.
Polymer brake discs for Kalina are made of high-strength materials. This type of plate was developed not so long ago, but has managed to gain popularity among many motorists. Polymer materials guarantee a long service life and are highly durable. A high-quality part is expensive, but it guarantees long and successful operation.
Before purchasing brake discs for Kalina, you need to figure out which type will be most suitable. It is recommended to make purchases in trusted stores. What material the part will be made from is decided by the buyer himself.
Why is it better to change VAZ (Lada) brake cylinders here?
The authorized Motul Expert technical center in Smolensk provides its customers with exceptionally top-class service. For full maintenance of VAZ (Lada) , we have:
- 23 posts;
- 18 lifts;
- original spare parts – always available for the most common models of foreign and domestic manufacturers;
- Assorted branded Motul oils.
We serve individuals, individual entrepreneurs and large enterprises. Cooperating with us is always beneficial thanks to:
- guarantee provided for all work;
- an individual approach when discussing the terms and conditions of payment;
- expanded discount program for regular customers.
REAR BRAKE CYLINDER
The working rear brake cylinder on a VAZ is a device in which two pistons, under pressure created by the liquid, push the rear pads apart. The pads are pressed against the drums and braking occurs.
The rear brake cylinder for 2114 (ZTC) can be of different manufactures. In Russia there are quite a lot of enterprises specializing in the production of spare parts for cars. The original parts are produced by AvtoVAZ; many spare parts for VAZ cars are produced in Samara. But there are also products from other companies (including foreign ones):
- Ate, Germany;
- Samco, Italy;
- Lucas;
- Fenox;
- AP Lockheed;
- "Basalt";
- "Craft".
ZTC Kraft
Among all the listed companies, according to customer reviews, the products of ATE have proven themselves the best. Among Russian brands you can about
Depending on the manufacturer and region of sale, the price of a cylinder on average ranges from 250 to 700 rubles (as of 2105). There is no difference between the VAZ 2114 and VAZ 2115 models; the parts are completely interchangeable with each other.
On a fully assembled car, it is not visible where the rear brake cylinder is located; it is located inside the rear drum. But you can understand where it is by looking at the brake pipe that goes to the cylinder.
Which cylinder is best to buy for replacement?
Rear brake cylinder from Kraft.
If you definitely decide for yourself that you will not go to a service station for repairs, then the spare part necessary for repairs will need to be purchased at a car store. Since spare parts for domestic cars are inexpensive, there will be no problems when purchasing.
When purchasing, you can buy both the original, which has the article number 21050-3502040-00 , and a “non-original” from another company. Unlike spare parts for foreign cars, where the original spare part is always better, the situation with spare parts for VAZ is the opposite. It often happens that non-original spare parts turn out to be of higher quality than the original.
Examination
You should make sure that the master cylinder is the culprit for the malfunction of the brake system. This is easy to do; you don’t even have to go to a service center and spend money on it.
Unit location
- Press the brake pedal with the power unit off.
- Start the engine without taking your foot off the gas pedal.
- During normal operation, the gas turbine engine fails under the influence of vacuum.
- If the pedal does not fail, you will need to conduct more thorough diagnostics and restore the device to functionality.
Most likely, you will need to restore the tightness of the return regulator connection. It is located on the intake manifold amplifier housing.
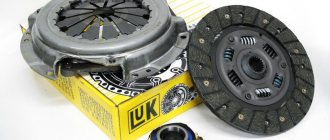
Repair kit or new GTZ?
Many car owners face a question when the brake master cylinder fails: how exactly to repair the brake master cylinder. After all, there are two main options:
- Purchase a new GTZ;
- Use repair kit.
First, let's take a look at the price tags.
Installation
Installation of the new element is carried out in the reverse order. Before installation, you need to thoroughly clean the brake mechanism from dirt using sandpaper. Degrease the seat with white spirit.
So, first you need to open the hood and add brake fluid to the maximum level. It is not recommended to mix different classes of products. Cars of the “tenth” family are filled with RosDot-4 class fluid. Please note that during pumping the level in the tank will drop. As soon as it drops 1.5 centimeters, you need to top it up again. Next we need an assistant. He will press the brake pedal at your command. So, unscrew the cap from the bleeder fitting and put the hose on it. We put its second end into a plastic bottle. We give the command to the assistant. He must press the pedal 5 times and at the last stage press it “to the floor”. At this time, you will observe how aired liquid flows out of the fitting.
Required Tools
In order to replace the brake cylinder you will need the following tools:
- wheel wrench;
- jack;
- WD-40;
- socket wrench 10;
- a device for unscrewing fittings if necessary;
- metal brush;
- rags;
- pliers;
- a screwdriver or pin for tensioning the springs.
Before starting all types of work, be sure to provide a place for laying out all spare parts; when removing them, it is advisable to remember the sequence and methods of removing them. This will make the reverse process much easier. In addition, before such a procedure, it is advisable to stock up on a set of brake pads, because they still need to be changed every year depending on the intensity of driving. And besides, they don't cost that much. So, having everything listed in our arsenal, let's get to work.
Dismantling
To carry out dismantling work that entails replacing the master brake cylinder, it is necessary to prepare a certain set of tools and materials. It includes:
- Brake fluid;
- Tool for unscrewing fittings;
- Pliers;
- Dry rags;
- Metal brush for cleaning contacts;
- Key for 17, 13 and 10 millimeters;
- Spring tensioner;
- New brake cylinder.
Before starting work, prepare yourself a site where you can place all the elements to be removed. Write down or photograph, or otherwise record where this or that unit was removed from. This will greatly simplify the reassembly procedure.
After all the preparatory activities, you can start working.
- Be sure to remove the negative terminal from the battery of your VAZ 2114. Without this, almost no repair or maintenance work on the car can begin.
- Raise the hood and lock it securely.
- Use a syringe to remove any remaining brake fluid from the container.
- Unscrew the brake fluid supply pipes using an open-end wrench. Unscrew it carefully so that the brake fluid does not get on other units in the engine compartment.
- In some cases, the thread becomes stuck, making it very difficult to remove. In such a situation, we recommend treating the threads with brake fluid and letting it sit for a while. Then the hoses are removed using a 10 mm wrench.
- If these measures do not help, you will need a special wrench with a clamping bolt and a cap slot. It is attached to a nut, clamped with a bolt and rotates the part.
- After dismantling the brake fluid pipes, be sure to mark them with a marker or corrector so that you know which pipe is connected where during reassembly.
- Now you need to remove the brake master cylinder. To do this, first remove the two main nuts that hold the GTZ to the amplifier.
- That's it, the damaged element can be removed from its seat.
Dismantling works
- Clean the installation sites so that there are no problems with the new cylinder in the very first months of operation.
- Follow the reverse assembly sequence so as not to confuse the location of certain elements.
- Do not clamp the brake fluid hoses too tightly, otherwise there is a risk of stripping the threads. Restoring connections is a hassle.
- It is recommended to replace the brake fluid used before repair, and then be sure to bleed the brakes.
- To level up, you will need help, so make an agreement with a friend in advance. One will gently press the brake from inside the car, and the other will wait for brake fluid to start coming out of the holes. At this very moment it will be necessary to return the front tubes to their places.
Be sure to simultaneously check the correct operation of the vacuum booster. If it is faulty, it will need to be replaced.
Features of the brake system on the VAZ-2110
The brakes on the VAZ-2110 have diagonal separation of the contours.
The device of the brake system of the VAZ-2110.
This allows if one brake circuit fails, it can only be repaired . Often car owners have to change the brake cylinder on one of the rear wheels. The first problem that novice car enthusiasts face is finding the location of this very cylinder. To see it, just remove the brake drum.
Brake cylinder location.
It is the brake cylinder that pushes the pads, forcing them to press against the walls of the drum.
Signs of a broken brake cylinder
A faulty rear wheel cylinder can be detected as follows:
- The wheel stopped braking.
- The wheel is jammed or jammed.
- The brake cylinder is leaking.
If the first two points are quite obvious, and the cylinder malfunction can be determined visually, then in the third case everything is much more complicated.
Brake fluid leaks on the inside of the wheel.
A cylinder leak will sooner or later lead to it jamming, and if this happens on the road, then major troubles cannot be avoided . To detect a leak, you need to pay attention to indirect signs. If there are visible leaks of brake fluid on the wheel, and the fluid itself runs out very quickly, you need to urgently remove the rear wheel and drum.
Wheel leaks do not always mean a broken rear brake cylinder. Most often, this is a brake hose that has burst or frayed.
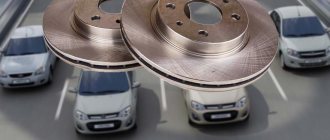
Selecting and installing rear disc brakes on Priora
Many manufacturers of modern vehicles install rear wheel drum brakes only on budget modifications. This fully applies to the VAZ model VAZ 2170 Priora. Let's try to find out whether it is possible to install rear disc brakes on the Priora.
ZTD on Priora (perforated and ventilated disc)
avtoexperts.ru
The GTZ is an integral part of the brake system, which performs one of the key tasks - converting the force applied to the brake pedal to generate pressure in the system. The GTZ interacts through the “vacuum valve” rod with the brake pedal directly. The task of the GTZ is to evenly distribute pressure across all circuits.
The brake cylinder is located on the brake “vacuum reservoir” cover. A brake fluid reservoir is mounted above it. The sections of the tank and the GTZ are interconnected by bypass holes, and are responsible for a specific section in the system. The reservoir itself is designed to replenish the loss of “brake fluid”. Visually, the tank has a transparent body, with a scale for monitoring the liquid level. In addition to the scale, sensors installed in the tank are used to signal the liquid level, displaying information on the “tidy”.
Types and design of GTZ
Structurally, gas turbine engines are divided into the following types:
For clarity, we will consider the design and principle of operation using the example of double-circuit GTZ. They are more popular than their predecessors. The latter were installed mostly on cars of the last century (various models of Moskvich, Zhiguli, GAZ, GAZ-53, 33 (first modification) trucks, etc. The dual-circuit system is considered more effective in terms of braking. Now it is equipped with Most of the modern cars are both domestic (Lada Kalina, Priora, “Ten” family, “Samar”, Granta, Vesta, Xray) and foreign (Renault Logan, Volkswagen Polo, KIA RIO, Hyundai Solaris, Opel Astra, Vectra, Chevrolet Lanos, Aveo, Cobalt, etc.) The advantages of a dual-circuit brake cylinder system are that if, for example, one circuit fails, the brakes on one pair of wheels are lost, but another circuit remains in the “battle” another pair of wheels, and therefore brakes, of which there are none.
Instructions for replacing rear pads on a Priora
So, before we start replacing the pads, let’s first unscrew the ABS sensor so that we don’t damage it during the process of dismantling the old pads.
The sensor is held on by one screw. In order to unscrew it we need an E-8 sprocket head.
Replacing rear pads on a Priora without an ABS sensor
Using a wrench or a socket on “7”, unscrew the two guide wheels. We unscrew it carefully, if the wrench doesn’t work, it’s better to take the head so as not to break the thread.
Next, remove the drum. It can be removed easily or tightly; if it is tight, you should gently tap it with a hammer on the back side. Knock should be evenly.
. If the car has an ABS sensor, there is a special sensor disc located under the brake drum
.After we have removed the drum, we should compress the pistons of the working cylinder. To do this, use screwdrivers to press on the piston and try to push it inside the cylinder on both sides.
Next, using a screwdriver, carefully remove the upper tension spring from the groove as shown in the photo
Now remove the spacer bar between the pads. To do this, first remove the upper part of the pads from the cylinder
Pry up and remove the lower tension spring of the pads
Also, using a screwdriver, remove the tension springs of the pads.
Remove the front pad. The parking brake drive is attached to the rear block. It must be disconnected from the block.
To do this, use pliers to pull out the fixing pin as shown in the photo.
After this, remove the pin and move the lever to the side; it will need to be secured to the new brake pad.
As a result, we should end up with something like this:
We reassemble in the reverse order carefully and carefully, not forgetting to put anything in.
After we have assembled everything, it is necessary to adjust the parking brake (handbrake).