Despite the global trends regarding the relatively low “landing” of cars, this is, frankly speaking, unacceptable for Russian roads. The achievements of the creators of the “ten” include the fact that the ground clearance on the VAZ 2110 is quite sufficient, one might say optimal for city conditions and paved roads (which for the most part leave much to be desired).
VAZ 2110 with lowered suspension
Specifications
So, if we consider the factory design characteristics, then on all types of VAZ 2110 (and they were produced with sedan, hatchback and station wagon bodies), the ground clearance should be at least 165 mm - from the road to the oil pan, 140 mm - to the lowest point of the muffler. For 1.5 liter engines there is another indicator - the clearance to the catalyst must be at least 130 mm.
Dimensions of VAZ 2110
"Lifting" the machine
In principle, as we have already noted, this is enough for a more or less comfortable ride. But, of course, many people want to “raise” the VAZ 2110 a little more, based on their realities.
“Raised” VAZ 2110
We will tell you how you can actually do this. But let us warn you right away: “raising” the car above the asphalt level entails a number of unpleasant consequences:
- Clamping the springs, firstly, will lead to a decrease in comfort while driving, and secondly, the shock absorbers will suffer as a result, which will not be able to cope with their responsibilities;
- The suspension also suffers from too stiff springs, as this leads to increased loads on it;
- Corrosion is inevitable when using aluminum spacers;
- By increasing the ground clearance of the VAZ 2110, car owners risk the stability of the car while driving. The fact is that the center of gravity shifts, the car can rock, and in some cases it can even roll over. Therefore, experts strongly recommend not increasing the ground clearance by more than 5 cm. That is, the maximum limit should be no more than 170 mm!
Lowering the car
Surely every owner would like to make his car look beautiful and attract attention on the street. There are many different ways to give your car an unusual look.
Someone lifts or lifts cars, someone tints or paints them, and someone lowers their iron horse. People perceive their relationship to car undervaluation as 50/50: some like it, some don’t. But if you came here, you definitely decided to lower your car. This article describes in detail all the methods of lowering a car using the example of Lada Priora and VAZ 2110.
Ways to lower a car
There are several ways to lower a car:
- Washed down the springs (the most budget-friendly and not the safest way)
- Installing short-travel struts (the most popular lowering method)
- Installation of pneumatic struts (the most expensive option)
Next, we will take a closer look at each of the options for lowering the car. Starting from the cheapest to the most expensive method.
Method one: Sawn springs
This method of underestimation has found popularity among young people. This is due to the fact that most young people do not have large sums of money to spend on tuning their cars. This method of lowering a car is the cheapest and fastest, but far from the most reliable and safe.
So, let's take a closer look at how to cut springs on the Lada Priora and VAZ 2110.
Washed down the springs on the VAZ 2110
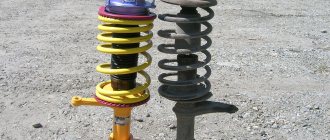
The suspension of the Priora and 2110 cars is slightly different in the design of the shock absorber strut. The Priora uses a barrel spring, while the VAZ 2110 uses a coil spring.
Coil spring VAZ 2110
In order to lower the car using the spring method, you need to decide on the amount of lowering of the car. It is not recommended to cut the springs more than 3 turns at the front, since the strut will compress and the upper cup of the shock absorber will rest against the bump stop, therefore, the shock absorber may not function properly.
The springs of the rear shock absorbers can be sawed up to 5 turns, after which the same thing awaits you as with the front shock absorbers, the bump stop will rest against the rear spar. It follows that the shock absorber will not work correctly and there can be no talk of any driving comfort.
Washed down the springs on the Lada Priora
You can file the spring on a Priora, but it is not recommended to saw the front springs. The front spring of the Priora, as described above, has a barrel shape, therefore, after washing it down, it will lose its shape and will not fit into the groove of the shock absorber cup. Some craftsmen, after washing down such a spring, heat it up and give it a similar shape.
It is strongly not recommended to use this method, since when heated, the spring loses its properties and elasticity, becomes more fragile and susceptible to rupture or breakage, which can lead to dire consequences.
Sawed barrel spring
The rear springs of the Priora can be cut in exactly the same way as the springs of the VAZ 2110, because they are absolutely the same.
Step-by-step instructions for cutting down a spring
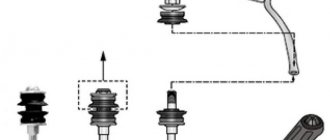
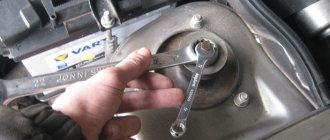
In order to safely file down the spring, the strut must be removed from the vehicle.
The first step is to prepare the necessary tool. It's better to use a key set
Removing the front struts
To remove the front struts you will need the following tools:
- Open-end wrenches for “13”, “17”, “19”, “22”;
- Hexagon at "6";
- Socket heads or wrenches for “13”, “17”, “19”, “22”;
- Anti-rust liquid WD-40, etc. (by the way, if you don’t have WD-40, you can use kerosene, antifreeze or diesel fuel)
- Hammer, pry bar and pliers
- Steering wheel end remover.
Steering end puller
So, let's start disassembling the car
- 1. It is necessary to jack up the side on which the spring will be washed down, having previously loosened the wheel mounting bolts 4 pcs. Do not forget to put chocks under the rear wheels of the car so that it does not roll forward or backward.
- 2. Remove the wheel from the car and place it under the threshold of the car. This action will help prevent damage to parts of the machine if it falls from the jack.
- 3. Next, you should loosen the nut securing the rod to the front shock absorber support in advance; for this you will need a hex socket set to “6” and a wrench set to “22”.
- 4. Unscrew the steering end mount with the head on “17”, having first pulled out the cotter pin. And we press it out of the rack axle using a puller or a hammer and a pry bar.
- 5. Pull out the brake hose and ABS wire from the seats in the rack.
- 6. Unscrew the bolts securing the strut to the steering knuckle using keys “17” and “19”.
- 7. Unscrew the three bolts securing the shock absorber support to the strut with a head set to “13”.
- 8. Take out the stand.
Next we should proceed directly to disassembling the shock absorber, here we will need spring ties
- 9. We tighten the spring with ties on both sides.
- 10. Unscrew the nut securing the support and remove it, then remove the spring and the bump stop with the boot.
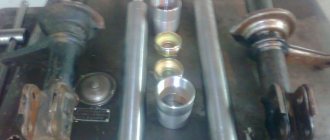
The stand is disassembled, you can start cutting. The number of turns must be measured from the beginning of the turn on the spring. We saw the spring with a grinder.
We assemble the rack in the reverse order. You should pay attention to the washers under the rack support and install them in the correct sequence as shown in the photo.
The sawn spring must be installed with the cut coil down.
We carry out exactly the same action with the opposite side.
Removing the rear struts
To remove the rear struts you will need much less tools than to remove the front ones.
Tools required to remove rear struts:
- Keys to "17", "19"
- A special key for unscrewing the rear shock absorber rod.
Step-by-step instructions for removing the rear shock absorber of Lada Priora and 2110
There is no need to use zip ties to replace rear shock absorbers
- Loosen the bolts securing the wheel to the hub.
- In the luggage compartment of the car, bend (unscrew if necessary) the trunk lining so that access to the rear spar is free. Loosen the nut securing the rear shock absorber rod to the spar.
- Jack up the side on which the spring will be cut. Do not forget to put chocks under the front wheels of the car so that it does not roll forward or backward. Remove the wheel from the car and place it under the threshold of the car. This action will help prevent damage to parts of the machine if it falls from the jack.
- Unscrew the bolt securing the shock absorber to the rear beam of the car.
- Unscrew the shock absorber rod from the rear side member of the vehicle.
- We take out the strut, you need to lower the strut all the way down, squeeze the shock absorber rod, pull out the spring with the boot and bump stop, and then the shock absorber itself.
That's it, the rear strut has been removed from the car, you can start cutting down the spring.
It is necessary to count the number of turns and cut the spring exactly opposite the beginning of the spring turn.
Reassembly of the rear shock absorber should be done in reverse order.
Examples of cars with sawn springs
Saw springs front 3 turns rear 5 turns Saw springs front 2 turns rear 3 turns
Advantages and disadvantages of sawn springs
Disadvantages of lowering a car by filing down the springs:
- There is no comfort when driving such a car.
- There is no way to travel on a country road.
- The spring may fly out of the shock absorber cup.
- Immediate failure of shock absorbers.
Advantages of lowering a car by filing springs:
- Cheap and easy to use.
Method two: Short-travel struts
This method is currently used along with cutting down springs. On the streets of the city you can see a huge number of cars with such racks. It gained wide popularity due to its simplicity, reliability and comfort. Also, short-travel struts have a wide range of vehicle height options. Any car enthusiast can choose the optimal understatement for himself.
Lowering with the help of short-stroke struts practically does not change the design of the car and does not cause any harm to it, unlike silting of the spring. Lowering in this way occurs by changing the height of the rod itself and the strut cartridge, and by installing an already obviously shortened spring.
Types of short-travel struts and springs
There are a large number of short-stroke struts that have their own characteristics. Let's look at a few examples of racks.
Short-travel struts are classified by lowering height, that is, each strut has its own size.
What do these numbers mean?! The number indicates the size in mm by which the stand rod and cartridge are shortened. Therefore, a rack with index -30 is shortened by 30 mm, a rack with index -50 is shortened by 50 mm, etc.
Racks are also classified according to their stiffness zone. Comfort and sport.
Comfort racks
Such struts have a softer degree of compression, which ensures comfort when driving. There is no shaking or knocking in the car when using such racks.
Sports racks
Sport struts are used for tuned cars with non-standard engines. Such struts provide positive dynamics when driving on the highway; the car experiences minimal roll when turning.
Springs
In combination with short-throw struts, shortened springs are used.
The classification of such springs is similar to the classification of struts. Springs are: -30, -50, -70, -120. The spring stiffness is exactly the same as that of the struts: comfort and sport.
Variable Coil Springs
Such struts can be installed in standard places with standard components; for example, to install short-stroke struts there is no need to change the support bearing and boots.
The most popular brands of short-stroke struts and springs: SS20, ASTON, TechnoRessor and Demfi.
Examples of cars with installed short-travel struts and springs
Lada Priora with an understatement of -50
Advantages and disadvantages of short-travel struts
Advantages of short-travel struts:
- Comfort while driving;
- There is no damage to the car;
- Large selection of rack heights;
Disadvantages of short travel struts:
- Inability to adjust vehicle height;
- Difficult traffic on a country road;
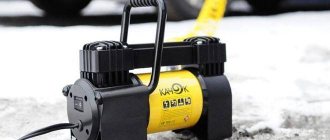
Method three: Air suspension.
This method is the most expensive and difficult to install. To install the air suspension, the car must be completely disassembled. Install special equipment; besides, air suspension is not suitable for cold seasons. Quite often it happens that condensation appears in the tubes, which in cold weather can lead to a blockage in the air channel.
To install this method of understatement, qualified specialists will be required. Large set of tools and equipment. To install the air suspension you will need: a receiver, a compressor, hoses, pipes, special racks, sleeves, etc.
The installation of air suspension has not found much popularity due to its high cost and capriciousness. Due to the large amount of reagents on the road, air leaks often appear in the system, which makes it impossible to drive a car. Also, using a car in winter is quite problematic.
Advantages and disadvantages of air suspension
Pros of air suspension:
- Possibility of changing clearance
Disadvantages of air suspension:
- High cost and complexity of installation;
- Inability to move in cold weather;
- Taking away useful space in the trunk;
Bottom line: to lower a car, it is best to use short-travel struts. Such racks are the most suitable option for everything in terms of price and quality.
It should be noted that with a measured lowering of -120 mm, it is necessary to saw the right spar. Due to the very low lowering, the right-hand drive wheel will touch the car body. The photo shows how the drive rests on the car body.
Also, when carrying out any actions, it is imperative to have the wheel geometry done at a service station upon completion of the repair.
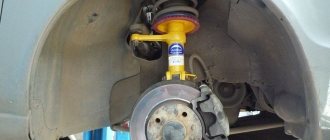
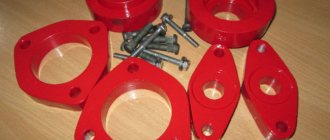
Spacers
One way to increase the clearance is to install spacers - a kind of spacer supports that can be found in stores and car markets. They are installed between the body and the support of the VAZ 2110.
Spacers for the concept of the rear of the car
They come in three types:
- made of plastic – they have practically no flaws, are quite durable and last a long time;
- polyurethane ones are also wear-resistant, but when the car “flies” into a hole, it is strongly compressed, which is why the impact becomes very noticeable;
- aluminum ones “peel” the paint from the supports and body, thereby increasing and accelerating corrosion.
Method two: Short-travel struts
This method is currently used along with cutting down springs. On the streets of the city you can see a huge number of cars with such racks. It gained wide popularity due to its simplicity, reliability and comfort. Also, short-travel struts have a wide range of vehicle height options. Any car enthusiast can choose the optimal understatement for himself.
Lowering with the help of short-stroke struts practically does not change the design of the car and does not cause any harm to it, unlike silting of the spring. Lowering in this way occurs by changing the height of the rod itself and the strut cartridge, and by installing an already obviously shortened spring.
Types of short-travel struts and springs
There are a large number of short-stroke struts that have their own characteristics. Let's look at a few examples of racks.
Short-travel struts are classified by lowering height, that is, each strut has its own size.
For example: -30, - 50, -70, -90, -120
What do these numbers mean?! The number indicates the size in mm by which the stand rod and cartridge are shortened. Therefore, a rack with index -30 is shortened by 30 mm, a rack with index -50 is shortened by 50 mm, etc.
Racks are also classified according to their stiffness zone. Comfort and sport.
Comfort racks
Such struts have a softer degree of compression, which ensures comfort when driving. There is no shaking or knocking in the car when using such racks.
Sports racks
Sport struts are used for tuned cars with non-standard engines. Such struts provide positive dynamics when driving on the highway; the car experiences minimal roll when turning.
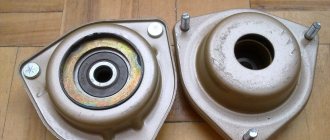
Shock absorber modification
When transporting large loads (and often VAZ 2110 owners do not listen too much to recommendations regarding load capacity), the car seriously “sits down” and its ground clearance is significantly reduced.
If you have to constantly carry heavy things, it makes sense to install springs with class “A”. Naturally, they will make the shock absorbers stiff, and you will only be comfortable in a heavily loaded car, and without a load it will shake like on a cart.
There are also s, which are installed between the spring coils and do not allow the shock absorber to compress too much.
Interturn spacers in the shock absorber spring
In principle, such a car will no longer sag significantly under load, as well as nod off, but the shock absorber stroke will decrease and it will fail faster.
The theory of lowering the VAZ suspension
This is popular mainly among young people (you must understand that I mean lowering civilian cars; in auto sports you can’t do without lowering as it affects both handling and aerodynamics). They want to stand out from the crowd and make their car more sporty. And this alteration is not the most difficult, you can do it yourself in a fairly short period of time. But unfortunately, people don’t want to strain too much and just saw the springs and don’t even suspect what problems they might have.
The optimal understatement is considered to be up to -50. Only up to -50 the spring on a standard strut will not force the body. You must understand that this type of suspension is more suitable for on-road driving rather than off-road driving. You will have to drive over any bumps with greater caution.
Also, along with lowering, it makes sense to install low-profile tires, for example hankook tires.
Suspension lowering goals
- Better stability when entering corners at high speeds
- Less roll
- Better directional stability and response to steering movements.
Lowering options
1. Buy a ready-made suspension kit. It includes: springs, struts, etc. This is the simplest, most convenient and expensive option, replacing almost the entire suspension at once. It will cost from 12,000+ rubles. This is the safest option, especially if you get quality parts and install everything correctly. If you choose this option, then do not forget about the wheel alignment.
2. The best option is to replace only springs with a smaller turn stroke. This will lower your car and add rigidity, without any harmful consequences for the car. You can also just buy a regular spring, but stiffer and lower. The range of prices is huge, but from about 3k rubles.
3. There is an option to move the spring cup down. But here you are playing the lottery, since it is very dangerous to do it yourself. - You may weld poorly - The stand is not guaranteed to be able to withstand high temperatures during welding. But don’t be discouraged, such racks are sold ready-made.
4. Cutting springs. Most people simply cut the coils off the spring. And this should not be done under any circumstances! In this case, the stroke of the rod decreases and when it gets into a hole, the strut does not have enough free play and it hits the body. Also, a sawn spring can become warped and it will also hit the body and spoil the suspension. Has proven itself to be excellent.
5. Helical suspension. The same as a regular suspension, only with the ability to adjust the height. Very convenient and reliable. Companies: GT Pro and Defi. Price: 20k rubles.
6. Air suspension. Air suspension is a device installed on a car, which is designed to compensate for excess load on the car's standard suspension. Usually they are air bags that are installed between the axle and the frame. With its help you can reduce the load on the springs and increase the vehicle's ground clearance. Sitting in the cabin, by pressing a couple of buttons, you can raise or lower your car. It is very expensive and not very reliable; iron springs are one thing, and cylinders another. I would advise you to buy a strut with a lower cup and a stiffer spring with the drop you need. Or if you have the opportunity to buy a screw suspension, then buy it, you won’t regret it.
And in conclusion, watch a very informative video about undervaluing real cars.
"Houses"
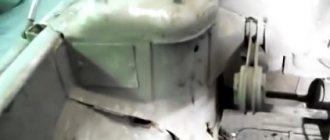
Another method of increasing ground clearance is to install so-called “houses” on the rear suspension. The “houses” have special holes through which the ground clearance is adjusted, and they are installed between the eyes of the rear suspension beam and the bottom of the shock absorber.
Spacers-houses
But experts generally cannot come to a common opinion - whether the “houses” of the VAZ 2110 help or harm it. Some people believe that they are needed when the springs have sagged, and with their help it will be possible to lift the rear of the car. Others suggest replacing the springs and not “fencing up houses”.
Safety
Whatever method of increasing the ground clearance on the VAZ 2110 you choose (if you need it, of course), remember that safety comes first. You want to get a car that will be more stable on the road, and not ready to roll over every minute even on a small obstacle?
Therefore, be sure to adjust the suspension to increase its elasticity. Swap out the regular tires on your car for low-profile tires. To ensure this, also install additional stabilizers.
- Author: ratico19
Rate this article:
- 5
- 4
- 3
- 2
- 1
(5 votes, average: 3.4 out of 5)
Share with your friends!
Method three: Air suspension.
This method is the most expensive and difficult to install. To install the air suspension, the car must be completely disassembled. Install special equipment; besides, air suspension is not suitable for cold seasons. Quite often it happens that condensation appears in the tubes, which in cold weather can lead to a blockage in the air channel.
To install this method of understatement, qualified specialists will be required. Large set of tools and equipment. To install the air suspension you will need: a receiver, a compressor, hoses, pipes, special racks, sleeves, etc.
The installation of air suspension has not found much popularity due to its high cost and capriciousness. Due to the large amount of reagents on the road, air leaks often appear in the system, which makes it impossible to drive a car. Also, using a car in winter is quite problematic.