Heating and ventilation of the interior remain an integral part of comfortable driving. The interior temperature sensor of the VAZ 2110 is one of the consumables that requires frequent replacement, since the heating system of the VAZ 2110 has a mileage of 20,000 km. starts working intermittently. How to check the part, repair and replace the controller.
Why the stove does not work in a VAZ 2110 family car
The heating system of the VAZ 2110 has several varieties. The older version was produced until 2001 and had on board the then current controller 1303.3854, which was later replaced by the newer 1323.3854. The changes also affected the material of the dampers, which rather made life more difficult for drivers than brought anything useful.
Despite all the inconveniences, this version of the VAZ is very popular among a large number of drivers due to the low cost of parts and its adaptability to domestic roads. You can either repair the heating system yourself or take it to a service center, where it will be quickly repaired by professionals.
If your VAZ 2110 stove does not work, then this may be due to several factors:
- perhaps you have an antifreeze leak;
- the ACS controller is faulty;
- the temperature sensor is broken;
- the dampers refused to work;
- The temperature has ceased to be regulated.
Heating is one of the most problematic components of this car. It constantly goes into a state of malfunction and creates problems for both the driver and passengers in the cabin. In this article you will learn why the stove stopped working and how to quickly determine it.
How does the DTV work?
The heating system in a car of this brand operates from impulses coming from the electronic unit. The unit itself receives information from the fuel combustion engine and compares these indicators with the heating intensity. There are certain temperature limits, the crossing of which is a trigger for the system to operate and the motor to turn on. There is a change in air flow and fan speed. All this serves to timely warm up the glass and the interior.
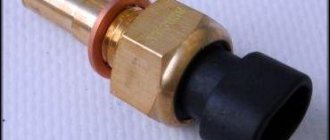
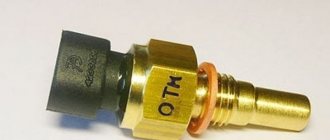
The sensor itself is a regular thermistor or semiconductor resistor. The relationship between resistance and heat is captured and sent to the vehicle's ECU as a specific measurement.
In addition to the obvious problems in measurements associated with a defect in the meter, there are a number of other malfunctions that one has to deal with:
- electrical wiring fault;
- mechanical damage to the sensor;
- operation outside acceptable limits.
Electrical wiring can be easily repaired by cleaning the contacts or reconnecting them more reliably. It happens that a break may not occur in the sensor itself, but somewhere along the line. Any malfunctions with the device itself are a reason to replace it, since repairing such a device is usually ineffective and more expensive than buying a new device.
How to check the cabin air temperature sensor
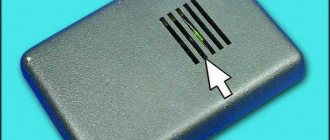
The most common problem is a broken temperature sensor. It is located on the ceiling, so in the event of a breakdown, it is best to start checking there. Take out the ends of the wires and apply 1.2 V to the plus and minus. Rotate the knob to the MIN and MAX positions. The blades should not move, otherwise the problem lies in the sensor itself. If you are confident that the automatic control system is working properly, you can also conduct a small experiment. To do this, turn off the cabin air sensor. In operating state, fan speed mode “A” will be disabled.
Otherwise, you can safely conclude that the fault was caused by the temperature sensor and quickly replace it. Fortunately, this component is not very expensive and is quickly installed, so both an experienced driver and a novice should not have any problems when replacing it.
If the furnace is not blowing, the problem may be more serious and require a more complex approach. Also, the cause of the malfunction may be broken contacts, which is a very common occurrence in this model. If there is no contact, all wires will have to be sorted out manually and cleaned.
Stories from our readers
“Fucking basin. "
Hi all! My name is Mikhail, now I’ll tell you a story about how I managed to exchange my two-wheeler for a 2010 Camry. It all started with the fact that I began to be wildly irritated by the breakdowns of the two-wheeler, it seemed like nothing serious was broken, but damn it, there were so many little things that really started to irritate me. This is where the idea arose that it was time to change the car to a foreign car. The choice fell on the melting Camry of the tenth years.
Yes, I had matured morally, but financially I just couldn’t handle it. I’ll say right away that I am against loans and taking a car, especially not a new one, on credit is unreasonable. My salary is 24k a month, so collecting 600-700 thousand is almost impossible for me. I started looking for different ways to make money on the Internet. You can’t imagine how many scams there are, what I haven’t tried: sports betting, network marketing, and even the volcano casino, where I successfully lost about 10 thousand ((The only direction in which it seemed to me that I could make money was currency trading on the stock exchange, they call it Forex. But when I started delving into it, I realized that it was very difficult for me. I continued to dig further and came across binary options. The essence is the same as in Forex, but it’s much easier to understand. I started reading forums, studying trading strategies. I tried it on a demo account, then opened a real account. To be honest, I didn’t manage to start earning money right away, until I understood all the mechanics of options, I lost about 3,000 rubles, but as it turned out, it was a precious experience. Now I earn 5-7 thousand rubles a day. I managed to get the car buy after half a year, but in my opinion this is a good result, and it’s not about the car, my life has changed, I naturally quit my job, I have more free time for myself and my family. You’ll laugh, but I work directly on the phone)) If If you want to change your life like me, then here’s what I advise you to do right now: 1. Register on the site 2. Practice on a Demo account (it’s free). 3. As soon as you get something on the Demo account, top up your REAL ACCOUNT and go to REAL MONEY! I also advise you to download the application to your phone, it’s much more convenient to work from your phone. Download here.
SAUO pinout:
The SAUO receives information from:
- – cabin air temperature sensor (No. 6), which has a built-in small-sized fan.
- – MMR (micromotor reducer) (No. 9), information about the position of the heater damper.
Damper control : Based on the received information and the set air temperature, the controller controls the position of the heater damper, sending appropriate signals to the damper drive micromotor.
How to check the serviceability of the SAUO controller
If you want to find out why the VAZ 2110 stove does not work , special attention should be paid to the ACS (automatic heater control system). This is where a multimeter comes in handy. Measure the voltage at the same time on the pink wire along with the brown contact, while at the same time turning on the ignition and turning the temperature knob. Also, do not forget about the controller model, since the voltage is reduced differently on different boards.
On controllers 1303.3854 (before the vehicle was produced in 2001), the voltage decreases after 13 seconds at the MIN mark, and at MAX it is constantly supplied and does not drop. At the slightest change in voltage, you can safely conclude that the controller is broken. On newer car models (2003 and higher), a more advanced block 1323.3854 is installed, and there is also a stove 2111-8101012. Although this solved some problems, these modules are not of high quality. The cause of failure of the 2110 is often the self-propelled gun system, so in case of the slightest problems it is worth paying attention to it.
Functions and tasks
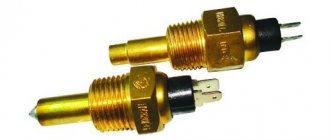
Today, several modifications of interior temperature sensors are offered for VAZ cars. Therefore, you need to choose wisely, in accordance with what functioned for the benefit of your car previously.
The best option is to remove the old sensor and take it to an auto parts store. This way you will be able to find an analogue and not doubt the correctness of your choice.
Depending on the city and store, the price of a new sensor may vary. But on average the device costs 500 rubles.
Checking the dampers of the VAZ 2110 heater system
If the controller starts acting up, the dampers themselves may be faulty. It is better to carry out proper inspection in a timely manner to avoid damage. The stove itself has 2 dampers. The upper part is responsible for bringing cool air into the cabin directly from the street, while the lower part heats the flow directly from the heater. If one of the dampers or actuator breaks down, you will experience constant discomfort due to poor heating or excessive heat input.
The breakdowns themselves can be divided into several types. For example, often the damper simply “jams” or “jams.” The damper actuator, also known as a micro-gear motor, may be damaged. Some valves may jam due to rust formed on them. Most often this happens on new samples, since the material of the dampers is metal, while the old ones are plastic with special foam.
We recommend reading! What to do when you hear a knocking sound when turning the steering wheel in place.
If you do not hear the characteristic movement of the damper, remove the deflector in the main panel and simply move the damper by hand. If there is no movement, check the micro-gearbox, it is the drive mechanism of the damper. If the windshield is blown with warm air, and a hot stream enters the legs, it means that the damper itself has poorly blocked the air, which is constantly coming from outside the cabin.
Dismantling
Removal principle
To install a new interior temperature element, you will first have to remove the old one. It can be removed quite simply:
- Four clamps, presented in the form of springs, are used as clamps;
- Be sure to park the car on a level surface and turn on the handbrake;
- For your own safety and comfort, do not forget to remove the negative cable from the battery;
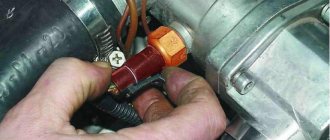
- Using a slotted screwdriver, move the box slightly from its seat;
- Dismantling begins from the top of the sensor, which makes work more convenient;
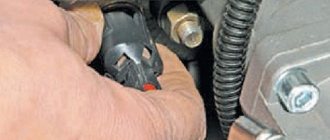
- After removing the device from its fasteners, do not jerk it sharply. The fact is that it is connected to two wire blocks. They are the ones that connect the sensor to the car’s electronic system. Carefully disconnect the wires, after which the dismantling can be considered complete.
How to check the heater damper micro-reducer
To test the micro gearbox, you must use an ohmmeter. On older versions of SAUO controllers, the minimum resistance should be in the range from 800 to 1,200 Ohms. In new samples this figure is 3.5–5 kOhm. Set the minimum mark on the heater control unit and wait 15 seconds. Next, simply disconnect the controller connector, measure the resistance between contacts X1.4 and X1.1.
When the temperature is set to the maximum level, the multimeter should output 3.2–5 kOhm, taking into account the fact that an old version of the controller is used. On the new one the indicator is 1.2–1.6 kOhm. If the indicators do not change, it means that the micro-gearbox shaft position sensor on the VAZ 2110 is faulty. In this case, take the car to a service center, as the replacement process requires the intervention of a professional. If you want to carry out the replacement yourself, carefully follow safety precautions.
There is no need to rush, as careless handling of spare parts can damage other components, which in turn will lead to even greater expenses and a mandatory visit to a service station. It is also recommended to purchase only high-quality equipment, because used spare parts can quickly become unusable and fail you at the most inopportune moment.
Installation
The procedure for installing the interior temperature sensor in a VAZ 2110 car is practically no different from dismantling it. Therefore, the operation is performed in reverse order:
- Armed with a new device, connect the wire blocks to it in the same way as they were installed on the old device;
- Using a little pressure, insert it into its seat. There is no need to unscrew or screw anything additional;
- Put the negative terminal back on the battery;
- Remove the car from the handbrake;
- Be sure to test your device after installing it. You need to make sure that the cabin sensor really works.
Why does the stove fan run at the same speed?
If you want to check the stove for functionality, you should not immediately start disassembling it. If the VAZ 2110 heater motor only works in the third or first two modes, then most likely the problem lies in the resistor. If the first two modes work through it, the third operates directly. If your resistor has burned out, there is no need to completely repair the heater . You can simply replace the faulty component. This will significantly save not only your money, but also time, since disassembly is not a simple process.
Climate control operating modes
Before using the unit, you must calibrate the climate control by pressing the A/C button and, without releasing it, turn on the ignition. As soon as three horizontally oriented bars appear on the display, the button can be released. Calibration will be performed automatically, and its duration is about 5 – 10 seconds. If, during operation of the climate control, it is discovered that the position of the air damper does not correlate well with the entered value, it is necessary to recalibrate using the same algorithm. As already noted, climate control operates in three modes: automatic, manual and “Semi-automatic” mode.
When manual mode is selected (which will be indicated by a non-lit LED located above the AUTO button), the damper is controlled manually using the corresponding regulator. On the display, the left scale in the form of stripes is responsible for displaying the position of the damper. The rotation speed of the furnace fan is controlled by pressing the regulator handle and then rotating in the desired direction (clockwise - increase the speed, counterclockwise - decrease). After a five-second time interval has passed, the fan speed control mode is switched off, and the regulator returns to the damper climate system control mode.
To switch the QC operation to automatic mode, just press the AUTO button. At the same time, the corresponding LED lights up, and with the adjustment handle you can set the temperature required for a comfortable stay in the car. In the future, the VAZ-2110 climate control unit will independently control the operation of the air conditioner and heater to ensure the required temperature conditions. Semi-automatic mode is activated as soon as the user tries to change the fan speed using the appropriate control. In this case, the climate control damper will still be controlled automatically, unlike the furnace fan mode. To switch to automatic operating mode, press the AUTO button twice quickly.
The rightmost key with the inscription INJ is responsible for turning on the mode of monitoring and indicating the voltage of the vehicle's electrical network, the operating temperature of the power unit and displaying ECM error codes (if there are problems with the engine). The display of each of the listed parameters is selected by successively pressing the key. For the button to work, it is necessary to connect the VAZ-2110 diagnostic circuit to the climate control control unit.
The second button from the right is responsible for turning on the display on the air temperature measured by the internal sensor. The key located in the middle turns on the mode for displaying the air temperature outside the car. Both of these keys require the installation of appropriate sensors and their connection to the control unit. The leftmost A/C button is the air conditioning on/off switch (if equipped in the car). Maintaining the set temperature when the air conditioner is turned on is carried out in the same way - by controlling the damper that regulates the supply of warm and cooled air.
As befits an air conditioning system, the main parameters of its operation (including the temperature inside the car, the rotation speed of the furnace fan, the operating mode of the electronic control unit) are stored in the internal memory of the controller when the ignition is turned off or the on-board power supply is completely de-energized. When you turn on the ignition, the air conditioning system turns on with some delay so as not to interfere with starting the engine. After this artificial delay, the climate control begins to function in accordance with the saved user preferences that were working at the time the ignition was turned off.
Checking the resistance resistor
The resistor of this car model has 2 spirals. The first has a resistance of 0.23 Ohm, and the second - 0.82. If both spirals are used at once, the heater electric motor is used at the first speed, and the second is turned on at the first spiral. The third does not need resistance, so it works without a resistor and is considered the most powerful. A lack of antifreeze can cause a malfunction, and a malfunctioning thermostat or pump will make the situation much worse. If the cause of the breakdown is a burnt out resistor, replace it with a whole one. You can purchase it at any car market or service center.
The fuse can also cause a breakdown. Despite the fact that it is as simple as possible to find, the problem is much more difficult to identify. We need a 25 ampere fuse F18. It is located in the main mounting block and is also partially responsible for the cigarette lighter and heated rear window. Check all circuits, perhaps the problem lies in a short circuit.
The cooling system of the VAZ 2110 is very capricious and unreliable, so it is strongly recommended to regularly check it for serviceability. This will contribute to a comfortable ride and allow you to be calm about your safety, because inappropriate conditions can cause an accident.
How to replace
For VAZ 2110, the element is mounted to the ceiling trim using four latches. Dismantling process step by step.
- Unclip the outer cover.
- Remove the wire block, disconnect the connector and check the integrity of the cables.
- Check the cleanliness of the board, remove dirt with a soft brush.
If the sensor is buzzing, it is not practical to repair the equipment; the controller is replaced with a new one. If after a visual inspection no breakdown is found, all contacts are clean, the wiring is normal, check the sensor with a multimeter. The tester is switched to resistance measurement mode and the signal from pins 1 and 2 is monitored.
Zero resistance indicates that the element is not working. If the device shows a resistance of 0.2 Ohm, the sensor must be placed in the freezer for 5 minutes. Repeated measurement of the resistance on the working sensor will be in the range of 2–3 ohms, that is, it will increase at least 10 times.
Replacement of consumables is carried out independently and requires 5 minutes. The only tool you need is a flat blade screwdriver. The cost of the controller is quite budgetary, from 300 rubles. The service life is from 1 year, so the element is not repaired.